
Successful online stores tend to have a lot of elements in common. They usually feature excellent customer support, user-friendly designs, competitive prices, and they tend to be super speedy. Slow-loading stores usually don’t get as much patronage, so it’s crucial you learn how to optimize your WooCommerce store’s performance.
If you’re a WooCommerce user, there’s plenty of scope for improving your store’s performance. In this article, we’ll explain why it’s important to keep your e-commerce site running smoothly, and teach you six ways you can optimize your WooCommerce store for better performance.
Let’s get to work!
Why Your WooCommerce Store’s Performance Is Vital
If we conducted a survey asking for the primary web pet peeves, we’d wager that clickbait titles, intrusive popups, and slow-loading pages are near the top. Most visitors have notoriously little patience for slow websites. This means the longer your pages take to load, the bigger the chance your users will decide to look elsewhere.
When it comes to e-commerce stores, lost traffic due to slow loading times will affect your bottom line. In 2012, Amazon estimated that a single extra second in loading times could cost them as much as $1.6 billion each year. However, you’re probably not racking up similar sales per day, which makes every dollar count more.
In the past, we’ve talked several times about how to optimize WordPress for better performance. However, for this article, we’re going to focus on how to improve WooCommerce sites specifically.
5 Ways to Optimize Your WooCommerce Store’s Performance
Of course, WooCommerce stores are still WordPress websites. However, running a store is different to other niches. Given this, let’s take a look at shaving every single millisecond you can out of your loading times, focused on your e-commerce storefront.
1. Compress and Resize Your Product Images
Images are a key component of any modern website, but are even more important for online stores. Customers have so many options for buying products online, leveraging every edge is vital. High-quality shots (for one example) can help differentiate you from other e-commerce sites:

However, detailed product photography means big file sizes. Including multiple images for each product will also bump up the overall file size. Given this, it’s important to ‘compress’ your product images to reduce both file size and loading times, without impacting front-end quality. A great solution for this is TinyPNG:

However, if you have an image-heavy site, automating the process using a plugin such as WP Smush makes more sense. This solution is good due to its user-friendly interface and built-in image resizing features:

Once you install and activate the plugin, you’ll come to a quick setup window:
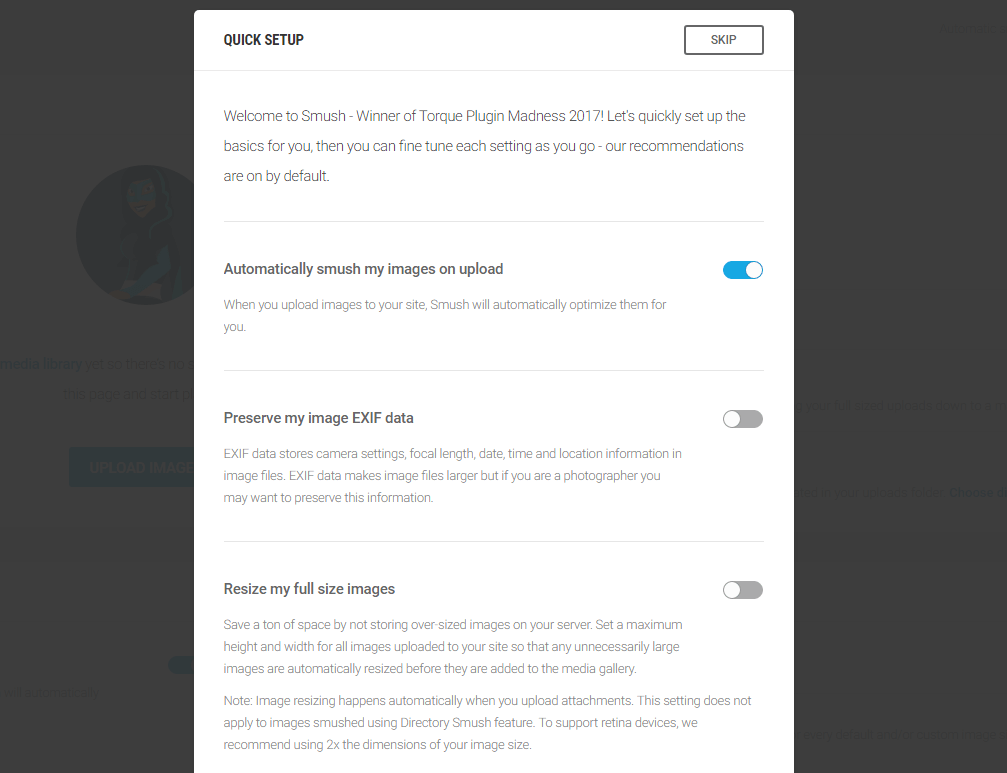
You’ll notice the image compression feature is turned on by default. However, you’ll also want to turn on the option reading Resize my full size images:
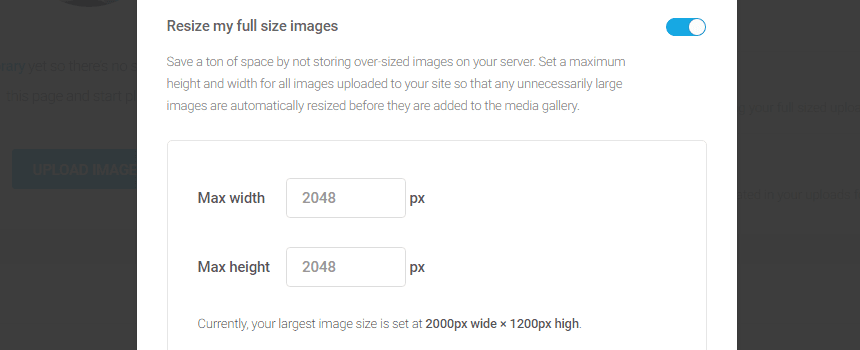
This feature makes sure none of the images you upload have unnecessarily large dimensions. For example, displaying full-resolution images is pointless if your site only displays smaller images throughout. By enabling this option, you’re reducing the file size even further, which translates to faster loading times. Of course, you should experiment with the optimal resolution for your WooCommerce product images, but make sure to leave the feature enabled.
Ideally, you’ll set up an image optimization plugin as soon as you launch your store. If you haven’t optimized every image on your site yet, the BULK SMUSH feature (found via the Smush tab within WordPress), lets you do this efficiently:

However, a major downside to the free version of the plugin is the file size limitation of 1 MB. However, you do get to optimize an unlimited number of images, which isn’t found in most similar plugins. If you’re regularly dealing with heftier images than this, you may want to invest in a premium image optimization plugin.
2. Clean Up Your Database Regularly
As you may know, your entire WordPress site is stored in a database. A standard WordPress website accumulates data as time goes by, including post drafts, trashed pages, deleted comments, and more. WooCommerce sites also have product pages, tags, categories, among other data.
Ultimately, this means you may need to clean up your database more often than with other types of websites. While you shouldn’t expect miracles, every optimization technique helps.
Fortunately, there are plenty of database optimization plugins to choose from. A popular choice is WP-Optimize, which is very simple to use:

Once you activate the plugin, a new WP-Optimize tab will appear on your WordPress dashboard. Here, you’ll see a list of the tables the plugin can optimize, and how many entries it will clean up within each of them:
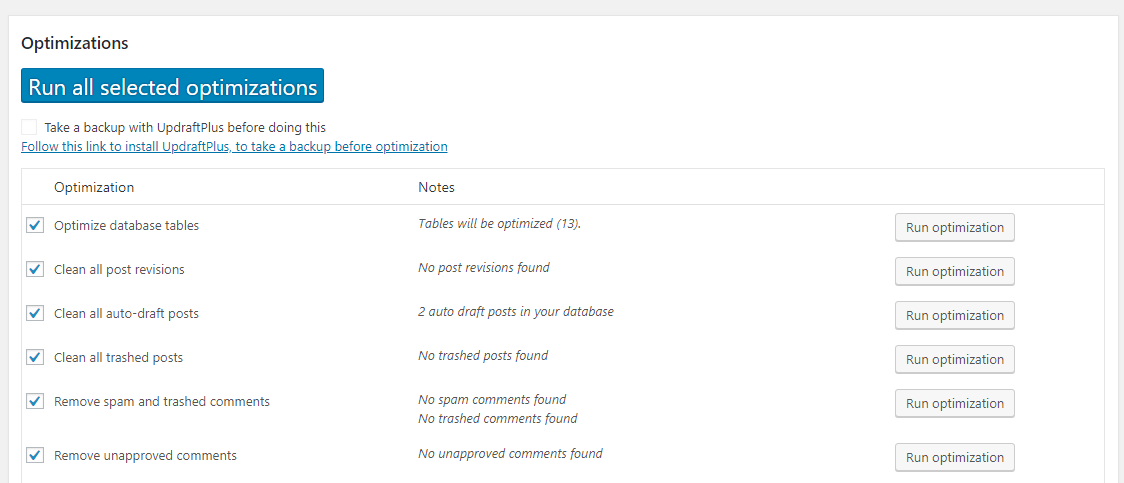
In our experience, it’s usually safe to optimize all of your tables at once. However, we still recommend you do a full backup of your website beforehand, just in case the worst happens.
3. Use a Content Delivery Network (CDN)
One of the factors that determine how long your WooCommerce store takes to load is the distance between your visitors and your server. The larger the distance, the longer your website will take to load, even over high-speed internet connections.
The best way to deal with this issue is to use a CDN. What these services do is store (or cache) copies of your website on data centers around the world. Then, when someone tries to access your site, your CDN will redirect them to the nearest copy of it, so to speak.
This approach enables you to cut down loading times across the board. However, this kind of service doesn’t often come for free – although companies such as Cloudflare offer limited free tiers:

The Cloudflare free plan isn’t as rapid as other premium CDNs, although it’s easy to integrate with WordPress and WooCommerce, and a breeze to use (especially with a host that integrates the service).
If you have a higher budget, Cloudflare’s premium plans also include built-in image optimization. This means they’re especially well-suited for WooCommerce websites with a lot of product images – and they can reduce your loading times even further.
Of course, there are plenty of other CDN solutions to consider, so it’s worth shopping around to find the right solution for you.
4. Set Up a Caching Solution
Aside from setting up a CDN for your WooCommerce site, you’ll also want to configure a local caching solution. This way, repeat visitors won’t have to load your entire website every time they visit.
Some people think that using a CDN is enough since it essentially caches your online store for you. However, even the best CDN doesn’t help much if you have visitors with flaky internet connections. In these cases, you can optimize your store for future visits by essentially speeding up loading times similarly to implementing a CDN.
When it comes to WordPress and WooCommerce, you have plenty of caching solutions to choose from. We’ve talked about several of them in the past, such as the popular Comet Cache:

This particular caching plugin offers an incredibly easy setup and configuration process, with the default configuration being good enough for simple WordPress sites. However, for complex WooCommerce stores that get updated often, you’ll want to configure your cache to clear regularly. To do this, head to the Comet Cache tab within WordPress, and open the Cache Expiration Time section. Inside, you’ll find a drop-down menu including expiration time settings:
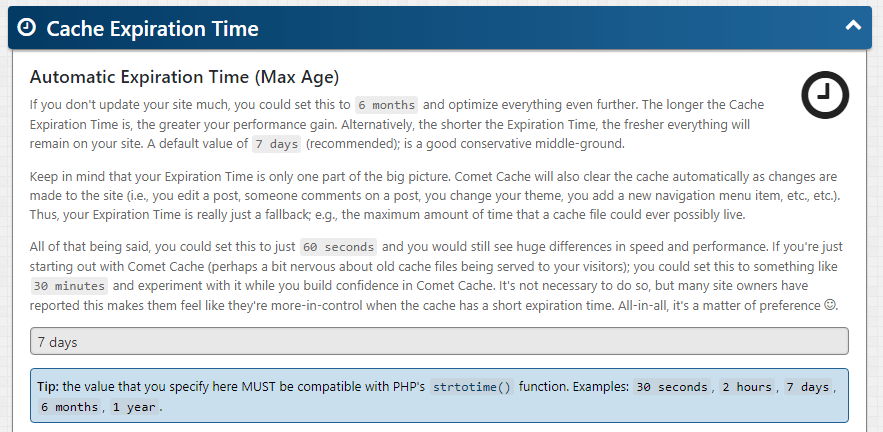
In our experience, the default 7 days setting works well enough for small stores, but you may want to go lower if you update your site more often.
5. Use a Solid WordPress Hosting Provider
Many site owners opt for budget-friendly WordPress hosting, which isn’t a problem for small, low-traffic websites. However, if you’re running a WooCommerce store, dealing with traffic surges should be a high-priority.
For example, an email campaign for your current sale could lead to a spike in traffic from would-be buyers. A hosting plan that can’t cope with multiple concurrent users means you’re probably going to lose a few sales in the process.
In our tests, we’ve found there are several WordPress shared hosting providers that perform great under stress, such as A2 Hosting and SiteGround. However, using a Virtual Private Server (VPS) for your WooCommerce store can be an even better option if you can afford the extra cost.
To sum up, hosting performance becomes more critical when loading times can impact negatively on conversions. If you want to grow a successful WooCommerce store, you need to be even more mindful about the hosting provider you choose from the get-go.
Conclusion
There are a lot of reasons your website’s performance can slip. WooCommerce sites are even more vulnerable and complex, since you usually have to deal with dozens of products, images, integrations with other services, and more.
As for WordPress, you have several methods at your disposal to optimize your WooCommerce store’s performance. Let’s talk about them quickly:
- Compress and resize your product images.
- Clean up your database regularly.
- Use a CDN.
- Set up a caching solution.
- Use a solid WordPress hosting provider.
Do you have any questions about how to optimize your WooCommerce store’s performance? Let’s talk about them in the comments section below!
Article image thumbnail by ProStockStudio / shutterstock.com.
The post 5 Ways to Optimize Your WooCommerce Store’s Performance appeared first on Elegant Themes Blog.