
Welcome to part 1 of this 4 part series on how to develop a product review site using Extra. If you are racking your brain on how to get started with developing a product review site, this series is for you. With its built-in review functionality and smart post categorization, Extra is specially equipped to create great looking reviews, product post templates, mega menus, and category layouts in minutes. Join me as we explore the power of Extra.
I love product reviews. In fact, I rarely buy anything these days without conducting a thorough FBI-level investigation to determine what the world has to say about the product. If I ever go out to shop (it’s rare), I’m the guy at the store facing a shelf for 30 minutes reading reviews on the items on the shelves. And I bet I’m not alone.
Product Review sites are popular, and they are a great way to earn some extra cash from the comfort of your own home if you are up to the task of building one yourself. From a business perspective, creating a product review blog will require significant work and a lot of patience for it to be successful. But as far as developing your actual site, Extra has you covered.
Extra comes with a lot of built-in features that make adding product reviews a lot easier. The smart category modules and layouts are extremely powerful and easy to customize. You can convert any menu item into a mega menu with featured images with a single click, which is important for a site with a lot of content. And the power of the Visual Builder adds a high level of design capability to your product post layouts.
In today’s post I will be going over basic Theme Options and Theme Customizer settings to get the ball rolling toward a great looking product review website.
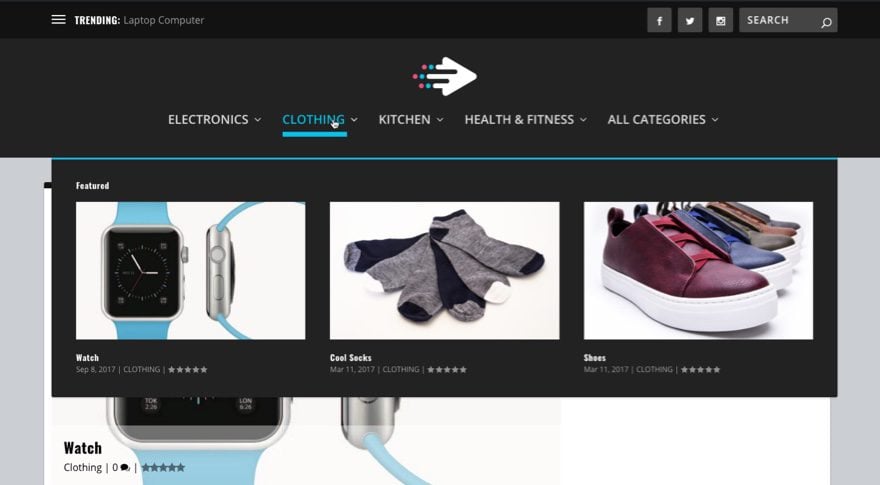
Here is a Sneak Peek of What We Are Going to Build in This Series

Before we get started, let’s go over some other important steps to consider.
Important Steps for Product Review Sites not Covered in This Series
This series is going to cover the basics of building and styling your product review site using Extra. Therefore, I will not be covering other important steps you need to take in order to build a successful Product Review site. Some of these important action steps include:
- Finding the right niche and narrowing your focus. This isn’t easy and will require some significant research.
- Researching affiliate earnings for products to see if you will actually make money.
Amazon is a popular choice for many product review sites although not always the best option. - Creating a simple email optin sequence and marketing campaign using Bloom and third-party services like Mailchimp or Aweber.
- Create great content or pay others to do it.
- Optimize your site for Search Engines (SEO).
- Market your site with social media
- Partner with other bloggers in your niche in order to generate more traffic.
There are more steps of course,
Preparing the Design Elements
- Latest version of Extra installed.
- An active Child Theme. We will not be editing any of the core theme files like the header.php or function.php files for this series. We will only be using the theme customizer and custom CSS.
- A light colored version of your logo to go on a dark background. My logo size is 103×63.
- Product Images. For this tutorial, I will have 4 categories with 3 products in each category so I will be using a total of 12 images. I’m using stock images from shutterstock with white backgrounds to give it a cleaner look.
Also, the biggest version of the product image will be 1280px (the website content width) so make sure your images are at least that wide. Ideally, I would shoot for all of your images to be 1280×720 in order to stick with the 16:9 aspect ratio of most monitors.
All set? Let’s get started.
Setting up Theme Options and Theme Customizer Settings.
From the WordPress Dashboard, go to Extra > Theme Options > General tab and update the following:
Logo: Enter your logo. Make sure it is a light version of your logo since it will be going over a dark background in your header.
Favicon: Enter your favicon
Global Accent Color: #222222
Sidebar Location: No Sidebar
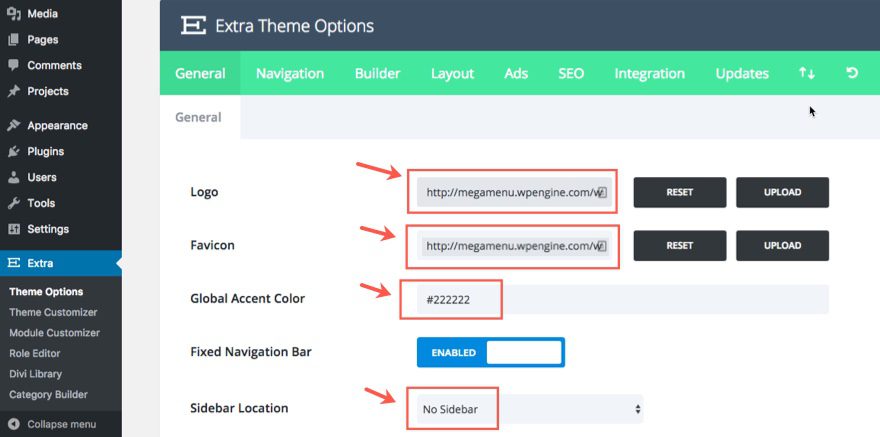
Save Settings
Now go to Extra > Theme Customizer > General Settings > Typography Settings and update the following:
Heading Text Size: 24
Body Text Size: 20
Heading Line Height: 1.3
Heading Font Style: B (Bold)
Heading Font: Oswald
Body Font: Open Sans
Body Link Color: #e6567a
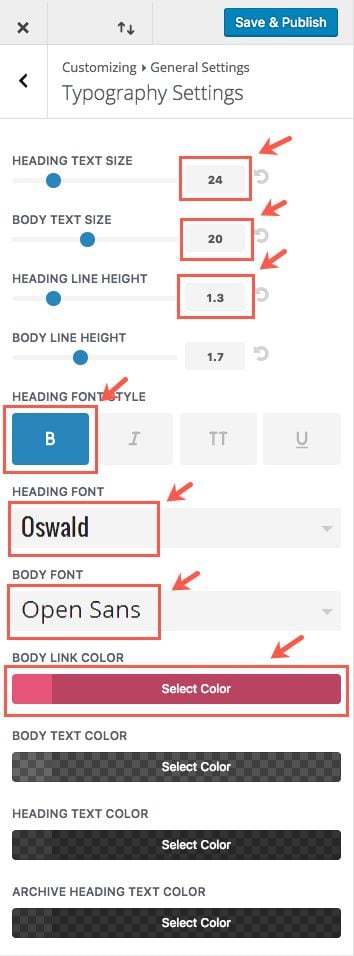
Save & Publish
Go back and select Background Settings and change the color of the background to rgba(0,0,0,0.14).
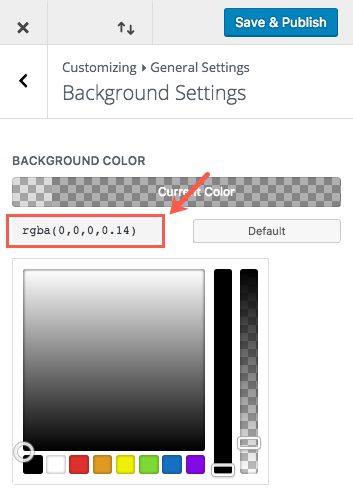
Save & Publish
Now go back to the main menu of the theme customizer and select Header & Navigation Settings > Header Format Settings and select “centered”.
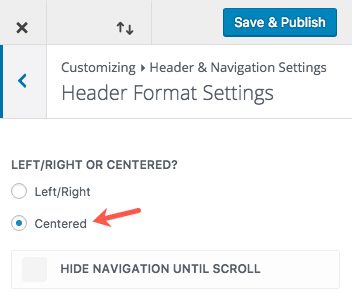
Save & Publish
Now back and select Primary Menu Bar Settings and update the following:
Menu Height: 124
Logo Height: 51
Text Size: 20
Text Color: rgba(255,255,255,0.86)
Background Color: #222222
Dropdown Menu Background Color: #222222
Dropdown Menu Animation: Flip In Vertically
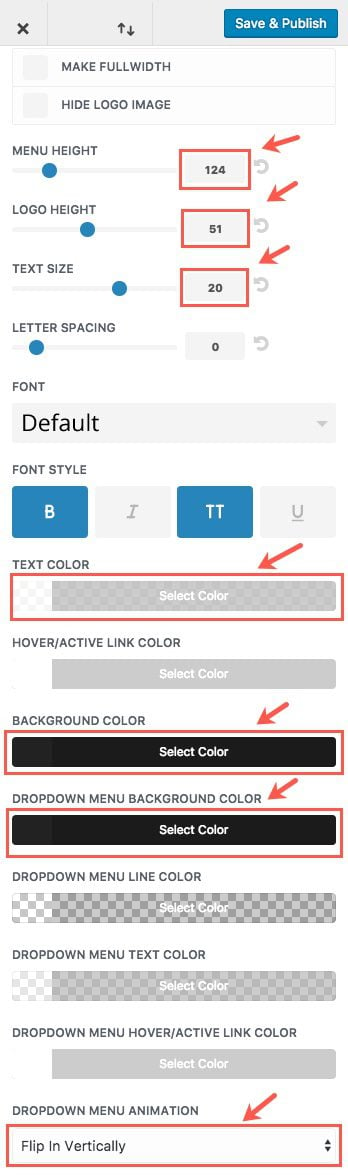
Save & Publish
Now go back and select Secondary Menu Bar Settings and update the following:
Text Size: 20
Background Color: #121212
Dropdown Menu Background Color: #121212
Trending Text Size: 16px
Search, Cart, & Icon Text Size: 16
Search, Cart, & Icon Background Color: #444444

Next, go back and select Fixed Navigation Settings. Then update the following:
Select Hide Logo Image
Menu Height: 60
Text Size: 16
Background Color: #222222
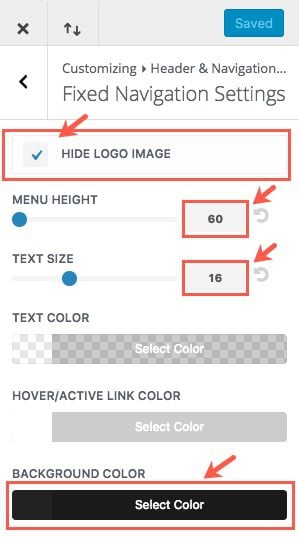
Save & Publish
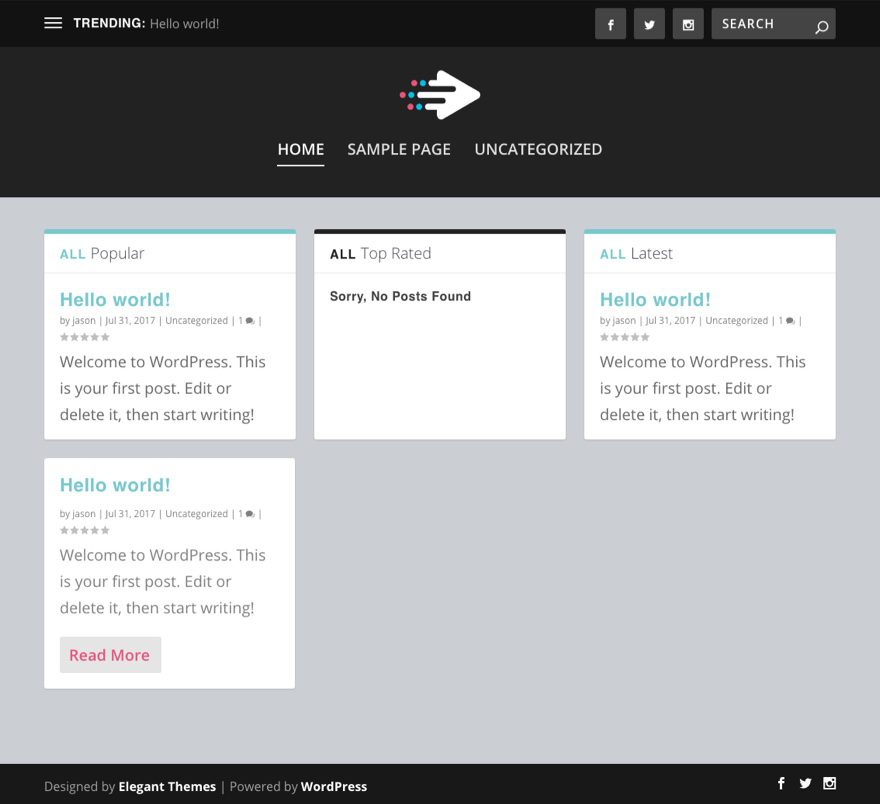
If you are working with a brand new install of WordPress and Extra then your homepage should look something like this.
Setting Up Categories for Your Products
Once you are done with the Theme Customizer settings, you can start adding the categories for the products we will be adding in the future.
To set up categories, go to the WordPress Dashboard and navigate to Posts > Categories. Under the Add New Category section on the left, add the info for your first category. For this example I’m going to add a category called “Electronics” with a slug named “electronics” and a the Color “#5bd999”.

Then click the Add New Category button.
I’m going to repeat this step for three more categories. Here is the info for all 4 of my categories:
- Name: Electronics
Slug: electronics
Color: #5bd999 - Name: Clothing
Slug: clothing
Color: #00c0e4 - Name: Kitchen
Slug: kitchen
Color: #e6567a - Name: Health & Fitness
Slug: health-and-fitness
Color: #7658f8
Note: The colors are going to play an integral part in the design of the site so make sure you add them.
Once you are done adding your categories, you are finished part 1 of the series!
Coming Up: Adding Posts and Building Post Layouts for your Products
In part 2 of this series, we will start adding our post content and building a new layout for our product posts. Adding product review posts to Extra is basically like adding a regular post so if you are familiar with creating blog posts and using the Divi Builder, you shouldn’t have any problems with our next step. If you are new to all of this, consider this a great time to learn how to build with Extra.
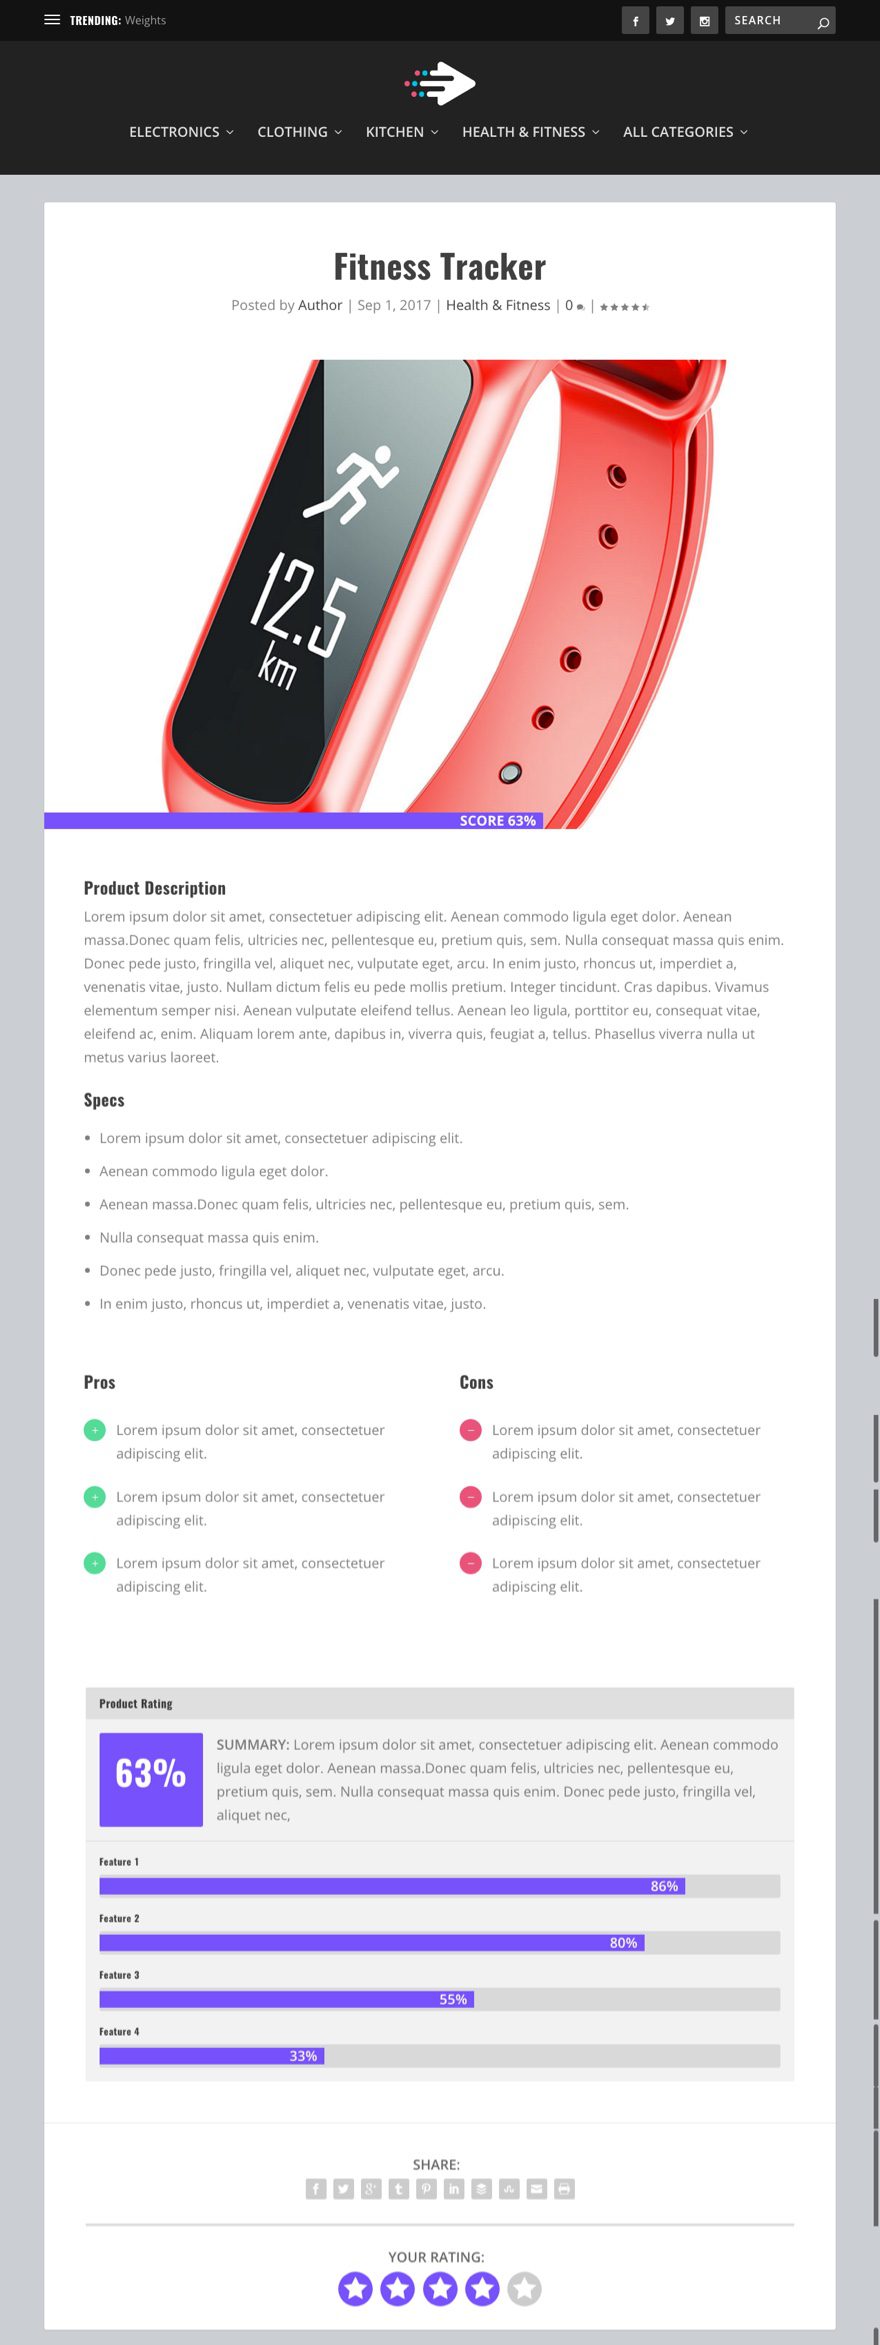
Here is an example of one of the product posts we will be building in part 2 of our series.
If you have any questions or feedback, feel free to post a comment.
Cheers!
The post Building a Product Review Site with Extra – Part 1 appeared first on Elegant Themes Blog.