
Creating a personal website is both fun and challenging. You want your website to look engaging and personal enough to get your story told. And at the same time, you want to have a beautiful and authentic website that shows that you know what you’re doing.
To help you with the creative process of creating such personal website, we’ve created a beautiful hero section that’ll definitely make your website stand out. In this post, we’ll be showing you step by step how to create that result using nothing else than Divi’s built-in settings for each one of the steps. Before diving into the tutorial, let’s take a look at the result.
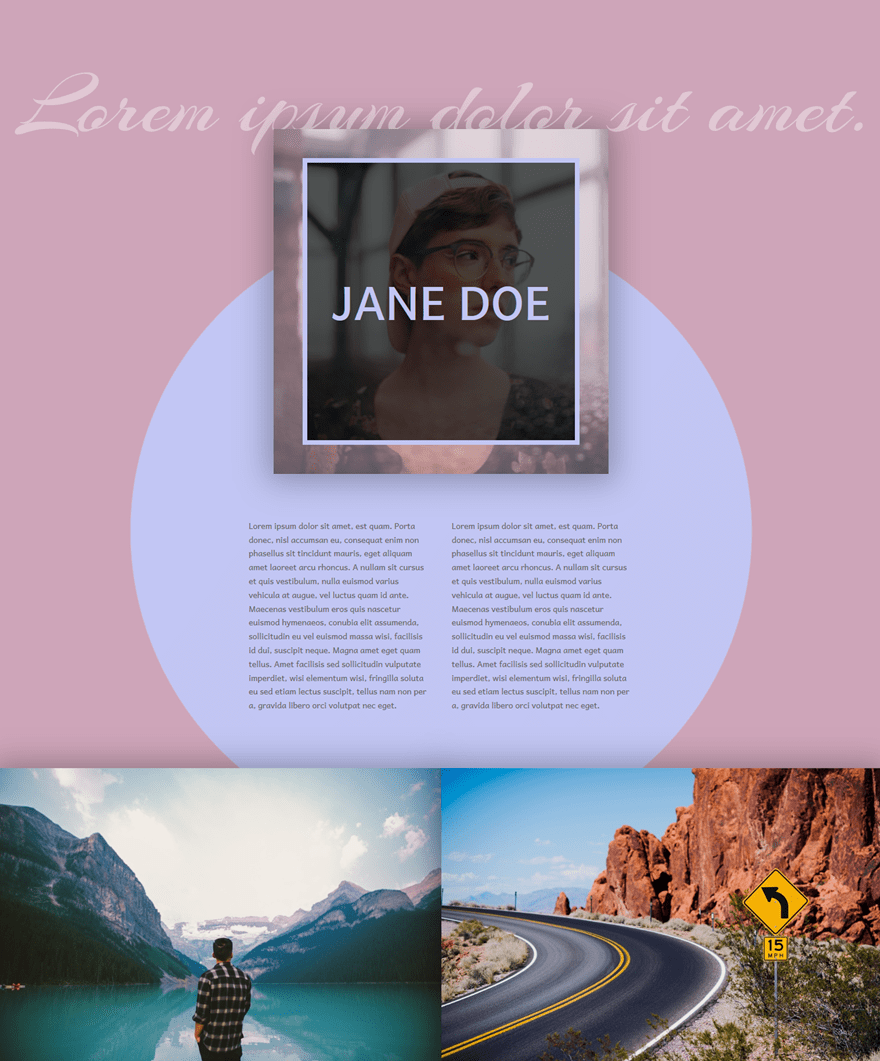
Result on Desktop
The result on desktop looks like this:
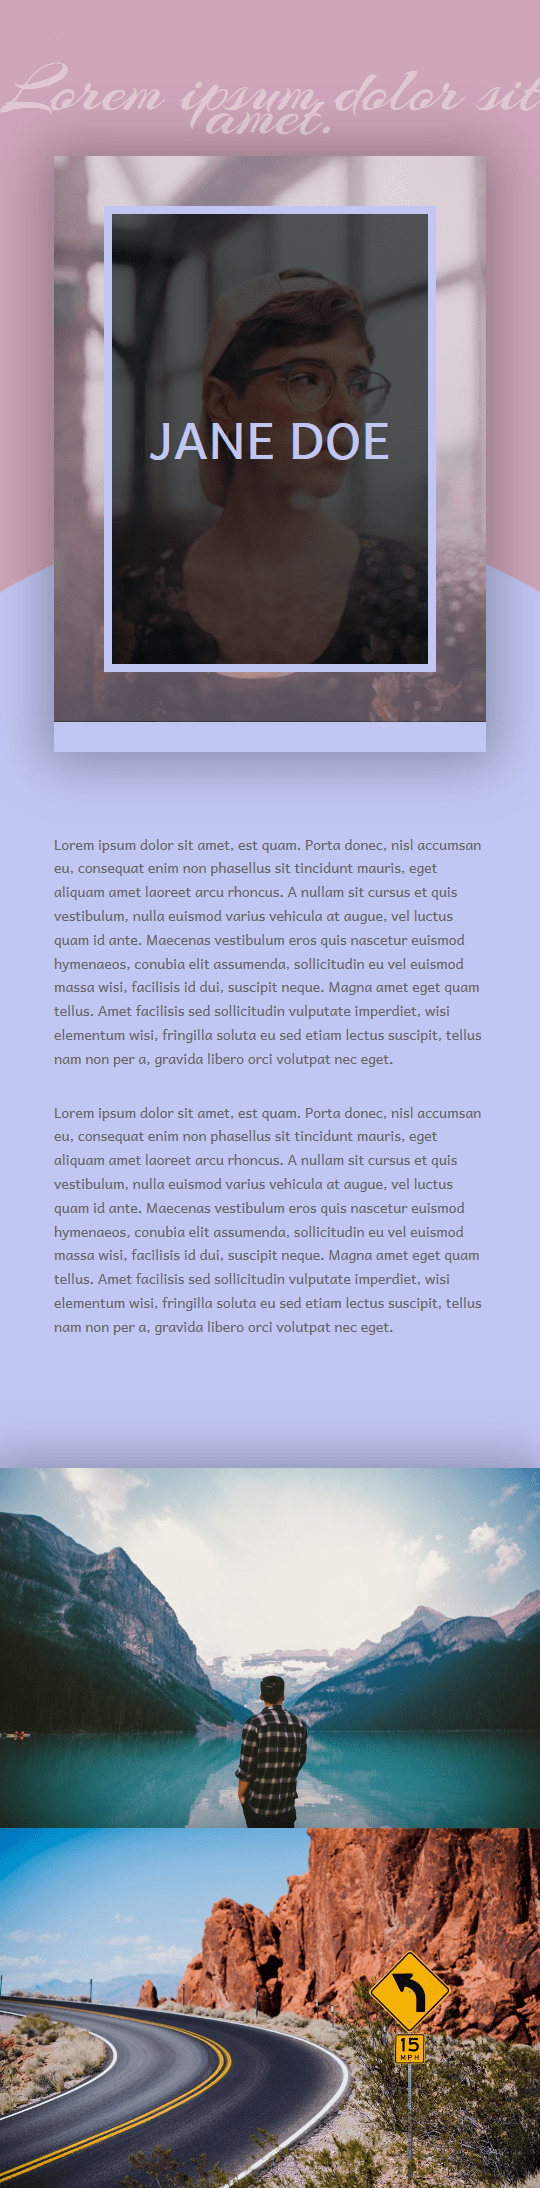
Result on Mobile
And the visitors who visit the website on mobile will get to see the following result:
How to Create a Beautiful Hero Section for Your Personal Website with Divi
Subscribe To Our Youtube Channel
Create Section
Start by creating a new page on your WordPress website, enabling the Divi Builder, switching over to the Visual Builder and adding a new section to it.
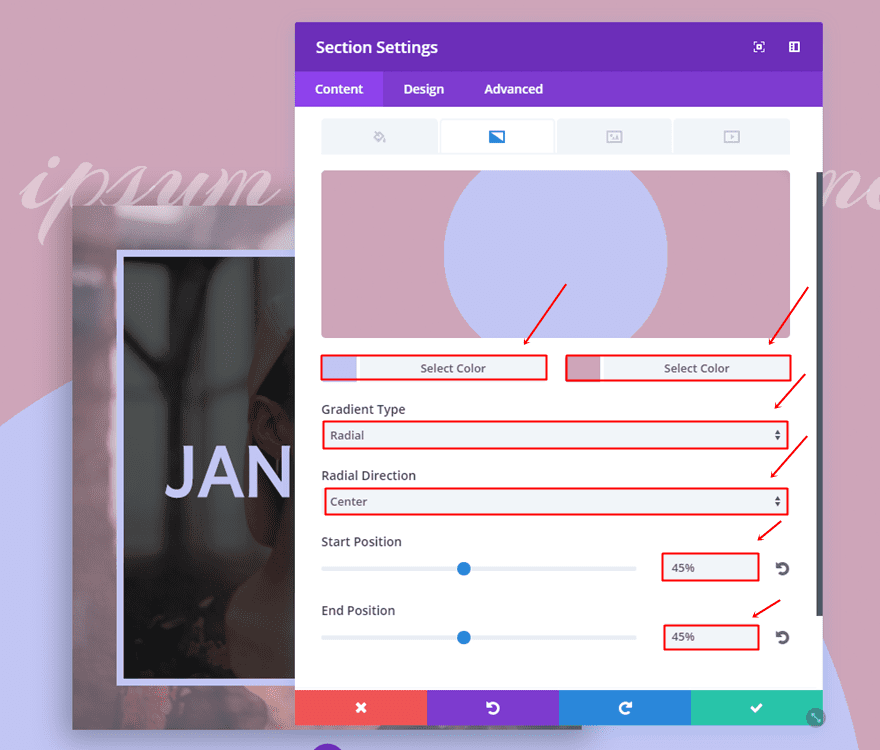
Gradient Background
The only thing you’ll have to change within this section is the background. This background will apply to all of the rows we’ll be adding in the next steps of this post. Open the Background subcategory and add the following gradient background to it:
- First Color: #c2c6f3
- Second Color: #cea5b9
- Gradient Type: Radial
- Radial Direction: Center
- Start Position: 45%
- End Position: 45%
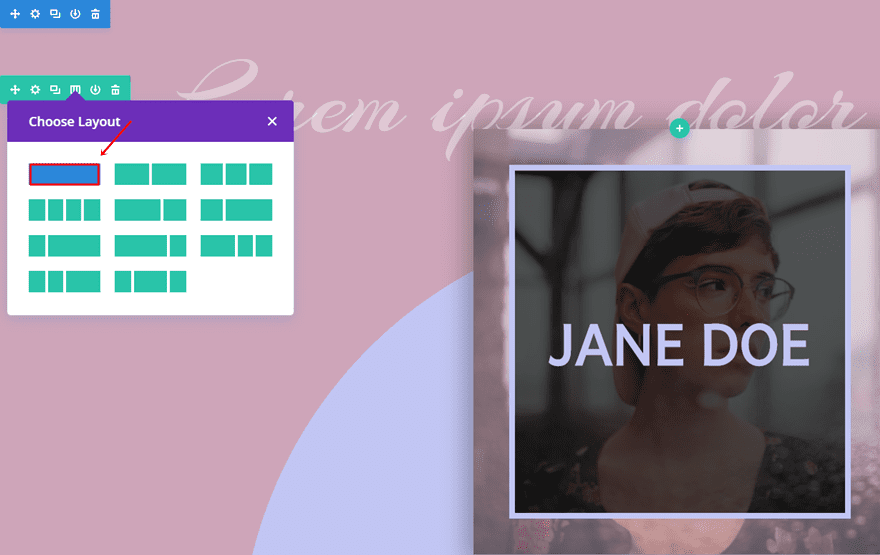
Add First Row
Then, go ahead and add the first row to the section. This row will only include the Text Module you can see at the top of the layout.
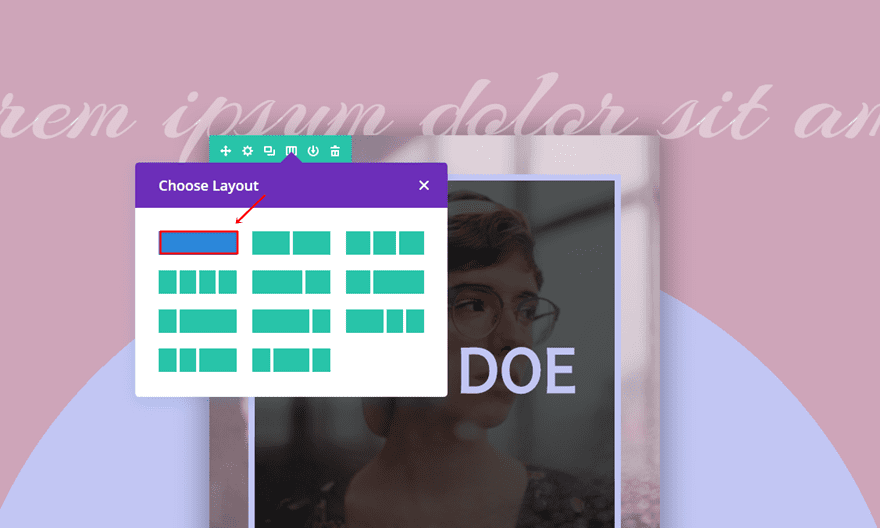
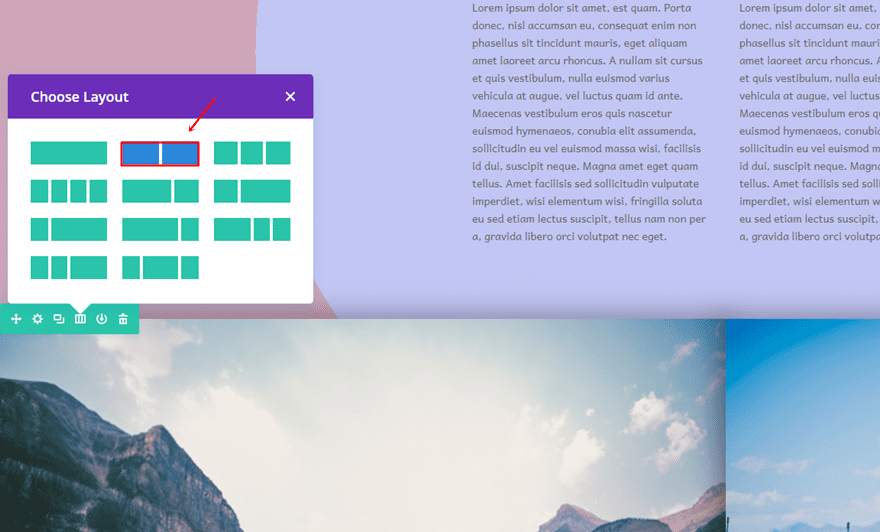
Column Structure
Next, choose a column structure with one column.
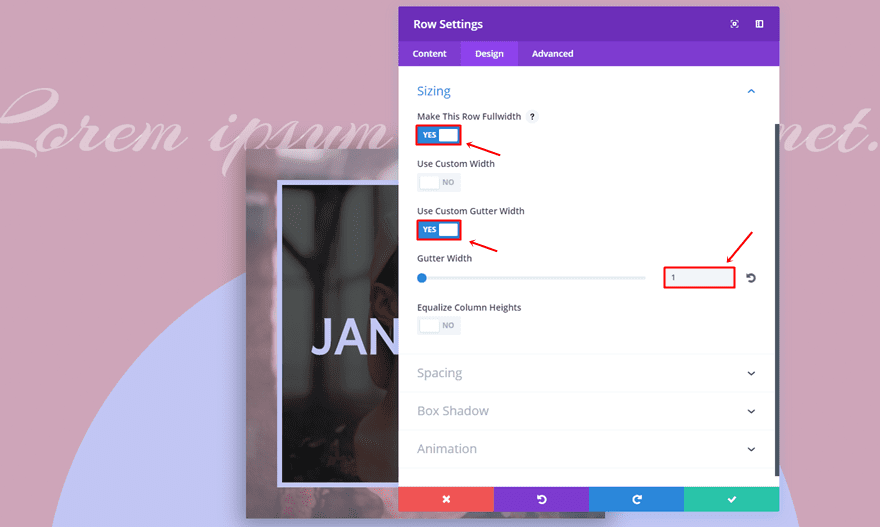
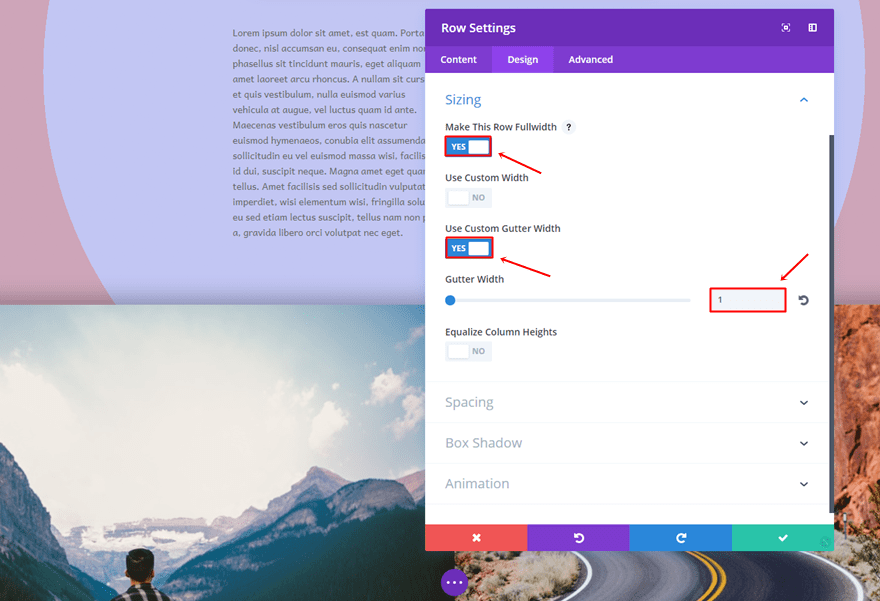
Sizing
Move on to the Design tab of your row settings and use the following settings for the Sizing subcategory:
- Make This Row Fullwidth: Yes
- Use Custom Gutter Width: Yes
- Gutter Width: 1
Text Module
As mentioned before, this row will only need a Text Module.
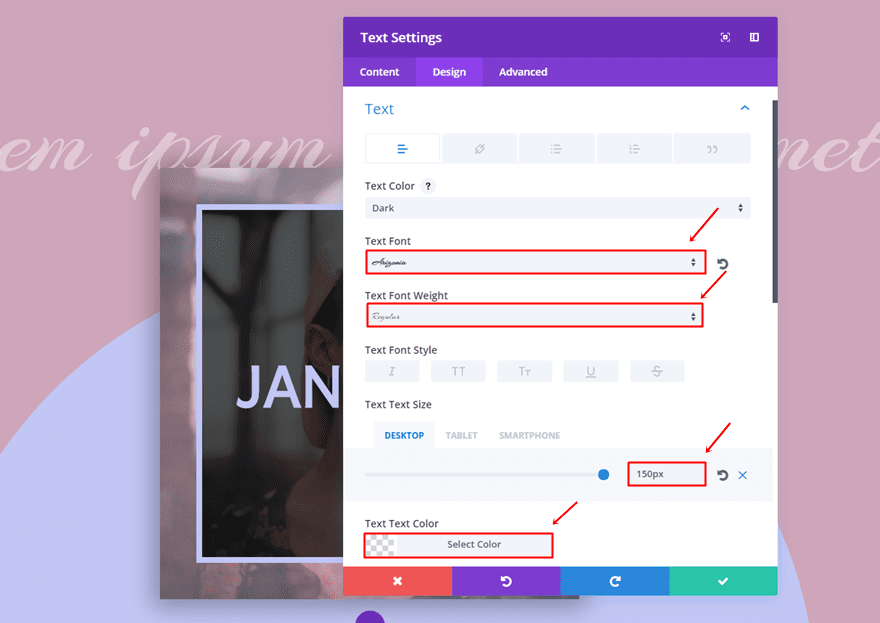
Text Settings
Once you’ve entered the text you want to appear in the Content tab, go to the Design tab and make the following settings apply to the Text subcategory:
- Text Font: Arizonia
- Text Font Weight: Regular
- Text Size: 150 (Desktop), 80 (Tablet), 70 (Phone)
- Text Color: rgba(255,255,255,0.39)
- Text Orientation: Center
Add Second Row
Once you’ve completed the first row, go ahead and add a second row to that same section.
Column Structure
Like the previous row, this row will only have one column as well.
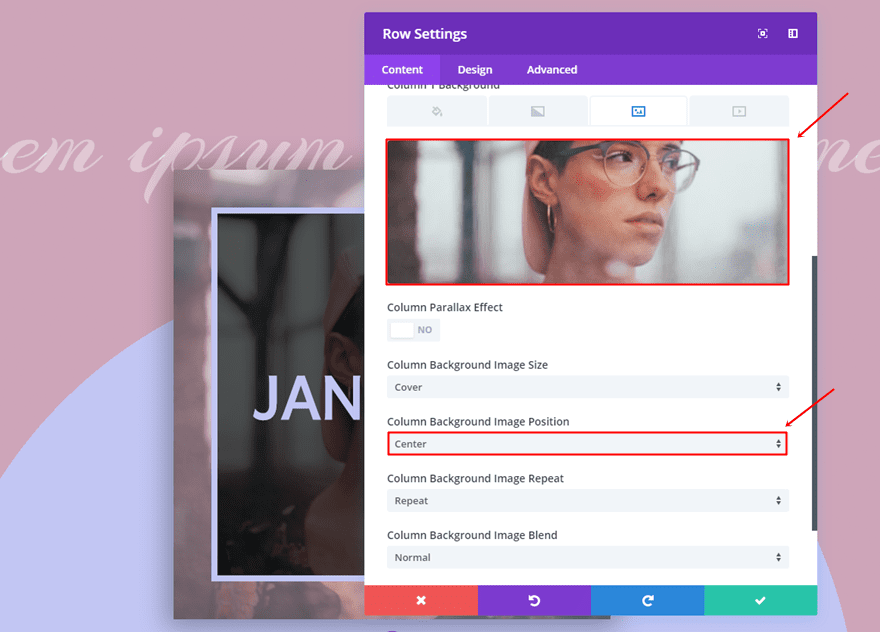
Background Image
Open the row settings and add the personal image you want to use as a background image for the first column. Make sure the Image Position is set to ‘Center’ as well.
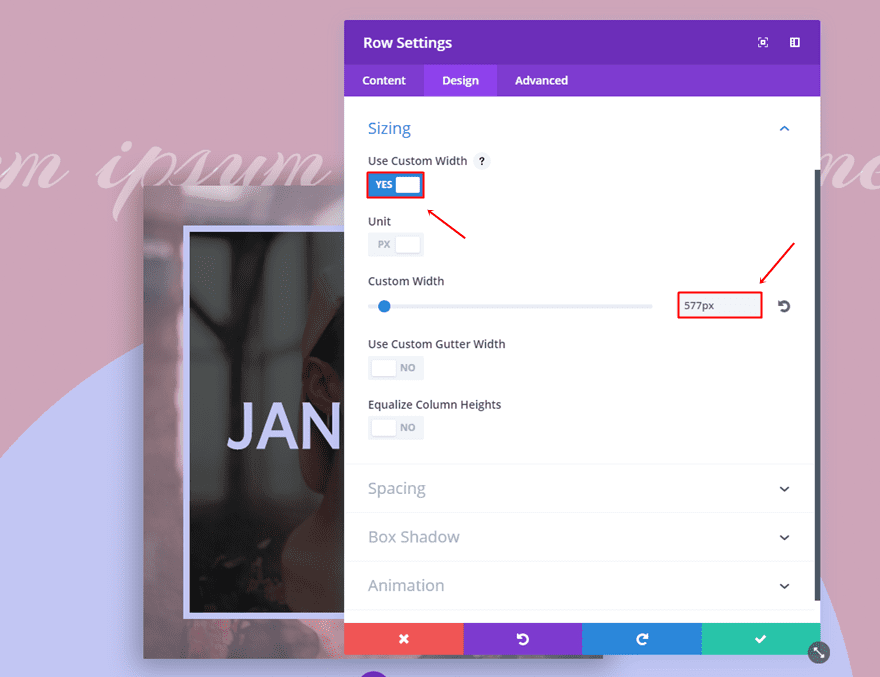
Sizing
Then, open the Sizing subcategory and make the following changes:
- Use Custom Width: Yes
- Custom Width: 557px
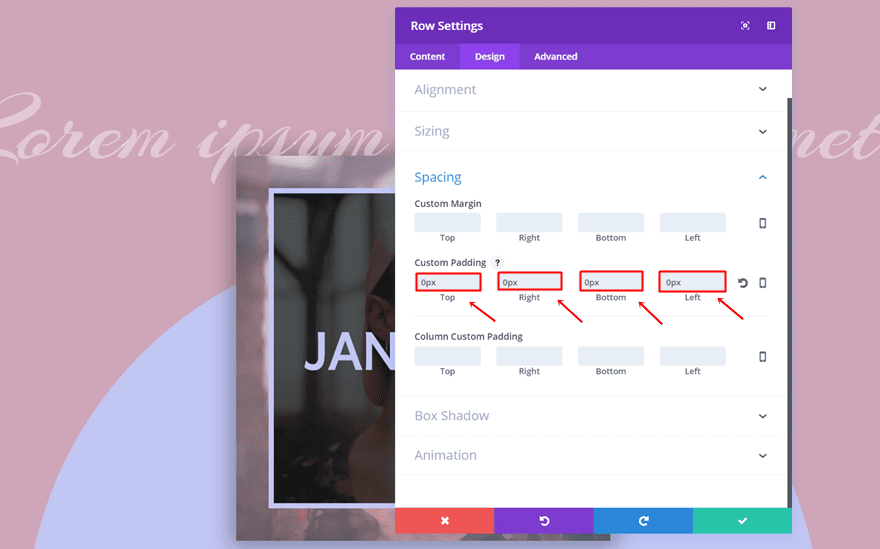
Spacing
Next, use ‘0px’ for the top, bottom, right and left padding of the row.
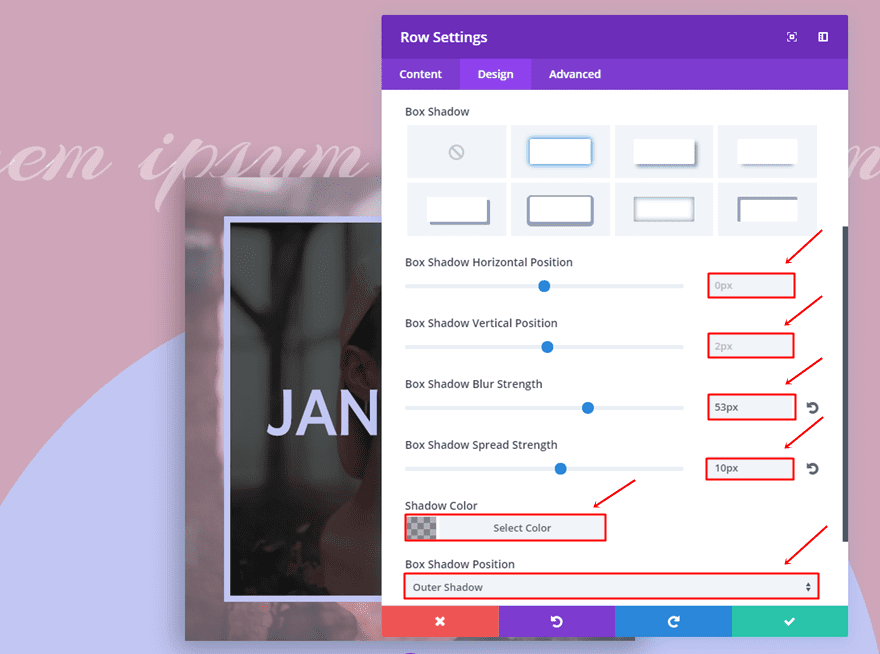
Box Shadow
Lastly, make the following Box Shadow apply:
- Box Shadow Horizontal Position: 0px
- Box Shadow Vertical Position: 2px
- Box Shadow Blur Strength: 53px
- Box Shadow Spread Strength: 10px
- Shadow Color: rgba(0,0,0,0.3)
- Shadow Position: Outer Shadow
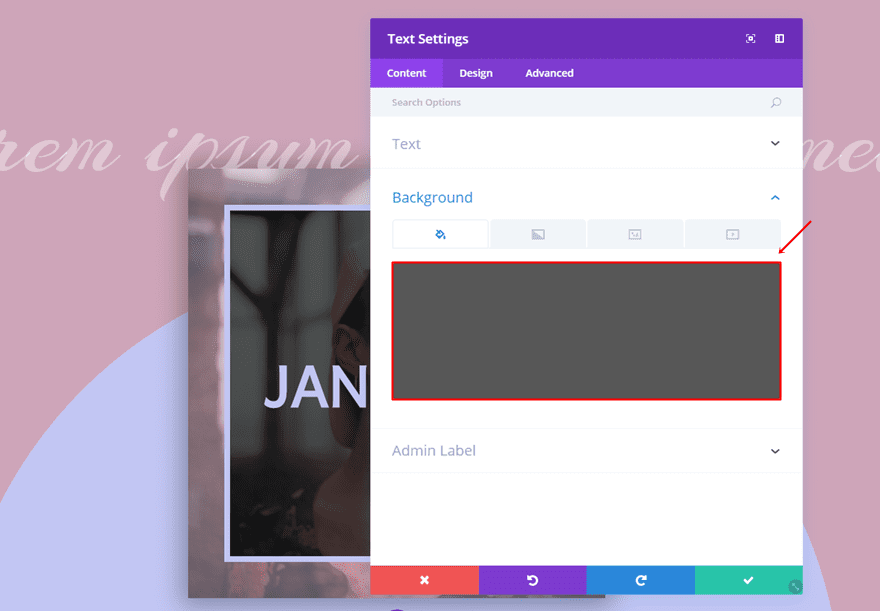
Text Module
Once your row settings are completed, go ahead and add a Text Module to the column.
Background Color
First of all, this Text Module will need a background color with the ‘rgba(0,0,0,0.66)’ color.
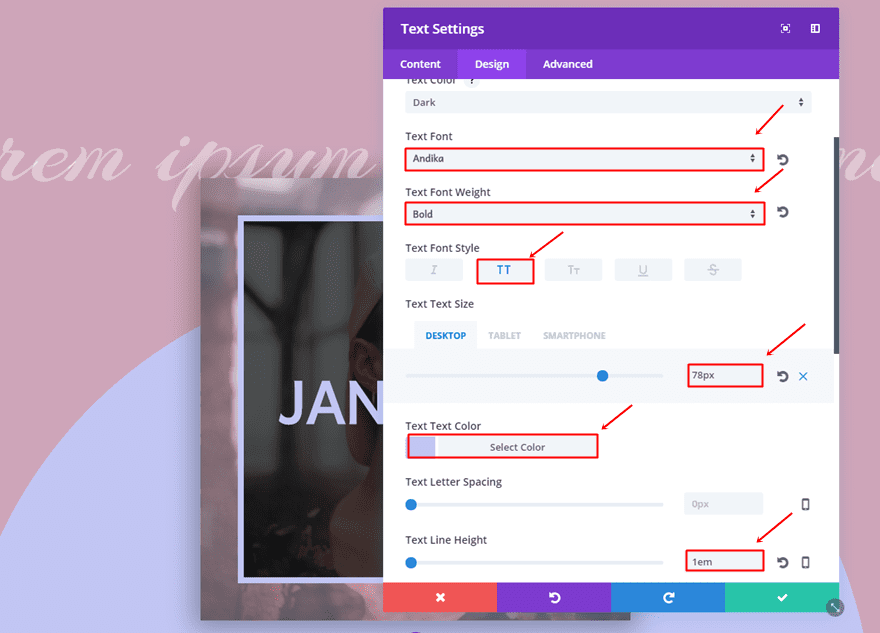
Text Settings
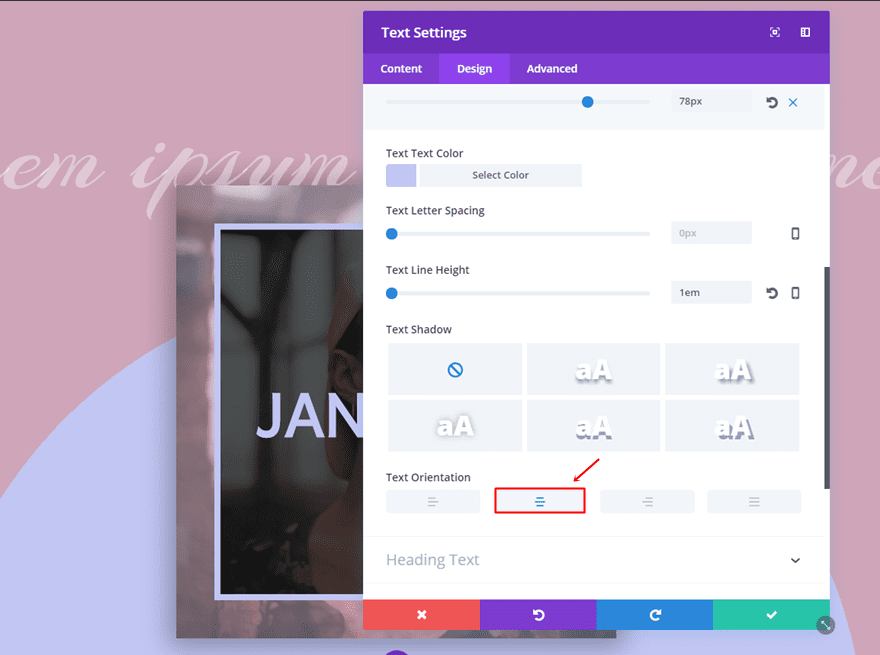
Then, move on to the Design tab and make the following changes apply to the Text subcategory:
- Text Font: Andika
- Text Font Weight: Bold
- Text Font Style: Uppercase
- Text Size: 78px (Desktop), 70px (Tablet), 50px (Phone)
- Text Color: #c2c6f3
- Text Line Height: 1em
- Text Orientation: Center
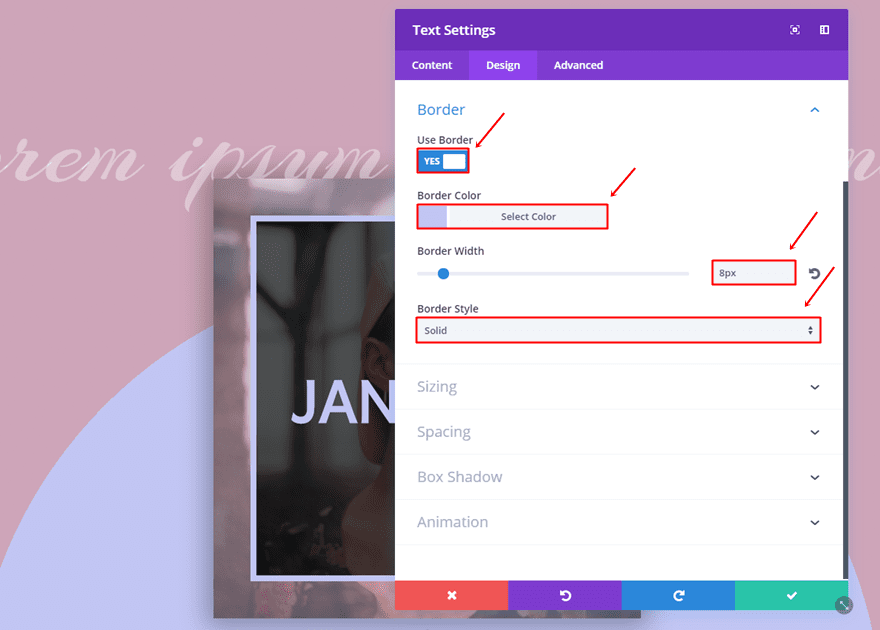
Border
Next, open the Border subcategory and use the following border:
- Use Border: Yes
- Border Color: #c2c6f3
- Border Width: 8px
- Border Style: Solid
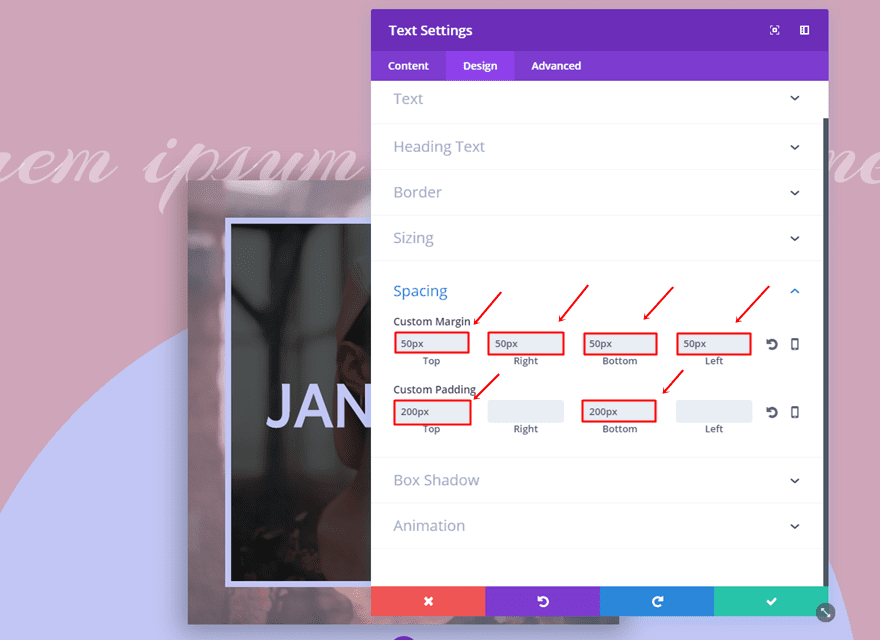
Spacing
Moving on, add the following margin and padding:
- Top, Right, Bottom & Left Margin: 50px
- Top Padding: 200px
- Bottom Padding: 200px
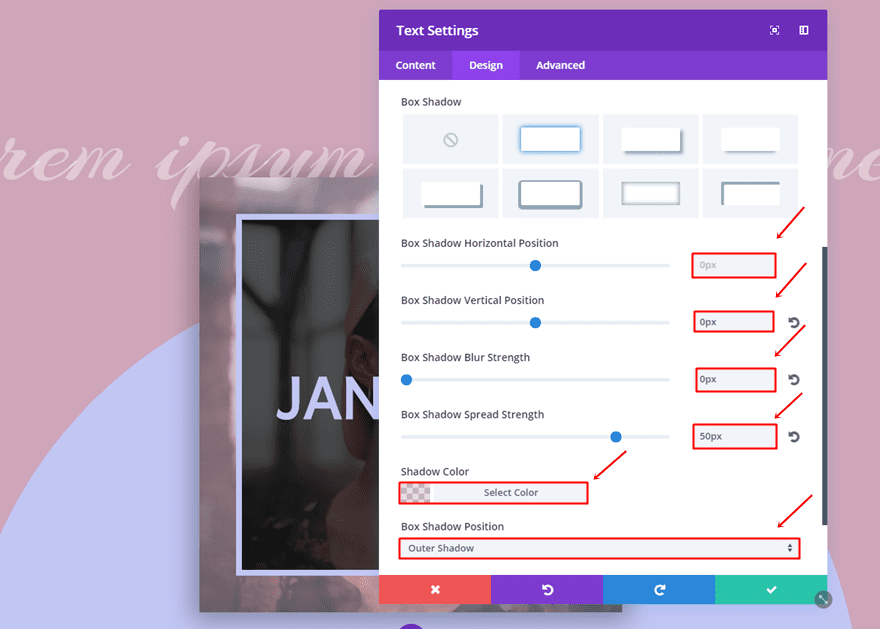
Box Shadow
Lastly, use the following Box Shadow to the Text Module:
- Box Shadow Horizontal Position: 0px
- Box Shadow Vertical Position: 0px
- Box Shadow Blur Strength: 0px
- Box Shadow Spread Strength: 50px
- Shadow Color: rgba(206,165,185,0.41)
- Box Shadow Position: Outer Shadow
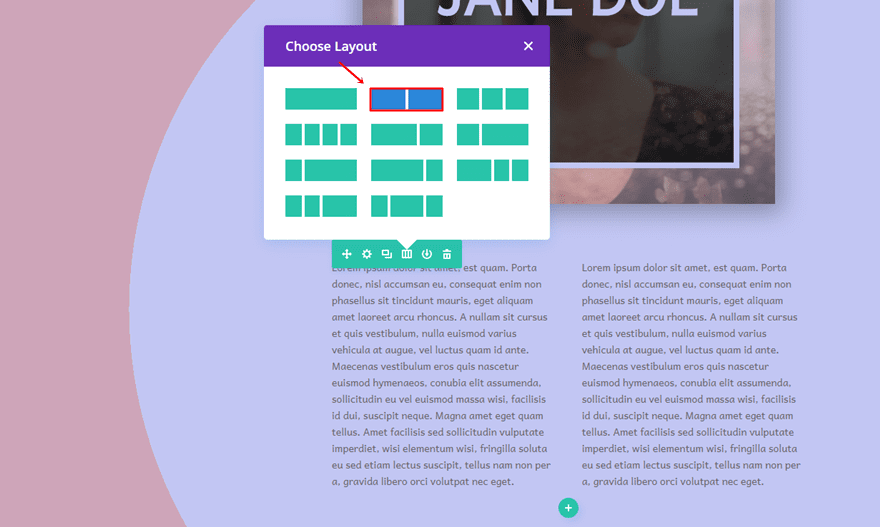
Add Third Row
As mentioned before, we’re only using one section for this tutorial. The reason behind that is that we want the gradient background of the section to be spread over all of the different content that is being shared. Go ahead and add a new row.
Column Structure
Select two columns for this row.
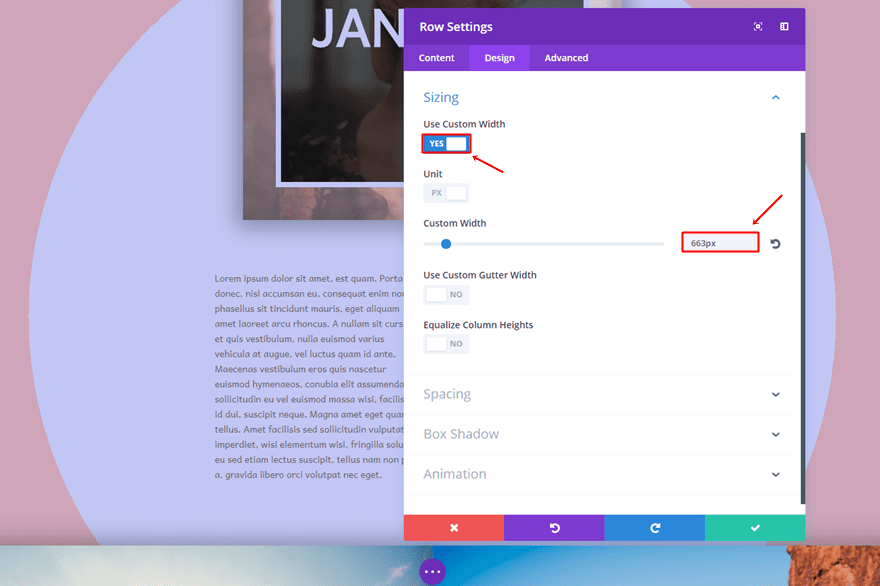
Sizing
Then, enable the ‘Use Custom Width’ option and apply a width of ‘663px’.
Spacing
Lastly, add a top and bottom margin of ’50px’.

First Text Module
Add a first Text Module to the first column of the row.
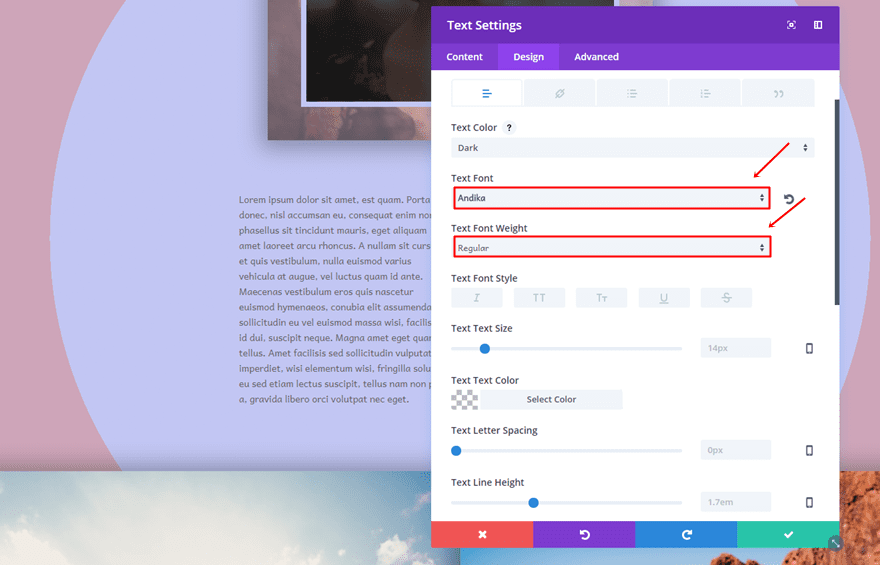
Text Settings
Then, go to the Design tab, use ‘Andika’ as the Text Font and ‘Regular’ as the Text Font Weight.
Clone Text Module & Place it in Second Column
The Text Module in the second column has the exact same settings so go ahead, clone the Text Module and place it in the second column.
Add Fourth Row
There’s one more row left to add to the section before the design is completed.
Column Structure
This new row has two columns as well.
Sizing
Open the Row Settings and make the following settings apply to the Sizing subcategory:
- Make This Row Fullwidth: Yes
- Use Custom Gutter Width: Yes
- Gutter Width: 1
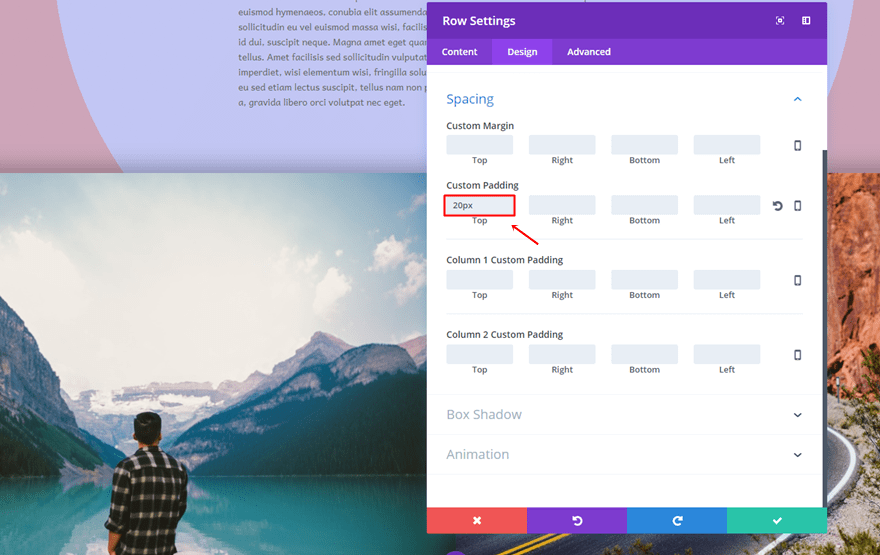
Spacing
Then, add a top padding of 20px.
First Image Module
Go ahead and add a first Image Module to the first column of this last row.
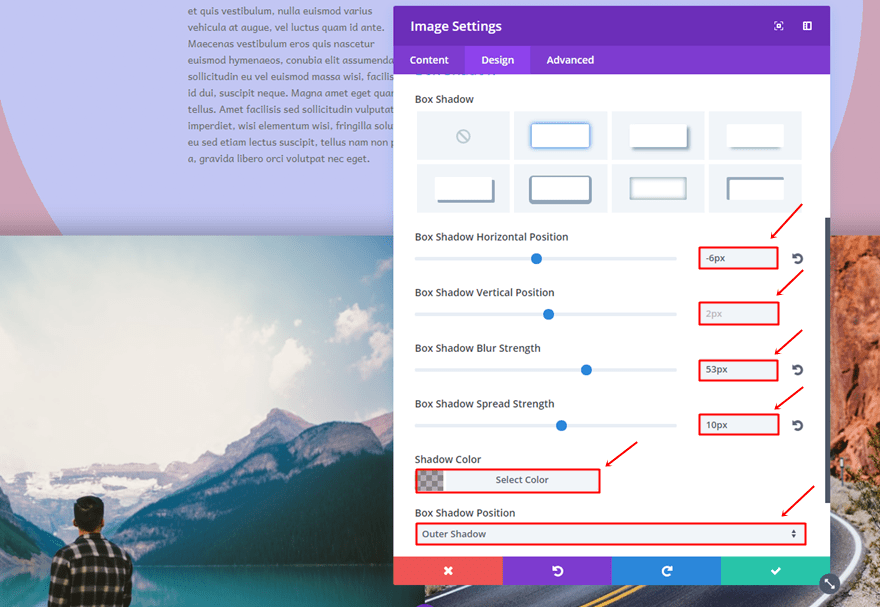
Box Shadow
And add the following Box Shadow to it:
- Box Shadow Horizontal Position: -6px
- Box Shadow Vertical Position: 2px
- Box Shadow Blur Strength: 53px
- Box Shadow Spread Strength: 10px
- Shadow Color: rgba(0,0,0,0.3)
- Box Shadow Position: Outer Shadow
Clone Image Module & Place in Second Column
And lastly, clone this Image Module and place it in the second column as well to complete this row.
Result
Once you go through all of the steps we’ve added to this post, you should be able to achieve the following result:
On Desktop
On Mobile
Final Thoughts
The possibilities you have with Divi are endless. You can make your website look exactly the way you want it to by using the Visual Builder that’ll show you the changes in real time. For this post in particular, we showed you how you could create a beautiful hero section for a personal website. This tutorial was made using nothing else than Divi’s built-in options. If you have any questions or suggestions; make sure you leave a comment in the comment section below!
Be sure to subscribe to our email newsletter and YouTube channel so that you never miss a big announcement, useful tip, or Divi freebie!
The post How to Create a Beautiful Hero Section for Your Personal Website with Divi appeared first on Elegant Themes Blog.