
In today’s Divi tutorial, we’re going to show you how to reach a certain effect you’ve probably never thought of integrating into your own website or a client’s. More precisely; we’re going to show you how to create a footer reveal. The footer reveal basically waits until you’re at the end of the page and reveals the footer according to the way you’re scrolling. Once you’ve scrolled all the way through the page, the footer will be shown in its original form.
Adding a footer reveal to your website can bring that extra little touch you were looking to give to the footer of your website. It’s also the last thing people will see when they scroll through any page on your website. To show you what exactly we mean by a footer reveal, let’s have a look at the end result:

You can see that, besides making the footer reveal, we also added some subtle shadow to the main content of our website. By doing that, we’ve created a kind of perspective between the main content and footer.
Add The Needed CSS Code
To achieve the footer reveal result, we’ll, first of all, need some lines of CSS code. Since there are different ways to add the CSS code to your Divi website, we’ll show you all three of them. Firstly, we’ll show you how to add the code to the Theme Options. Secondly, we’ll add the code through the Theme Customizer. By adding code through one of the two methods, your footer reveal will immediately apply to the entire website. On the other hand, if you want to make the code apply to one page in particular, you can do that as well. By showing you how to add the code to the page you’re working on, you can create that effect for one page exclusively.
The two main things we’ll need in our code are the z-index and a margin bottom for the main content. To make sure the footer fits perfectly, we need to know the height of the footer. Standardly, the footer that’s being used has a value of 53px. But, it could be that you’ve changed the height according to your needs. After showing you how to add the footer reveal standardly, we’ll also show you how to make it fit with the height of any footer.
Add The Needed CSS Code Through Theme Options
The first way we’ll show you how to add the CSS code is through the Divi Theme Options. This is the most frequently used method to add any additional CSS code to your website. By adding the CSS code in this area, you’ll immediately make it apply to the entire website.
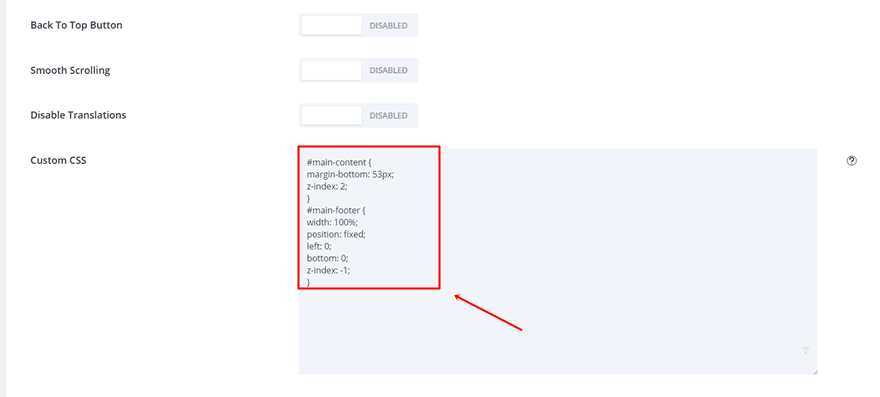
To add the code, go to your WordPress Dashboard > Divi > Theme Options > And copy paste the following lines of CSS code in the Custom CSS field at the bottom of the tab:
#main-content {
margin-bottom: 53px;
z-index: 2;
}
#main-footer {
width: 100%;
position: fixed;
left: 0;
bottom: 0;
z-index: -1;
} 
Once you’ve added the code, go to your website and watch the footer reveal do its job.
Add The Needed CSS Code Through Theme Customizer
Another way to add the CSS code to your Divi website is through the Theme Customizer. Adding the code through the Theme Customizer or Theme Options is the same. Once you remove the code within the Theme Options, it’ll get removed in the Theme Customizer as well and vice versa. One of the advantages of adding code through the Theme Customizer is that you can see everything happen in real time. The additional adjustments you make to the code will therefore immediately give you a clear picture of the end result you’ll obtain.
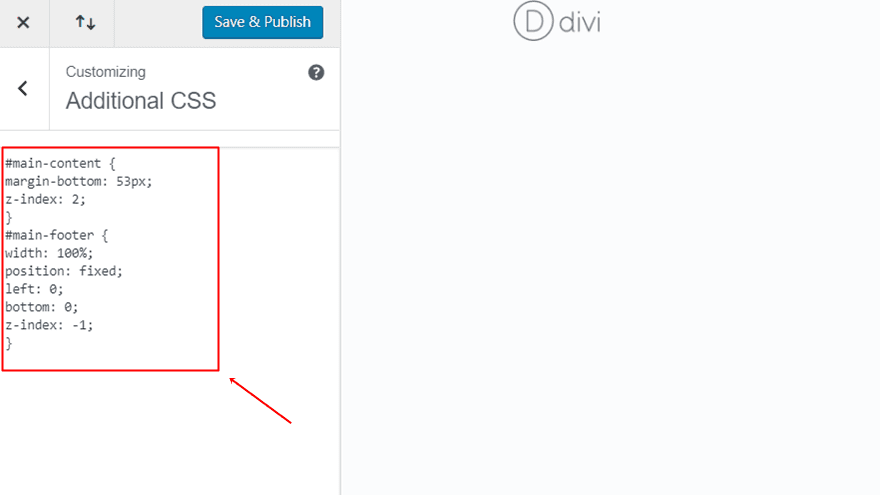
To add the code to the Theme Customizer, go to your WordPress Dashboard > Appearance > Customize > Scroll down to ‘Additional CSS’ > And add the following lines of CSS code:
#main-content {
margin-bottom: 53px;
z-index: 2;
}
#main-footer {
width: 100%;
position: fixed;
left: 0;
bottom: 0;
z-index: -1;
} 
Add The Needed CSS Code To One Page Only
The last way to add the footer reveal CSS code lines is by adding it to one page in particular. This can be interesting if you want to give some added value to the pages that have less interacting content, for example. By adding a footer reveal, you will somehow still make the page a bit more interactive and you’ll put the focus on the content that is being provided in the footer, such as the social media icons.
To add the CSS code to one page in particular, open that specific page. In the right top corner of the Divi Builder on that page, you’ll see the following icon.
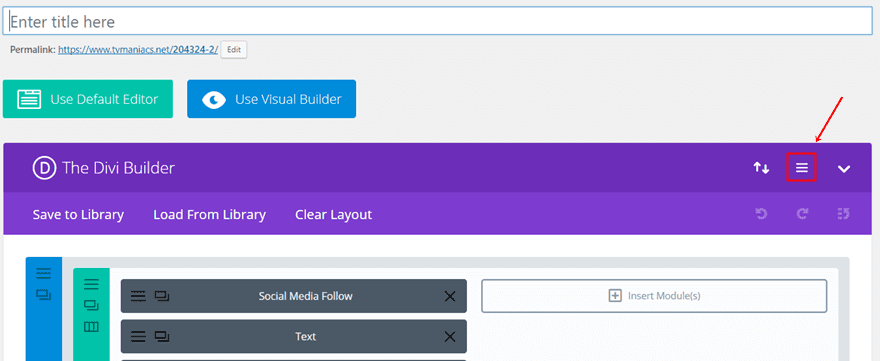
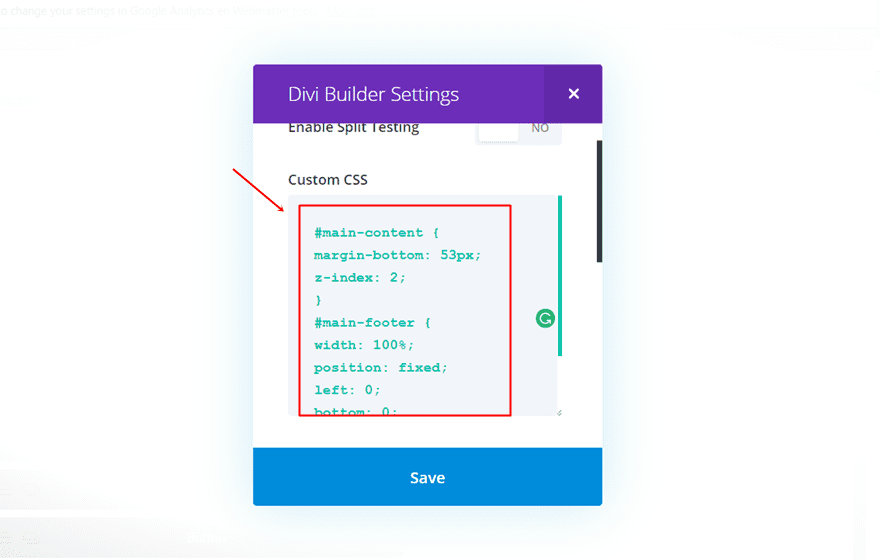
Click on the icon and paste the following lines of code in the Custom CSS field:
#main-content {
margin-bottom: 53px;
z-index: 2;
}
#main-footer {
width: 100%;
position: fixed;
left: 0;
bottom: 0;
z-index: -1;
} 
Once you’ve saved the settings, you’ll see the footer reveal appear on that page in particular.
Change Footer Height
Now, the method that we explained above, counts for the standard footer provided only. Once you’re dealing with another height, the code will not do its job properly. We’ve taken that into consideration and we’ll show you how to make the footer reveal for other heights as well.
At any point, you can choose the height you want to assign to your footer. We have to set the height for two CSS IDs: the main footer and the footer bottom. By adjusting the height in these two places, the footer will fit in place. Of course, once you’ve done that, you also have to change the margin bottom of your main content. If you want a footer that has a height of 60px, for example, you’ll be needing the following lines of code:
#main-content {
margin-bottom: 60px;
z-index: 2;
}
#main-footer {
height: 60px;
width: 100%;
position: fixed;
left: 0;
bottom: 0;
z-index: -1;
}
#footer-bottom {
height: 60px;
} 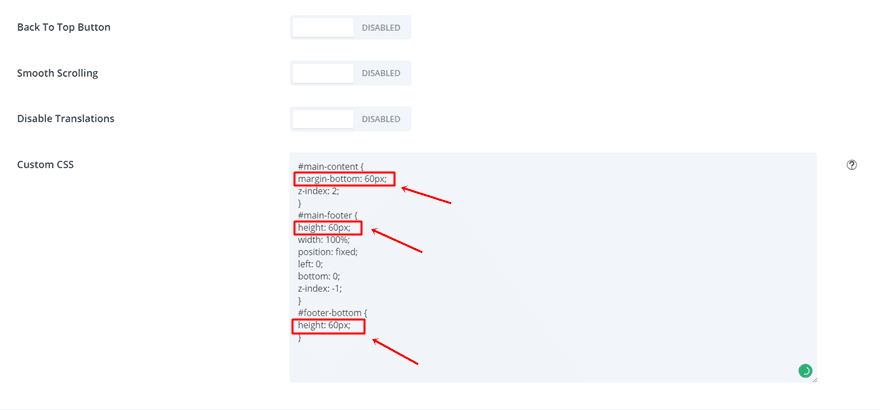
You can see that there are three places where we needed the ’60px’ value. If you have another height value you’d like to assign to your footer, make sure you change it in all three places; the main content, main footer and footer bottom.
Add CSS Box Shadow
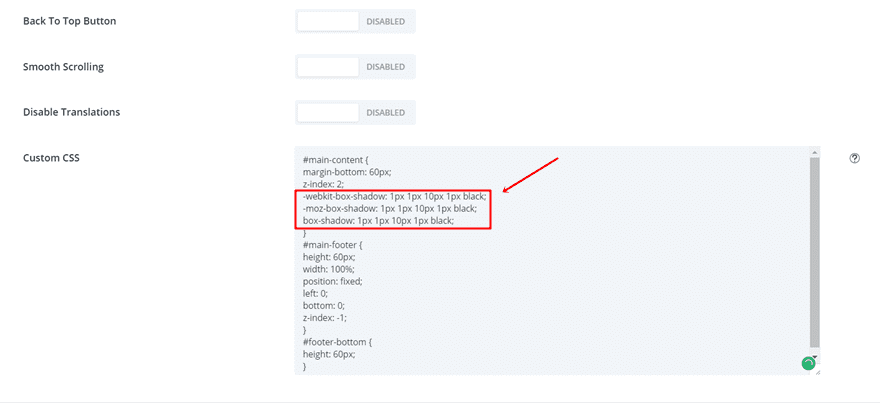
Another thing you can do to add that little bit of perspective and interaction to your website is add some box shadow to the main content. The footer already shows that it’s kind of located ‘under’ the main content. Once you add the box shadow, you’ll emphasize that. By having a shadow, the illusional distance in height between the main content and the footer will seem larger.
To add the box shadow to your footer reveal, use the following lines of code:
#main-content {
margin-bottom: 60px;
z-index: 2;
-webkit-box-shadow: 1px 1px 10px 1px black;
-moz-box-shadow: 1px 1px 10px 1px black;
box-shadow: 1px 1px 10px 1px black;
}
#main-footer {
height: 60px;
width: 100%;
position: fixed;
left: 0;
bottom: 0;
z-index: -1;
}
#footer-bottom {
height: 60px;
} 
That’s it! Your footer reveal should now work fine.
Final Thoughts
In today’s post, we showed you how you could create a footer reveal effect on your website. Make sure you use the provided custom CSS code to create the effect and ensure that it fits with the height of your footer. If you want to give that additional perspective to it, we recommend adding the box shadow to the main content as shown in the step above. If you have any questions or suggestions; make sure you leave a comment in the comment section below!
Be sure to subscribe to our email newsletter and YouTube channel so that you never miss a big announcement, useful tip, or Divi freebie!
Featured Image by Demja / shutterstock.com
The post How to Create a Footer Reveal with Divi appeared first on Elegant Themes Blog.