
In today’s tutorial we’re going to show you how to style your vertical navigation links so that as a visitor scrolls down the page, the menu link corresponding to the section they’re in will highlight. It’s a nice little effect that adds a bit of interactivity between your web design and the user’s behavior. This method works particularly well if you’re creating a one-page website.
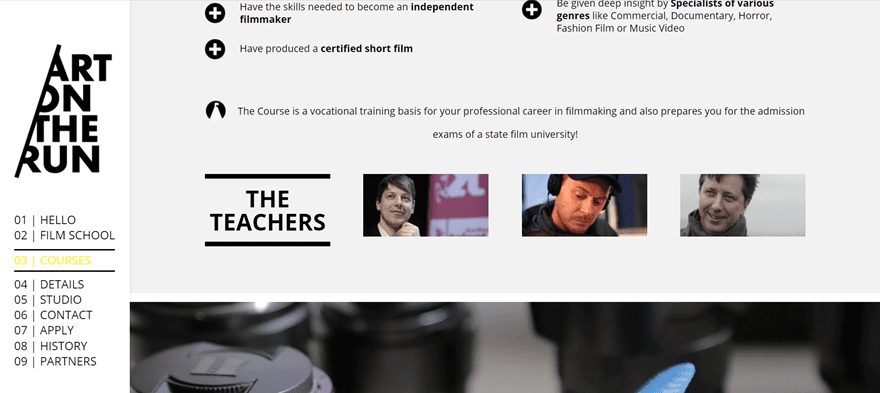
For those having a hard time picturing this effect in their mind, we’ve provided a preview below.
Result
Let’s have a look at the final result you’ll be able to achieve after following this post:

As you can see, the highlighted active link changes automatically as the user scrolls through the page sections (as well as on click).
Inspiration
We found our inspiration for this post at the Filmschool Berlin website which we mentioned as an example in our post on vertical navigation. A reader in the comments of that post asked that we show them how to create the scrolling active link effect and so here we are!
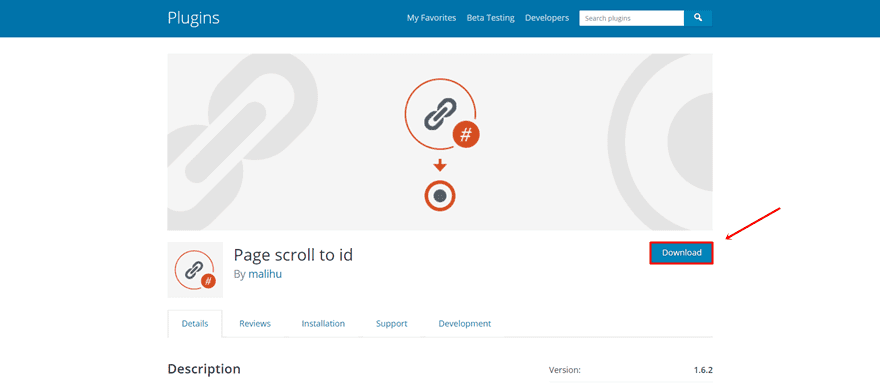
Getting Started: Download The Page Scroll to ID Plugin
To pull this design off we’re going to begin by making use of the free and well-rated Page Scroll to ID plugin which you can find here. Click on the ‘Download’ button and save the plugin ZIP file somewhere where you can find it right away.
Upload & Activate The Page Scroll to ID Plugin
The next thing you’ll need to do is go to your WordPress Dashboard > Plugins > Add New > Select the ZIP file you’ve just downloaded and upload it.
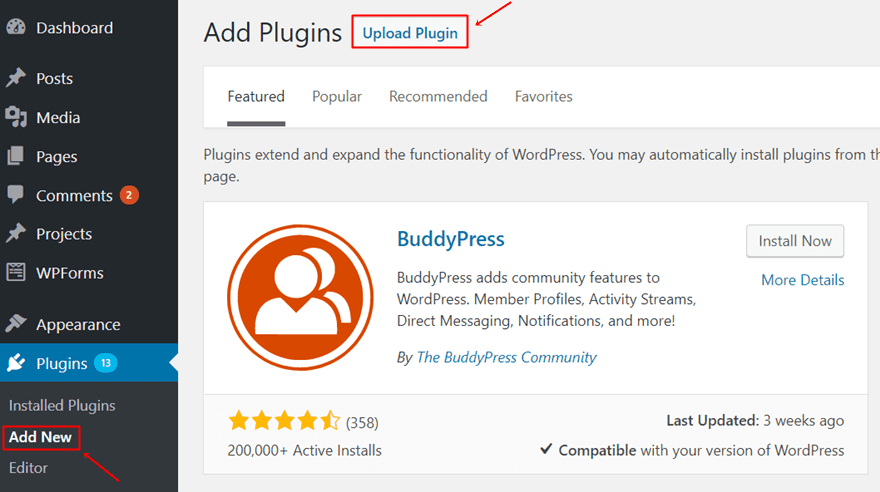
After that, don’t forget to activate the plugin as well.
Enable Vertical Navigation
Before we get into the settings of the Page Scroll to ID plugin, we’ll enable the vertical navigation (and the fixed navigation in the next step) first. If you’re on your WordPress Dashboard, go to Appearance > Customize > Header & Navigation > Header Format > And enable vertical navigation.

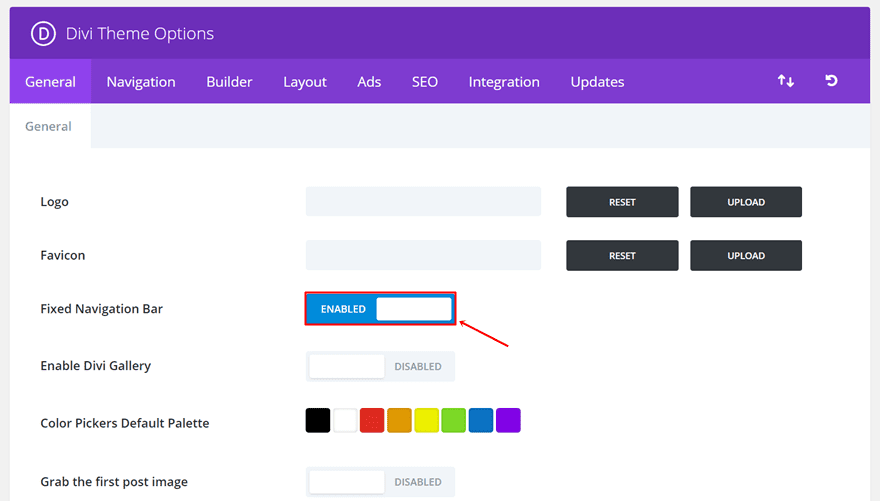
Enable Fixed Navigation
Moving on, let’s enable the fixed navigation of your website. This is necessary since the whole point of using the active links on scroll is for the visitors to see which section they are in, when they’re in it. If you’re on your WordPress Dashboard, go to Divi > Theme Options > And enable the Fixed Navigation Bar in the General tab.
Page Scroll to ID Plugin Settings
For this part, we’re going to go back to the plugin that was recently uploaded. Once you’ve activated the plugin, you’ll need to use the right settings. To go to the settings, click on ‘settings’ right below the plugin name.
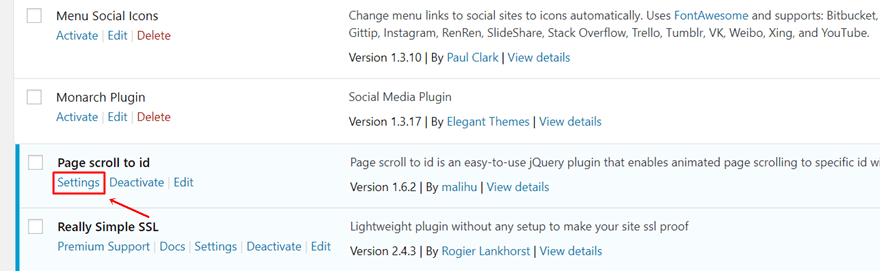
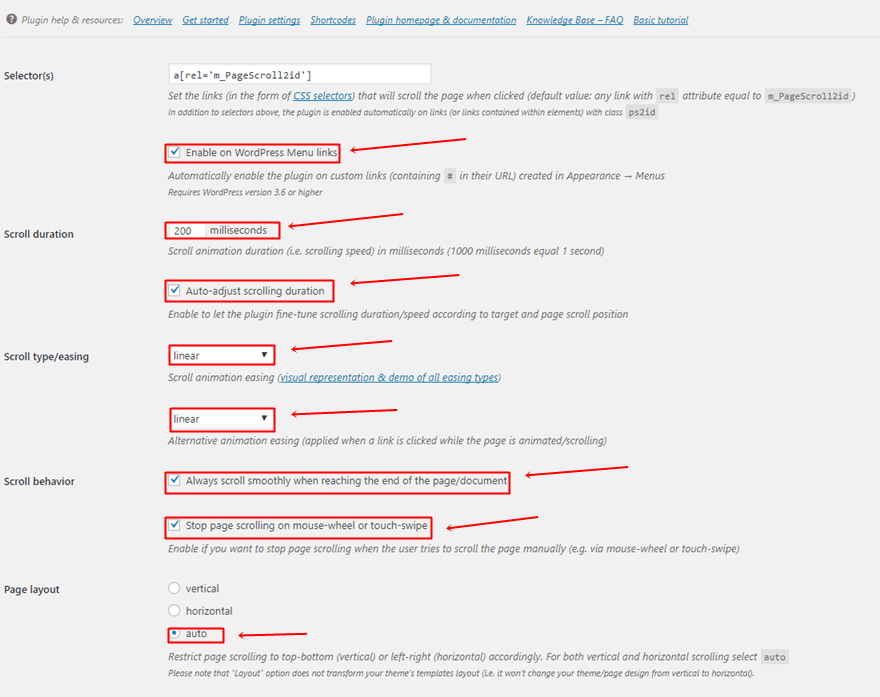
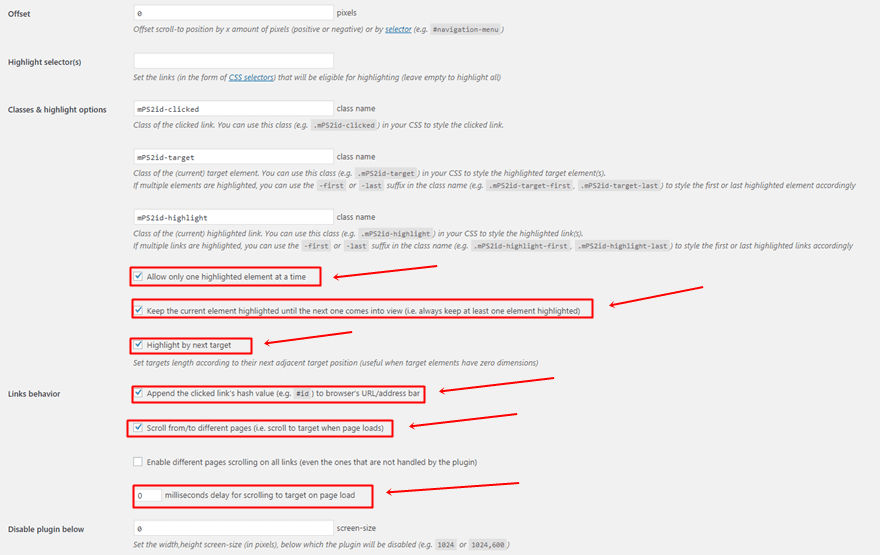
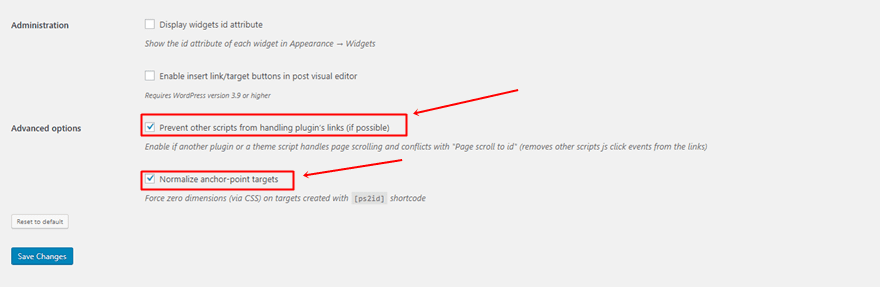
Once you’ve done that, you’ll notice the different options that help you determine how the active links will behave on your website. For the example we’ve made, we’re using the following settings:
- Enable on WordPress Menu Links: Yes
- Scroll duration: 200 milliseconds
- Auto-adjust scrolling duration: Yes
- Scroll animation easing: Linear
- Always scroll smoothly when reaching the end of the page/document: Yes
- Stop page scrolling on mouse-wheel or touch-swipe: Yes
- Page layout: auto
- Allow only one highlighted element at a time: Yes
- Keep the current element highlighted until the next one comes into view: Yes
- Highlight by next target: Yes
- Append the clicked link’s hash value to browser’s URL/address bar: Yes
- Scroll from/to different pages: Yes
- 0 milliseconds delay for scrolling to target on page load
- Prevent other scripts from handling plugin’s links (if possible): Yes
- Normalize anchor-point targets: Yes
Add CSS ID & Class to Sections
The next thing you’ll need to do is assign the different CSS IDs and the Page Scroll on ID CSS Class to the different sections on your one-pager. To do that, open the settings of each one of your sections and go to the Advanced tab. Within the Advanced tab, decide on the different CSS IDs you want to use for your sections. Know that, in order for it to work, you’ll have to assign a different CSS ID to each one of the sections on your one-pager.
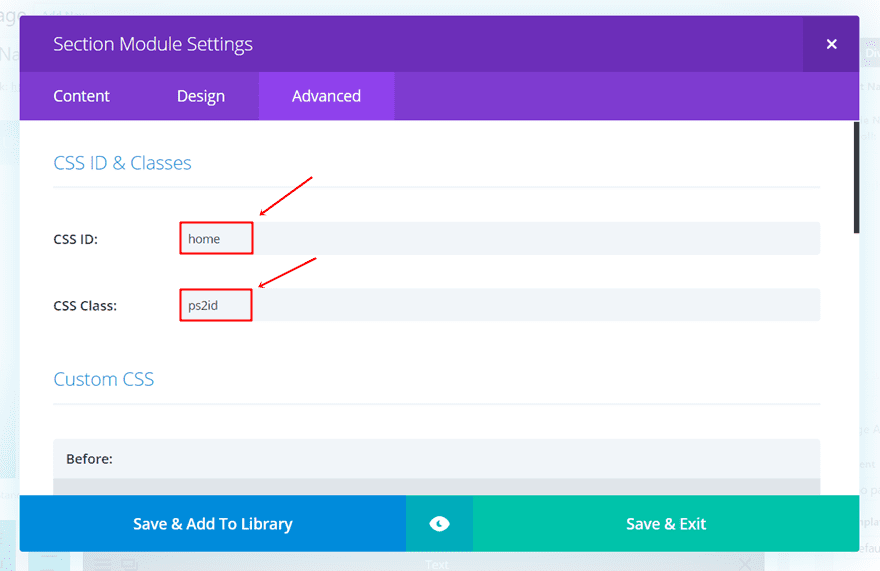
In this example, we’re using ‘home’ as our first CSS ID. The CSS Class, however, is the same for each one of the sections and helps you link the section to the Page Scroll to ID plugin. The CSS class name is ‘ps2id’.
Add ID to Menu Items
Next up, it’s time to create the menu items and make sure they’re in line with the sections and with the Page Scroll to ID plugin. If you’re on your WordPress Dashboard, go to Appearance > Menus. If you already have a primary menu, you can work on that one. If not, you can type down the title and create a new menu. Don’t forget to make it a primary menu.
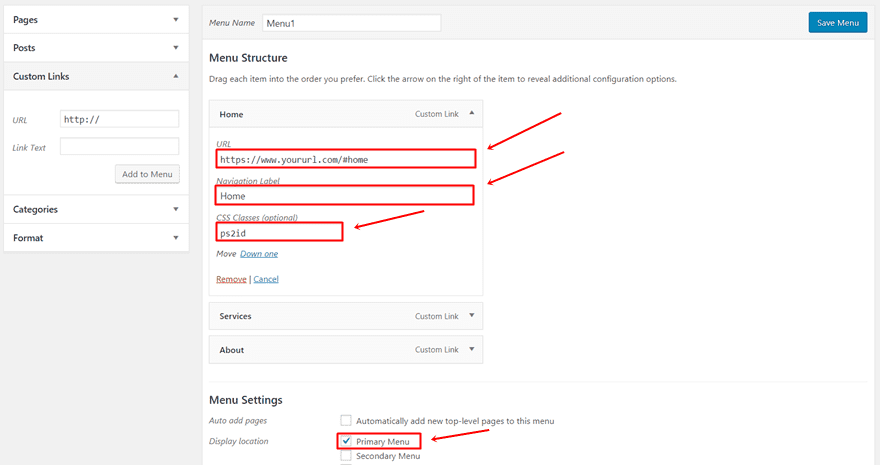
Use Custom Links
Next, you’ll be needing custom links to achieve the results you want. Start by adding a first custom link. Add your website followed by the first section ID to the link field as shown in the screen shot below.
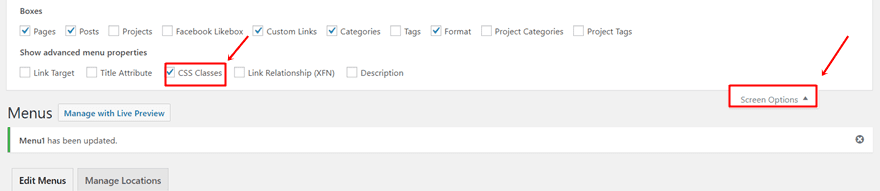
Enable CSS Classes
The next thing you’ll need to do, if you haven’t done it in the past already, is activate the CSS classes for your menu items. To do that, click on the ‘Screen Options’ option in the right corner. Once the possibilities appear, enable the CSS classes.
Use Page Scroll to ID CSS Class
Once you’ve enabled the CSS classes for your menu items, you can go ahead and manually link the Page Scroll to ID class to each one of the menu items. The CSS class is the same as we’ve used to assign IDs to our sections, namely ‘ps2id’.
Make Appearance Modifications
You can make all kinds of modifications to your primary menu, even when you’re using this method. To show you how you can make the changes, we’re going to recreate our example vertical navigation.
Note: As mentioned in the introduction of this post, you won’t be able to see the changes you’ve made while you’re previewing the page. You have to publish the page first and view it in its live modus to notice the results.
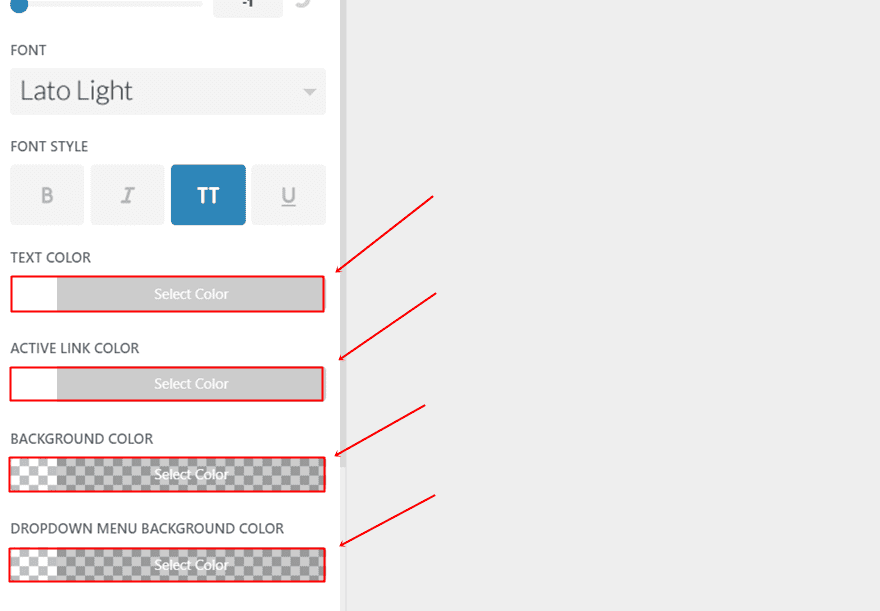
Theme Customizer
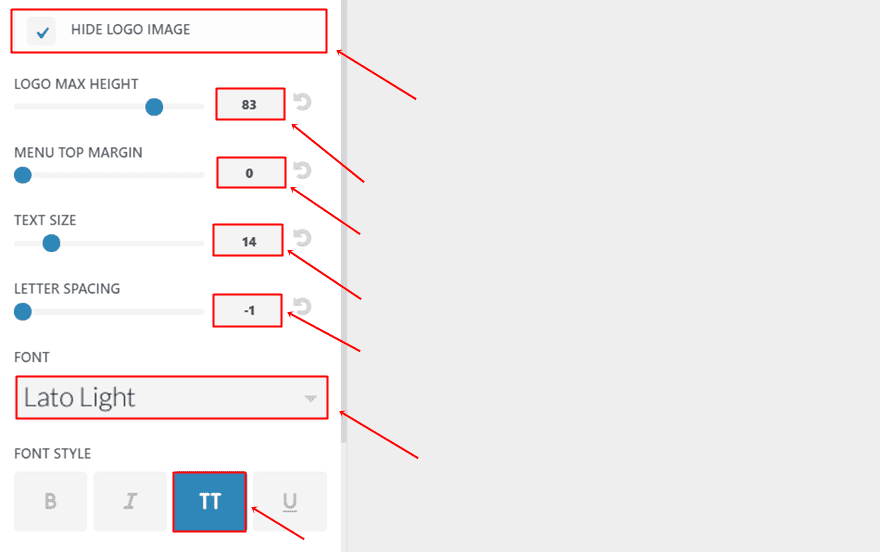
Start by going to the Theme Customizer > Header & Navigation > Primary Menu and make the following changes to how your primary menu will look like:
- Hide Logo Image: Yes
- Logo Max Height: 83
- Menu Top Margin: 0
- Text Size: 14
- Letter Spacing: -1
- Font: Lato Light
- Font Style: Capitals
- Text Color: #FFFFFF
- Active Link Color: #FFFFFF
- Background Color: rgba(255,255,255,0)
- Dropdown Menu Background Color: rgba(255,255,255,0)
Custom CSS Theme Options
To change the active link style, we’ll have to add some Custom CSS code. If you’re on your WordPress dashboard, go to Divi > Theme Options > Scroll down the General tab and paste the following lines of CSS code in the Custom CSS box:
#top-menu .current-menu-item a.mPS2id-highlight{
background: black;
border-top: 1px solid #FFFFFF;
border-bottom: 1px solid #FFFFFF;
padding-top: 15px;
}
Besides that, we’ve also used an overlapping transparent menu, which we’ve handled more in detail in this post. To apply those CSS changes to your website as well, copy and paste the following lines of CSS code in the Custom CSS box as well:
@media (min-width: 981px) {
.et_vertical_nav #et-main-area, .et_vertical_nav #top-header {
margin-left: 0px !important;
}
.container {
margin-left: 3% !important;
}
.et_vertical_nav #page-container #main-header {
box-shadow: none !important;
}
} 
Results
When having followed all the steps in this post, you should be able to achieve this final result:
You can, of course, modify the style to your own preferences (or use it for top navigation as well).
Final Thoughts
In this tutorial, we’ve shown you how to create an interactive vertical navigation menu for one-pagers. We’ve shown you how you can use the Page Scroll to ID plugin in combination with the Divi theme to easily achieve the result you want to get. In a future post, we’ll come back to this and show you how to creatively style the active links you’re using through this method. If you have any questions or suggestions, make sure you leave a comment in the comment section below!
Be sure to subscribe to our email newsletter and YouTube channel so that you never miss a big announcement, useful tip, or Divi freebie!
Featured Image by Yurlick / shutterstock.com
The post How to Create Active Links on Scroll for One-Page Divi Websites appeared first on Elegant Themes Blog.