
Alright, let’s talk about content aware sidebars. However, before we do we should first talk about sidebars in general.
The typical sidebar is a staple of web design and many WordPress themes. They are a good place to display additional information such as contact forms, your latest or most popular blog posts, advertisement or anything else that is not the main attraction of your site. While in recent years, the trend has gone toward one-page designs without sidebars, they remain a popular element.
In most cases, the sidebar of a website will show the same content no matter which page you are on. However, that is not always the optimal way to do it. In fact, there are plenty of reasons to show custom sidebars on different pages or posts that are aware of the content they accompany.
For that reason, in this article we want to talk more about this topic. We will first show you use cases for content aware sidebars. This way, you will understand whether they make sense for you. After that, we will continue by explaining how to implement this type of sidebar on your WordPress website.
Ready to go? Then let’s get cracking.
What’s The Point of Content Aware Sidebars?
Before anything else, let’s talk about why you would even bother customizing sidebars depending on what content they appear next to. After all, the static sidebar has been around for ages and still seems to do the trick. Why mess with a working system?
As it turns out, there are lots of use cases where it makes sense to use content aware sidebars:
- Onboarding — First-time visitors might have need for different content as regulars. For example, your logged in users don’t need to see the “sign up” call to action that is meant to get people to join your site or on your email list.
- Tailored information — Some information makes more sense on some pages than others. Examples include additional contact information on the contact page, best or latest articles on the blog page, special offers on the shop page — you get the gist.
- Improved SEO — While not a major factor, the sidebar content still matters for search engine optimization (especially if widget titles are properly wrapped in heading tags). Therefore, you can use content aware sidebars to make your pages even more targeted.
- Calls to action — You can also use this type of sidebar to customize calls to action for different places on your website.
- Languages — They also make it possible to create sidebars for different language versions of your site and target different markets.
As you can see, there are several reasons to use content aware sidebars and this list is far from exhaustive. However, let’s now turn our focus on how to implement them.
How to Implement Content Aware Sidebars in WordPress
There are three main ways to set up custom sidebars for posts and pages. What they all have in common is that the content of the sidebar is changed in response to which page or post it is displayed on. Conditions include WordPress tags, categories, page names or other attributes like whether a user is logged in or not.
After that, the sidebar is usually changed in one of three ways:
- Filter widgets — One sidebar is filled with widgets and some kind of logic in the background decides which widgets appear on which location and which are hidden
- Set up entire sidebars — Another way is to create entirely separate sidebars that show up in the same location when different conditions are met. They can contain individual widget configurations.
- Hardcoded into theme — Of course, you can also add custom sidebars to your theme files, if you have the coding chops for it
I personally think the second method is the one that results in the most orderly user interface. However, in the following we will go over each way in detail so you can make up your own mind. After that we will list a few more options to implement custom sidebars on you WordPress site.
Use Jetpack Widget Visibility to Filter Widgets
The easiest way to filter the widget appearance on your site is the aptly named Widget Visibility module included in Jetpack. If you already have the plugin on your site, creating custom sidebars is as easy as activating the module (if it isn’t already active by default). Alternatively, you can also use this standalone version.
Once you do and go to the widget menu, you will find a new Visibility button on all your widgets. Click it and you can easily implement the desired display logic for your widgets via drop-down menus.
Conditions for visibility are as follows:
- Category — Widgets can appear on certain category pages or all of them
- Author — Appearance on all author pages or limited to certain users
- User — Checks whether the user is logged in or not
- Role — Control widgets depending on user role
- Tag — Works like category pages but for tags
- Date — Control on which date archives widgets appear on
- Page — Set widget visibility for front page, posts page, archive pages, the 404 error page, post types, post types archives and static pages
For each option, you can define whether widgets are shown or hidden. Rules have to be entered separately, that means it’s not possible to input several pages at once. However, this method is still more convenient that inputting page ids manually as necessary in other solutions (more on that below). There is also a Match all conditions check box that forces widgets to only be displayed if all conditions are valid.
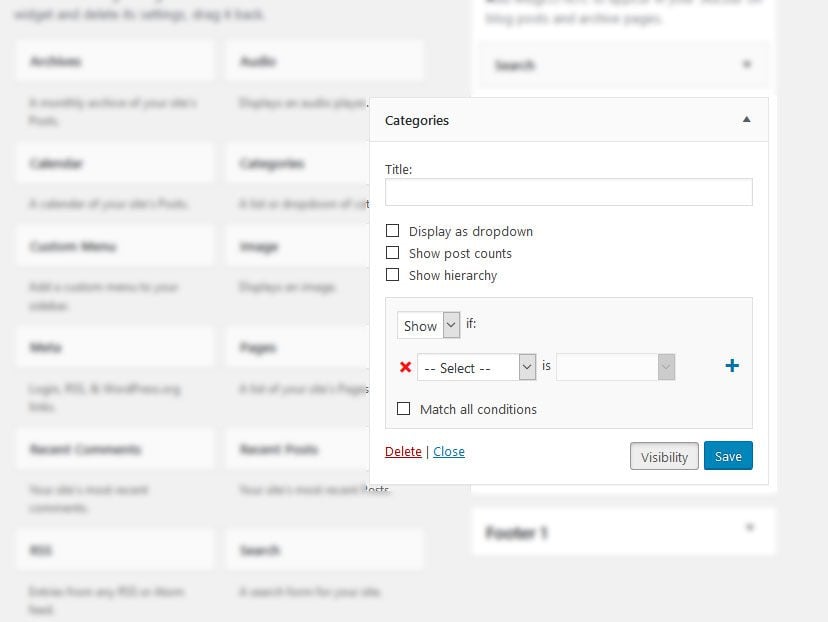
Content Aware Sidebars Allows You to Set up Custom Sidebars
The second solution we want to talk about is the Content Aware Sidebars plugin. As mentioned earlier, this plugin allows you to set up entire sidebars that you can then populate with widgets and assign to posts and pages. It’s pretty simple to use.
After the installation, you find a new menu item called Sidebars in the WordPress menu.

When you choose Add New here, you get to this screen:

Here, the first thing to do is to name your sidebar. After that, it’s time to set up the conditions for displaying it. Available options are similar to Jetpack:
- Static pages — Pick static pages to display sidebar on like the front page, search results or 404 error pages
- Posts — The same options as above but for posts
- Pages — Pick on which pages on your site to show the sidebar
- Media — Determines which media pages your sidebar appears on
- Authors — Limit the display to author pages
- Page templates — Pick page templates to display your sidebar on
- Categories — Pick certain categories or all category archives
- Tags — Same options but for tags
- Formats — Again, the same settings for format archives
- Dates — And once more for date archives
- URLs (Pro version only) — Limit sidebar display to certain URLs
Additional settings:
- Schedule — Set a timing for sidebar display. In the free version you are limited to whole days, the Pro version offers more granular time slots.
- Design — Add custom CSS classes to your sidebars, widgets and widget titles to manipulate their
- Advanced — Set the order of your sidebars (in case there’s more than one)
In addition to that, you can also merge sidebars with one another, replace them, set them up as widget areas and control their visibility for logged-in users (user roles available in Pro).
After you are done configuring, the new sidebar shows up in the normal widget menu where you can populate, activate and deactivate it and even see past revisions. Neat and easy.
Manually Create Custom Sidebars
Finally, it’s also possible to create custom sidebars via coding. WordPress offers plenty of options for that and we will quickly go over the process.
The first thing to do to create custom sidebars is to register a new widgetized area. For that, simply input the following code into functions.php of your (child) theme:
[php_code1]
Of course, you can change the name and other elements to your liking. After saving and uploading to your server, it will now appear in your widget menu where you can add widgets to it as usual.
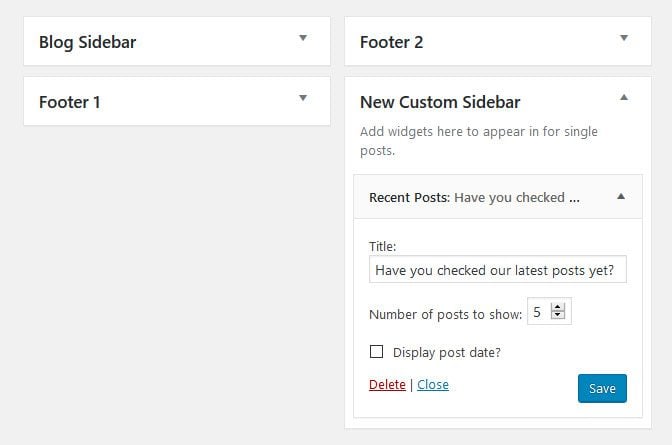
However, so far the sidebar doesn’t show up anywhere on your site. To change that, you need to add it to the template file(s) of where you want them to show up.
In our example, we want the new sidebar to appear for single posts, so we would input it inside single.php of our theme. In the case of the Twenty Seventeen theme, that means we would exchange this:
[php_code2]
With this:
[php_code3]
After that, that’s the end result on the frontend:

Of course, if you have further development chops, it’s possible to add more conditions such as showing the sidebar only for logged-in users. You can also get more granular about where to display it by using the WordPress template hierarchy. It might not be the most dynamic solution, however, it does the trick and can work completely in the background without the need to install additional plugins.
Additional Ways to Implement Content Aware Sidebars
Aside from the options above, we also have a few more plugins with similar functionality.
Widget Logic

This plugin works similar to the Jetpack solution, however, instead of drop-down menus, you need to manually input WordPress conditional tags. That way, you can determine where widgets appear depending on as many rules as you want.
However, to do so, you need to know the ids of your pages and overall it’s a bit more technical than what we have seen above. That doesn’t mean it doesn’t work and isn’t a powerful plugin, however, less technical people might be better off with something else.
Custom Sidebars

Made by WPMU DEV, here we have another solution to set up content aware sidebars that works with any widget area. The plugin lets you dynamically display widgets on any post, page, category archive, post type and more. Plus, it does all that with a very powerful and easy-to-use user interface. For a full introduction, check Tom Ewer’s article over on their website.
Simple Page Sidebars

The final solution to create custom sidebars is made for simplicity. It allows you to assign sidebars and make changes in bulk directly from the page editor. After you have done so, you can then populate them as usual in the widget menu.
Unfortunately, more advanced customization options are missing. However, if you only want to have different sidebars for your pages, this might be the solution you are looking for.
Content Aware Sidebars in a Nutshell
There are many good reasons to use custom tailored sidebars on your site. Not all content needs the same information to appear next to it. With content aware sidebars, you can display what makes sense instead of using one standard sidebar.
In this tutorial, we have learned several ways to create customized sidebars. From filtering widgets over creating entire new sidebars to coding them into your theme, it’s all there.
Armed with this information, you can now provide just the sidebar content you need for improved user interaction and service to your audience. Give it a try!
What’s your experience with content aware sidebars? Let us know in the comments section below!
Article thumbnail image by Kit8.net/ shutterstock.com
The post How to Display Content Aware Sidebars for Any WordPress Page or Post Type appeared first on Elegant Themes Blog.