
‘404 errors’ are one of the most annoying parts of surfing the web. If you’ve ever run across one – and chances are you have – you’ll know how frustrating they can be. Therefore, quickly fixing them on your site is imperative (if they exist, of course).
Fortunately, WordPress enables you to tackle 404 errors using multiple methods, most of which are quite easy to implement. In this article, we’ll talk about what 404 errors are, explain how to detect broken links on your site, discuss creating a custom error page, and show you how to fix the problem using three different methods. We’ve got a lot of ground to cover, so let’s get started!
What the 404 Error for WordPress Is
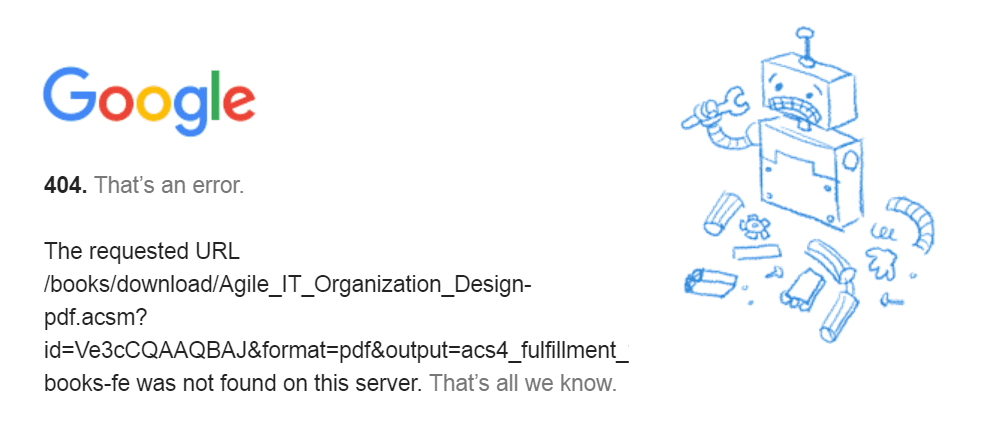
‘404’ refers to the error code your browser displays when it can’t find what you’re looking for. Your browser will always look for the URL entered, regardless of whether it exists. If it doesn’t find anything, you’ll see an error:
Fortunately, this error is straightforward. You simply need to be mindful of any mistyped internal links in your content, and remove links to pages that no longer exist. It sounds like a hassle, but 404 errors can have serious negative repercussions, such as:
- An increased bounce rate. Some people will leave your site immediately after running into this error, which will increase your bounce rate and affect your Search Engine Optimization (SEO).
- It makes you look unprofessional. It’s safe to say that no one enjoys running into a ‘broken’ site. Even if the 404 error isn’t your fault per se, it can impact how your visitors perceive you.
- They’re highly frustrating. In a lot of cases, your visitors might not be able to differentiate between your site being down and a 404 error. It means they might keep trying to access the same page and become frustrated.
The good news is minimizing the impact of 404 errors is simple. In fact, there are several ways to deal with them, but for now, let’s talk about prevention.
How to Detect Broken Links on Your WordPress Website
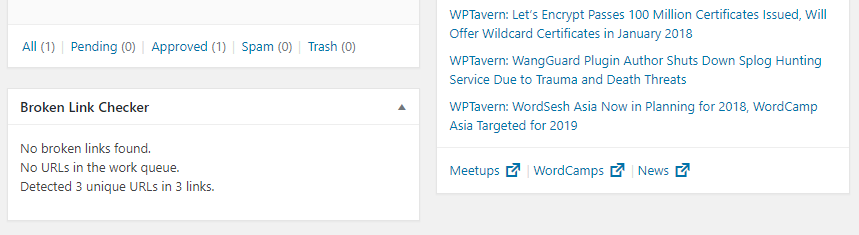
In general terms, any link that doesn’t work as it should is referred to as ‘broken’. Over the course of your site’s life, some links may stop working, but checking each of them manually is a fool’s errand. Enter the Broken Link Checker plugin:
This tool enables you to automate the process of checking the internal and external links on your site to identify any broken ones. If it finds one, the plugin will let you know so you can jump in and fix it.
Once you’ve installed and activated the plugin, it’ll run the first full check automatically, and you’ll be able to see the results on your dashboard’s home page:
By default, the plugin will check for any broken links every 72 hours, but you can tweak this value via the Settings > Link Checker page on your WordPress dashboard. As far as we’re concerned, running the test this frequently is overkill, but it shouldn’t have a noticeable impact on your site’s performance – so it’s up to you whether to tweak the value or not.
How to Create a Custom 404 Error Page for WordPress

One of the biggest problems with default 404 error pages is that most of them don’t give you enough information. If you’re somewhat tech-minded, you’ll probably take the time to read through your browser’s error description, but most people probably don’t. What’s more, for the visitor, seeing a string of text and the word “Error” sets alarm bells ringing.
Creating a custom 404 error page solves this problem, and many look to get creative with their layouts. In short, you don’t have to settle for an ugly, default error page – in fact, WordPress makes it relatively straightforward for you to customize yours. The goal here isn’t just to make your 404 error pages look pretty; you also want to take the opportunity to be informative. Take another look at our example at the beginning of this section. It clearly shows that the site is still working and explains what the problem is in layman’s terms.
The WordPress Codex has an entry on how to create a 404 page, but if you’re a Divi user, we’ve previously covered how to do this specifically for the theme. There are a number of steps, but Divi’s module system can make short work of it since there won’t be too many elements to include.
Finally, keep in mind that creating a custom 404 error page isn’t a fix per se. It’s just a way to lessen the negative impact when this issue pops up. With that in mind, let’s talk about some fixes.
How to Fix the 404 Error for WordPress Websites (In 3 Different Ways)
In this section, we’re going to walk you through three fixes for 404 errors. The first is a good option if you want to avoid 404 errors altogether, while the other two are more suited for troubleshooting purposes. Either way, we recommend you read through all three ways to find a solution that suits your needs.
1. Use a Plugin to Redirect 404 Errors
A ‘redirect’ is when you take a user visiting one URL, and send them to another one automatically. Your goal is to redirect anyone visiting a non-existing page on your site to another one (such as your home page, for example).
To do this, you’ll want to use a plugin such as Redirection, which is massively popular thanks to its ease of use:

Once you’ve installed and activated the plugin, head to the Tools > Redirection tab on your WordPress dashboard. Inside, you’ll find a list of all your existing redirects – which should be empty – and an option to set up new ones:
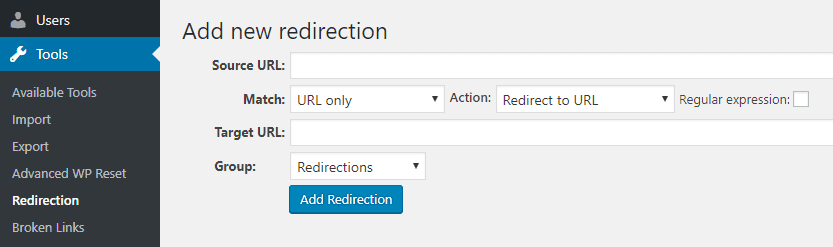
The Source URL is the address that would lead someone to a 404 error, and the Target URL is the page you want them to land on. As we said earlier, your home page is your best bet. As for the other settings, we can safely leave them at their default values. However, there’s still the matter of which URLs you need to redirect.
The Redirection plugin will start to log any 404 errors that pop up for your visitors upon activation. You can access this data at any time by clicking on the 404 tab within the plugin’s settings:
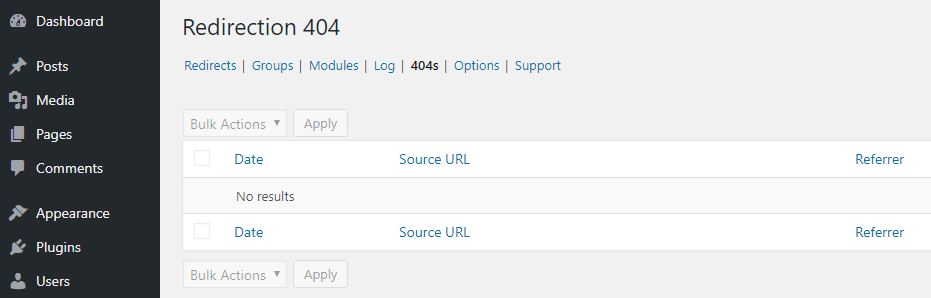
You’ll want to check this tab periodically, grab the URLs giving your visitors trouble, and set up redirects for them. While it may be time-consuming initially, once you set up a redirect you’ll never need to worry about the URL again – so it’s worth the effort.
2. Fix Your Permalink Settings Manually
In some cases, your WordPress website might start showing 404 errors when anyone tries to access your posts. It doesn’t mean your posts were deleted, and in fact, it’s a somewhat common bug relating to your permalink structure (i.e. the format of your URLs).
The good news is that fixing this issue is a walk in the park (in most cases). Firstly, head to your WordPress dashboard, and navigate to the Settings > Permalinks tab:
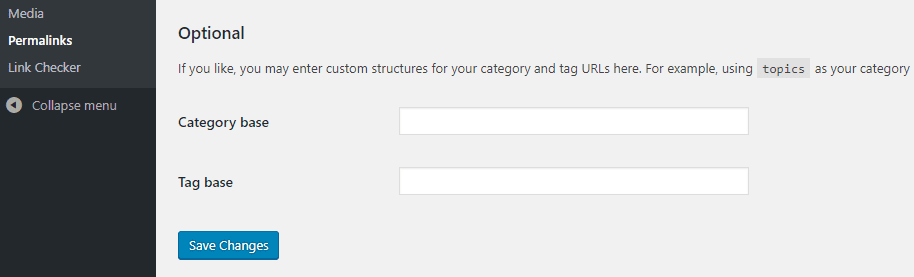
Here, scroll to the bottom and click on the Save Changes button without making any modifications to your settings. What this does is tell WordPress to save a new .htaccess file, which governs your permalink settings. Try to access your posts now, and if they’re still not working, move on to the third and last method.
3. Edit Your .htaccess File Manually
In most cases, if updating your .htaccess file via the WordPress dashboard doesn’t work, it’s due to a permissions error on your back end. It means you’ll need to get back there and make the changes manually, which is easier than it sounds.
To do this, you’ll need to use an FTP client – we recommend FileZilla – and access your website using the credentials your web host gave you. Once you’re in, access your WordPress root folder – it’s usually named either public_html, www, or after your site.
As we mentioned earlier, the file we’re looking for is called .htaccess. Before you continue, make sure you right-click the file and select Download. This gives you a way back if you make a mistake. When you’re ready, choose the View/Edit option:
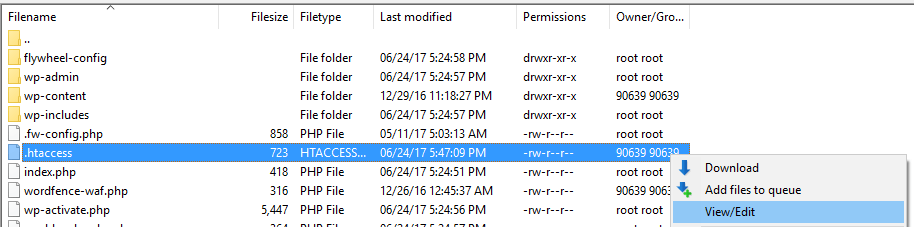
This will open the file using your default text editor – you’ll want to delete the contents and replace it with WordPress’ default settings:
# BEGIN WordPress
<IfModule mod_rewrite.c>
RewriteEngine On
RewriteBase /
RewriteRule ^index\.php$ - [L]
RewriteCond %{REQUEST_FILENAME} !-f
RewriteCond %{REQUEST_FILENAME} !-d
RewriteRule . /index.php [L]
</IfModule>
# END WordPress
Now save your changes and try re-accessing your posts. They should be working, although you may have to go back to the Permalinks tab in WordPress and re-configure your URL structure to get it back to the way it was before.
Conclusion
Dealing with 404 errors is vital for many reasons, but so is preparing for them. While creating a custom 404 page is a good first step, you’ll also want to eradicate broken links using a solution such as the Broken Link Checker plugin. These measures are necessary if you want to make a good impression on your users, and protect your search rankings.
In this piece, we’ve looked at three methods for dealing with 404 errors in WordPress. Let’s recap them quickly:
- Use a plugin to redirect 404 errors.
- Fix your permalink settings manually.
- Edit your .htaccess file manually.
Do you have any questions about how to fix the 404 error for WordPress? Ask away in the comments section below!
Article thumbnail image by VikiVector / shutterstock.com.
The post How to Fix the 404 Error for WordPress Websites appeared first on Elegant Themes Blog.