
Your navigation menu is one of the first things visitors look for when they go to your site. Because of this, websites make sure to give it the primary real estate (at the top of the page) it deserves. But if you are looking to make your navigation menu stand out a little more, you can spice it up with custom background designs. With Divi’s Visual Builder, you can create some awesome background designs with the Divider background options available in every section of your page. And with a little creativity, you can use a divider background to serve as a unique frame for your navigation menu. You can even create a unique menu background for each page of your website.
In this tutorial, I’m going to show you how easy it is to frame your navigation menus with beautiful background designs using section divider backgrounds. I’ll be using the pharmacy layout pack as an example site to create these designs.
Let’s get started!
Sneak Peek
Here is a sneak peak of what can be accomplished with this design technique.


What You Need
For this tutorial, all you really need is the following:
- The Divi Theme (installed and active)
- The Pharmacy Layout Pack (a free premade layout pack available within the Divi Builder)
Setting up Your Primary Menu in the Theme Customizer
For this tutorial, I have a fresh install of Divi with my primary menu containing the six pages of the pharmacy layout pack. Here is what the menu looks like by default.

As you can see the header has a white background and sits above the first section of the page. When you scroll down, the header converts to a fixed navigation menu bar.

But for this tutorial, I want to make the header background transparent so I can add my own custom background. To do this we need to hop over to the theme customizer. From the WordPress dashboard go to Divi > Theme Customizer. Then from the customizer menu, go to Header & Navigation > Primary Menu Bar.
Change the background color to be completely transparent by dragging the transparency slider all the way down or enter the color code rgba(255,255,255,0).

As you can see the white header background has disappeared and your first section has jumped to the top of the page to serve as the background of your header and primary menu.
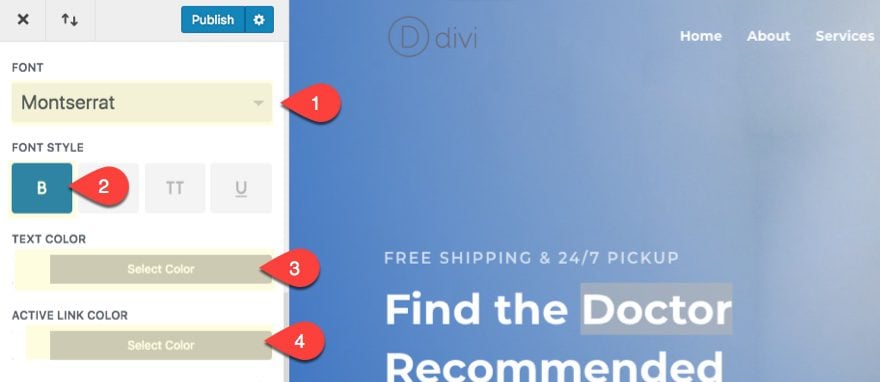
Since we are going to add a color background to frame our navigation menu, let’s update the following menu text options as well.
Font: Montserrat
Font Style: Bold (B)
Text Color: White
Active Link Color: White
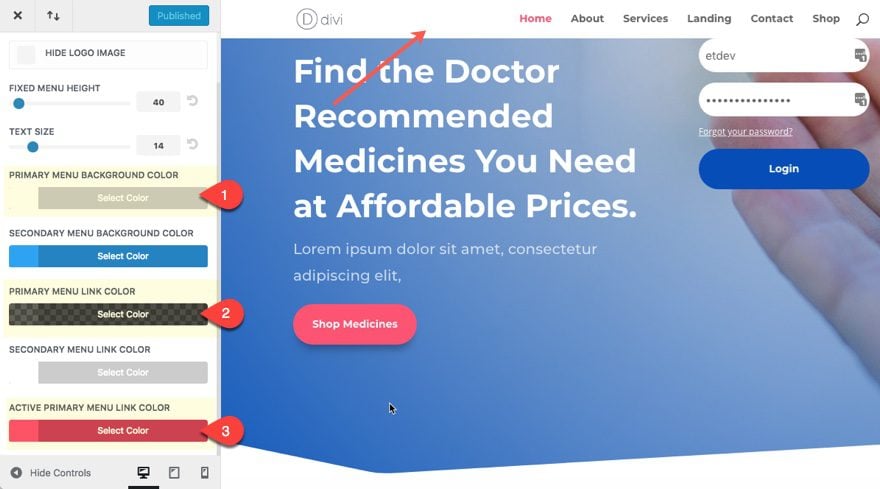
Go back one level in your customizer menu and click the Fixed Navigation tab. If you are going to be keeping the fixed navigation functional, you can give it a custom color that compliments the color of your custom background you will build in the visual builder. Or you can give it a more generic color so that you can frame your primary menus with different colors on a per page basis. For now, I’m going to use a more generic color scheme for my fixed navigation. Update the following:
Primary Menu Background Color: #ffffff
Primary Menu Link Color: rgba(0,0,0,0.61)
Active Primary Menu Link Color: #ff5473
Now we are ready! Make sure you publish your changes.
Framing Your Navigation Menu with a Section Divider Background
Example #1
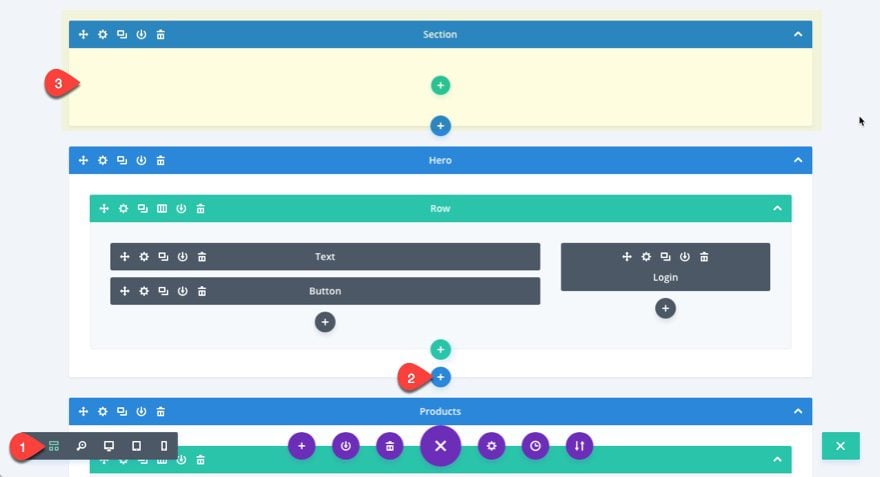
Go over to your pharmacy home page and deploy the visual builder. Then add a new regular section without any rows, columns, or modules (you don’t need them) and drag the section to the top of your page (I find it easier to rearrange sections in wireframe mode because they are larger blocks).
Now go back to desktop mode to complete the design.
Open the section settings and update the following:
Top Divider Style: see screenshot
Divider Color: #ff5473
Divider Height: 150px
Divider Horizontal Repeat: 0.8x
Custom Margin:-80px bottom
Custom Padding: 0px Top, 0px Bottom

The divider color is the same pink color used in the layout. I set the divider horizontal repeat to 0.8x in order to flatten out the divider a bit. The -80px bottom margin brings the section down the page in order to hide the white background of the section. This results in the divider framing the navigation on the right. The divider extends to the left to add a nice background to your logo as well.
Here is what it looks like on the live site.

Example #2
For this next example I’m going to position the section so the divider background only frames the navigation menu instead of extending to the logo as well. To do this we need to give our section a custom width and make it right aligned so that it fits around the navigation menu.
Go to the section settings and update the following:
(Note: You may need to open the settings in wireframe mode since the custom margin of the section may make the section menu unclickable. Once you open the settings in wireframe mode you can switch back to desktop view mode.)
Width: 75%
Section Alignment: Right
Divider Style: see screenshot
Divider Horizontal Repeat: 1x

Here is what it looks like:

With Fixed Navigation activated, you can see how the fixed menu header activates just as the menu starts to leave the frame.

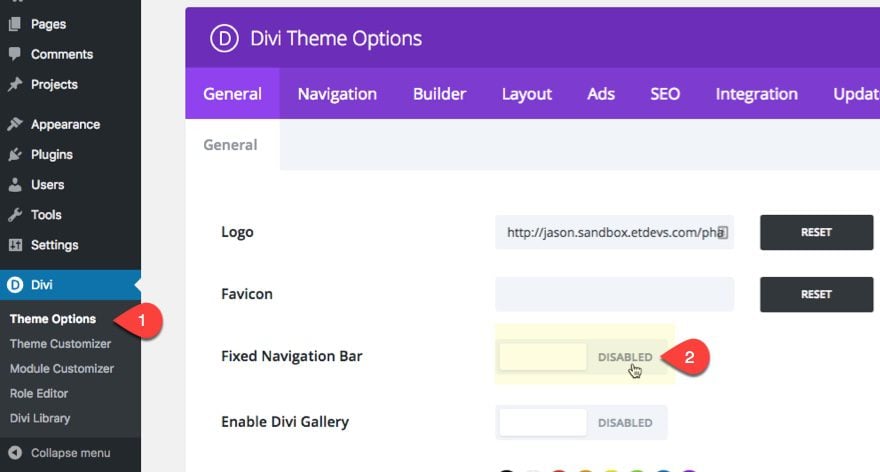
If you want to disable fixed navigation, navigate to Divi > Theme Options, and disable the Fixed Navigation Bar option under General Settings.
Without fixed navigation activated, your menu will stay locked in place within your frame design as your scroll.

Responsive
The frame will even look good on mobile as well.

But you can always choose to hide the frame by giving your section a custom divider height of zero for desktop and mobile. And then customize your mobile menu in the theme customizer.
Use Different Color Frames on Different Pages
If you want, you can add different colors and designs on a per page basis. All you need to do is save your section to your Divi Library and add it to a different page of your website. Then you can adjust the color or design as you want. The possibilities are endless.
Final Thought
Adding a custom background to your navigation menu is actually pretty easy with the Divi Builder. All you need to know is how to position your section to serve as a background for your menu. And with this setup in place, you can test out different divider styles to create all kinds of unique frames for your navigation menu. And since you are using a section, you have all the design options of a section to design your frame. You can even use a simple section background or gradient and adjust the position of your section anywhere you want.
I look forward to hearing from you in the comments.
Cheers!
The post How to Frame Your Navigation Menu with Section Dividers appeared first on Elegant Themes Blog.