
Sometimes, the best possible move is to start over from zero, and that holds true even for WordPress websites. In some cases, simply starting from scratch will be much easier than reworking your site. However, the bad news is that WordPress doesn’t include a way to start over by default.
Fortunately, there are a few ways to return your website to its original state manually. In this article, we’re going to talk about why you may want to reset your WordPress website, then teach you three ways to do it. Let’s take it from the top!
When It’s a Good Idea to Reset Your WordPress Website
Everything that happens on your WordPress website gets recorded into its database. Resetting your website, therefore, is akin to cleaning out all of the records in the database – which means you get to start with a clean slate.
It’s not actually common to reset your WordPress website. However, there are plenty of situations where it’s warranted, for example:
- You want to rebuild or repurpose your website. If you want to pull the plug on one of your sites, you can still use the installation for a new project.
- If you can’t access your website and want to restore it from a backup. In some cases, you may get locked out of WordPress due to an error or a security breach. To fix things, you can roll your installation back to an earlier state, but you’ll need to access it first – something you can do after resetting it.
- To clean up a test installation. If you regularly use either local or online WordPress setups for testing purposes, you’ll want to clean up after your experiments by resetting your setup.
In any case, it’s always a good idea to create a backup of your website before resetting it, even if you’re confident about your decision. You may change your mind at some point, or perhaps need to access some of the information you deleted. If that happens, you’ll be glad to have a backup ready. Although to be fair, you should already have multiple backups of it, unless you like to live on the edge!
How to Reset Your WordPress Website Using the Advanced WordPress Reset Plugin

Despite what its name would imply, plugins don’t get much easier to use than Advanced WordPress Reset. As you recall, we talked about how resetting your website equals wiping its database clean, and that’s exactly what this tool does.
What’s more, it’s very quick and easy to use, which is our primary reason for choosing it. To reset your website, install and activate the plugin, then look for the new Advanced WP Reset tab under Tools on your WordPress dashboard:
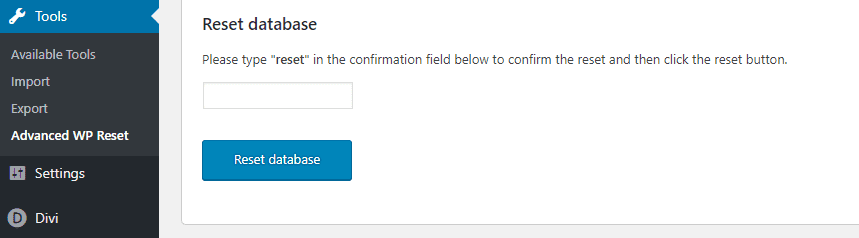
From here, simply type reset into the only field in the page (to avoid accidents) and click on Reset database. You won’t see a confirmation message, but once you click on any of the other tabs on your dashboard, you’ll need to log in again, as your admin user has now been deleted and recreated.
It’s worth noting that this particular tool doesn’t remove your plugins or themes. You’ll need to go through both relevant tabs to deactivate and delete those you don’t want to keep. When that’s done, your website will be back to its original state.
How to Reset Your Website Using the WordPress Command Line (WP-CLI)

If you’re a developer, you’re probably familiar with WP-CLI. It’s a tool that enables you to interact with the platform using the command line via Secure Shell (SSH) access. More importantly, it enables you to carry out complex tasks using simple commands.
For example, WP-CLI users can reset their WordPress websites without having to install a plugin or do the process manually. While we’ll leave the installation to our previous piece (as it can be complex), once you’re ready, you’ll only need to enter the wp reset database command to carry out a reset. Of course, you’ll still need to clean up your plugins and themes as with the last method. However, it’s a great time saver if you’re already a WP-CLI user.
How to Reset Your WordPress Website Manually (In 4 Steps)
Plugins aren’t necessary for resetting your site. In fact, it can be done manually in four short steps. Let’s take a look!
Step #1: Access Your WordPress Database and Delete It
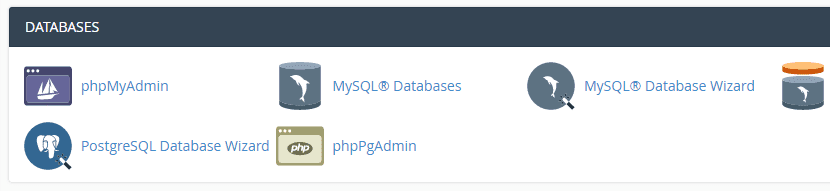
In most cases, your web host will enable you to access your database through your cPanel account (or a similar method). With that in mind, log into your cPanel now and look for the MySQL Databases option under the Databases section:
Click on it, and look for your WordPress database in the list. In most cases, it will start with the wp prefix, although this may change depending on your security practices or your web host’s settings:
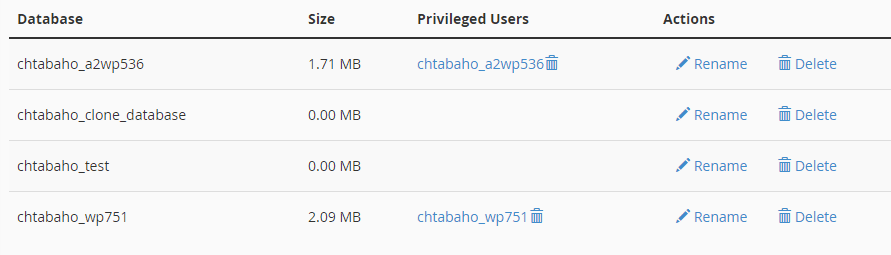
Once you’ve identified your database, take note of its name, then click the Delete button under Actions. However, don’t try to access your site again just yet. We’re going to need to create a new database to replace the old one, and your website won’t work until that’s done.
Step #2: Create a Brand New WordPress Database
At this stage, you should still be within cPanel’s MySQL Databases tool. At the top of the page you’ll see an option to create a new database. Keep in mind that for this to work, you have to use the same name of the database you just deleted (which you hopefully copied earlier!):
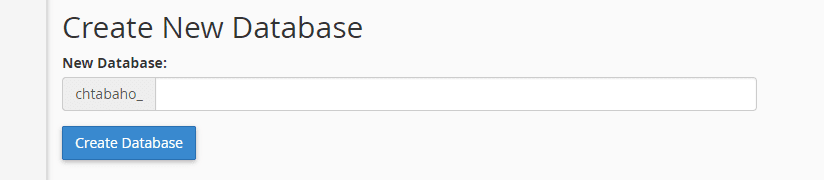
Type it into the relevant field, click on Create Database, and it’ll be added to the main list at the bottom of the page. Now you need to recreate your admin user by scrolling down to the Add User to Database section of the page. There you’ll see two lists: one enabling you to choose from existing users, and another to indicate which database to add them to:
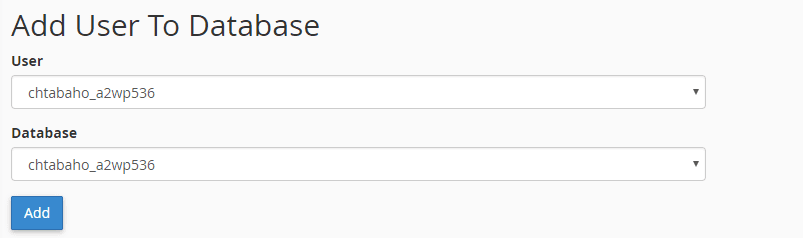
If you can’t find your user here, you’ll need to add it manually to your new database by scrolling up to the Add New User menu:
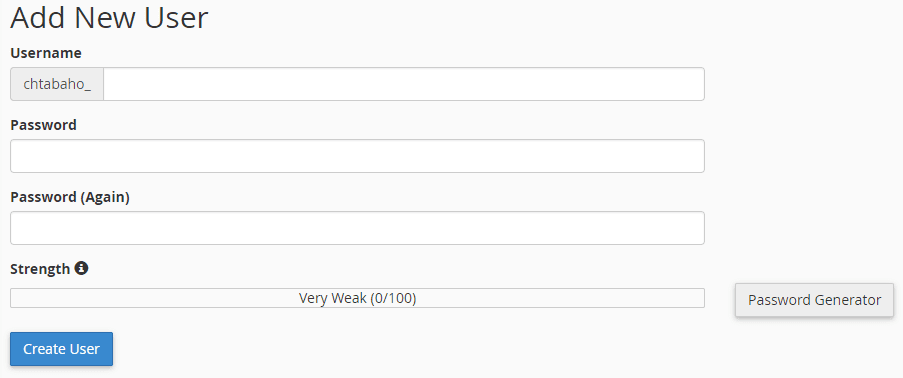
Remember that you need to use the exact same username and password your old database had, otherwise your wp-config.php file won’t recognize the new database. If you’re unsure of your credentials, you can find out by opening wp-config.php using an FTP client, such as FileZilla.
Just log into your website via FTP and access your WordPress root folder, which should be called either public_html, www, or named after your site. Inside you’ll find the wp-config.php file. Right-click on it and choose the View/Edit option:
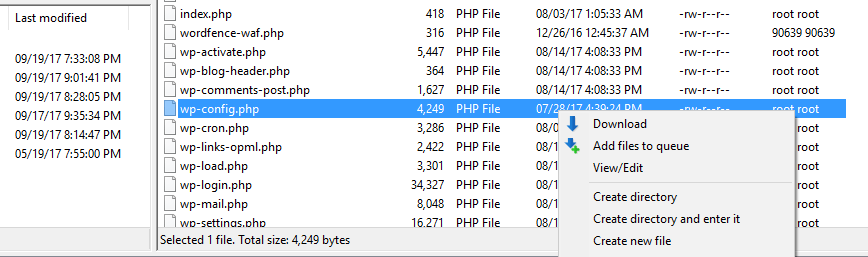
This will open the file using your default text editor. Don’t change anything once you’re in, just look for your database’s username and password. If you have problems finding them, look for the comment that reads /* * MySQL Database Username * / (both values will be right below). Once you have them, return to your cPanel and use the credentials to recreate your old admin user.
Your database should now be ready, but we still have one step to go before you can enjoy your ‘brand new’ WordPress website.
Step #3: Delete Any Leftover Files on Your Website Via FTP
Similarly to the first two methods, creating a new database doesn’t delete your WordPress plugins and themes. To do that, you’ll have to remove the files manually, and we recommend using FTP for this step.
Return to your WordPress root folder and look for the wp-content directory. The three folders we’re looking for are inside – plugins, themes, and uploads:

You can safely delete all of them except for themes. Here, you’ll want to leave at least one theme folder inside, so WordPress can load it in a moment. When you’re done, pat yourself on the back. The hard work is done, and all that’s left now is to inaugurate your site.
Step #4: Execute the WordPress Installation Script
The WordPress installation script enables you to configure your WordPress setup through your browser. To run it, you’ll have to append /wp-admin/install.php to your site’s primary URL.
That will execute the script, which will ask you to fill in a few simple details such as your site’s language, and your admin credentials. This step is critical if you want your website to work, since the database we created earlier is still bare. If you don’t run the installer, it won’t have the tables it needs for you to use WordPress.
After the installation process is complete, you’ll be able to log into your dashboard as normal and get back to working on your website.
Conclusion
Resetting your WordPress website is a drastic move, but it’s often your best option. For example, if you want to repurpose your site entirely, it makes sense to start over with a blank slate. If you keep a local website around for testing purposes, it’s also smart to reset it now and then. That way, you’re working within a clean environment.
The easiest way to reset your website is by using a plugin such as Advanced WordPress Reset. However, you can also do it manually following these steps:
- Access your WordPress database and delete it.
- Create a brand new WordPress database.
- Delete any leftover files on your website via FTP.
- Execute the WordPress installation script.
Do you have any questions about how to reset your WordPress website? Ask away in the comments section below!
Article thumbnail image by Nakigitsune-sama / shutterstock.com.
The post How to Reset Your WordPress Website (And Why You’d Want To) appeared first on Elegant Themes Blog.