
Setting up a Secure Socket Layer (SSL) certificate for your website is easier than ever. However, in some cases, you’ll go through the entire process only to run into a ‘mixed content’ error in WordPress once the certificate is set up.
This particular error occurs when there’s a problem with your HTTPS/SSL configuration. More specifically, it happens when WordPress doesn’t load all your content via HTTPS, hence the ‘mixed content’ part. In this article, we’ll talk more about how the WordPress mixed content error works and what causes it. We’ll then show you two ways to fix it.
Let’s get to work!
What the WordPress Mixed Content Error Is (And What Causes It)
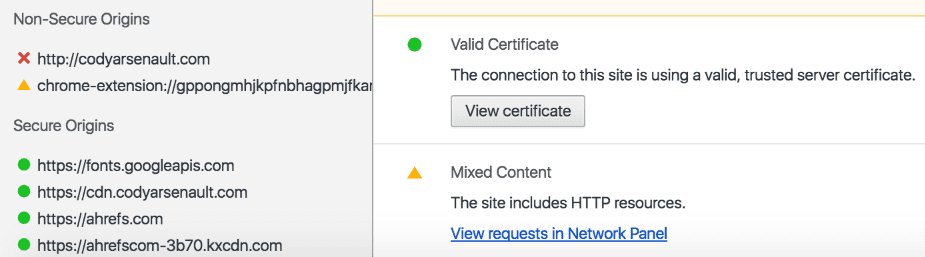
The mixed content error appears due to an error with your SSL configuration.
We’ve talked a lot about SSL certificates and HTTPS in the past, and there are several types of SSL certificates you can get for your website. This tells the world your website is not compromised and that any information users give you will be safe. However, after enabling HTTPS for your site, you might come across an error, known as the WordPress ‘mixed content’ error.
This can occur when your site serves some, but not all, of its contents using the protocol. Most commonly, this content will include your images or scripts. Since your site uses ‘mixed’ resources, it will cause this error to occur. If this happens, your website won’t display the green padlock symbol to users, and make your site appear unsecured.
It’s easy enough to find out which of your website’s assets are still loading via HTTP. For example, if you’re using Chrome, you can right-click on the page and use the Inspect option:
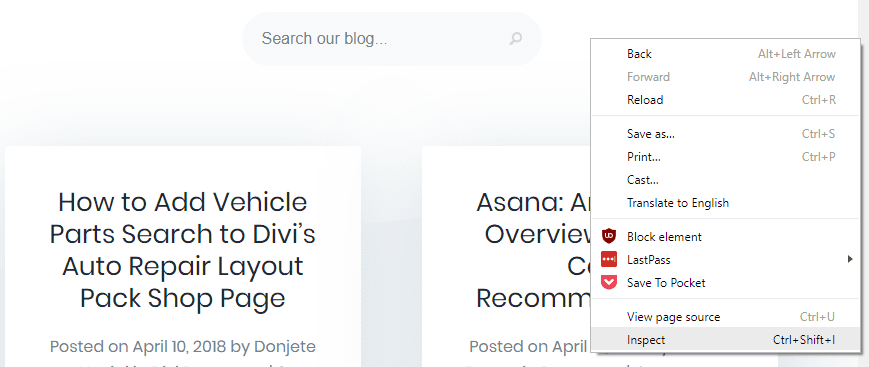
Now you can use the search feature within Chrome Dev Tools to look for the following string – src=”http. This will help you locate any content that uses HTTP rather than HTTPS. Once you’ve found the content that’s still loading via HTTP, there are two simple ways to fix the problem.
2 Ways to Fix the WordPress Mixed Content Error
There are plenty of ways to tackle this particular error. For example, plugins like SSL Insecure Content Fixer tend to work rather well, but we’re partial to a more manual approach when it comes to HTTPS. With that in mind, let’s talk about two ways to can fix this problem manually.
1. Force WordPress to Redirect All Traffic Through HTTPS
For this step, we’re assuming you already configured WordPress to use HTTPS through your dashboard. In case you haven’t, you can do so by going to the Settings > General tab. Once you’re in, look for the WordPress Address (URL) and Site Address (URL) fields:

You want to make sure your site’s URL uses HTTPS instead of HTTP on both these fields. This step is enough if you’re starting a new website. However, if you’re adding SSL to an existing property, you’ll need to set up redirects using .htaccess, so your existing content doesn’t continue to load over HTTP.
To do this, you’ll need to access your .htaccess file (pardon the pun) via FTP. We recommend using FileZilla if you don’t have an FTP client set up already. Once you log into your website via FTP, navigate to the public_html or root directory and look for the .htaccess file within. Right-click on it and choose the option that says View/Edit, which will open the file using your default text editor. Usually, a clean .htaccess file should look like this:
# BEGIN WordPress
<IfModule mod_rewrite.c>
RewriteEngine On
RewriteBase /
RewriteRule ^index\.php$ - [L]
RewriteCond %{REQUEST_FILENAME} !-f
RewriteCond %{REQUEST_FILENAME} !-d
RewriteRule . /index.php [L]
</IfModule>
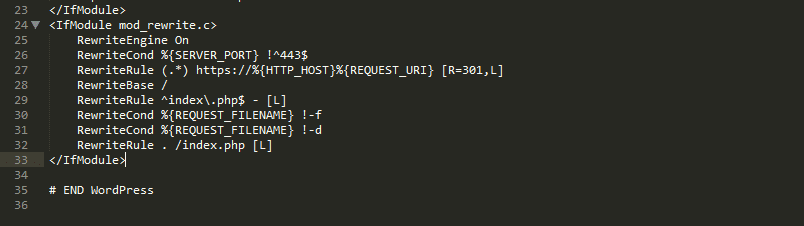
# END WordPress What we’re going to do now is rewrite that code so when someone tries to access your website via a port that isn’t 403, the content they want to see will be loaded through HTTPS. Port 443 is the default for SSL traffic, so redirecting all other options takes care of all our problems.
# BEGIN WordPress
<IfModule mod_rewrite.c>
    RewriteEngine On
    RewriteCond %{SERVER_PORT} !^443$
    RewriteRule (.*) https://%{HTTP_HOST}%{REQUEST_URI} [R=301,L]
    RewriteBase /
    RewriteRule ^index\.php$ - [L]
    RewriteCond %{REQUEST_FILENAME} !-f
    RewriteCond %{REQUEST_FILENAME} !-d
    RewriteRule . /index.php [L]
</IfModule>

# END WordPress
This snippet uses a 301 or permanent redirect for all traffic that isn’t routed through port 443. Using this type of redirect ensures the changes to your URL structure don’t affect your Search Engine Optimization (SEO), which is key for established websites.
Keep in mind – some web hosts make changes to your .htaccess file out of the box to implement advanced features, such as browser caching. That means your file might include more code than the default WordPress snippet. In those cases, you’ll want to download a copy of the original .htaccess file as a kind of backup, which you can do by right-clicking on it and using the Download option within FileZilla.
Once you have your backup, add the code we provided you with before the line that reads #END WordPress. Just make sure it doesn’t interfere with other code within the file by making sure to paste it after the last </IfModule> tag you see, like this:
Now, save the changes to .htaccess and close the file. FileZilla will ask you if you want to update the version of the file on your server with the one you just edited. Answer yes and try loading your website again. If everything’s worked, you should no longer see the mixed content error.
You might still run into the error if you’re using a caching plugin. If that’s the case, make sure you empty your website’s cache and try loading your website once more.
2. Configure Your CDN to Load Your Static Content Over HTTPS
In some cases, using a CDN can trigger the WordPress mixed content error. This can happen when you set up an SSL certificate for a website that already has a working CDN. In this case, you’ll need to update your CDN’s settings to avoid any such errors.
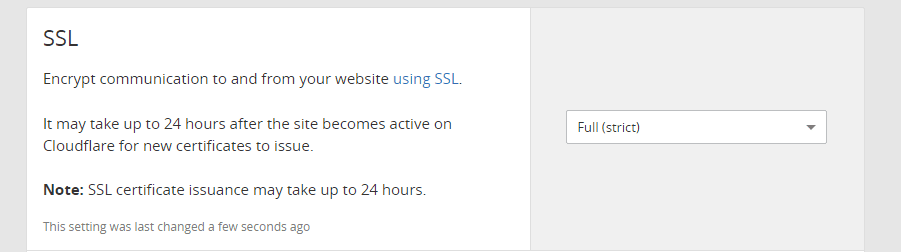
For example, let’s look at Cloudflare. If you’re using this service to cache your WordPress website, you need to head to your Cloudflare dashboard and look for the SSL settings section. Here you’ll find a drop-down menu enabling you to check how Cloudflare handles encrypted content. We recommend choosing the Full (strict) setting since that way, the connection between your visitors and Cloudflare will be encrypted, as well as from the CDN to your server:
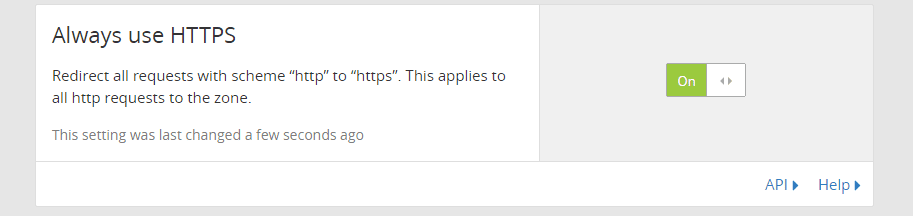
Once your CDN is configured to work with SSL. You’ll also need to make sure all the content it caches loads over HTTPS. With Cloudflare you can do that by enabling the Always use HTTPS setting on the CDN’s dashboard:
Save the changes to your settings now and reload your website, at which point the error should no longer disappear. This process can will differ depending on which CDN you use, but you should be able to find more information on how to configure SSL in your CDN’s knowledge base.
Conclusion
Running into the WordPress mixed content error doesn’t mean your SSL certificate isn’t working. It just points towards an error in the way WordPress uses the HTTPS protocol, which can be easily fixed. Failing to do so may cause your website to be hit with some SEO penalties, so it’s something you should take care of right away.
There are two ways you can tackle this issue, depending on whether you’re using a CDN or not:
- Configure your .htaccess file so WordPress redirects all its traffic through HTTPS.
- Tweak your CDN’s settings so it loads static content over HTTPS.
Do you have any questions about how to force WordPress to serve your content through HTTPS? Let’s talk about them in the comments section below!
Article thumbnail image by Zhitkov Boris / shutterstock.com
The post 2 Ways to Fix the WordPress Mixed Content Error appeared first on Elegant Themes Blog.