
Anchor links can improve navigation and help organize your content, especially on a website with long-form content. One of the other main benefits of using anchor links other than navigation is the fact that they are awesome for SEO. While the concept of using anchor links is very simple, it can be hard to know where to start. It’s actually one of the first things I went hunting for when I got started developing WordPress websites.
This article shows you 5 cool things you can do in Divi with anchor links. For these examples, all you need is Divi and a desire to learn.
Let’s go!
What You’ll Learn how to:
- Scroll to and Open a Toggle with an Anchor Link in Divi
- Create a One Page Navigational Menu
- Jump to a Page Section from Another Page
- Use the Divi Dot Navigation
- Add Anchor Links to Your Headings
Scroll to and Open a Toggle with an Anchor Link in Divi

Toggles are one of those elements that can enhance user experience. Call me lazy (I’d use the word efficient) but the easier it is for me to get my information, the better. I’m a big fan of toggles for certain types of content.
One of the best uses I’ve seen for toggles are for FAQ pages. They work great for revealing small bits of information that the user wants to focus on. This will only take a minute and a few lines of JavaScript to complete. You can also use a variation of this method to open tabs or accordions and while this may seem difficult, it’s really not too complex.
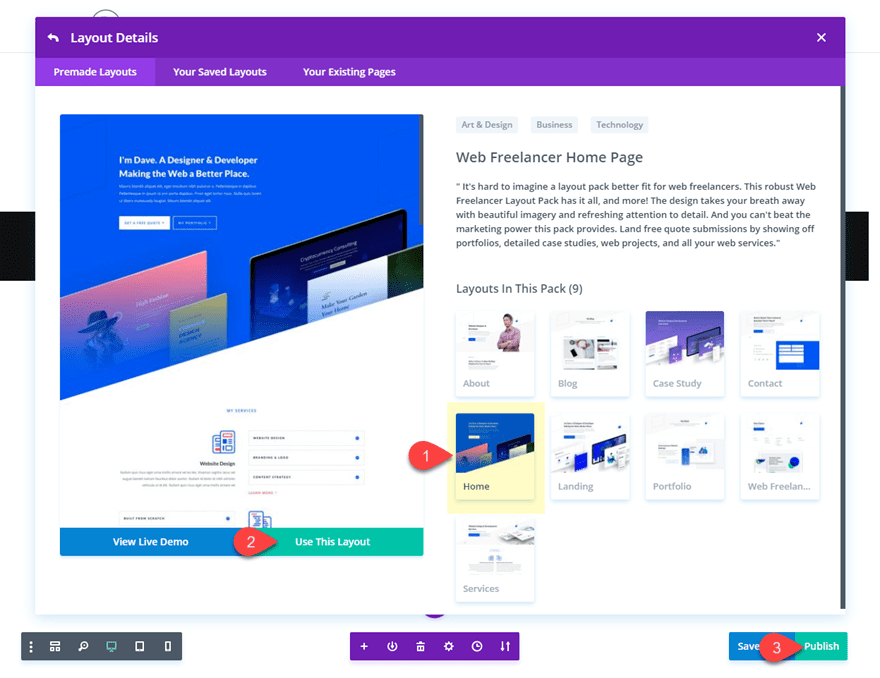
First, create a new page and deploy the visual builder. Then select the option “Choose a Premade Layout”. In the Load from Library popup, find the Accountant FAQ page layout by typing “faq” in the search bar. Then click on the layout and on the preview that comes up click the Use This Layout button to deploy it to your page.
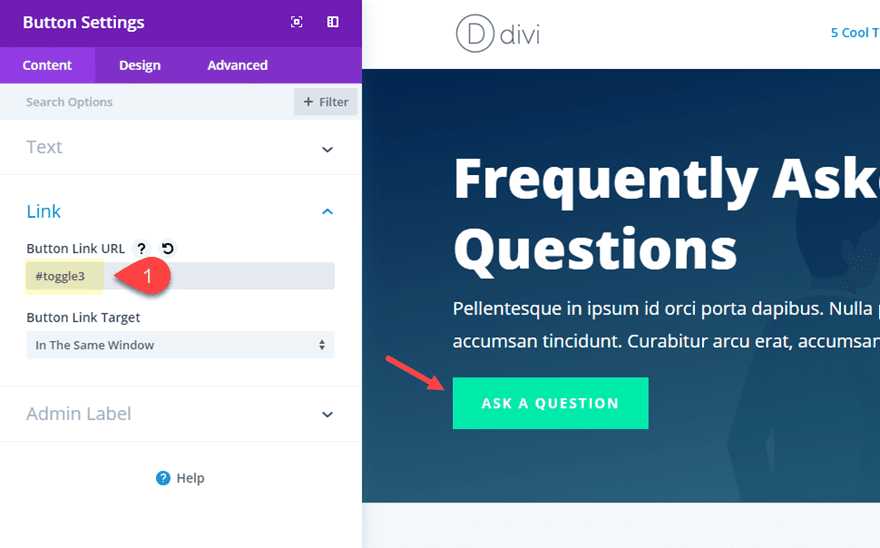
Now you are ready to add your anchor link functionality. For this example, I’m going to use the button in the top header section as the anchor link so that, when clicked, the page will scroll to a specific toggle which will simultaneouisly open automatically.
To do this, first open the button settings and add the following link URL for your button:
Button Link URL: #toggle3
I gave this anchor link the id “toggle3” to help remember that I want to link to the third toggle on the page. This id name will correlate to the toggle CSS ID we will add later so that the button knows to what toggle to scroll.
Next add a unique CSS Class to the button module:
CSS Class: open-toggle
Then save your settings.
This class name helps remind you of the action of the toggle opening when clicking the button. We will use this class in our custom jqeury to get the desired functionality in a little bit.
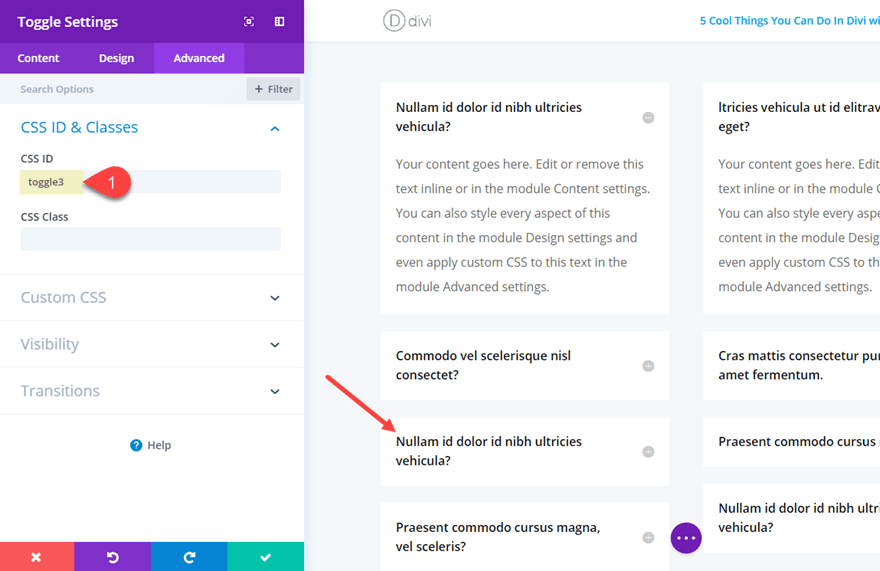
Next scroll down the page to the row containing the two columns of toggle modules that are being used for the FAQs. Open the setting of the third toggle module in the first column. This is the module we want to scroll to and open when clicking the Button (or anchor link).
Under the Advance Tab, add the following CSS ID:
CSS ID: toggle3
It is important that this exactly correlates to the button link url used earlier. The only different here is that you must leave out the “#”.
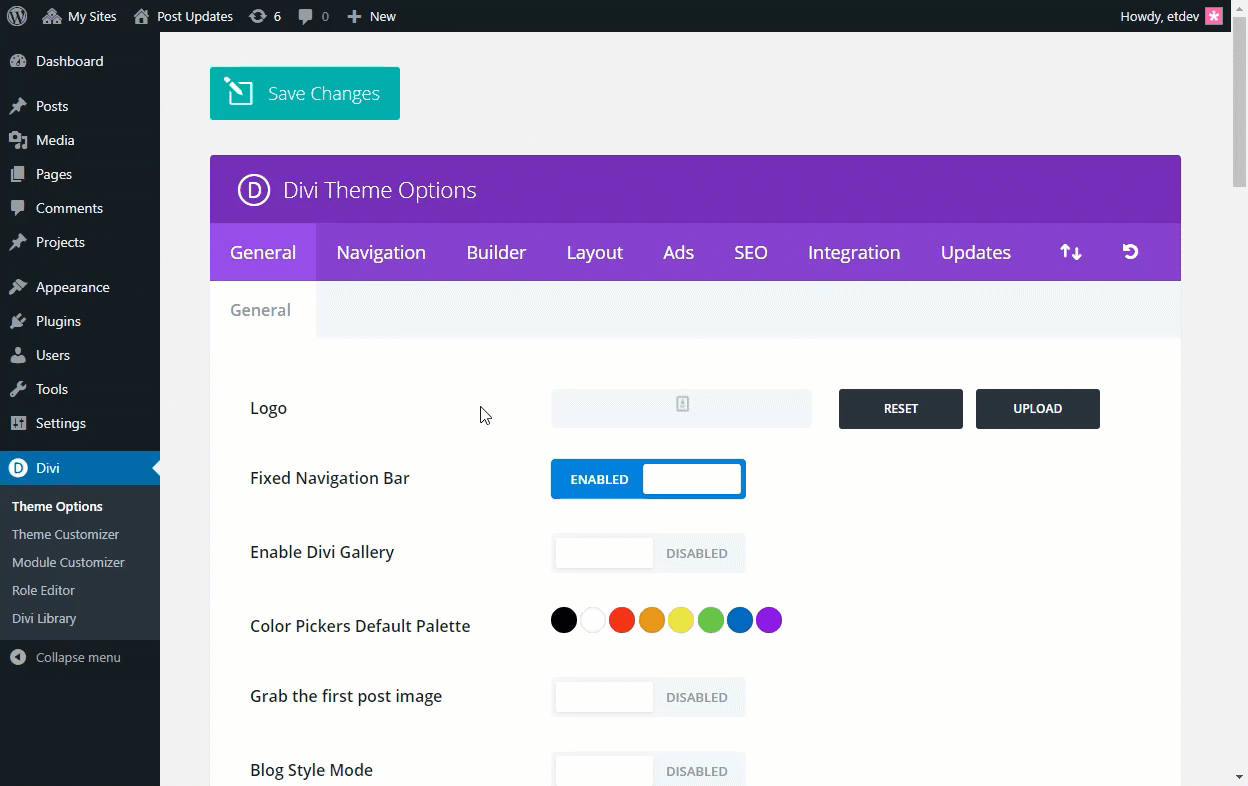
The last step involves adding some custom code to the body of our page. To do that, navigate to the Divi Theme Options, and open the Integration Tab then paste the following into the body section as shown in the GIF below.
jQuery(function ($) {
    //open toggle on button click
	$('a.open-toggle').on('click', function(event){
        $('#toggle3.et_pb_toggle_2 .et_pb_toggle_title').click();
	});
});
Don’t forget to wrap the code in the proper script tag.
Now you can test out your page to see if it works.
To understand a little about what this code is doing. Let’s take a closer look. Here is the snippet again:
jQuery(function ($) {
    //open toggle on button click
	$('a.open-toggle').on('click', function(event){
        $('#toggle3.et_pb_toggle_2 .et_pb_toggle_title').click();
	});
});
In the code, the selector “a.open-toggle” refers to the button with our custom class. The selector “#toggle3.et_pb_toggle_2 .et_pb_toggle_title” refers to the the title of the the toggle with the id “toggle3” and the class “et_pb_toggle_2”.
The class “et_pb_toggle_2” is actually the class associated with the third toggle. That is because Divi gives the first toggle the class “et-pb_toggle_0”, the second toggle “et-pb_toggle_1”, and so on.
So if you want to know what the class is for a particular toggle on your page, you can simply count from 0 starting with the first toggle on the page and work your way down. Or you can always just inspect the html code to find the class that way.
This is important to know so that you can update your code accordingly. For example, if I wanted my button to open the second toggle on the page, I would replace “#toggle3.et_pb_toggle_2 .et_pb_toggle_title” with “#toggle3.et_pb_toggle_1 .et_pb_toggle_title”.
This code snippet is a variation of the following concept. I tried to keep it as simple as possible.
This cool technique would also work for tabs and accordions. The trick is to identify the right css classes for the accordion item or tab so that you can use it in the code.
Create a One Page Navigational Menu
This sort of menu design is popular for one page sites. It can be useful to create links in the menu to jump from section to section on your page. This is especially helpful if you are building a one page site, or a landing page. You can check out the documentation on how to create one-page websites with Divi for more info on this process.
Here is a quick overview on how to do this.
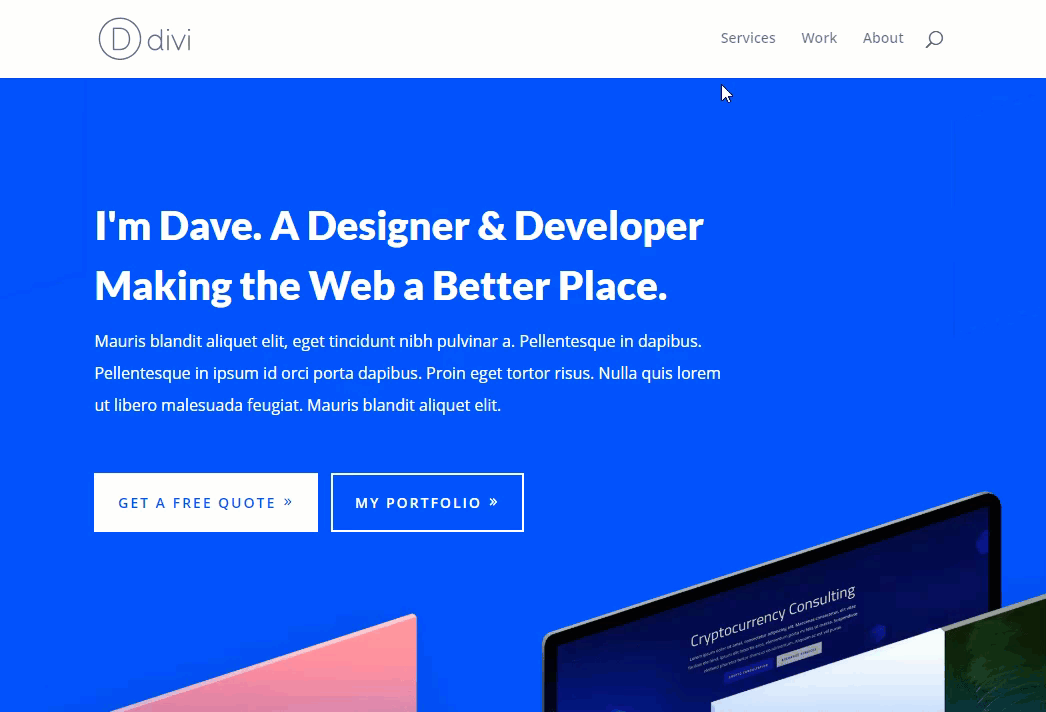
This will work for any premade layout, but for this example, I’m going to use the Web Freelancer Home Page Layout. Create a new page, deploy the visual builder, select “Choose Premade Layout”, and then deploy the Freelancer Home Page Layout to your page.
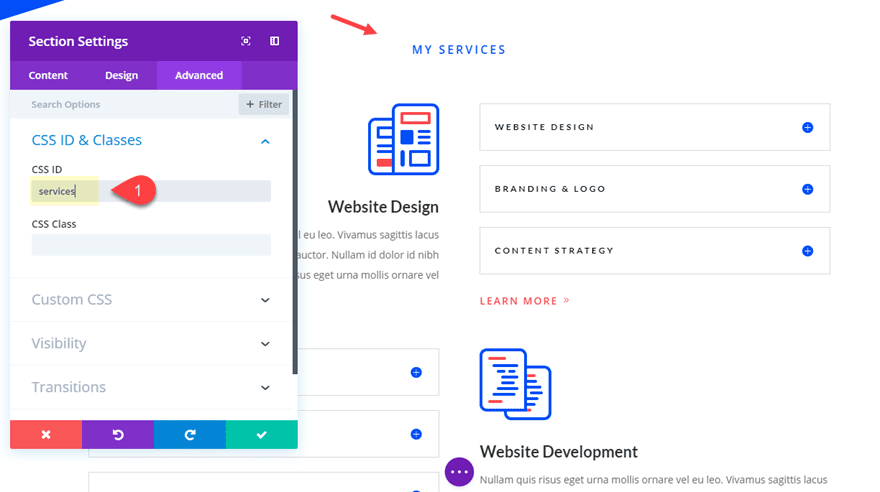
Now you need to add CSS IDs to each section that you will want to link (or scroll) to. Find the section titled “My Services”. Open the section settings, click the advanced tab, and add the following CSS ID:
CSS ID: services
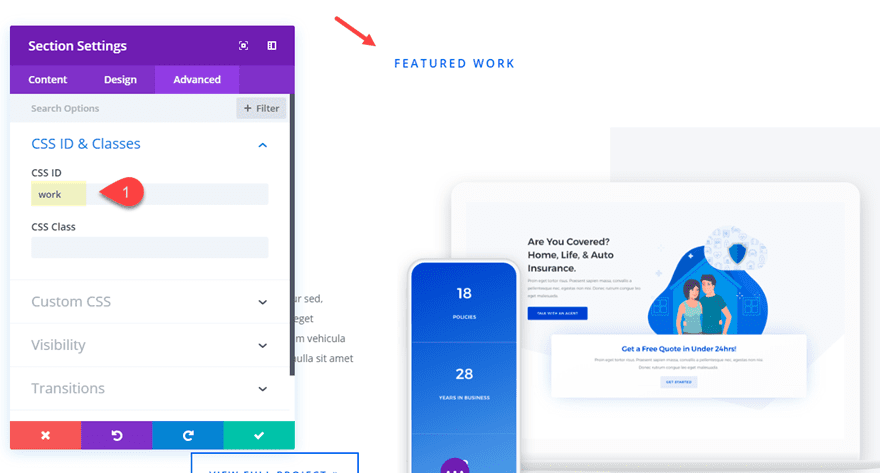
Next, find the “featured work” section and give that section a CSS ID as follows:
CSS ID: work
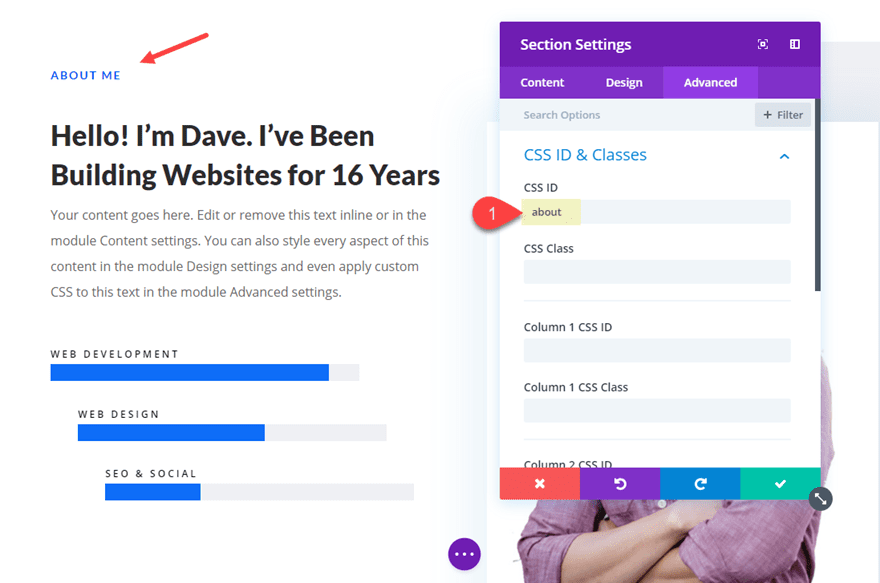
And add the following CSS ID to the “About Us” section as well:
CSS ID: about
With these three sections properly setup with their unique CSS IDs, we can know create our menu anchor links.
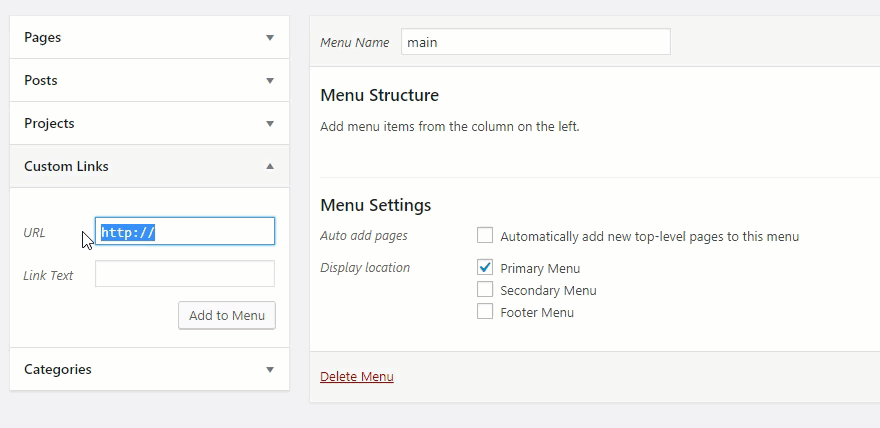
From the Dashboard, navigate to Appearance > Menus and create a new Primary Menu. Then Create three custom links with the following URL and Link Text:
Custom Link 1
URL: #services
Link Text: Services
Custom Link 2
URL: #work
Link Text: Work
Custom Link 3
URL: #about
Link Text: About
Here is the final result. Notice the smooth scrolling magic when clicking the anchor links in the navigation menu.
Don’t forget to select set your display location to Primary Menu. Then save your menu.
Now when you visit your page you can try it out. You may notice that there is smooth scrolling. This is because the Divi theme automatically adds smooth scrolling – this feature was added in Divi version 2.4.
For a more inspiration on building killer one page style websites, check out these posts:
- How to Build a Responsive Fixed Sidebar With Anchor Links
- How to Create Full Screen Sections with Top and Bottom Scroll Links with Divi
- How to Create Active Links on Scroll for One-Page Divi Websites
Jump to a Page Section from Another Page
We can use the example from above to demonstrate this. Since we added a CSS ID to three sections on the page (services, work, about), not only can we jump to those section using our menu anchor links, but we can also jump to those sections from a completely different page.
All you need to do is use the URL of the anchor link when created a link on a different page. If you wanted to put a link to the services section with the ID “services”, it would look something like, www.yourdomain.com/page/#services.
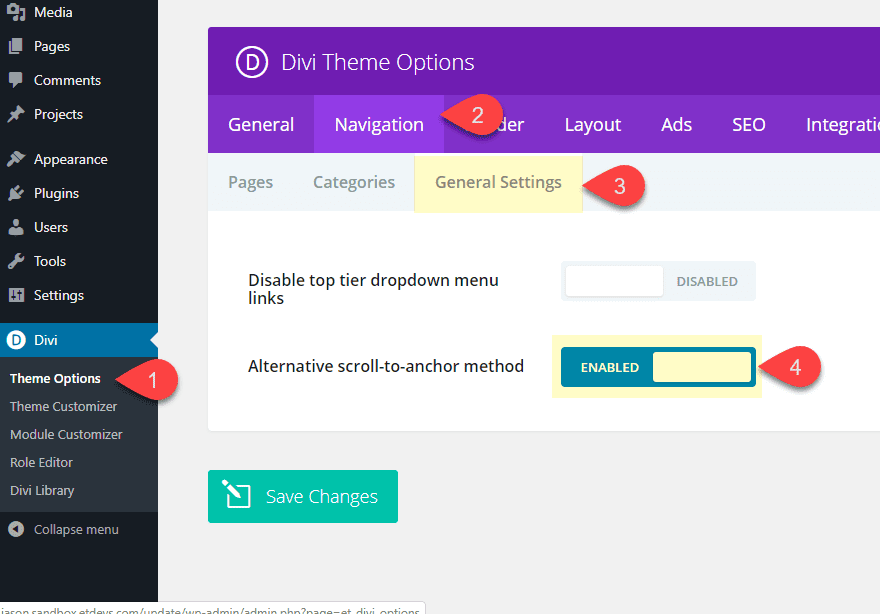
In order to make sure the page scrolls to the correct location when jumping from a different page, you may need to enable the “Alternative scroll-to-anchor method” option under Divi > Theme Options > Navigation > General Settings.
Here is an example of how the page will load and scroll to the “My Services” section when linking to that section from another page.
This works great for many different calls to action (i.e. learn more, get Divi, vote for me!, etc.) that you may want to jump to from different pages of your site.
Use the Divi Dot Navigation
Technically these are built-in anchor links. You won’t need to add your own CSS section ids. The Dot Navigation feature automatically creates anchor links out of your sections. To turn on dot navigation for your page, simply set the Dot Navigation option to “ON” under the Divi Page Settings at the top right of the screen when editing your page. Once you turn on Dot Navigation, Divi automatically adds a transparent menu on the side your page. Each dot scrolls to the sections throughout your page when clicked.

For more info, there is a great post on how to add labels to your dot navigation.
Add Anchor Links to Your Headings
Adding anchor links to your headings is always a good idea. It is a great way for indexing longer pages with a lot of content, allowing you to easily navigate to each heading within the same page or to create links to these headings from other pages on your website. It also helps search engines crawl your site.
To add a CSS ID to your headers using the Divi Builder, open the module containing your heading text. Make sure you have the text tab open. Find the header tag (h1, h2, h3, etc…) and then enter an id within the brackets of the beginning header tag. Here is an example of an h3 heading with the id “webdesign”:
<h3 id="webdesign">Website Design</h3>
Now I can link to this header from anywhere as long as I use the correct anchor link URL. Which for this example should look something like this:
www.yourdomain.com/page/#webdesign
This will also come in handy for pages or posts that aren’t using the Divi builder. To add Anchor Links to your headings for these pages or posts, open up the Text tab in the WordPress text editor. Simply locate the heading of your choice and add the id inside the heading tag as shown below.

This is exactly what I did for this post. The section links at the top of this post serve as a nice table of contents that link to the different headings on the post.
Pretty cool stuff.
Wrapping Up
Anchor links have a few great practical uses, but don’t go too crazy with them because you must always first consider your audience and your goals. Remember, good design is about usability and function so, in some instances anchor links can be very helpful. But in others, it just means users zap back and forth over the parallax sections and wind up getting lost. Hopefully, you were able to get some useful tips from this post.
Do you have any tips or questions about anchor links? Let us know about your experiences in the comment section below.
The post 5 Cool Things You Can Do In Divi with Anchor Links appeared first on Elegant Themes Blog.