
Divi Quick Actions can be a valuable asset to your design workflow. Quick Actions make it easy to find anything you need and perform Divi Builder tasks from one convenient location. And as the name suggests, you can perform actions quickly, which definitely improves the efficiency of designing a website in Divi.
In this tutorial, I’m going to give seven tips for using Divi Quick Actions that will make you more efficient at building a website in Divi.
Why You Should Consider Using Quick Actions
One main reason you should consider using Quick Actions is to make you a more efficient Divi user. The time you can save by avoiding a few clicks to do one task may not seem worth it. But when you combine those savings over the entire process of building a Divi site, you can shave significant time off of your workflow. Plus, there is something very convenient about having one place to find what you need. Even Divi experts will forget where something is and have to interrupt their workflow with a distracting search for a specific option or setting that needs to be updated. But with quick actions, there is a certain comfort that comes with being able to type in what you need on the fly without having to leave your page.
Divi Quick Actions is a feature that is available in Divi as a helpful optimization and design tool. But like any tool, it takes a little time to get used to using it. Of course, you don’t have to use it. It’s not like you can’t build a website easily without quick actions. You certainly can. However, you may find that taking a few moments to explore how quick actions work may open your eyes to a few valuable ways to simplify your workflow and boost productivity.
Now let’s get to those tips.
Tip #1: Label your Divi Elements for “Go To” Commands
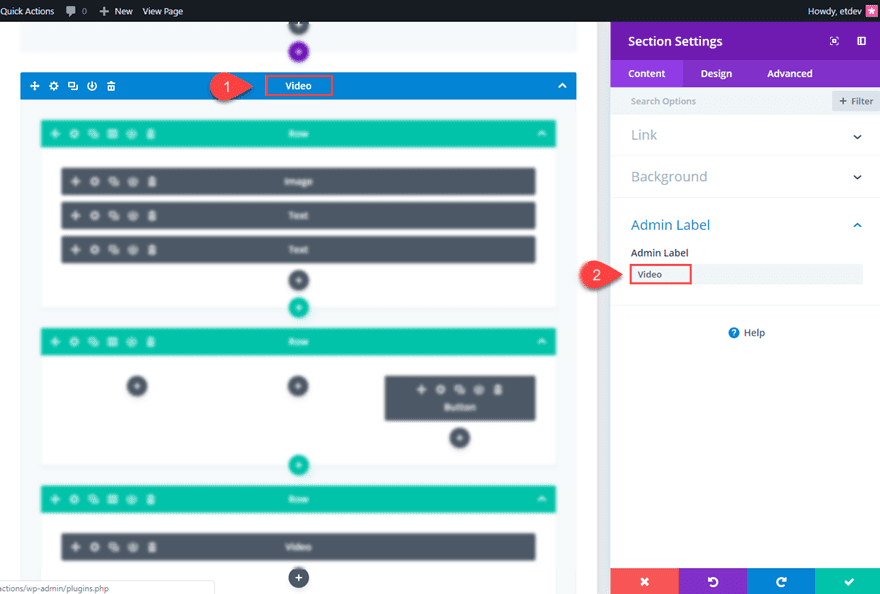
Admin labels have always been an integral part of Divi. Before the days of the Visual Builder, admins relied on these labels to identify Divi elements when using the Divi Builder. Yet, even with the ability to build on the front end (visually), admin labels are still valuable. Just like before, admin labels still help you (or your client) readily identify elements in wireframe view. You don’t want to have to guess where a section is when toggling from desktop view to wireframe view. But there is another good reason to label your Divi Elements. Divi’s quick action menu has a “go to” command that will allow you to quickly search for and jump to any element on the page. And if you have your elements labeled, you can easily identify the element you wish to “go to”.
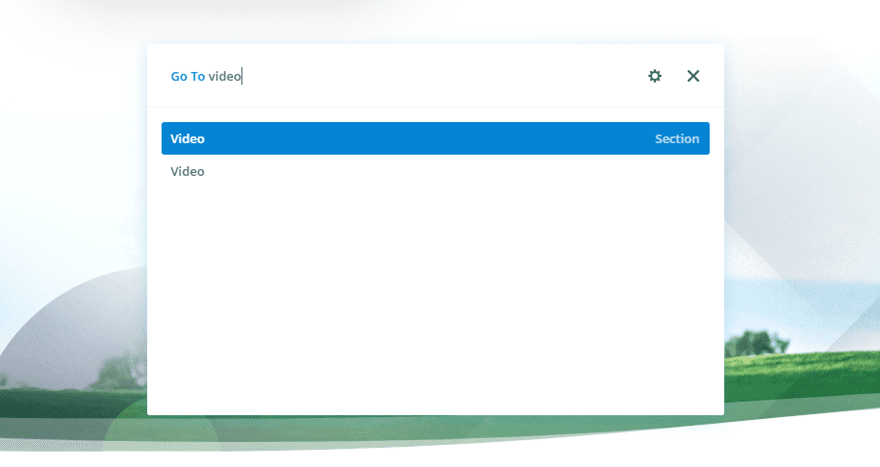
For example, let’s say you have a section of your page with a video, you can label that section “video” easily either by typing the label “video” inline directly from the wireframe view or by filling in the admin label in the settings modal.
With the label in place, deploy the quick actions menu and type “go to video”. Divi will automatically jump to that section and open the settings modal.

You may have already incorporated admin labels into your workflow. If so, now you have an easy way to find that labeled element in a flash.
This especially comes in handy when you have long page content.
Tip #2: Inserting New Divi Elements with the Insert Command

This is perhaps one of the quick actions that is most intuitive and easy to implement to your workflow. To utilize the Insert command, all you need to do is deploy the quick action menu and type “insert” followed by whatever element you want to insert. This is especially helpful for inserting new modules since the traditional method requires you to search for the module. For example, if you want to add a text module, traditionally you would click the gray plus icon, search for the module (by scrolling or using the search bar), then select the module.
With quick actions, all you need to do is type “insert text” and press enter. Then you can place the module anywhere you want on the page using the intuitive hover indication.
Bonus Tip
Actually, since the insert command is the first on the list when you deploy the quick action menu, technically all you need to do to insert a blurb module is deploy the quick action menu, click enter (this selects the insert command), and then type “blurb” and press enter again.
Another Bonus tip: Optimize Search Settings
If you find yourself using the “insert” command more and more, you can speed up the quick action search even more by optimizing the quick action search setting to always start the search with the “insert” command.
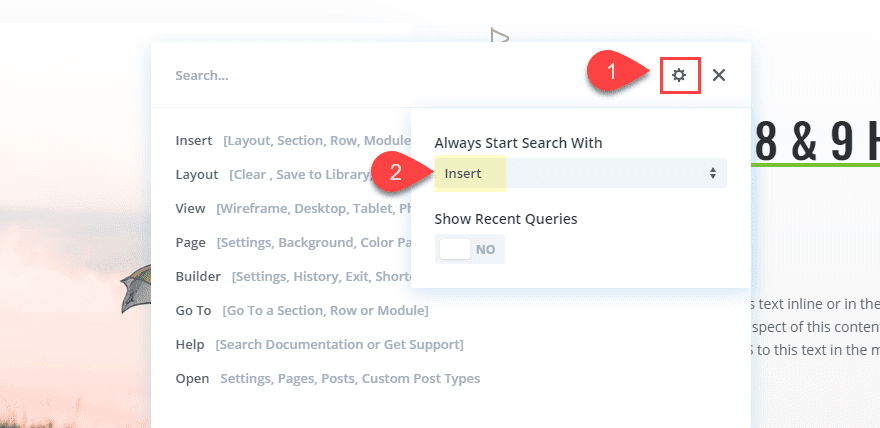
This way all you need to do is deploy the quick action menu and type “text” since the Insert command will already be there.

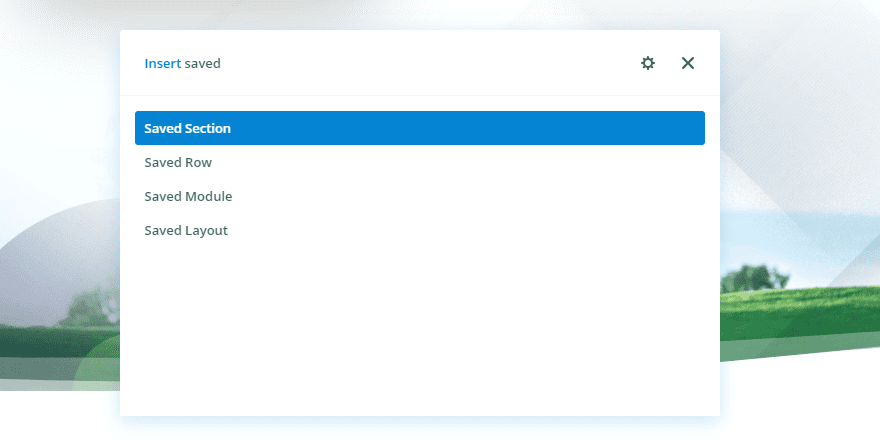
Tip #3: Insert Saved Elements from your Divi Library
With the quick actions Insert Command you can add any saved element from your Divi Library. This includes saved sections, rows, module, or layouts.
Simply type “Insert Saved” follow by the type of element you are wanting to add (section, row, module, or layout).
This is a useful feature, but if you have a large number of saved elements, you may need to think about a more categorized naming system to help speed up the search.
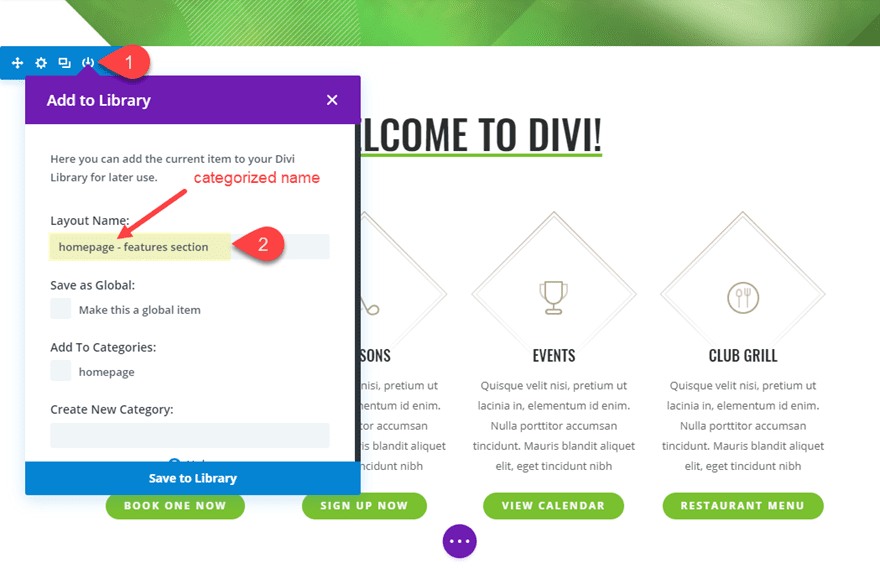
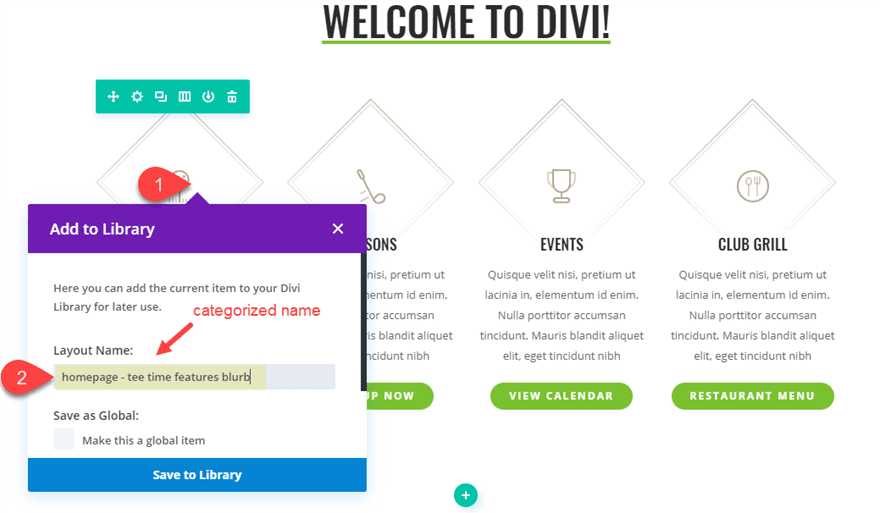
Organize your Library Items with Categorized Names
If you have a good number of saved items in your Divi library, inserting them to your page (even with quick actions) could be more time consuming than it needs to be. After all, you can easily forget the exact name of a specific module, row, or section. One way to find your saved elements more quickly using quick actions, is to purposeful give each element a categorized name when saving it to your library. This is different from assigning a category to your saved element. For example, if I want to save elements of my homepage to the Divi Library, I could categorize the name of each element by inserting “homepage” at the beginning of the name. So if I was saving a section of blurbs showcasing features on the homepage, I would give the following name to the section when saving it to the library.
“homepage – features section”
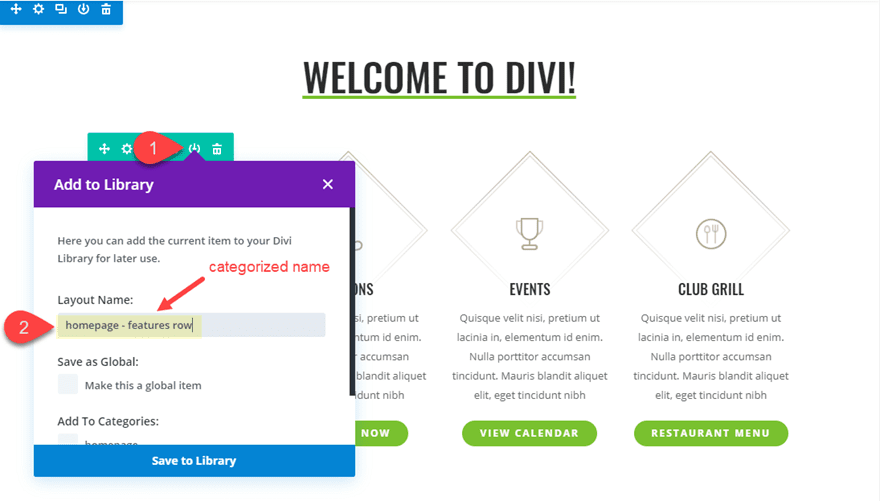
If I wanted to save a row of feature blurbs, I would give it the following name:
“homepage – features row”
If I wanted to save a blurb module showcasing a feature, I would give it the following name:
“homepage – tee time features blurb”
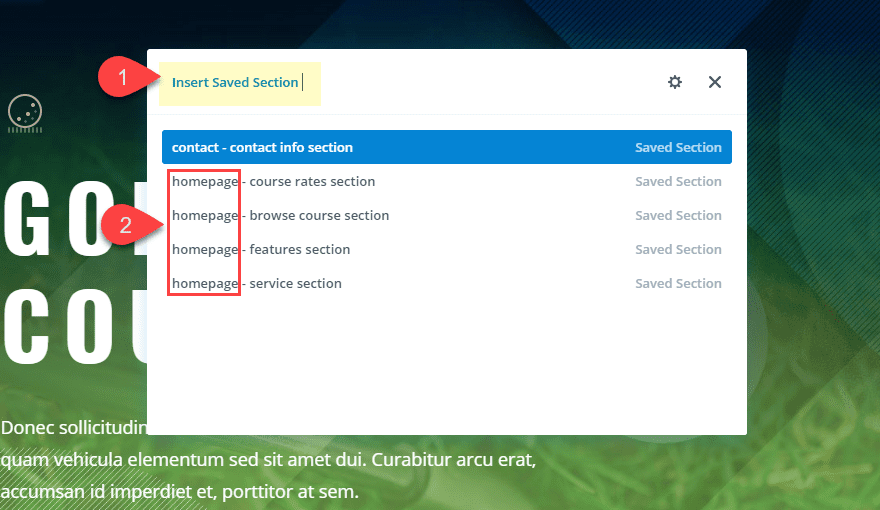
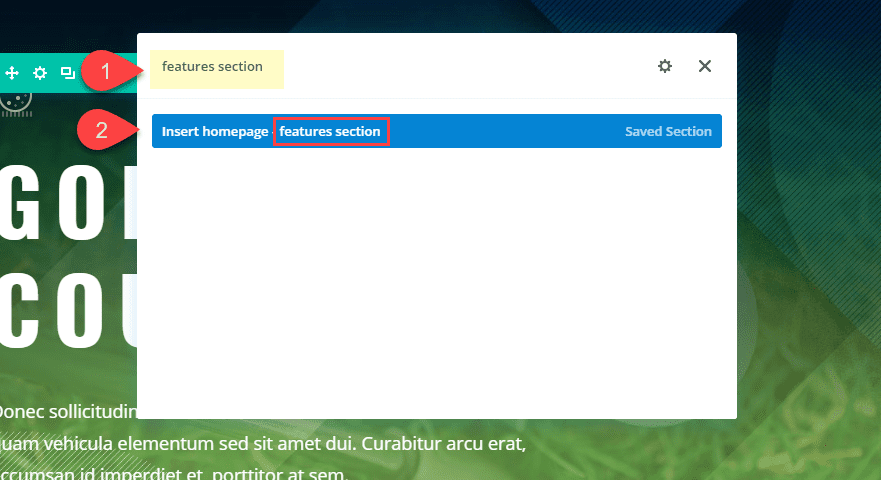
With this naming system in place, you can easily find the saved element you are looking for in a categorized list in the quick action menu. Let’s say you want to add that features section you previously built on your homepage, you can do one of three things.
1) You can deploy the quick actions menu and type “homepage”. This will display the list of saved elements with “homepage” at the beginning of the name. There you can identify the specific section you are looking for with the categorized “homepage” name.
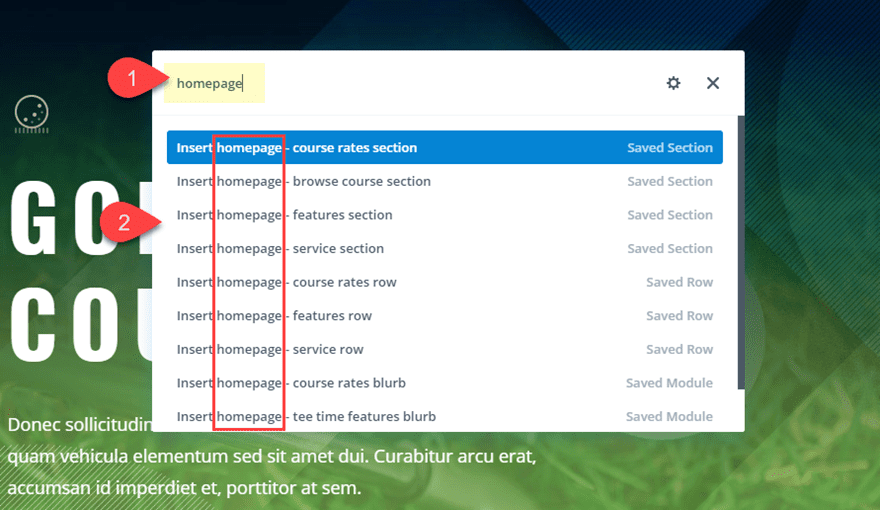
2) You can type “insert saved section” or simply “saved section” to see a list of all your saved sections. There you can identify the one categorized by “homepage”.
3) If you remember the name of the section, you can type that in and save yourself even more time.
Tip #4: Open Pages in Divi Builder with Open Command
The Open command in Quick Actions is useful for opening any page, post, or project that you have created on your website. For example, in the quick action menu, knowing the search command “Open Page” is helpful for bringing up a list of all your existing pages on your website.
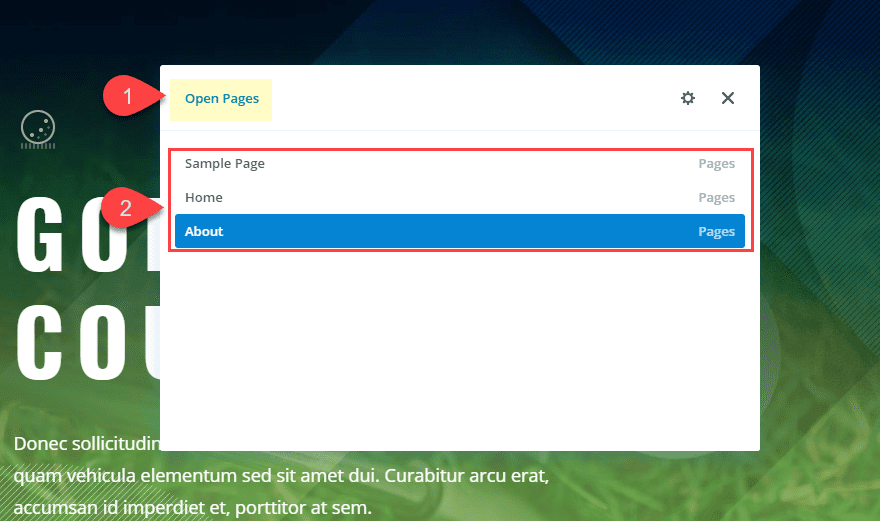
What is great about opening pages from the the quick actions menu is that each page is opened in a new tab with the Divi builder already deployed. This is convenient when you are in web design mode because it allows you to skip some steps that could possibly distract your creativity or strain of thought.
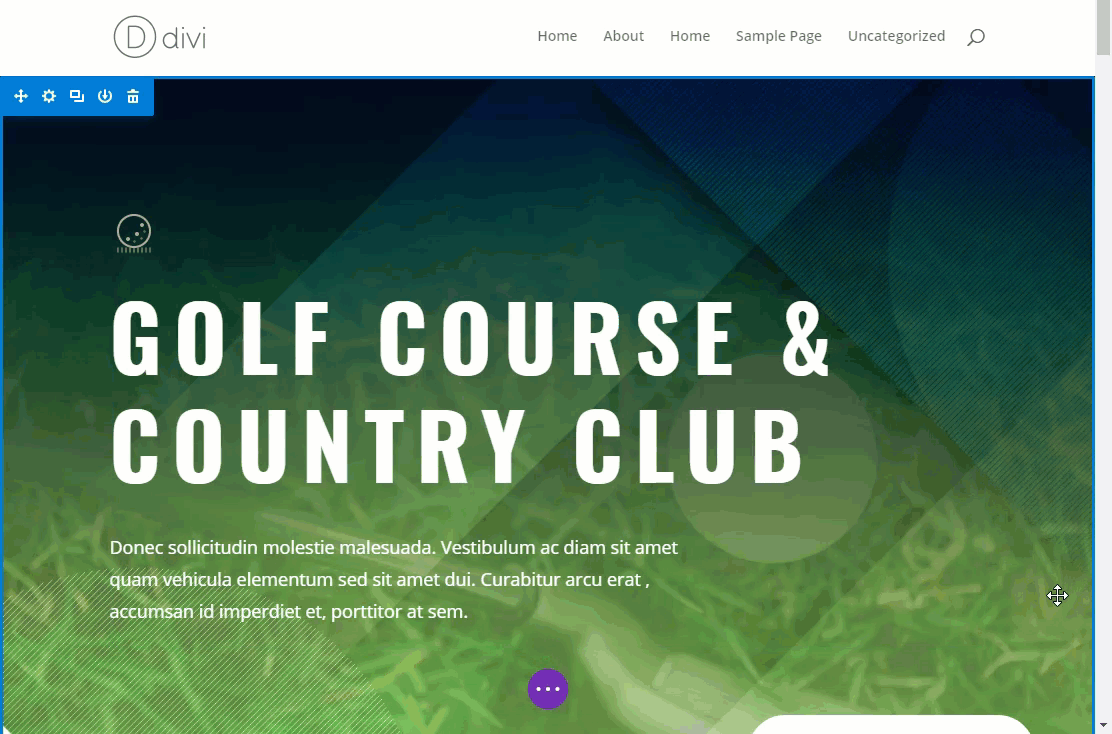
If you know the name of the page, you can type “open” followed by the name of your page to bring it right up. So, for example, if you have a page with the title “About”. To open the page, simply type “open about”. The page should pop up to the top of the list. Then all you need to do is click enter! You will automatically be redirected to that About page with the Divi Builder already active and ready for editing.
Tip #5: Use Quick Actions as a Stepping Stone to Keyboard Shortcuts
For those of you committed to learning keyboard shortcuts, quick actions can be a helpful teacher. Let’s face it, most of us aren’t going to take the time to memorize all the keyboard shortcuts in one sitting and then struggle as you force them into your workflow. But, I would bet that if you take a moment to recognize the keyboard shortcuts labeled next to quick action options, you will be more inclined to try them out the next time think about that particular action. Here are a few examples of how this might play out.
From “Page Settings” to “O”
Let’s say you are cruising along with quick actions and you find yourself frequently typing “page settings” to access page settings (because you are a rockstar and you know the lingo). Then one time you notice the letter “O” labeled to the far right of the option.
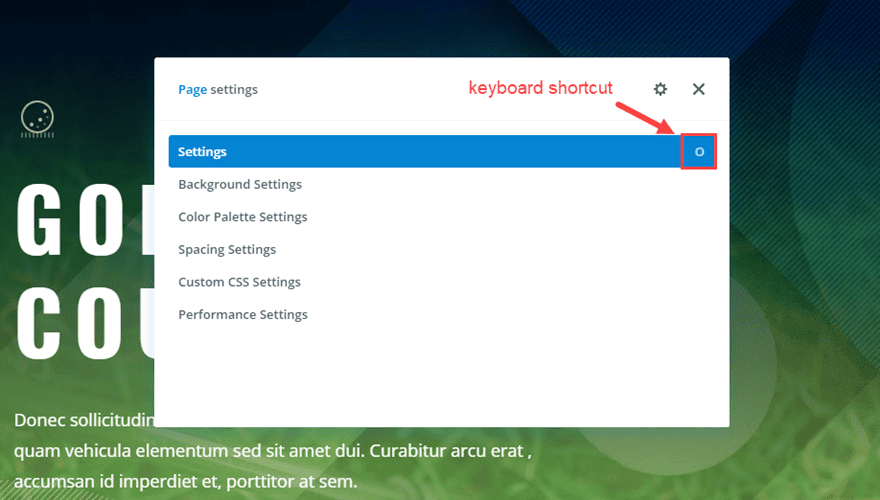
Then a lightbulb goes off that you can access page settings with one simply key! You may never go back to the old way again.
From “wireframe” to “shift-w”
You can deploy the wireframe view simply by typing “wireframe view” in the quick actions menu. But you may notice the keyboard shortcut “shft + w” labeled to the right of the option in the list.
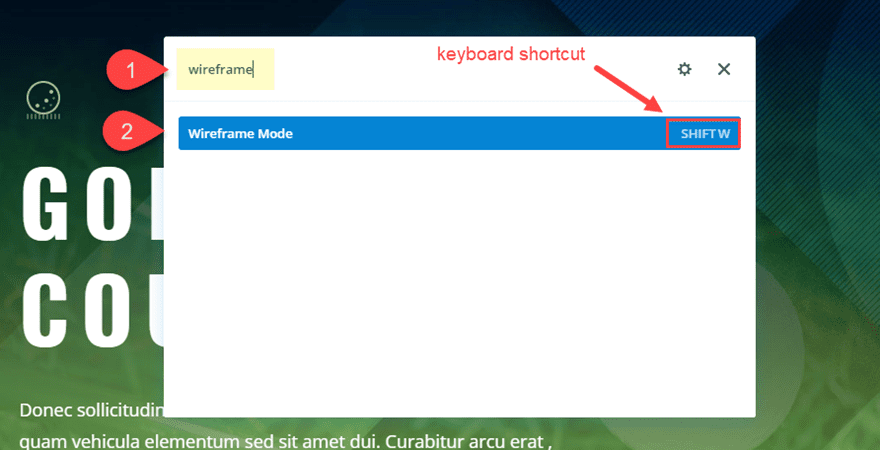
This little shortkey is perfect for toggling back and forth between wireframe and desktop view mode on the fly!
Don’t Forget about “?”
To access a list of the shortcuts in the quick actions menu, you can use the builder command. Simply type “Builder shortcuts”. Or you can also just type “keyboard shortcuts” or simply “shortcuts”. But, don’t overlook the keyboard shortcut label “?” to the right.
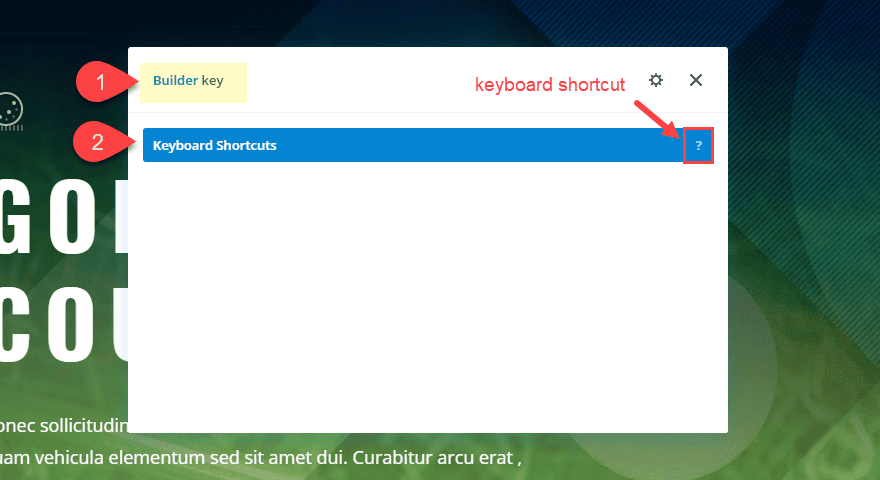
You can view the full list of keyboard shortcuts simply by typing “?” in the Divi Builder and clicking the Keyboard Shortcuts tab.
Tip #6: Quickly Update Page Options and Page Settings on the Fly
While building a website in Divi, you will often encounter the need to update your page settings, theme settings, and theme options. Here are a few ways this might come in handy.
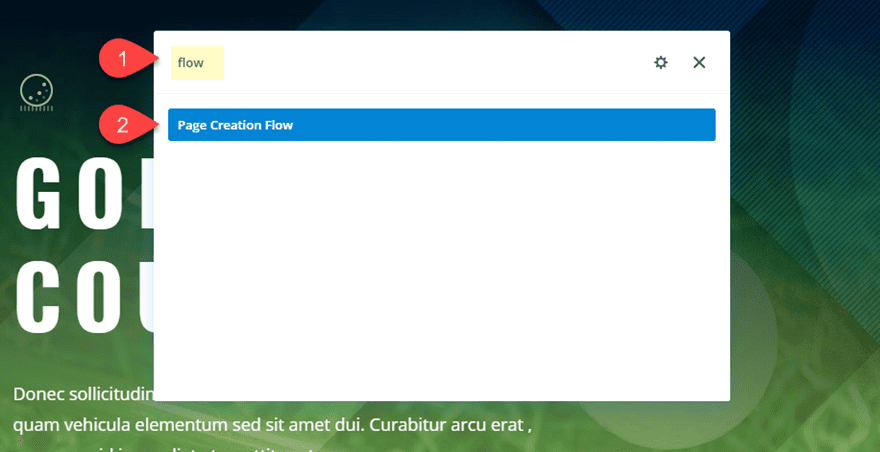
Page Creation Flow
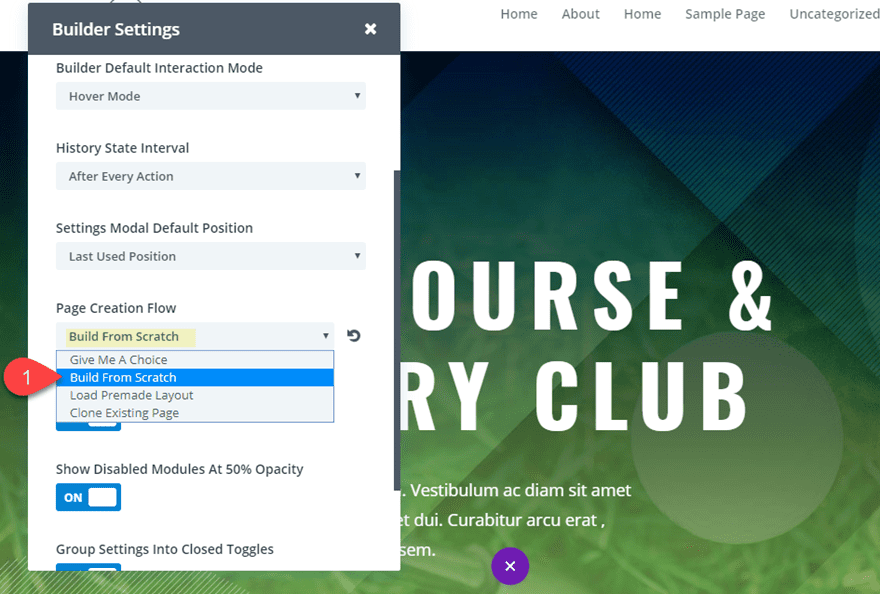
There you are creating you third page of your website and realize that you don’t want to be bothered with the Page Creation Flow popup everytime. Deploy the quick actions menu and type “flow”. Then select the option “Page Creation Flow” to open the page settings modal where that option is found.
Then you can change it to “Build from Scratch” so that every time you deploy the Divi builder on a new page, you can start building immediately.
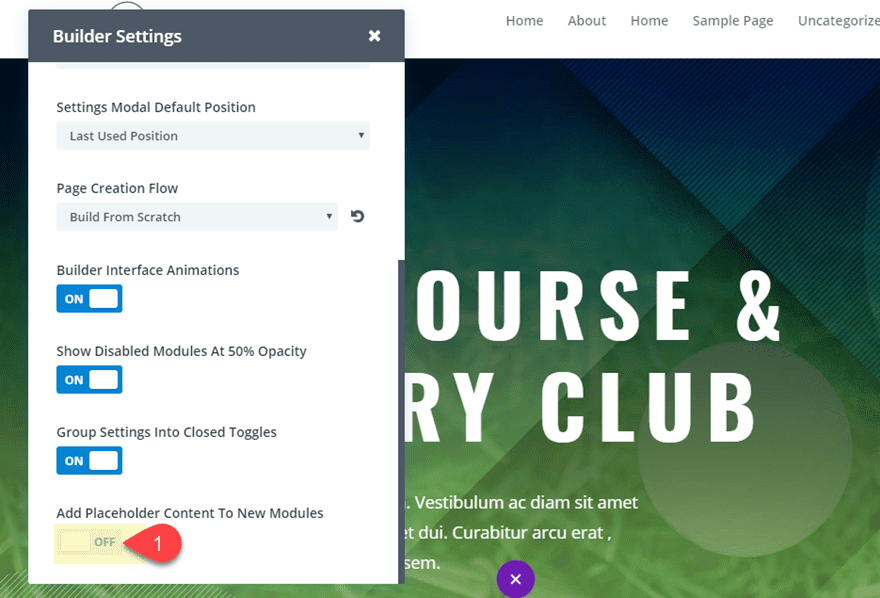
Placeholder Content to New Modules
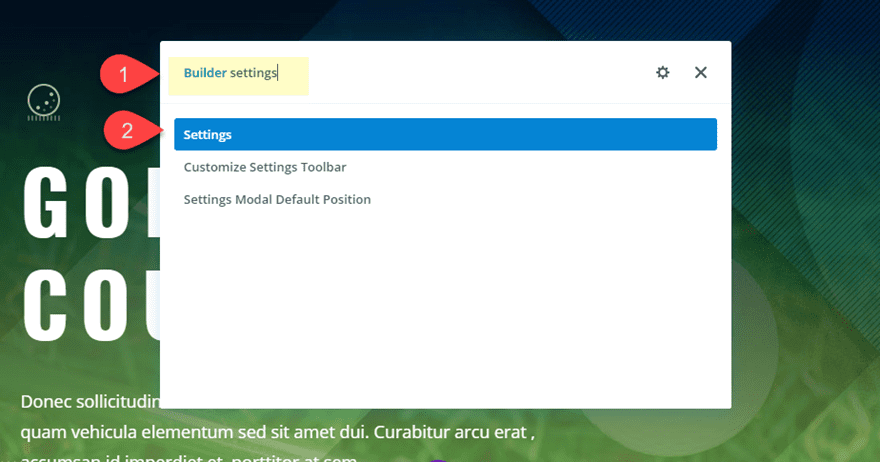
After you get used to using Divi modules, you may find you don’t need the placeholder content anymore. This saves you the need to delete placeholder content before adding your own. Deploy the quick actions menu and type “builder settings” to disable that option.
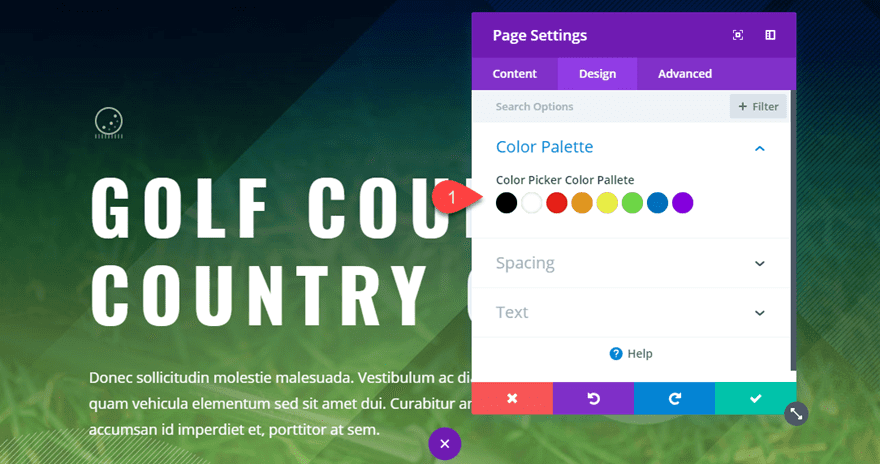
Update Color Palette
I’m willing to bet many of you are still wasting valuable time searching for and copying and pasting color codes into sections, rows and modules as you build your website. You don’t need to! Simply deploy the quick actions menu and type “color” and choose the “Page Color Palette Settings” option.

This will bring you directly to your page color palette. There you can add the new color you are using to the palette and it will be available on all color palettes in every Divi element settings modal when building your page. Now you can simply click the color from the palette instead of resorting to searching and for it again and again.
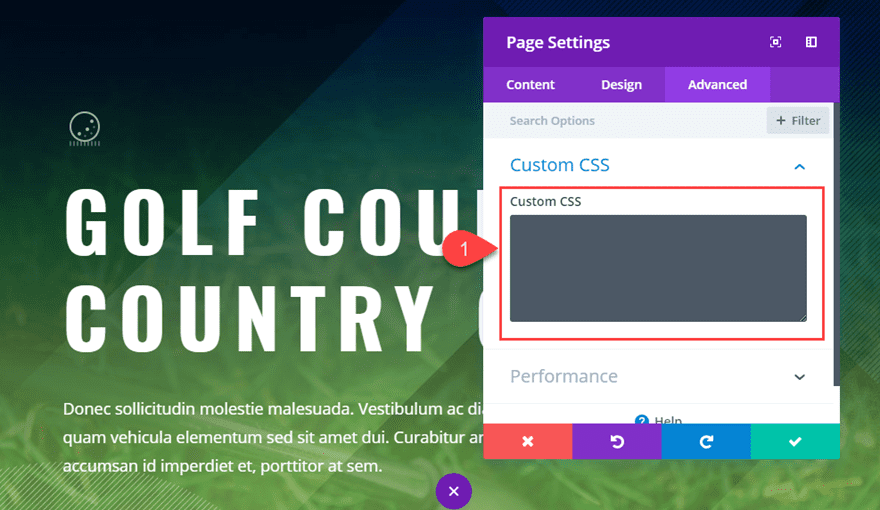
Adding Custom CSS to your Page
If you want to add custom CSS to your page, usually it takes a few clicks to open page settings and clicking the advanced tab (that’s if you remember where is it in the first place). With quick actions, you can simply deploy the quick actions menu and type “css” and click enter to select “Page Custom CSS Settings”.
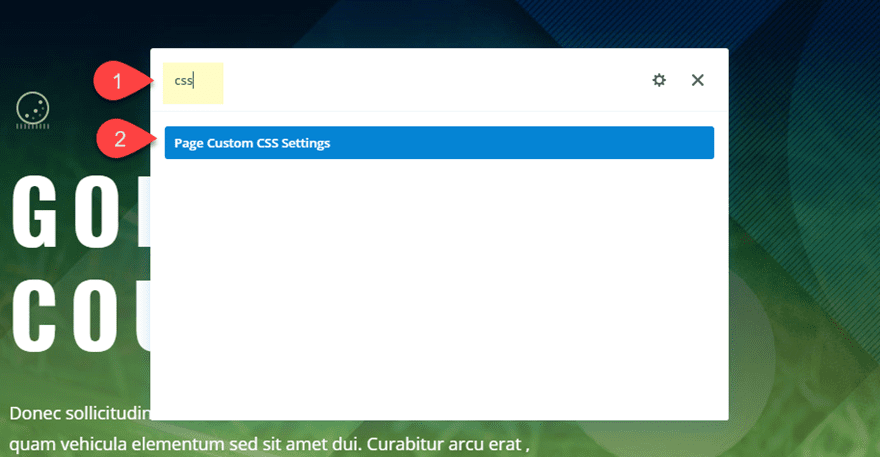
Just like that, you are right where you need to be without one single click of the mouse.
Tip #7: Use Your Life Lines
I’ll be the first to admit that I used to suffer from the classic male stereotype of not asking for directions or reading instructions. But I have learned my lesson. After many failures, I discovered that the success of any project I took on (like building a toy kitchen set for my daughter for example) depended highly upon how soon I reached for the instruction manual. The same goes for building websites with Divi. With quick actions, help documentation and support is literally a few keystrokes away.
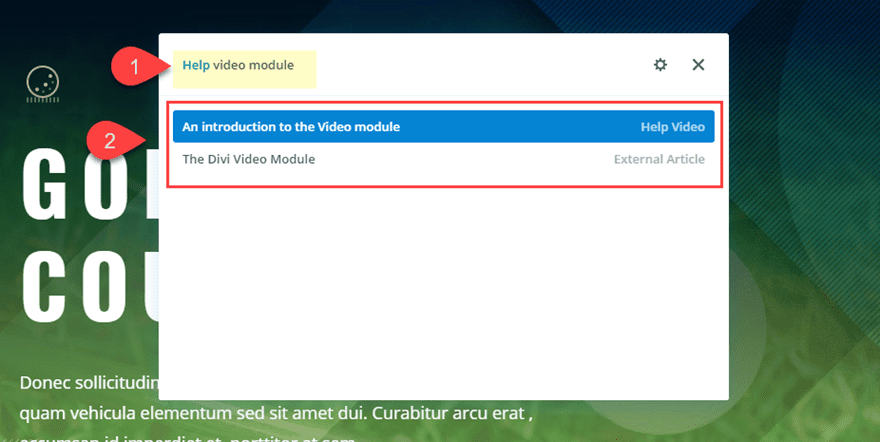
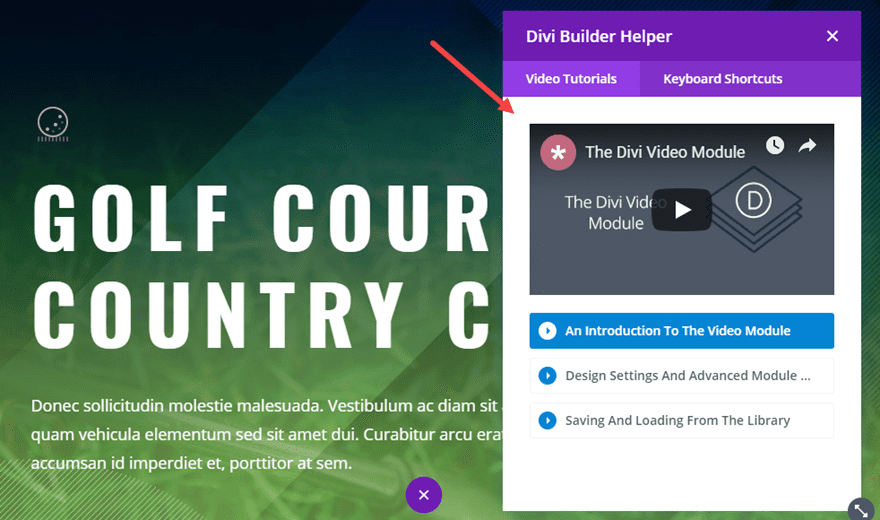
Need a quick overview of the video module, simple deploy the quick actions menu and type “Help Video” or “video module”. There you will see a link to popup a video tutorial or an external link to the documentation article.
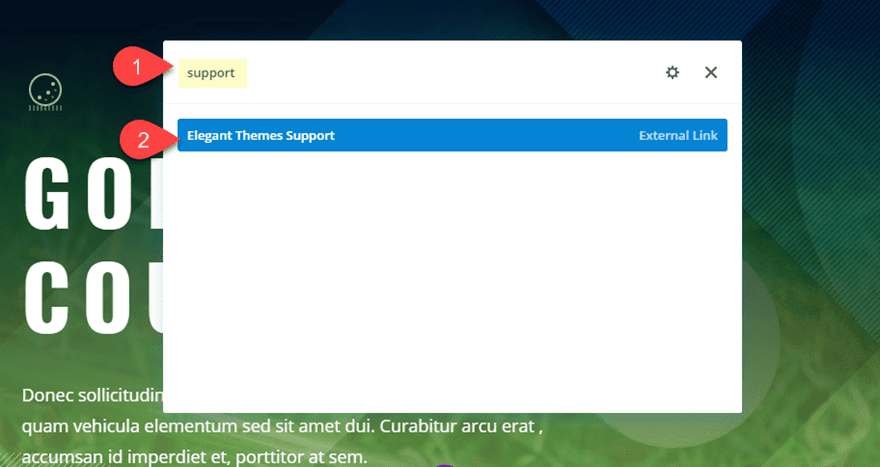
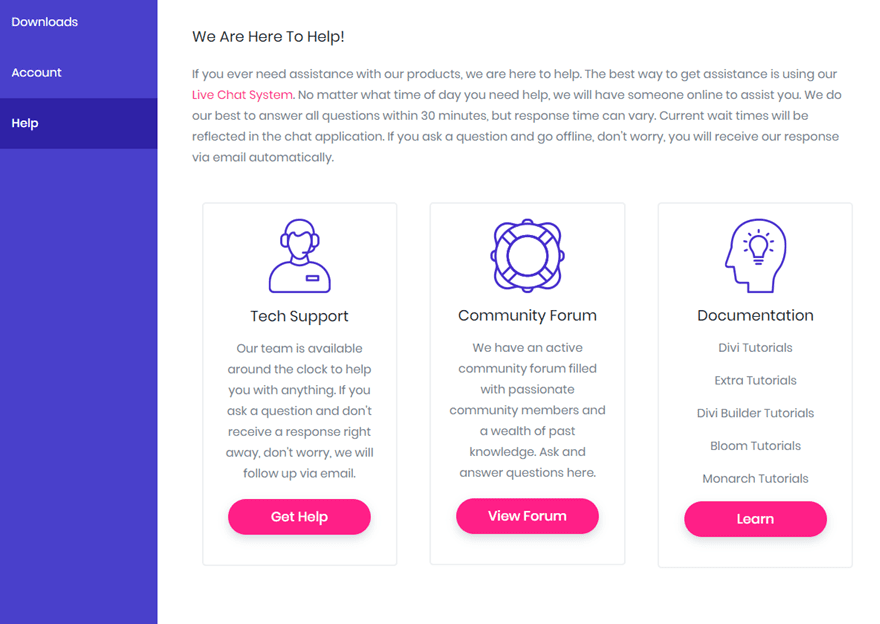
Have a specific issue that needs custom support, simply type “support” to bring up the external link to the Elegant Themes Support page.
Final Thoughts
If you are hesitant about incorporating Divi Quick Actions into your workflow, I hope these few tips will help nudge you off the ledge so that you can try them out for yourself. Even one or two of these tips may save you valuable time in the long run.
I’m curious to know some tips that you may have to share with us. I look forward to hearing from you in the comments below.
Cheers!
The post 7 Tips for Using Divi Quick Actions when Building a Website appeared first on Elegant Themes Blog.