

Divi’s Woo Modules can be helpful for showcasing a featured product section anywhere on your website, including other WooCommerce pages like the Account Page. This makes it easy to make special offers to users even when they are browsing their account information.
In this tutorial, we are going to design an entire WooCommerce Account Page from scratch complete with a handy featured product section using Woo Modules. We’ll even include a few snippets of CSS that will show the featured product section only when the user is logged in.
Let’s get started.
Sneak Peek
Here is a quick look at the account page we will be building in this tutorial.
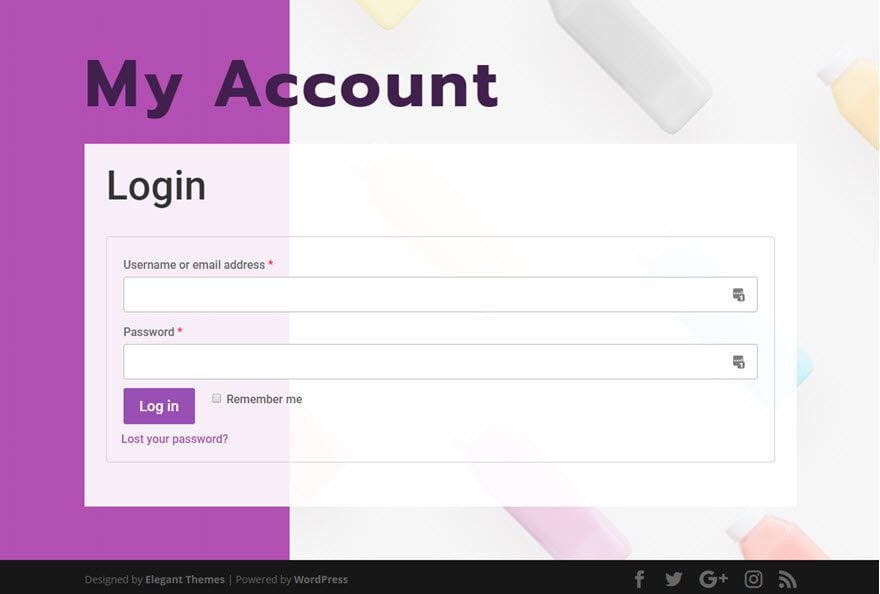
Here is the account page before a user logs in.
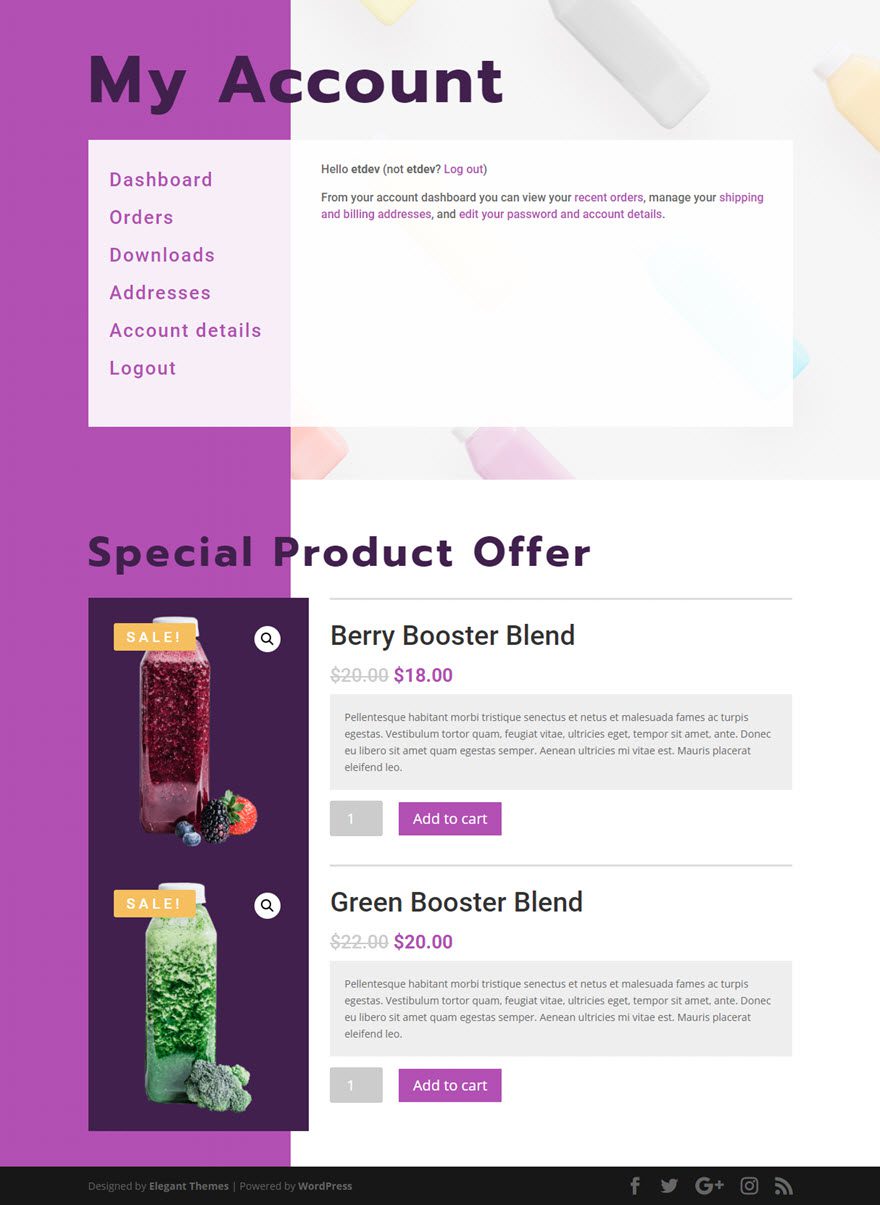
Here is the account page after a user logs in. As you can see, the featured product section shows under the account page content.
Download the Featured Product Account Page Layout for FREE
To lay your hands on the account page layout from this tutorial, you will first need to download it using the button below. To gain access to the download you will need to subscribe to our Divi Daily email list by using the form below. As a new subscriber, you will receive even more Divi goodness and a free Divi Layout pack every Monday! If you’re already on the list, simply enter your email address below and click download. You will not be “resubscribed” or receive extra emails.
@media only screen and ( max-width: 767px ) {.et_bloom .et_bloom_optin_1 .carrot_edge.et_bloom_form_right .et_bloom_form_content:before, .et_bloom .et_bloom_optin_1 .carrot_edge.et_bloom_form_left .et_bloom_form_content:before { border-top-color: #ffffff !important; border-left-color: transparent !important; }
}.et_bloom .et_bloom_optin_1 .et_bloom_form_content button { background-color: #f92c8b !important; } .et_bloom .et_bloom_optin_1 .et_bloom_form_content .et_bloom_fields i { color: #f92c8b !important; } .et_bloom .et_bloom_optin_1 .et_bloom_form_content .et_bloom_custom_field_radio i:before { background: #f92c8b !important; } .et_bloom .et_bloom_optin_1 .et_bloom_border_solid { border-color: #f7f9fb !important } .et_bloom .et_bloom_optin_1 .et_bloom_form_content button { background-color: #f92c8b !important; } .et_bloom .et_bloom_optin_1 .et_bloom_form_container h2, .et_bloom .et_bloom_optin_1 .et_bloom_form_container h2 span, .et_bloom .et_bloom_optin_1 .et_bloom_form_container h2 strong { font-family: “Open Sans”, Helvetica, Arial, Lucida, sans-serif; }.et_bloom .et_bloom_optin_1 .et_bloom_form_container p, .et_bloom .et_bloom_optin_1 .et_bloom_form_container p span, .et_bloom .et_bloom_optin_1 .et_bloom_form_container p strong, .et_bloom .et_bloom_optin_1 .et_bloom_form_container form input, .et_bloom .et_bloom_optin_1 .et_bloom_form_container form button span { font-family: “Open Sans”, Helvetica, Arial, Lucida, sans-serif; } p.et_bloom_popup_input { padding-bottom: 0 !important;}

Download For Free
Join the Divi Newlsetter and we will email you a copy of the ultimate Divi Landing Page Layout Pack, plus tons of other amazing and free Divi resources, tips and tricks. Follow along and you will be a Divi master in no time. If you are already subscribed simply type in your email address below and click download to access the layout pack.
You have successfully subscribed. Please check your email address to confirm your subscription and get access to free weekly Divi layout packs!
To import the layout to your page, simply extract the zip file and drag the json file into the Divi Builder.
Let’s get to the tutorial shall we?
What You Need to Get Started
To get started, you will need to do the following:
- If you haven’t yet, install and activate the Divi Theme installed (or the Divi Builder Plugin if not using the Divi Theme).
- Install and activate the WooCommerce plugin. If it is the first time setting up WooCommerce, you will need to run through the basic setup wizard to get your store ready. Once done, you are ready to add your new products.
- Create a few products if you don’t have any yet. For more info on how to add a new product, check out this tutorial.
After that, you will be ready to start designing a featured product section in Divi.
Part 1: Designing the Account Page
Enable the Divi Builder on the WooCommerce Account Page
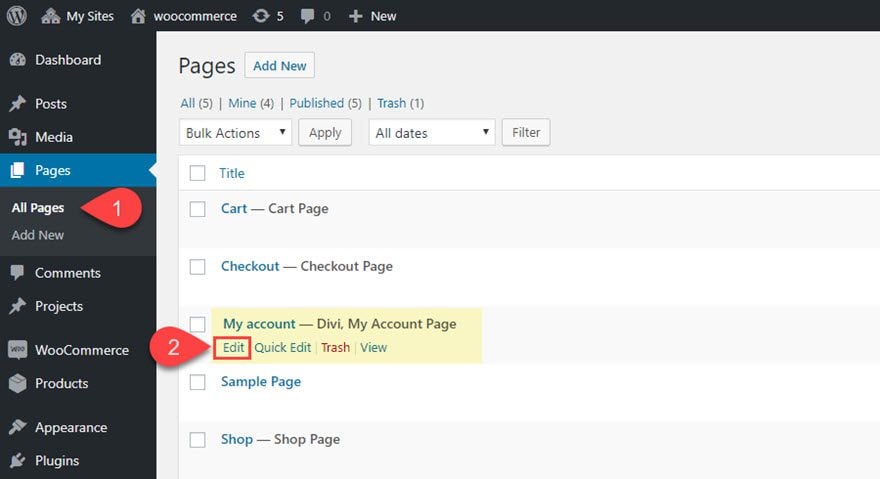
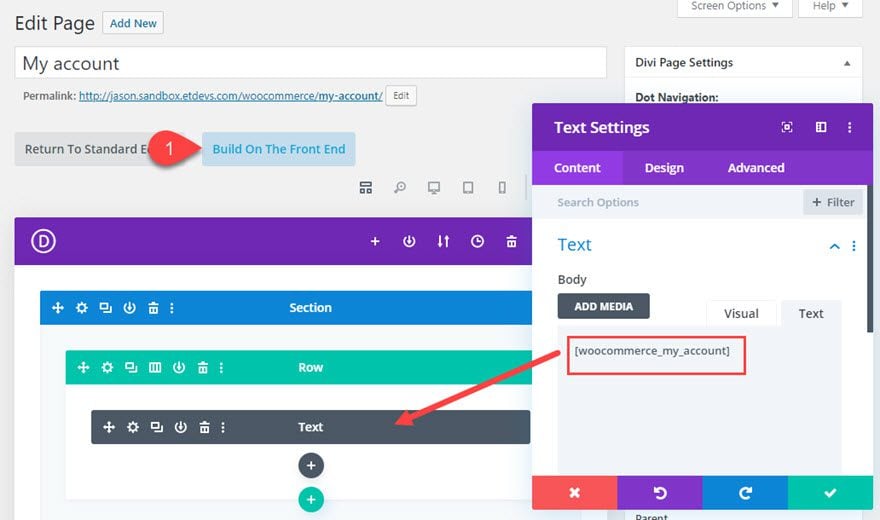
Once WooCommerce is installed and activated, the WooCommerce Account page will be created automatically for you. To edit the account page, you can find it from the WordPress Dashboard by going to Pages > All Pages. Then hover over the Account page and click “edit”.
Next, you will notice the WooCommerce Shortcode that is being used to generate the Account Page content. Go ahead and click to use the Divi Builder.
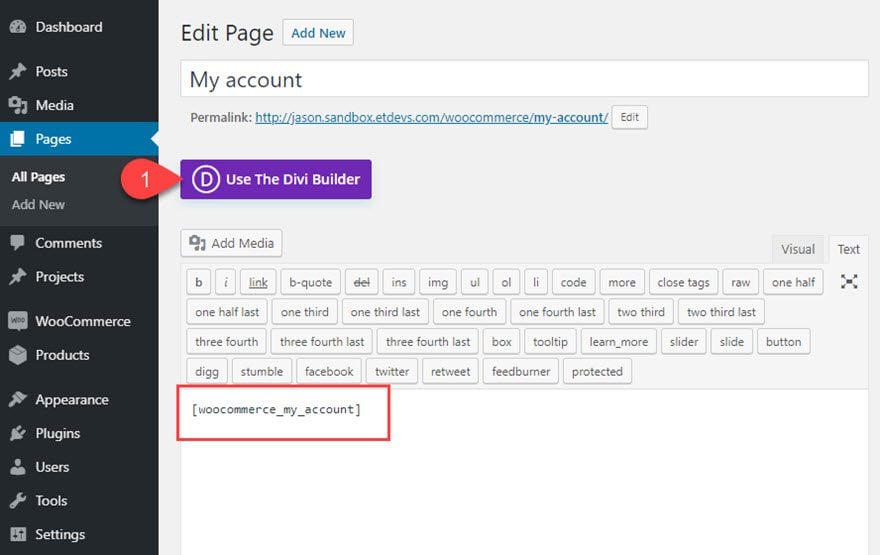
The shortcode will be carried over and placed into a text module. Now click to use the Divi Builder on the Front End.
The Section Settings
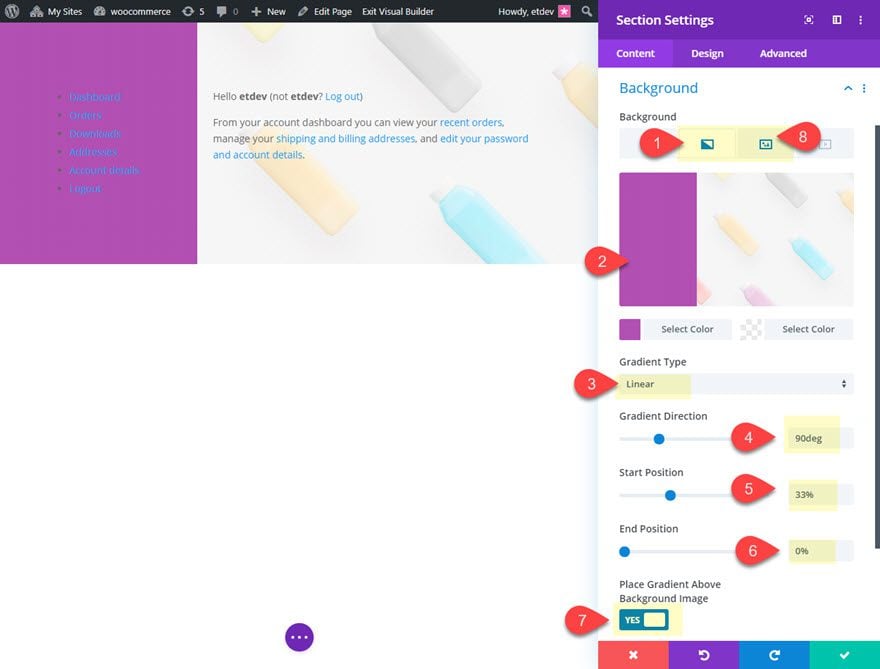
The first thing we are going to do is add a background to the section. Open the section settings and update the following:
- Background Gradient Left Color: #ad52b7
- Background Gradient Right Color: rgba(255,255,255,0.66)
- Gradient Direction: 90deg
- Start Position: 33%
- End Position: 0%
- Place Gradient Above Background Image: YES
Then add a background image that is at least 1920px wide.
Add Header Using a New Text Module
To add the main page header (h1), add a new text module by clicking the gray plus icon under the current text module containing the WooCommerce Shortcode.
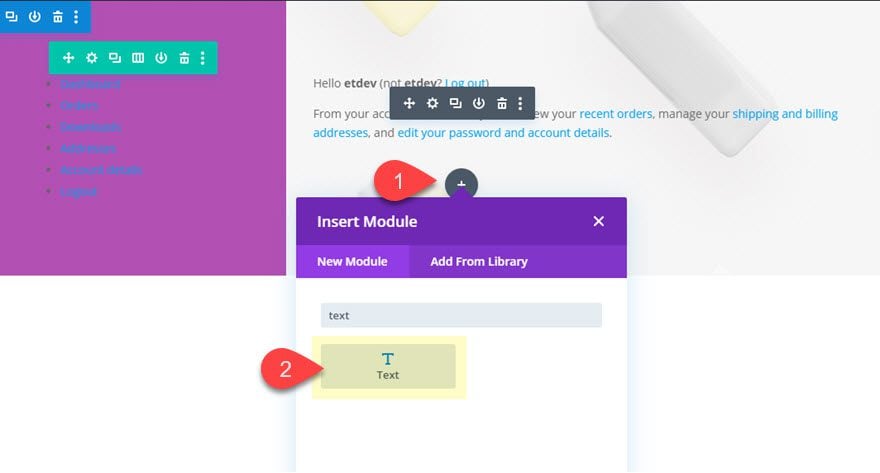
Then drag it above the WooCommerce shortcode text module and update the settings as follows:
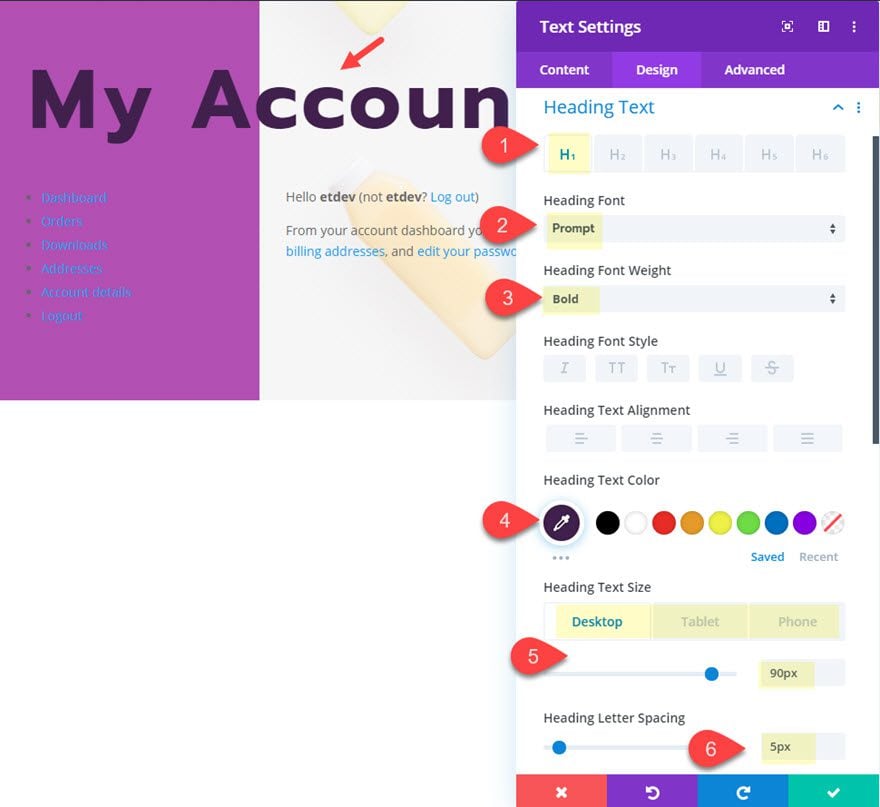
Body Content:
<h1>My Account</h1>
Under the H1 tab, update the following heading text styles:
- Heading Font: Prompt
- Heading Font Weight: Bold
- Heading Text Color: #3f214f
- Heading Text Size: 90px (desktop), 56px (tablet), 36px (phone)
- Heading Letter Spacing: 5px
Customize Shortcode Content
Even the the woocommerce account page information is being generated by a shortcode, we can still target some of those elements using the text module settings.
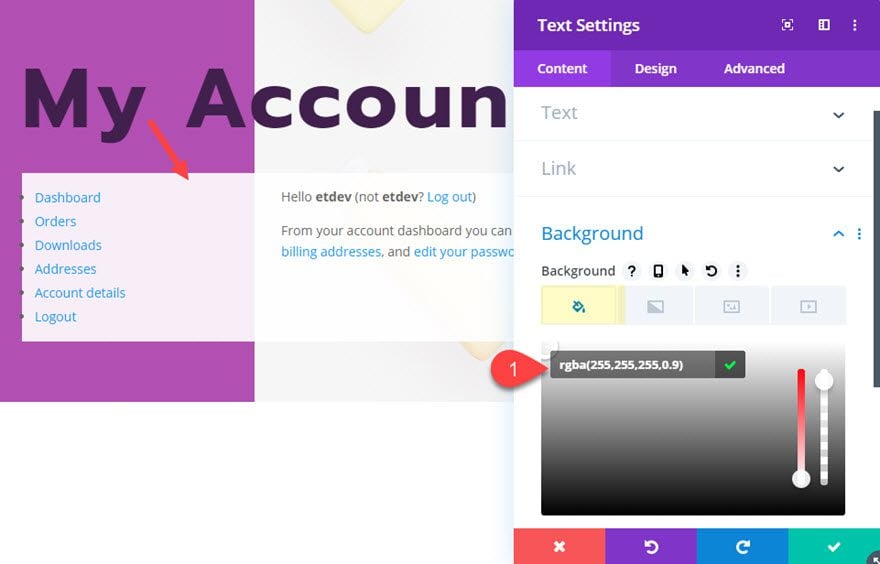
Open the settings of the text module holding the shortcode and update the following:
- Background Color: rgba(255,255,255,0.9)
Under the paragraph text tab, update the following:
- Text Font: Roboto
- Text Text Size: 16px

Under the Link tab, update the following:
- Link Text Color: #ad52b7
Under the unordered list tab, update the following:
- Unordered List Text Size: 26px (desktop), 18px (tablet)
- Unordered List Letter Spacing: 2px
- Unordered List Line Height: 2em
- Unordered List Item Indent : 0.01px

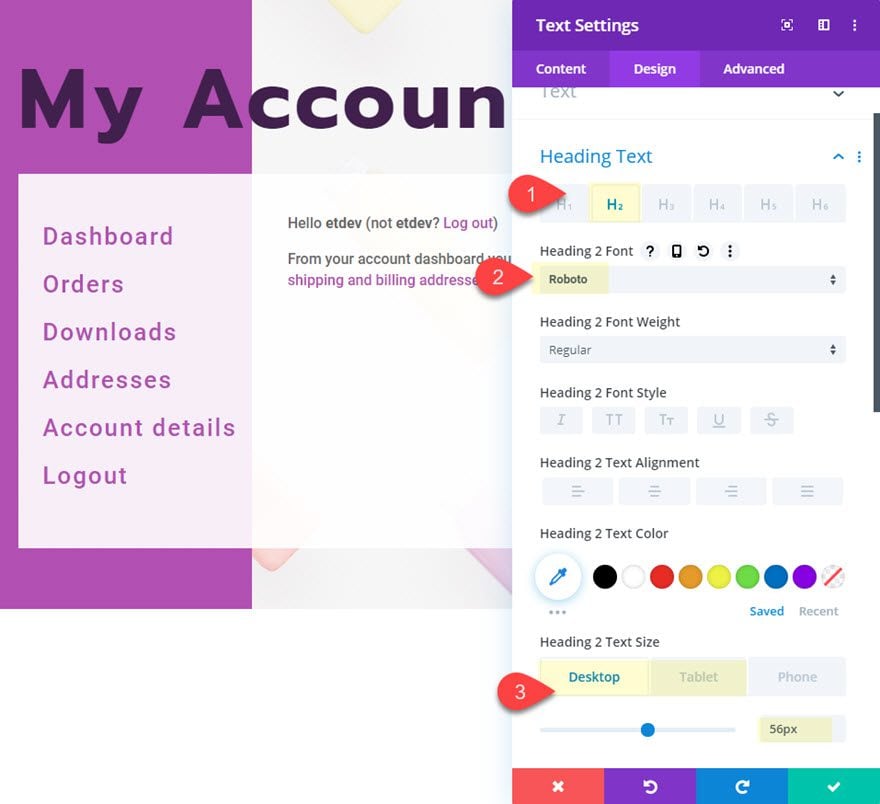
Even though we can’t see it right now, there will be an h2 heading on the Login Form whenever a user visits the account page without being logged in. To target that h2 header, update the following:
- Heading 2 Font: Roboto
- Heading 2 Text Size: 56px (desktop), 32px (tablet)
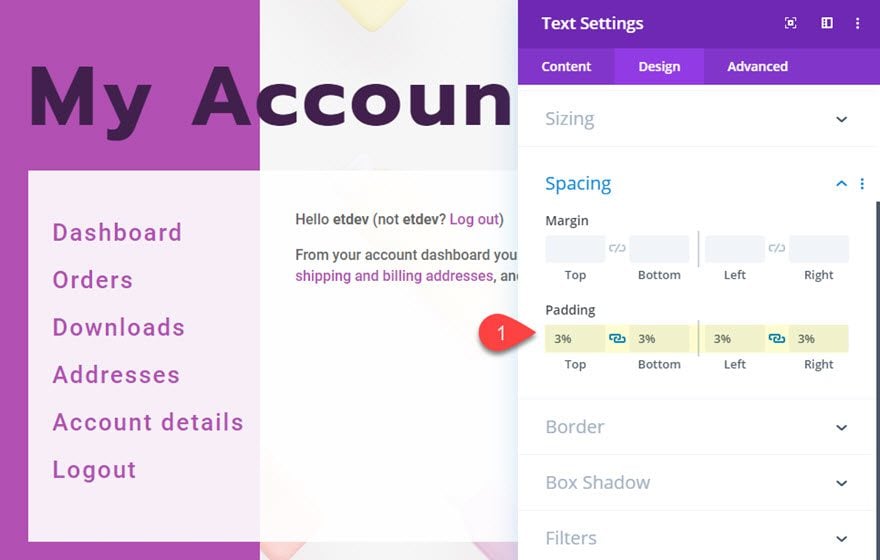
Then add some padding around the text module:
- Padding: 3% top, 3% bottom , 3% left, 3% right
Finally, give the text module a custom CSS Class.
- CSS Class: custom-account-style
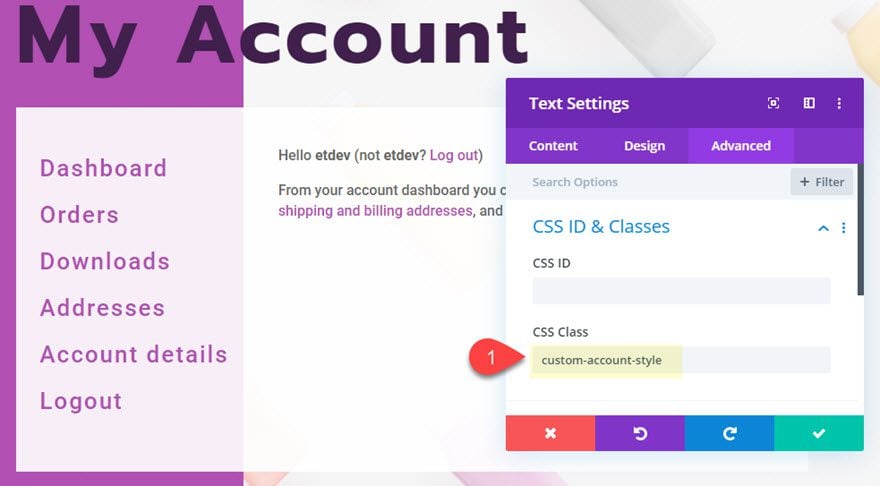
With this class, we can target the module with some external CSS to put some final touches on the account information elements we weren’t able to target with text modules settings.
Adding External CSS to Style Other Account Information Elements
Since we have our CSS Class in place, we can use external CSS to style other account information elements generated by the shortcode. This is not necessary if you are wanting to control these elements from the Theme Customizer Settings. For example, the color of the links and buttons and notification backgrounds will be inherited from the secondary color you have selected in the Theme Customizer Settings.
To style the colors of certain elements directly for this page, open the page settings and add the following Custom CSS to the page:
.custom-account-style .woocommerce-Button.button, .custom-account-style .woocommerce .woocommerce-form-login .woocommerce-form-login__submit {
    color: #ffffff!important;
    background-color: #9452b7;
    border-color: #9452b7;
}
.custom-account-style .woocommerce-Button.button:hover {
    background-color: #3f214f;
}

.custom-account-style .woocommerce .woocommerce-error, .custom-account-style .woocommerce .woocommerce-info, .custom-account-style .woocommerce .woocommerce-message {
   background-color: #3f214f;
}
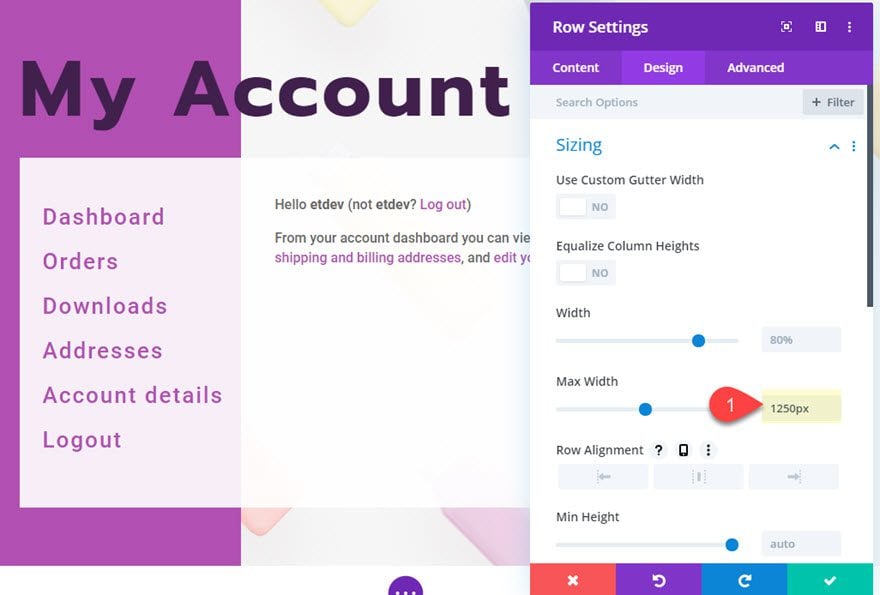
Row Width
After the text module woocommerce shortcode information is styled, save the settings and open the row settings. Update the max width as follows:
- Max Width: 1250px
Part 2: Designing the Featured Product Section
Now that the main Account Page information is finished, we can now design the featured product section. This is where we will use Divi’s WooCommerce Modules to pull in product information dynamically. Then we are going to add a few snippets of CSS in order to show the product(s) whenever the user is logged in.
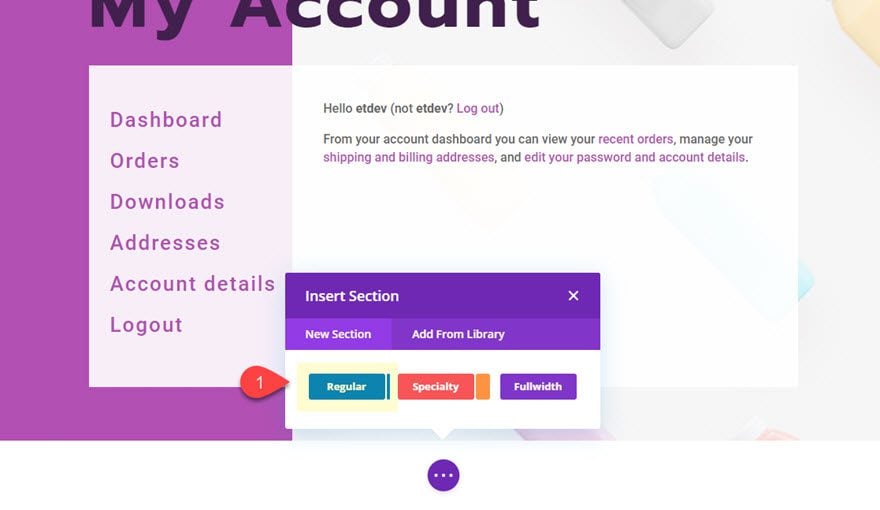
Creating the New Section and Row
To begin, create a new regular section.
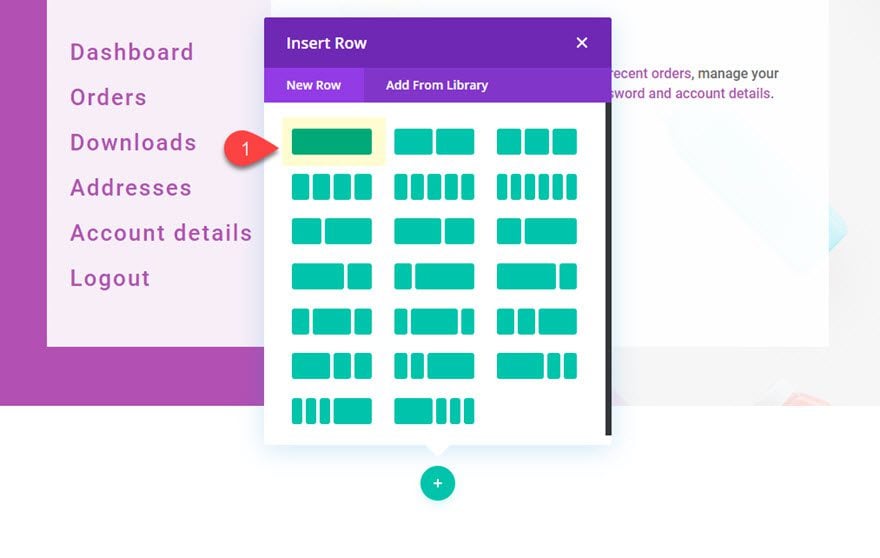
Then add a one column row to the section.
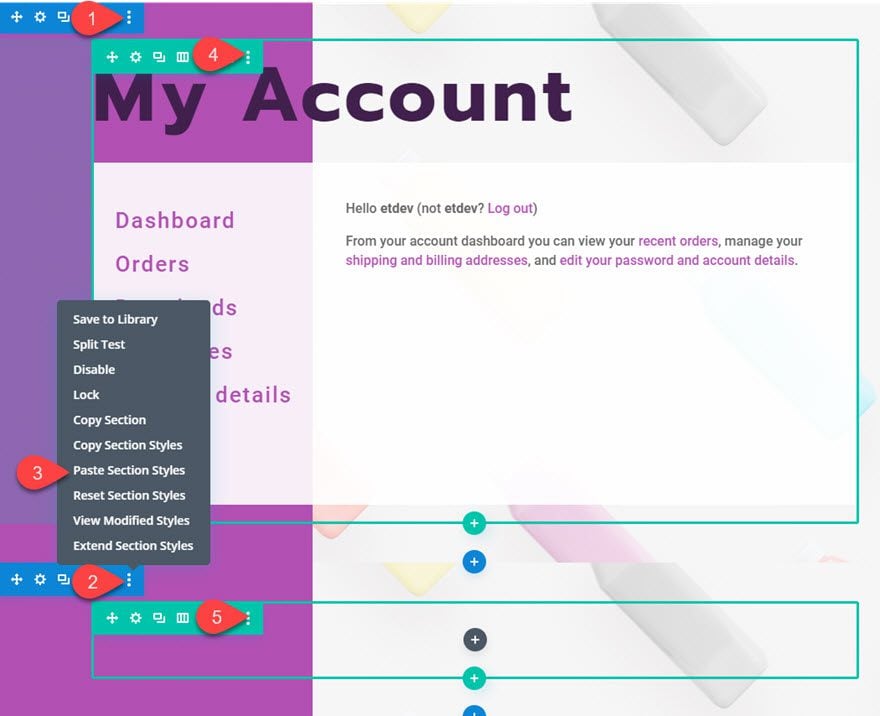
Before we add a module, copy the section settings and the row settings used for our account page design above and paste them into the new section and row we just added.
Add Heading with Text Module
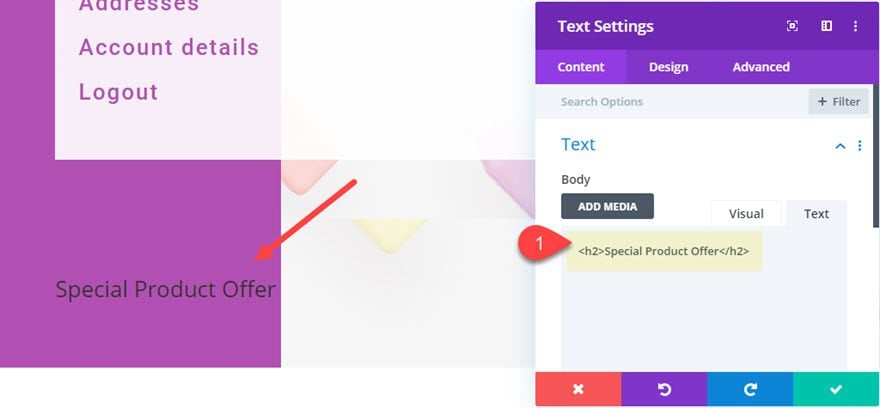
Similar to what we did for the main header of the page, we are going to create a new header for the featured product section. To do this, add a new text module to the one-column row and update the following:
Body Content:
<h2>Special Product Offer</h2>
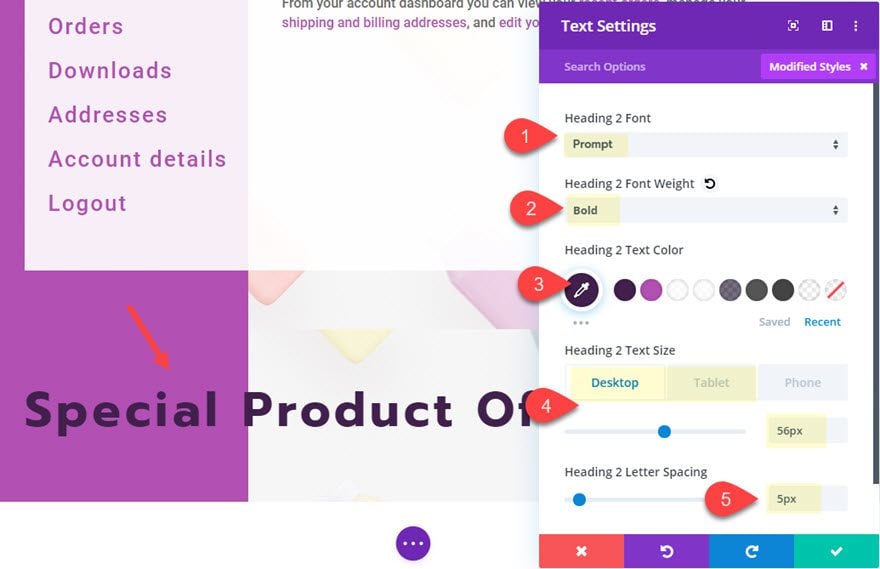
- Heading 2 Font: Prompt
- Heading 2 Font Weight: Bold
- Heading 2 Text Color: #3f214f
- Heading 2 Text Size: 56px (desktop), 36px (tablet)
- Heading 2 Letter Spacing: 5px
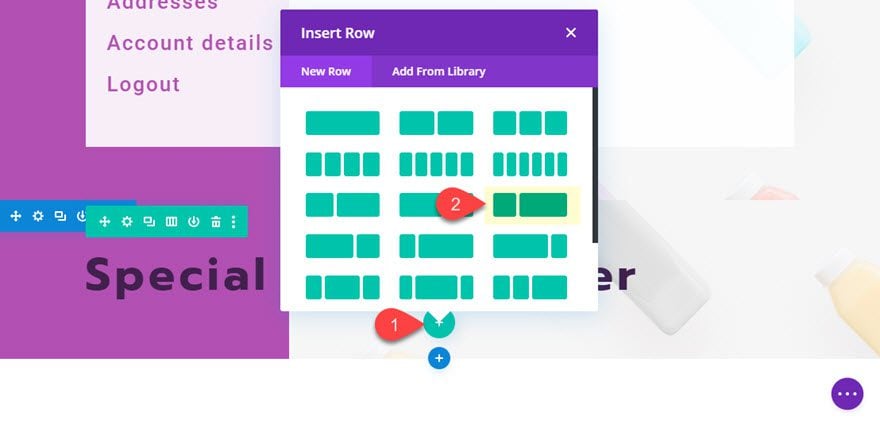
Add Second Row
Next add a new row with a 1/3 2/3 column structure.
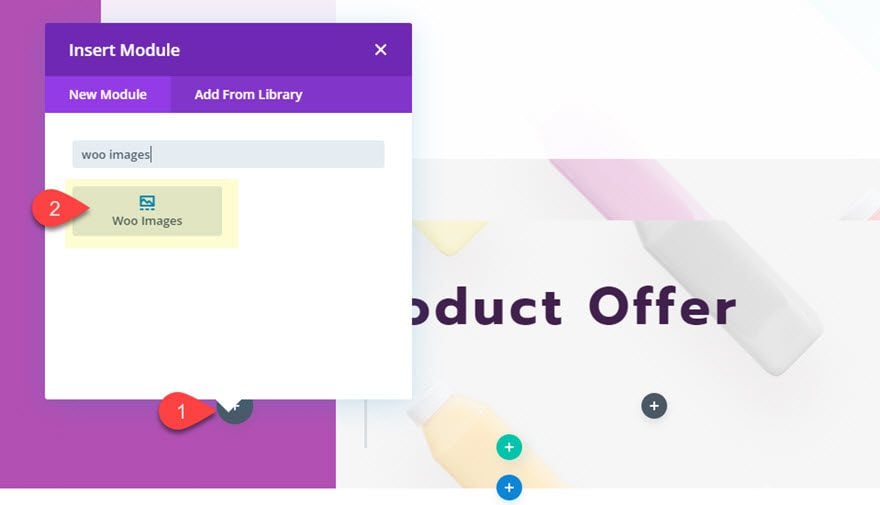
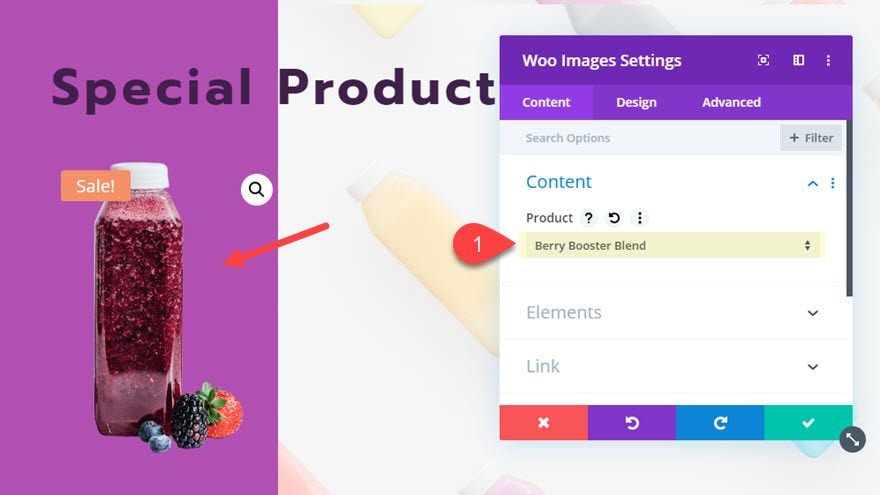
Add Woo Images Module
In the left column, add a Woo Images module.
Then select the product you want featured from the product dropdown.
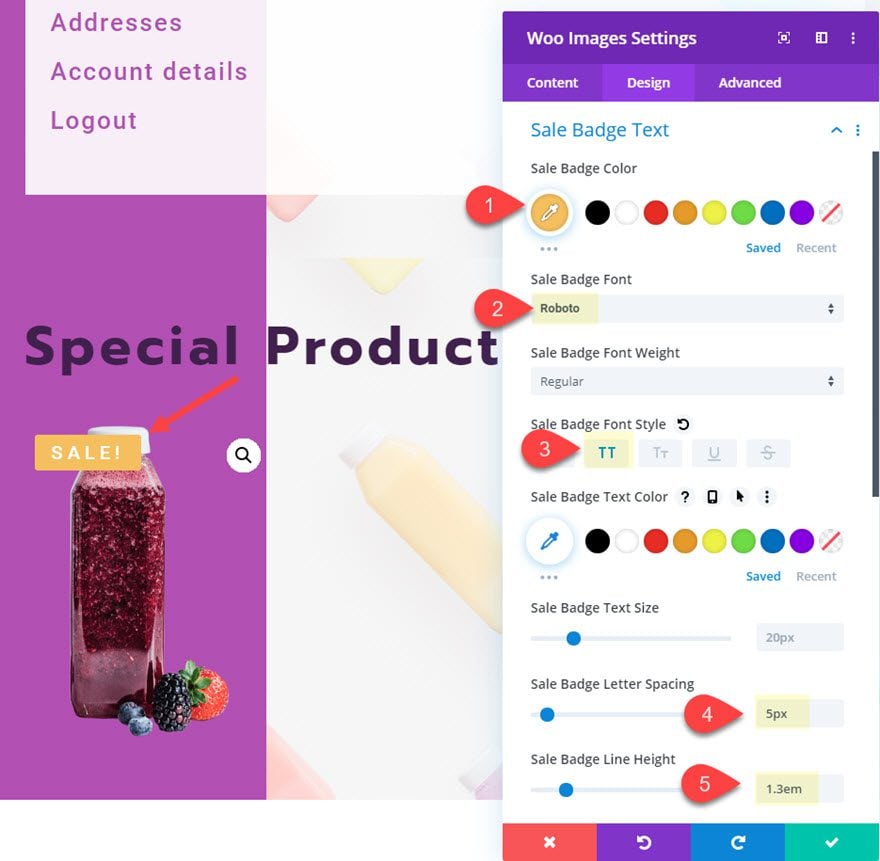
Then update the sale badge style as follows:
- Sale Badge Color: #f1be51
- Sale Badge Font: Roboto
- Sale Badge Font Style: TT
- Sale Badge Letter Spacing: 5px
- Sale Badge Line Height: 1.3em
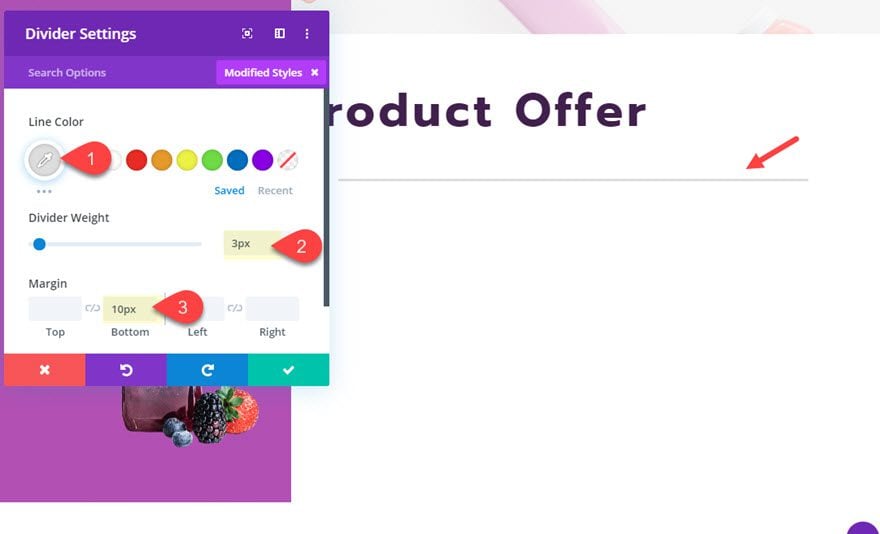
Add Divider
In the right column, add a divider module and update the settings as follows:
- Line Color: #dddddd
- Divider Weight: 3px
- Margin: 10px bottom
Add Woo Title Module
Under the divider module, add a Woo title module.
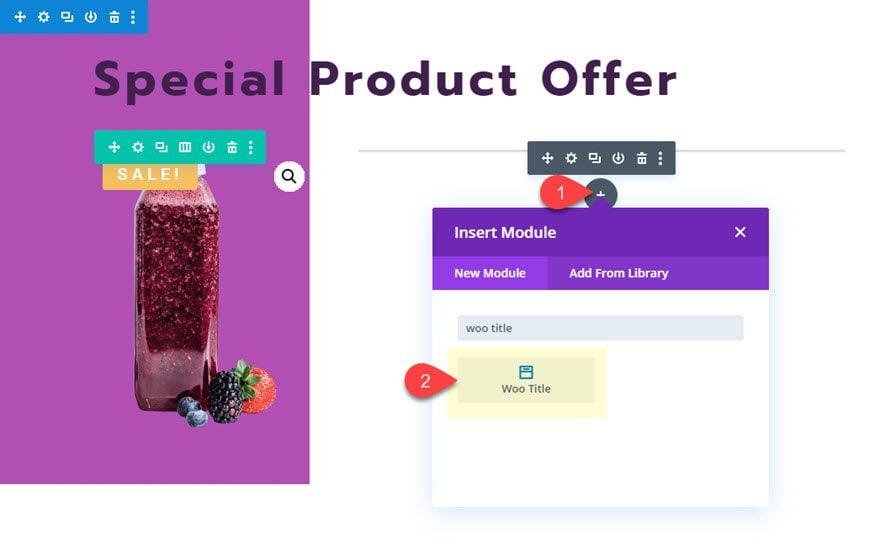
Then add the same product as the one added in the woo images module.
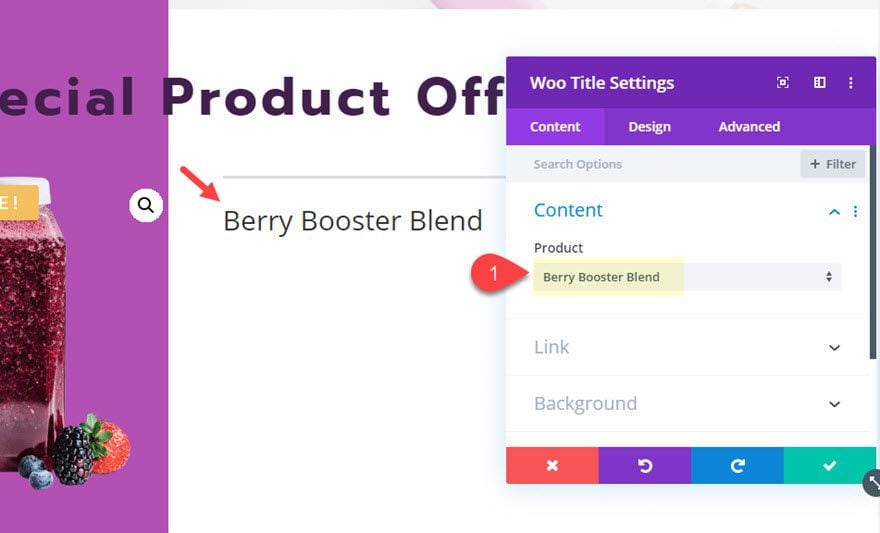
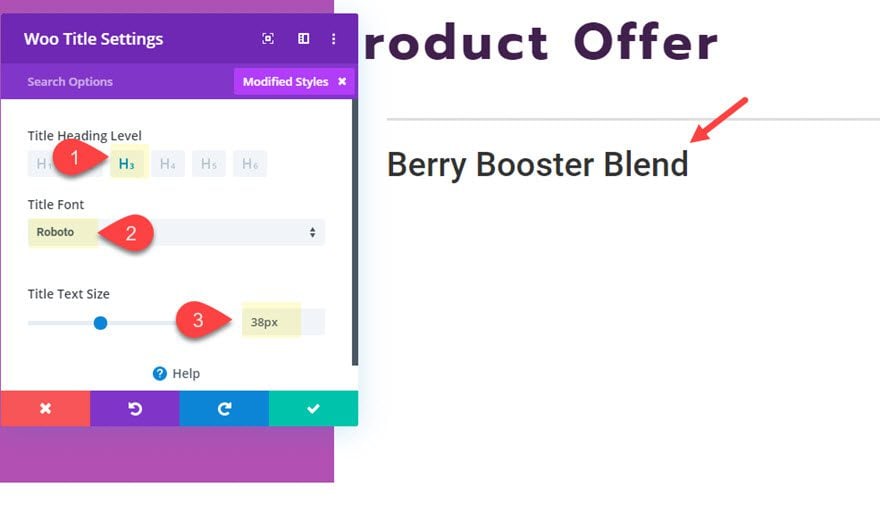
Then update the design settings as follows:
- Title Heading Level: H3
- Title Font: Roboto
- Title Text Size: 38px
Add Woo Price Module
Next, add a Woo Price Module with the same product.
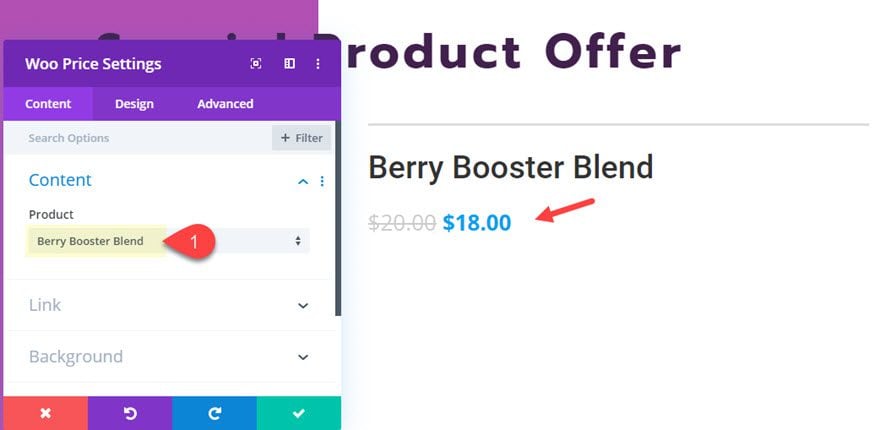
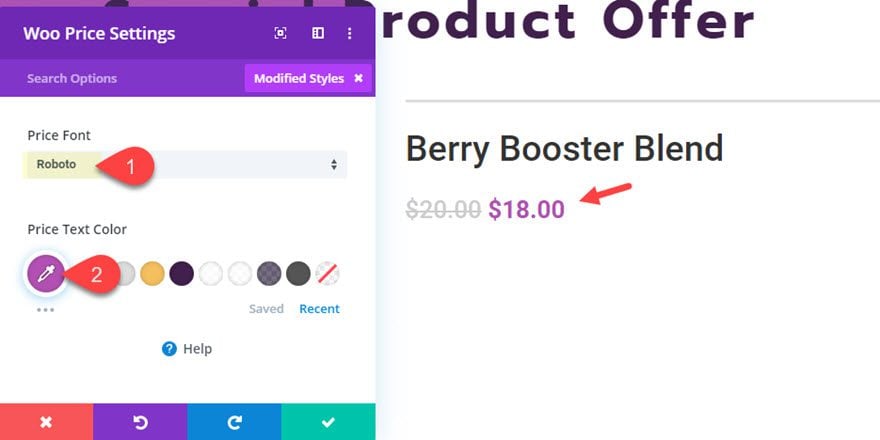
Then update the design settings as follows:
- Price Font: Roboto
- Price Text Color: #ad52b7
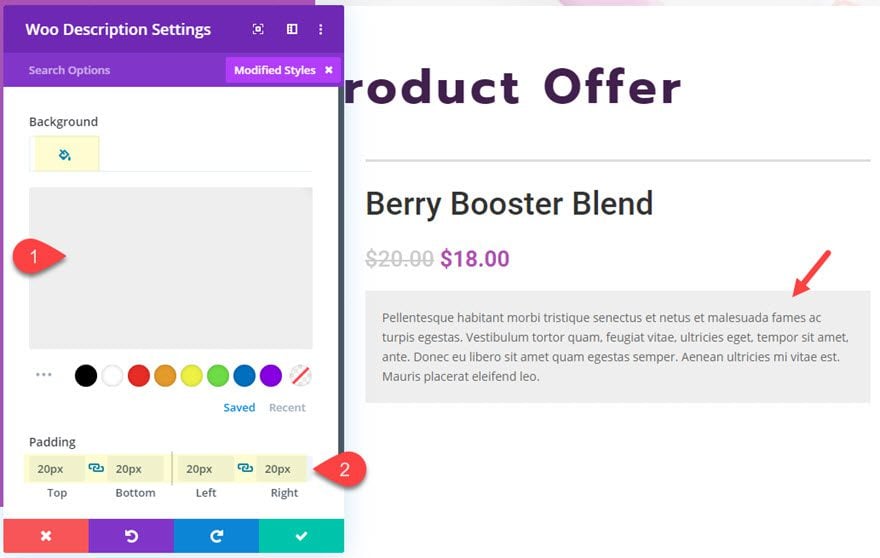
Add Woo Description Module
Under the Woo Price Module, add a Woo Description Module.

Then add the same product to the woo description module.

Then update the settings as follows:
- Background Color: #eeeeee
- Padding: 20px top, 20px bottom, 20px left, 20px right
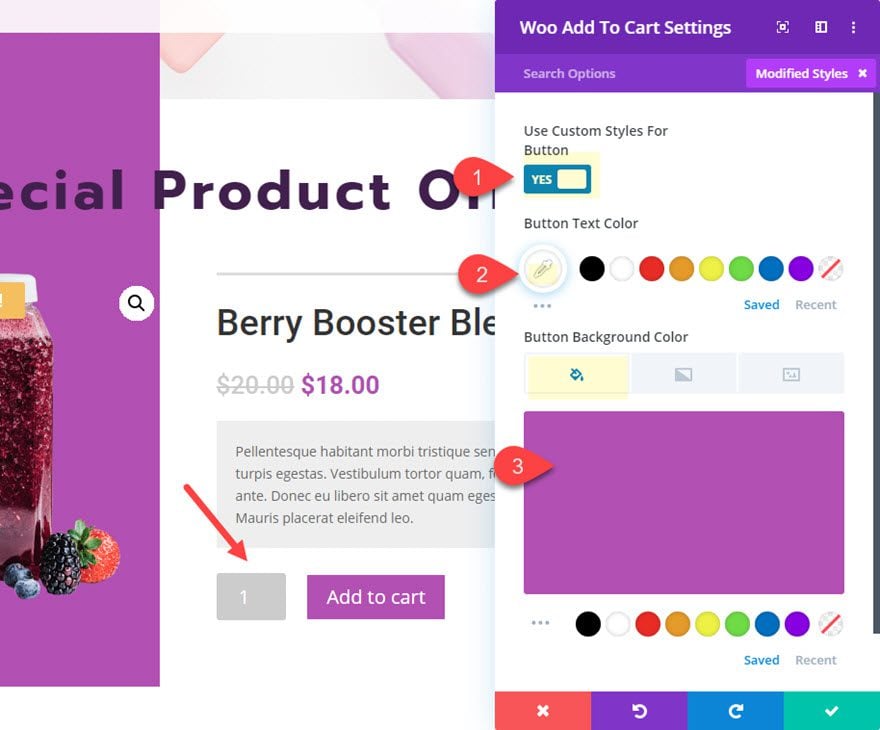
Add the Add to Cart Module
Under the Woo Description Module, add the Woo Add to Cart Module and select the same product.
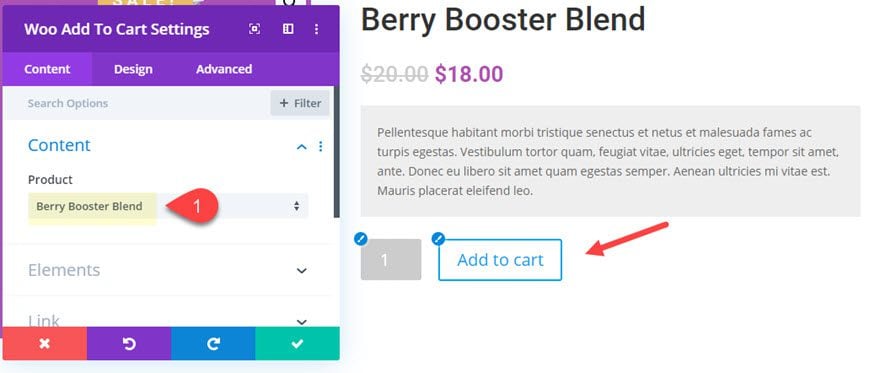
Then update the settings as follows:
- Use Custom Styles for Button: YES
- Button Text Color: #ffffff
- Button Background Color: #ad52b7
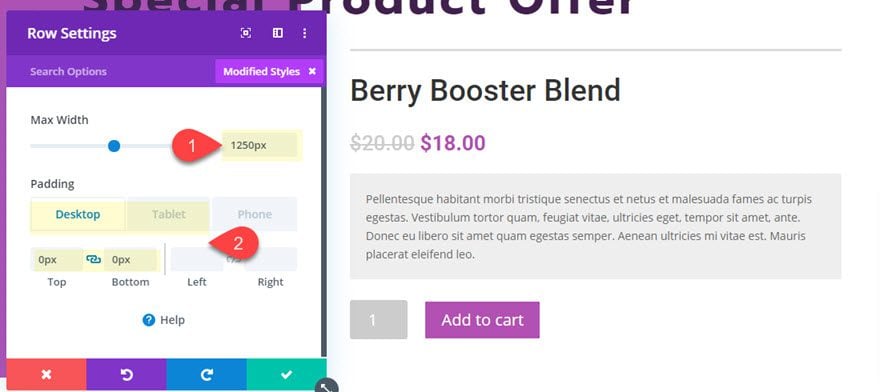
Update the Row Settings
Then update the row settings as follows:
- Background Color (tablet): #ffffff
- Max Width: 1250px
- Padding (desktop): 0px top, 0px bottom
- Padding (tablet): 25px top, 25px bottom, 25px left, 25px right
Next, open the left column settings and update the following:
- Background Color: #3f214f
- Padding: 25px top, 25px bottom, 25px left, 25px right
Adding More Products
The trick to adding more products to this featured section is to duplicate the row containing the WooCommerce Elements that make up the featured product. Then open the Woo Images module for inside the new duplicated row and click to use Find & Replace on the Product option.
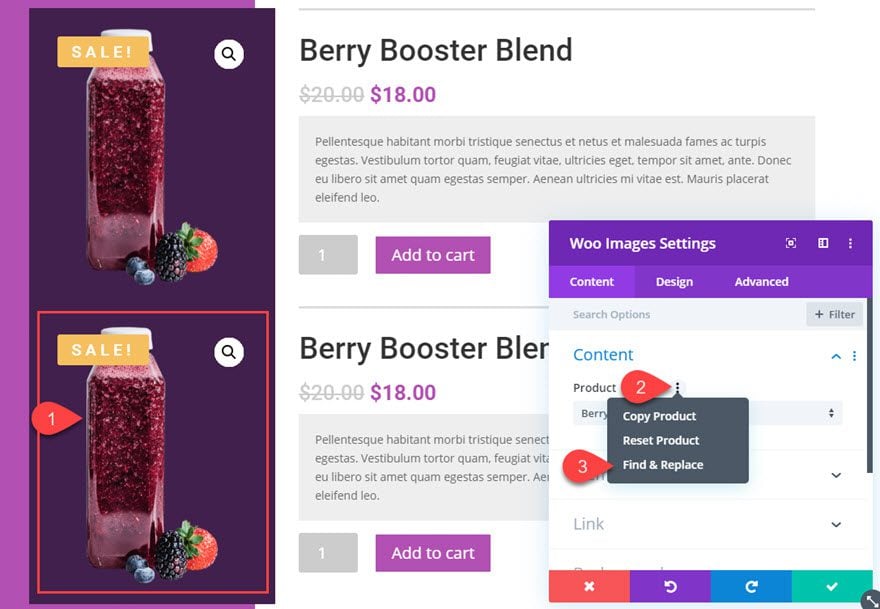
Then use the find & replace options to replace the product selection with a new product of your choice. Make sure to replace the product for all the product options within this row. Then click the Replace button.
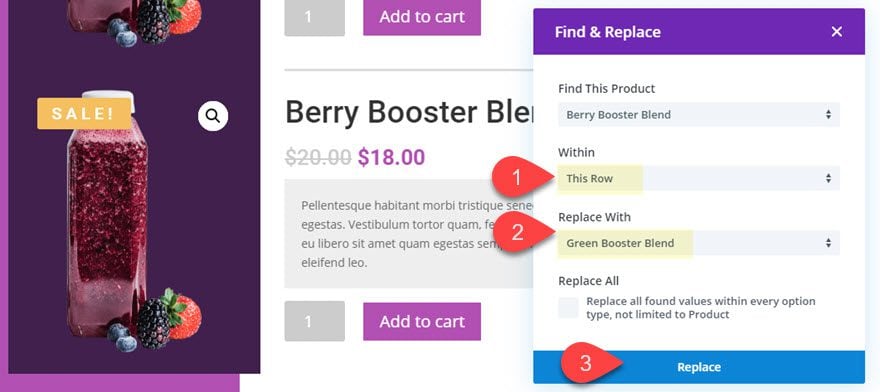
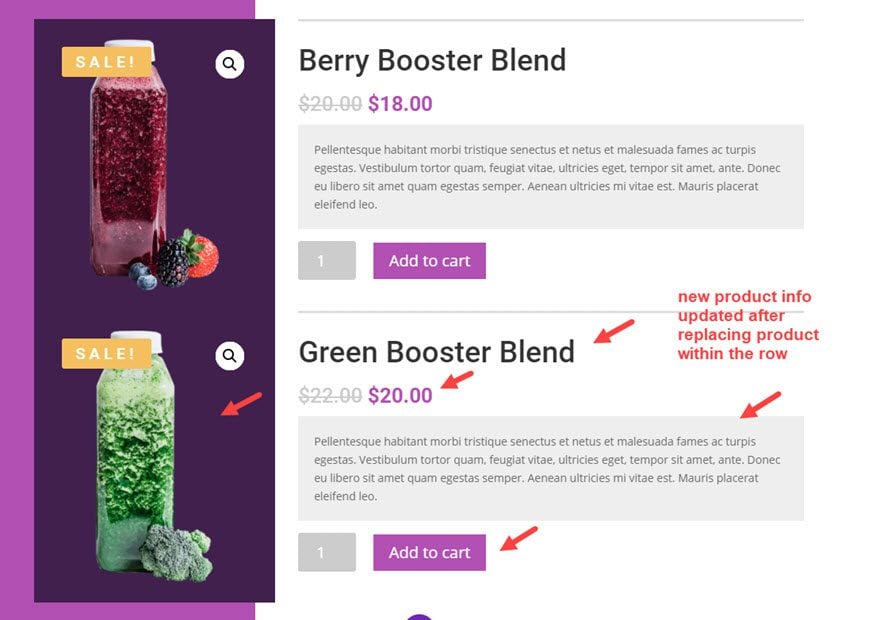
After that, all 5 woo modules will automatically share the same new product.
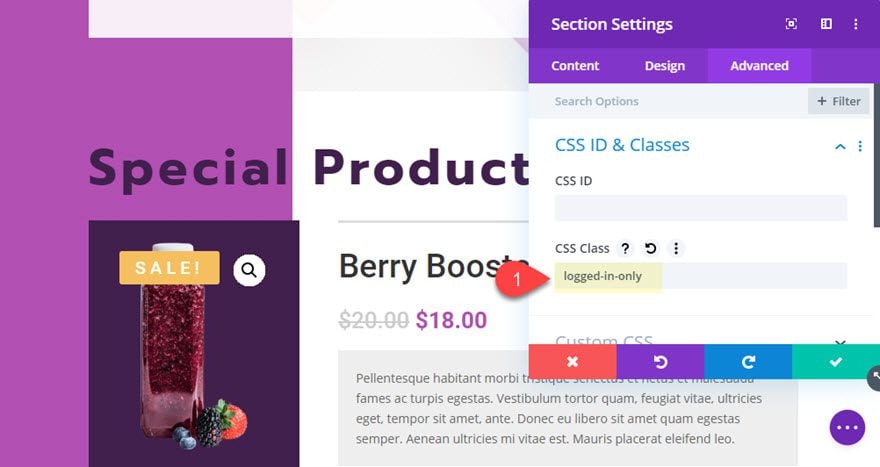
Add CSS ID
In order to hide the featured product section users that aren’t logged in, we need to add a CSS Class to the featured product section as follows:
- CSS Class: logged-in-only
Add External CSS
After the CSS class is in place, open the page settings and add the following custom CSS right under our previous CSS snippet.
.logged-in-only {
  display: none;
}
.logged-in .logged-in-only{
  display: block;
}
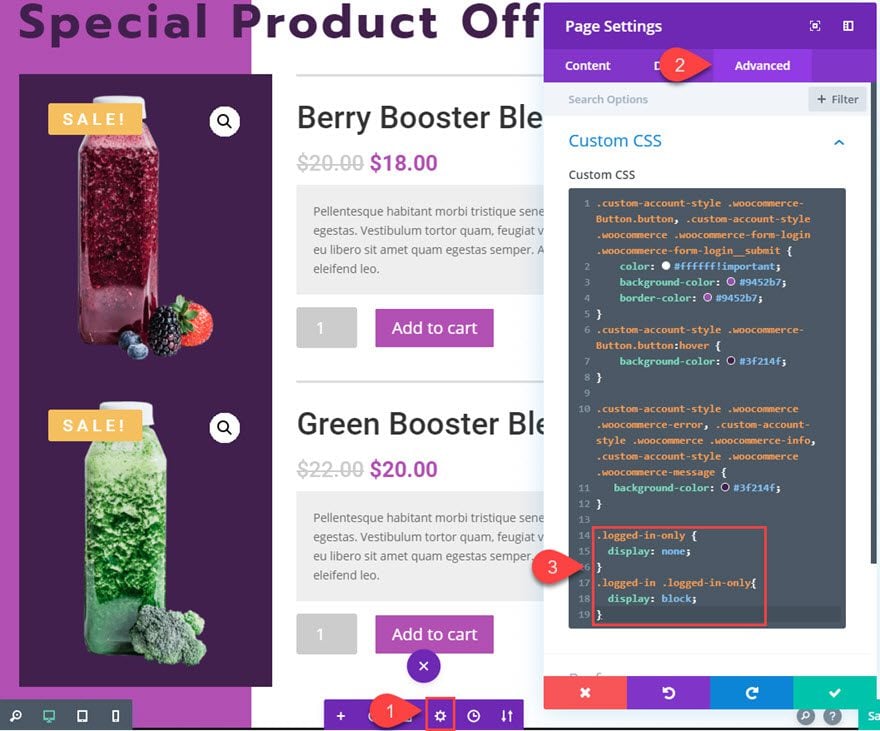
This code will hide the section by default and then show the section once a user logs in to your WordPress site.
Final Result
Here is the account page before a user logs in.
Here is the account page after a user logs in.
Final Thoughts
Having a featured product section for the WooCommerce Account Page is a great way to promote new product offers in a targeted location on your website. Divi makes it easy to customize a WooCommerce Account page with a completely unique design in minutes. And, Divi’s Woo Modules make creating featured product sections a breeze. Plus, having the featured products only show to users who are logged in adds value and incentivizes the offer even more.
Hopefully this will give you a little inspiration when designing your next account page in Divi.
For more, learn more tips on styling account pages in Divi. And don’t forget to check out the full documentation on Woo Modules to discover even more possibilies.
I look forward to hearing from you in the comments.
Cheers!
.inline-code{padding: 0px 4px; color: crimson; font-family: Monaco,consolas,bitstream vera sans mono,courier new,Courier,monospace!important}
The post How to Create a WooCommerce Account Page with a Featured Product Section for Logged-In Users appeared first on Elegant Themes Blog.