
Design reviews are an important part of every project. They enable your entire team to catch up with your progress, and also gives them the opportunity to receive valuable feedback on their recent work. What’s more, these reviews can also help make sure everybody is on the same page regarding the project’s design. The problem is, just as with any other type of meeting, holding a productive design review can be tricky.
In this article, we’re going to talk about what design reviews are and how they can help you create better products. Then, we’ll cover seven steps that can help you ace your next design review without breaking a sweat. Let’s jump in!
What Is a Design Review (And How It Can Help You)?
Design reviews are milestone meetings that are more typical for large teams and projects. For example, if you’re working on a website or an app, a review meeting can help your team evaluate whether there are any kinks to work out with the design, and if you’re ready to advance to the next step.
You may not enjoy meetings, but design reviews can be crucial to ensure your project is on track. Plus, they can also be a boon in other ways, such as:
- Enabling you to identify and correct mistakes.
- Providing a dedicated opportunity for team-building.
Naturally, not every team or project is a good fit for these sort of meetings. For example, if you have tight deadlines, you might not be able to round up the team once, let alone multiple times. However, if you have a bit of breathing room, consider holding a review meeting. You’ll be surprised with the benefits it’ll yield. To that end, we’ll cover some steps to help you get started in the next section.
Ace Your Next Design Review in 7 Steps
If you’ve never been involved in a design review before, don’t worry. These steps can still be of use to you if you’re looking to plan one for your team, and we’ll explain why each of them is crucial. Let’s start by talking about attendees.
Step #1: Figure Out Who Needs to Be There
The first step to any successful meeting is figuring out who needs to be there. In most cases, you won’t want your entire team present, since some of them may not have anything to do with the process.
With that in mind, you need to carefully consider how many people you invite to your design review. If you keep things small, decisions can be made faster, but inviting more people may be better from a brainstorming perspective.
As a rule of thumb, you probably don’t want more than 20 people in the room unless you’re holding a company-wide meeting (an extreme example, admittedly). In most cases, that should cover your entire design team, and any other relevant members. Now, let’s talk about how to pick these additional attendees:
- Since you’ll probably need to make decisions on the project’s future, you’ll need to include the people who can make them, such as your team leader or department heads.
- If you’re working on a web project or an app, you’ll probably want some of the developers to be in the room so you can talk about any usability issues with your design.
At this stage, you’ll want to make a list of people and get hold of their contact information (if necessary) before step number two.
Step #2: Set a Date and Make Sure All the Attendees Know About It
As soon as your attendees are sorted out, you need to start thinking about potential dates. Design reviews aren’t the kind of events you can schedule at short notice, or at least you shouldn’t if you want them to be productive.
Ideally, you’ll schedule your review well in advance so attendees can inform you about any problems, and everyone has time to clear their schedules. You can also make this sort of meeting periodical, so your team can meet before significant milestones, and the process becomes part of your routine.
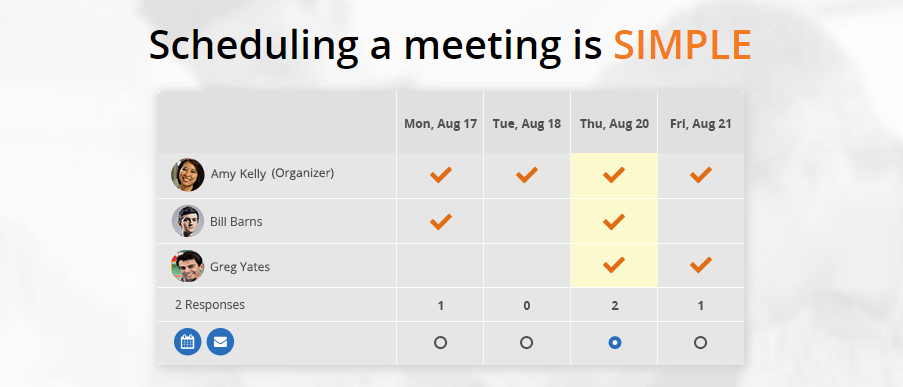
Scheduling a meeting with a large number of participants can get tricky, but there are ways around that. For example, you can use an app such as NeedToMeet so the entire team can RSVP and inform you about any timing conflicts:
If you’d rather stick to emails to organize the event, just remember there are a few key pieces of information you need to include in your message, such as:
- The date and specific time of the meeting.
- Asking attendees to RSVP, which is particularly important for those members who need to approve decisions.
- If possible, include a rough outline of the points you’ll cover so everyone can come prepared.
Now that you have a date, it’s time to start thinking about practical considerations, such as the location for your review.
Step #3: Prepare the Location for Your Review
Successful meetings are all about making sure you’re prepared, and your location is no different. That means making sure both the space itself and anything you’ll need to use during the design review are in place.
This last point is particularly important if you want to avoid any delays during your meeting. For example, if you’re going to have remote members join in, you’ll need to set up the necessary equipment ahead of time. Same goes for items such as whiteboards, slides, and so on.
As for what location to choose, you’ll probably want to stay in-house if possible to minimize costs and logistics. As long as you have enough space to fit all of your attendees and any equipment you’ll need, you’ll be ready.
With that in mind, let’s go over a few points to help you tackle this task in an orderly fashion:
- Pick a location and make sure it’ll be available come meeting time.
- Inform your attendees where the meeting will be held.
- Make a list of all the equipment you’ll need, and check off items as you secure them.
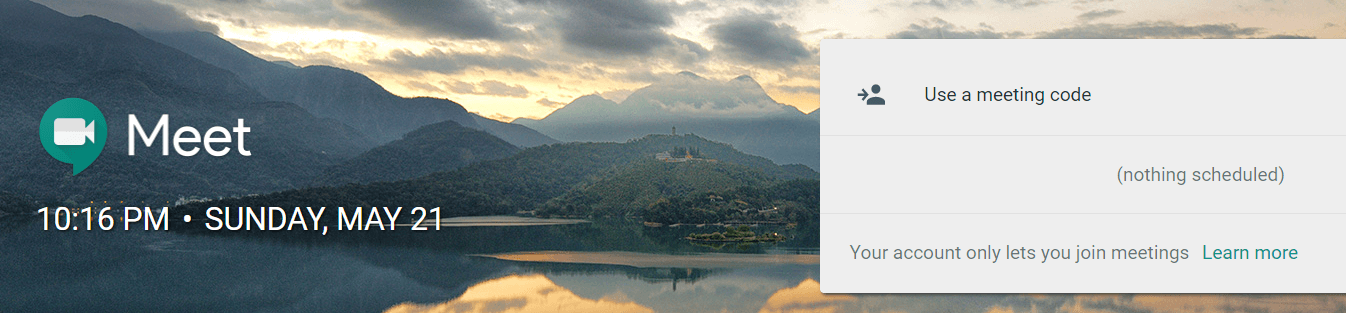
If you’re going to have multiple members attend virtually, you may also want to consider using a teleconferencing app so they can listen in and participate. Google Meet is a great option:
Plus, make sure to test all the software and items you’ll need before meeting day rolls around, just in case!
Step #4: Come Up With a List of Questions to Structure the Discussion
If left unprepared, meetings can take up a lot of your time. The smart move is to go into your design review knowing what topics you want to tackle, and in what order.
Also, shorter meetings are less likely to tire out your attendees, which means they’ll be more focused. This works out perfectly if you schedule periodical reviews, since you won’t need to cover so much ground during each of them.
One of the best ways to plan the content of your meeting is to structure it around specific questions. Let’s check out a few examples:
- Does the progress of your design match the project’s current milestone?
- Do you have any positive or negative feedback about the design as it stands?
- What do you think our next steps should be?
As you can see, these questions provide you with a rough outline that includes a progress check, a review of your design’s usability, and a feedback discussion. Over the next three steps, we’re going to elaborate on these questions, so you’ll have a better idea of how to present them to your team.
Step #5: Make Sure Everyone Knows How the Project Currently Stands
The best way to kick off most design meetings is by bringing the rest of your team up to speed on your progress. That way, everyone will be able to keep up with the discussion without the need to backtrack.
This is particularly important if you’re going to include members from outside of the design team in the meeting (which you should!). Spending a little time discussing your current milestone, your past progress, and any delays can ensure the meeting runs smoothly.
Let’s cover a few tips to help you deliver a concise and compelling recap:
- Be honest about your current level of progress.
- Discuss any issues you’ve dealt with recently or that you’re tackling right now.
- Be concise so you can dive into the rest of the review, and the team can begin to participate.
Don’t worry if you don’t have time to cover everything you need to during this introductory section – you’ll get the chance to dive into details later on.
Step #6: Listen to Your Team’s Feedback
Once you move into the feedback section, you need to make sure you’re taking your team’s remarks into consideration. They’ll likely have both positive and negative reactions to your work, and both are equally as important.
Remaining open to feedback is critical to spot errors you might have missed, or even to come up with new ideas. Of course, since this is a design review, you’ll need to do more than just listen. Here are a few tips to navigate through the feedback round of your meeting:
- If possible, come up with a list of specific questions about your design to get the ball rolling (e.g. “do you like this header, and if not, why?”).
- Ask attendees to write down their thoughts so you can review them later at a more leisurely pace.
- Go around the room and give everyone a few minutes to share their thoughts openly without fear of reprisals.
For this step, you’ll need to keep your feelings at the door in order to make progress. You’re probably going to hear criticism, and not taking that personally is key to being objective. Remember – it’s not completely about you, it’s about what’s best for the project.
Step #7: Follow Up After Your Review
At this stage, you’ve already caught the rest of your team up on your progress, and heard their feedback. All that’s left is for you and the other project leaders to take everything into consideration and make decisions based on that information.
If you manage to reach a consensus during the meeting, you’ll want to follow up with the rest of your team afterward, just to get the ball rolling. This enables you to check if they remember what was discussed, and to also let them know you value their feedback.
As with step number two, a simple email is often enough to get this done. Here are a couple of tips about what to include:
- Thank everyone for their time and input.
- Propose a date for your next design review if one isn’t set in stone yet.
- Ask them to contact you if they have any follow-up questions about what was discussed.
Remember, you can also use an app to handle the scheduling end of things, such as NeedToMeet. There are also other (simpler) options such as setting up a group calendar in G Suite:

The platform’s calendar also enables you to configure reminders, which makes it perfect for scheduling meetings.
Conclusion
Making sure you get your project’s design right is critical to its success, and holding a design review meeting is an easy way to check in with everyone involved. Regular meetings will enable team members to be on the same page, and can also help facilitate breakthroughs within the project.
These are the seven steps you need to keep in mind to ace your next design review:
- Figure out who needs to be there.
- Set a date and make sure everyone knows about it.
- Prepare the location for your review.
- Come up with a list of questions to structure the discussion.
- Make sure everyone is up to date on the project.
- Listen to your team’s feedback.
- Follow up after your review.
Do you have any questions about how to ace your next design review? Pick our brains in the comments section below!
Article thumbnail image by 0beron / shutterstock.com.
The post Ace Your Next Design Review With This Simple Guide appeared first on Elegant Themes Blog.