
Welcome to part 2 of this 4 part series on how to develop a product review site using Extra. If you are racking your brain on how to get started with developing a product review site, this series is for you. With its built-in review functionality and smart post categorization, Extra is specially equipped to create great looking reviews, product post templates, mega menus, and category layouts in minutes. Join me as we explore the power of Extra.
In part 1 of this series we began our journey of building a product review site by setting up the Theme Options and Theme Customizer Settings.
Today we are going to hit the ground running by adding our first product review as a new post and customizing the post layout for that post using the Divi Builder and Extra theme Settings. Once you have completed this tutorial, you will have a saved post template you can pull from your library to create the rest of your posts with ease.
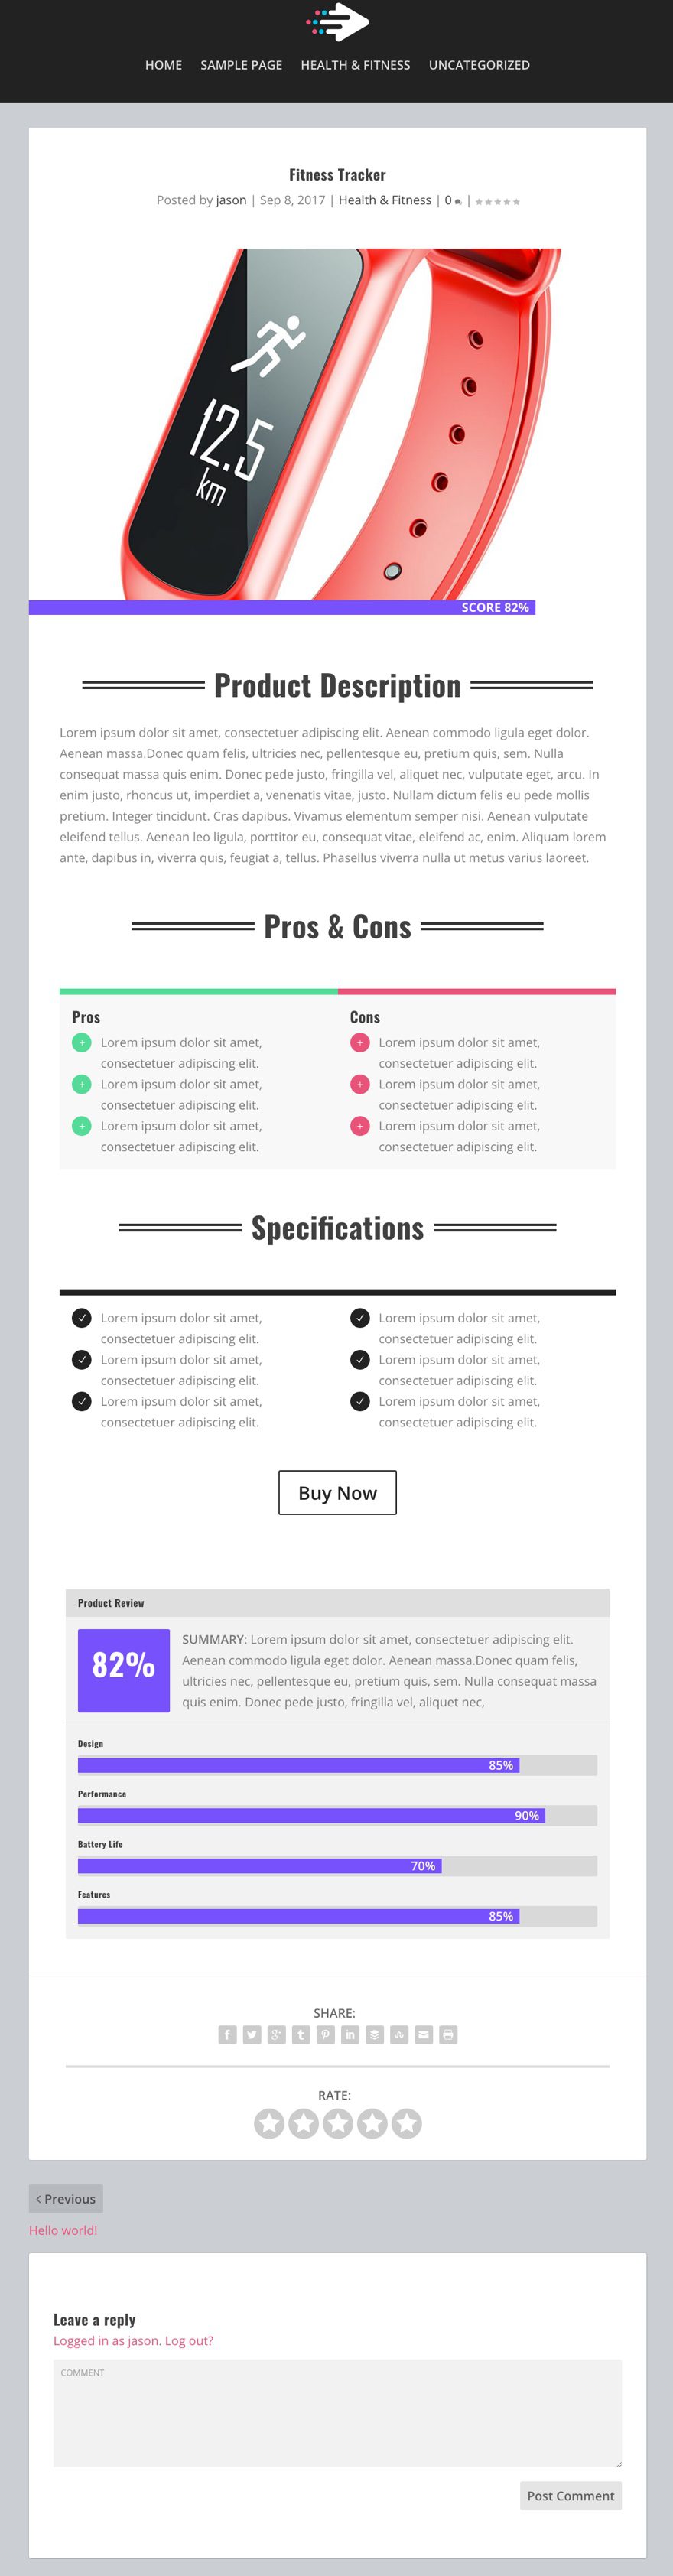
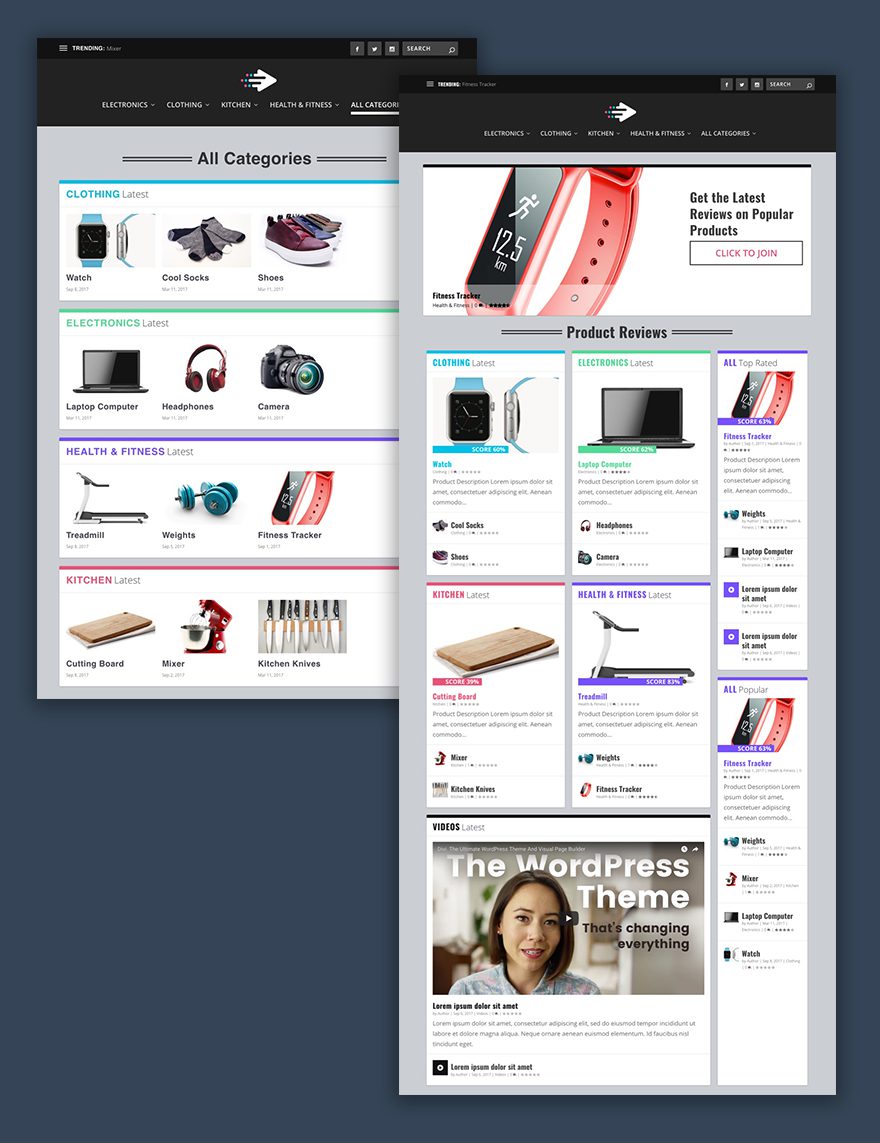
Here is a Sneak Peek of What We Are Going to Build
Preparing the Design Elements
Since we will be adding our products in this part of the series, you will need your product images. For this tutorial, I will have 4 categories with 3 products in each category so I will be using a total of 12 images. I’m using stock images from shutterstock with white backgrounds to give it a cleaner look.
To design the post layout we will be using the Visual Builder and a little Custom CSS.
Let’s get started.
Adding Your First Product Review as a New Post
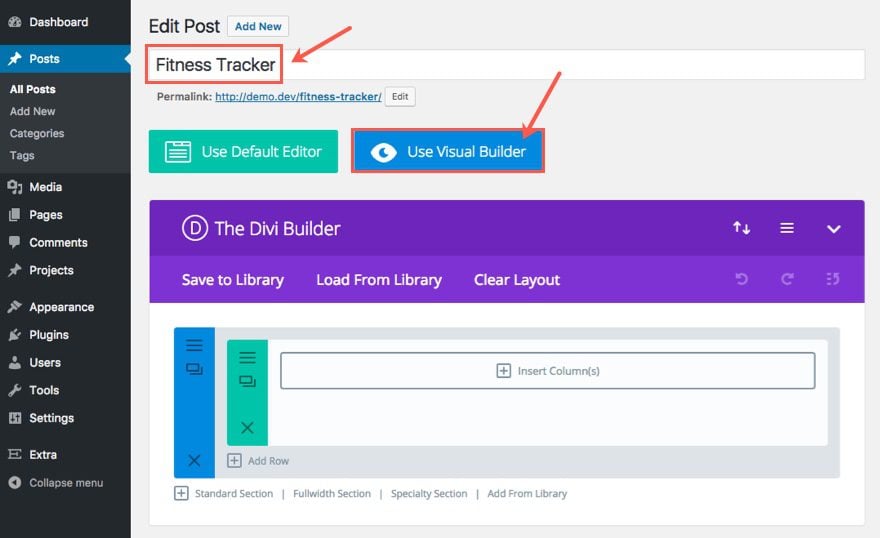
From the WordPress dashboard, go to Posts > Add New.
Each post is going to be your product review so the name of your post should be the name of your product. Since my product is going to be a fitness tracker I will enter “Fitness Tracker” as the title of my post.
Note: if you haven’t already, now is a good time to set your permalink settings to the “Post Name” option so that your URL will contain only the product name (your preference of course).
Next, click the “Use Divi Builder” button and then the “Use Visual Builder” button to deploy the Visual Builder.
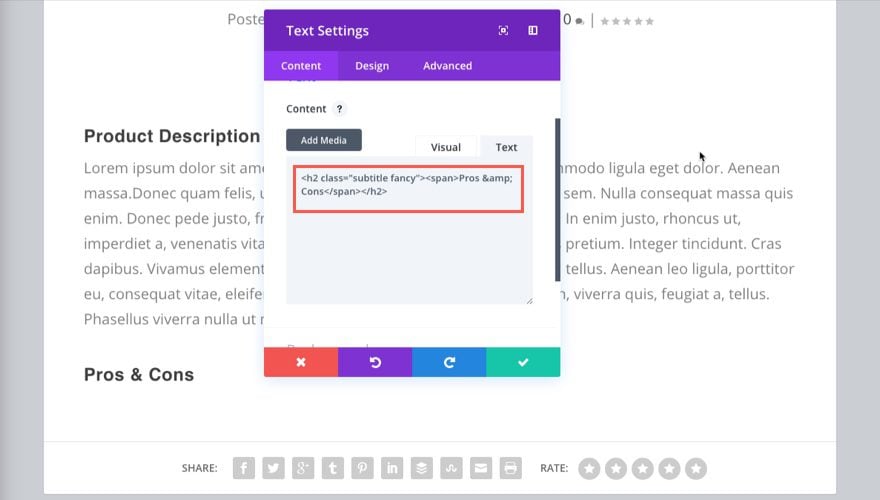
From the Visual Builder, insert a one-column row and add a text module to the column.
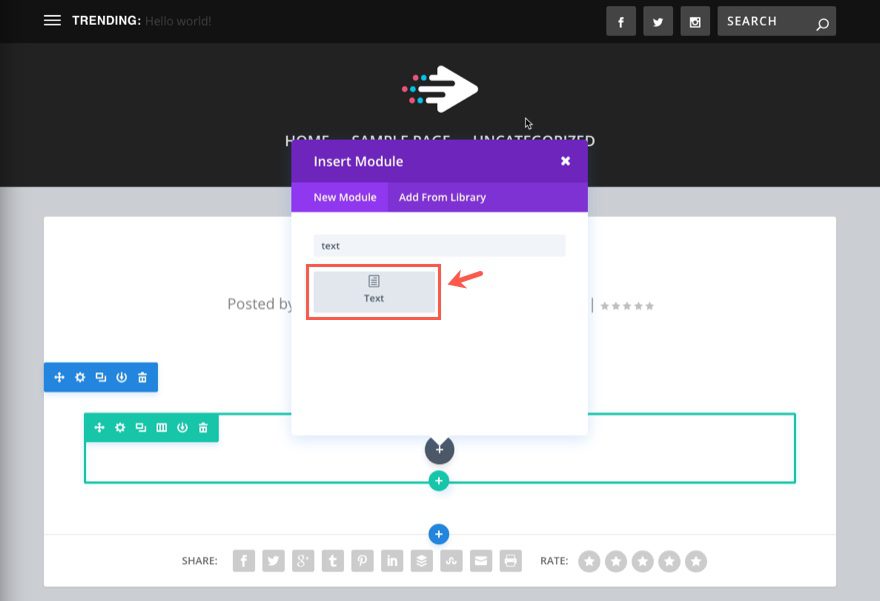
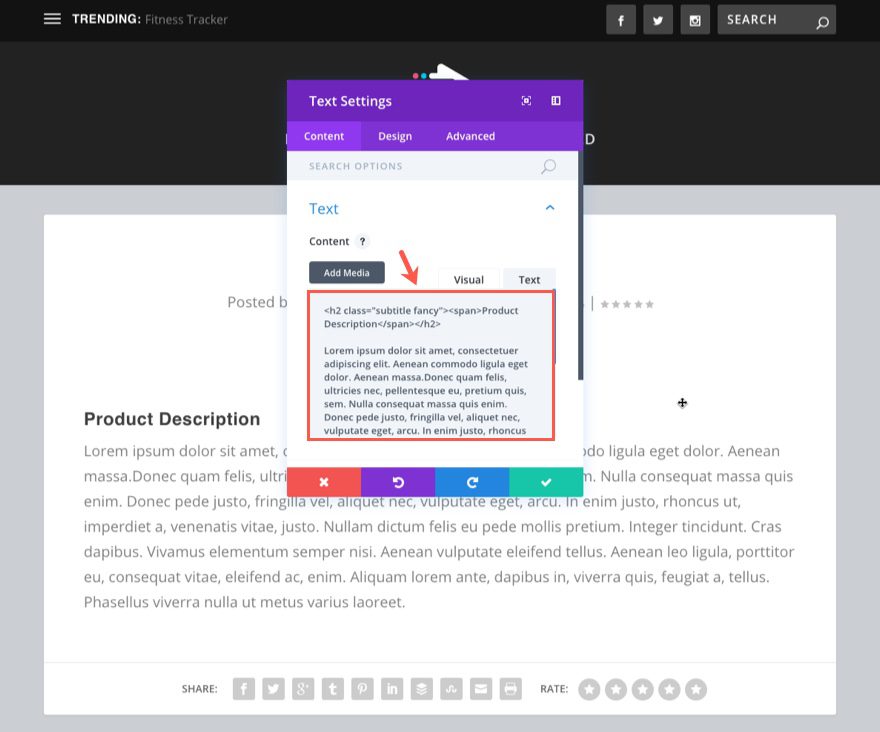
In the content tab of the Text Module Settings, enter the following html in the content box (make sure you are working in the “text” tab and not the “visual” tab):
<h2 class="subtitle fancy"><span>Product Description</span></h2>
This will serve as our “fancy” subtitles for different sections. We will style it with custom CSS later.
Right underneath the h2 tag you can add your product description text. I’m using some “lorem ipsum” for now.
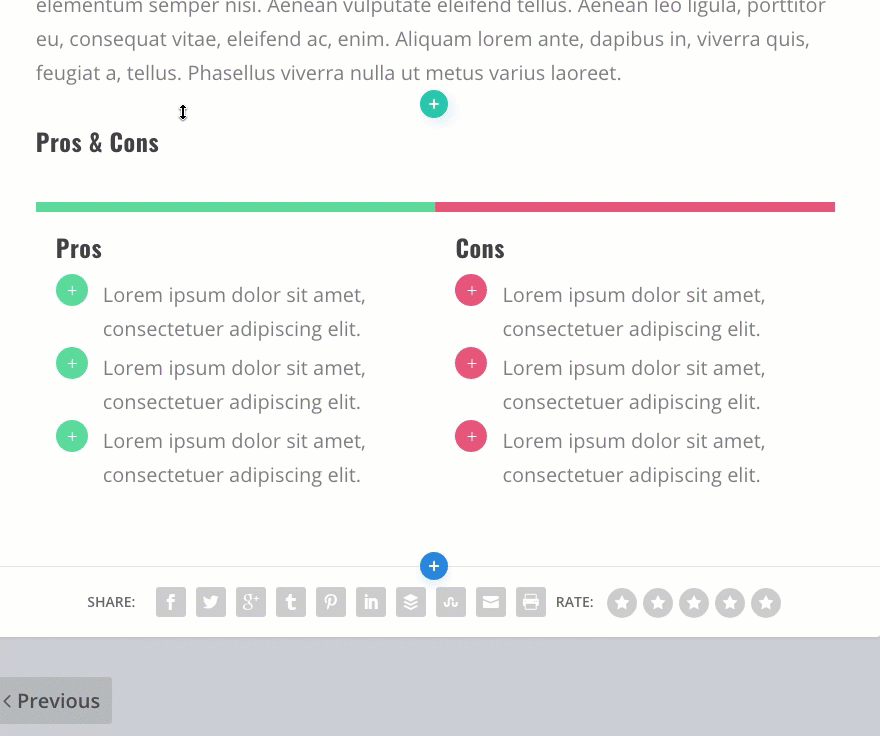
Add another one-column row below your current row and add another text module in it. In the Text Module Settings, add another html subtitle by inserting the following “Pros & Cons” h2 tag in the text tab of your content section.
<h2 class="subtitle fancy"><span>Pros & Cons</span></h2>
This is will begin the Pros and Cons section of your product review.
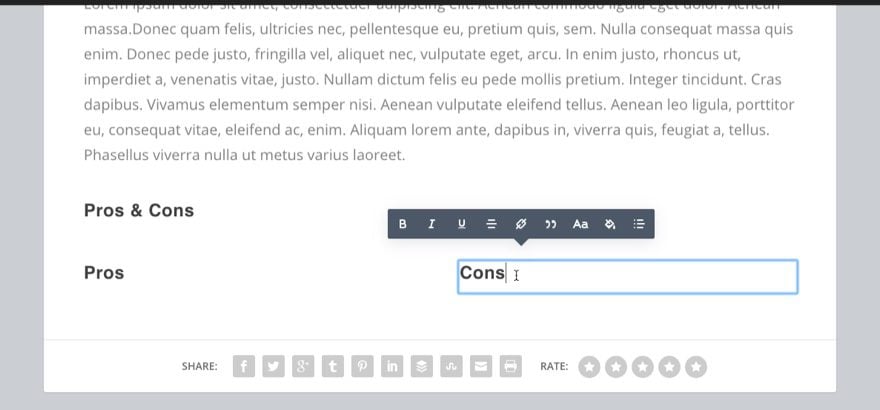
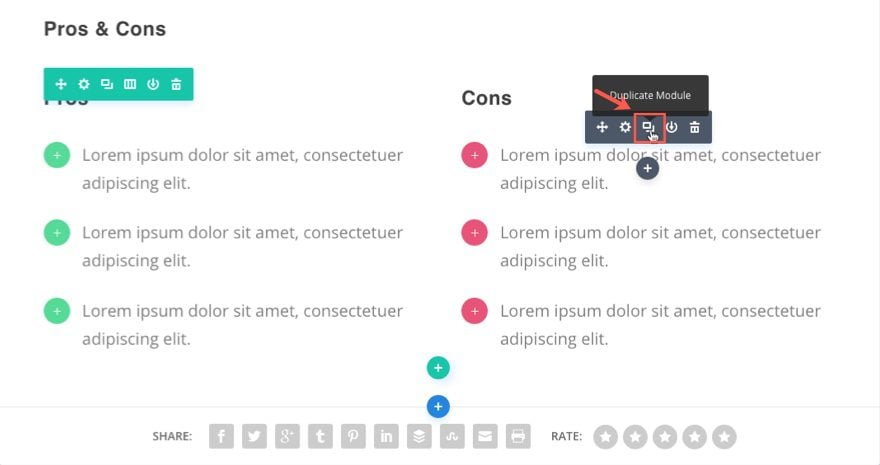
Next add a one-half one-half (two-column) row under the previous one. In the left column add a text module and put an h3 title with the text “Pros”.

Now duplicate that text module and drag the duplicated module over to the right column. Change the h3 title in the new text module to “Cons”.
Tip: In the Visual Builder you can simply click on the text box and type the new title instead of opening the settings.
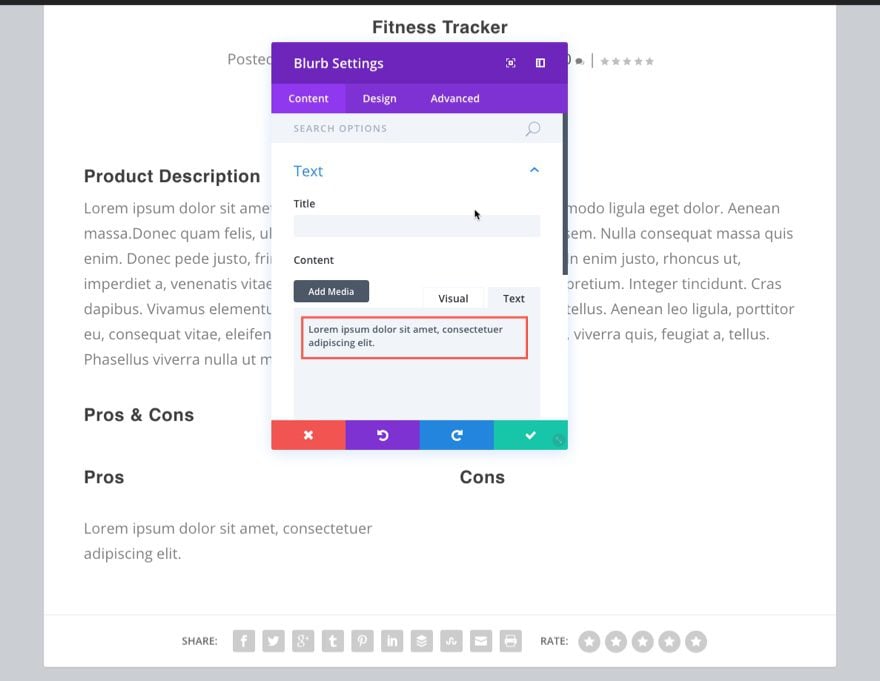
Next we are going to use the blurb module to add some sub-items under the Pros and Cons titles.
In the left column, under the “Pros” Text Module, add a Blurb Module. In the content tab of the Blurb Settings, add a line of text (I’m using dummy text for now) in the content box.
Then scroll down and select “Use Icon”. In the Icon box that appears, select the plus symbol.
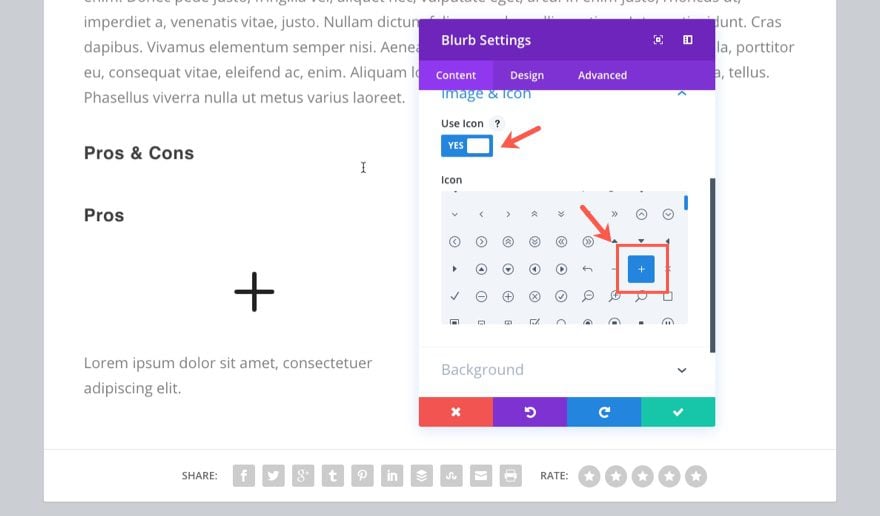
Click over to the Design tab and update the following:
Icon Color: #ffffff
Circle Icon: YES
Circle Color: #5bd999
Image/Icon Placement: Left
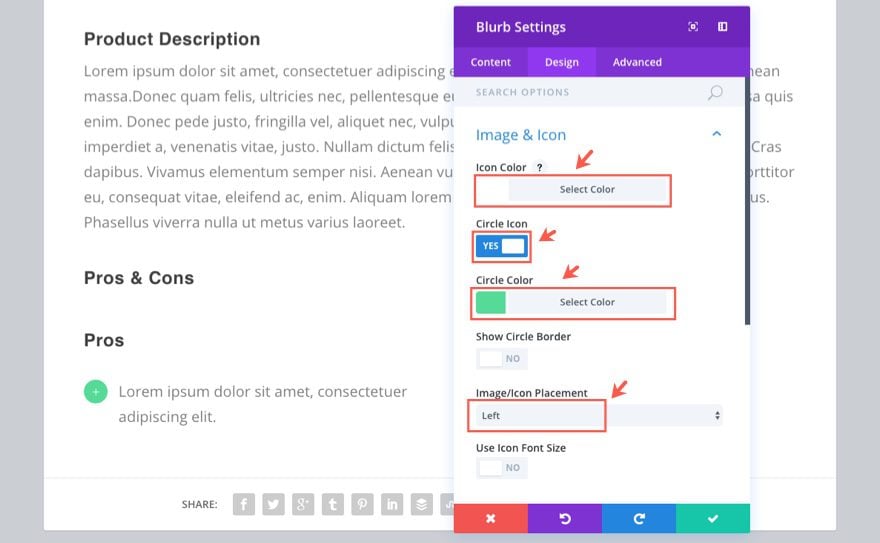
Save settings
Duplicate (or copy) that blurb module and drag (or paste) it under the “Cons” text module. Then update the Blurb Settings Design tab with the following circle color: #e6567a
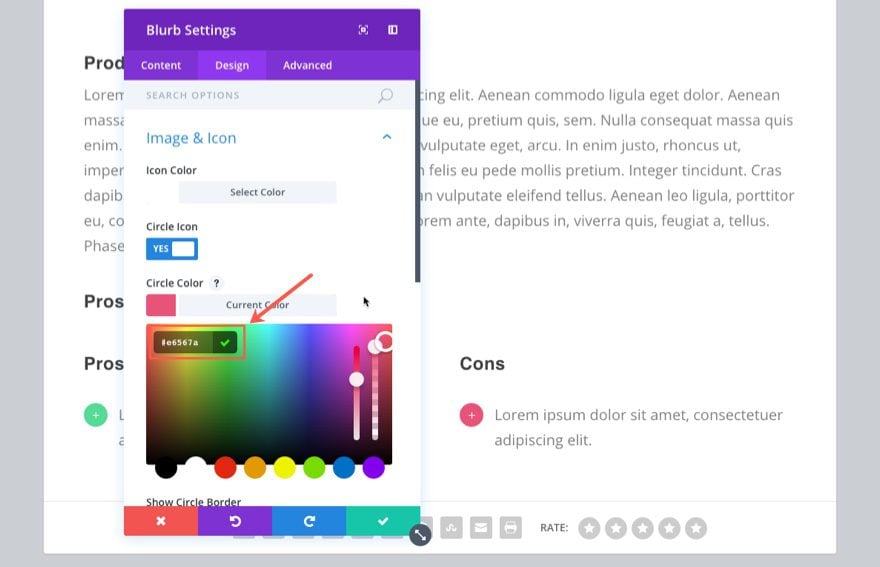
Save Settings
Now duplicate the blurb modules in each column a few times since we don’t know how many you may need for a certain product.
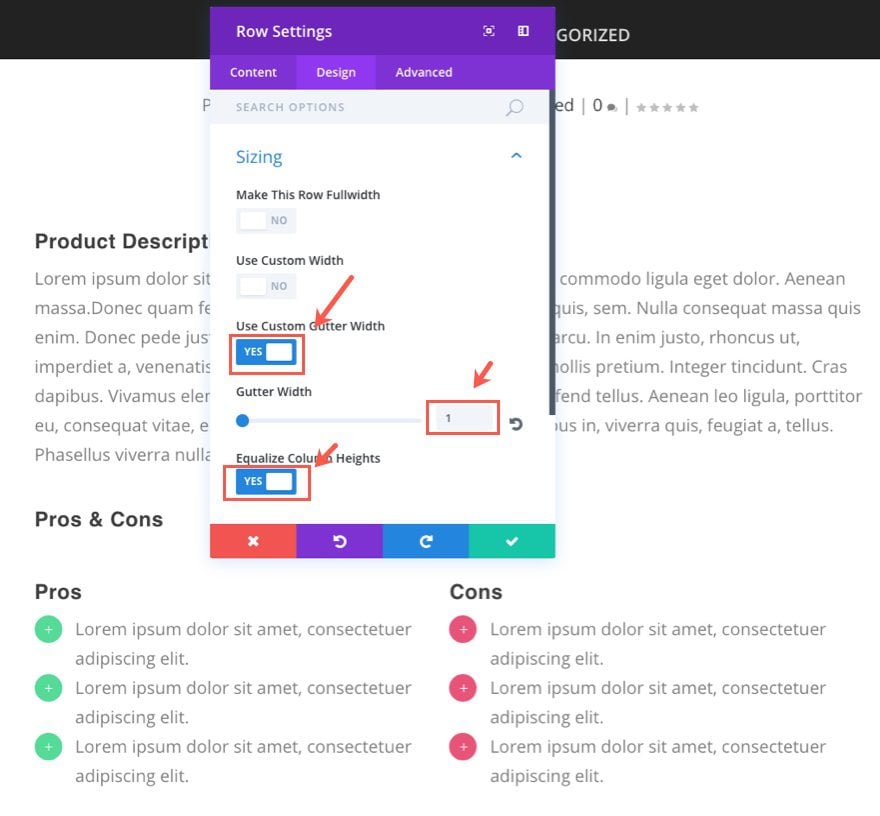
Now go to the row settings that contain your pros and cons. Under the content tab, update the following:
Column 1 background: #f8f8f8
Column 2 background: #f8f8f8
Under the Design tab, update the following:
Use Custom Gutter Width: YES
Gutter width: 1
Equalize Column Heights: YES
Column 1 padding: 20px (top), 20px (right), 20px (bottom), 20px (left)
Column 2 padding: 20px (top), 20px (right), 20px (bottom), 20px (left)
Under the Advanced tab, add the following custom CSS to the Column 1 Main Element text box:
border-top: 10px solid #5bd999;
Add the following CSS to the Column 2 Main Element text box:
border-top: 10px solid #e6567a;

Tip: If you have an updated version of Extra, you should have the ability to apply the new animations to your website. Add an animation to the Pros and Cons row by going to the Row Settings under the Design tab and selecting the Animation Style you want. This will make your Pros and Cons section pop as the user scrolls down the page.
Save Settings
Duplicate (or copy) the second row that hold the subtitle “Pros & Cons” and drag (or paste) it under the row we just finished. Then change the h2 header to “Specifications”.
Duplicate the two-column row that contains the pros and cons list items and put it under the new text module with the title “Specifications”. Delete the two text modules that contain the headers “Pros” and “Cons” from the column.
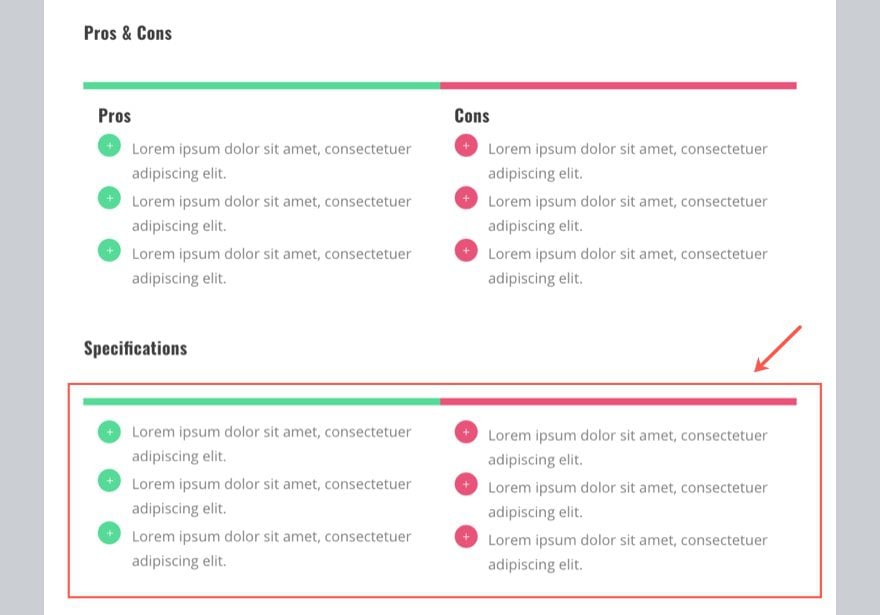
Now click on the Blurb Settings for first blurb module in the left column.
Under the Content tab, change the Icon to a checkmark.
Under the Design tab, change the Circle Color to #222222.
Save Settings
Now delete the other blurb modules and replace them with the one your just updated by duplicating and dragging them to the right places.
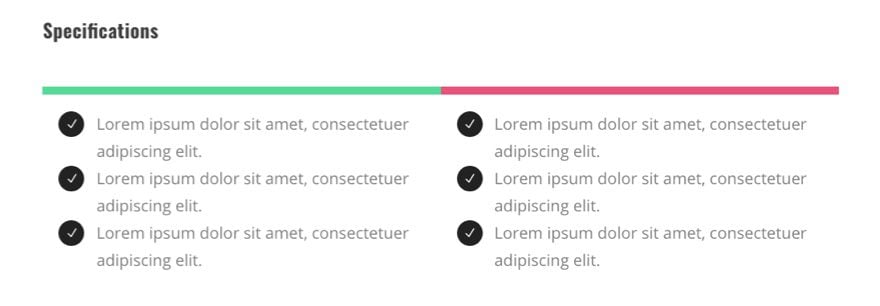
Now go to the Row Settings and replace the Custom CSS in both the Column 1 Main Element textbox and the Column 2 Main Element text box with the following:
border-top: 10px solid #222222;
Save Settings
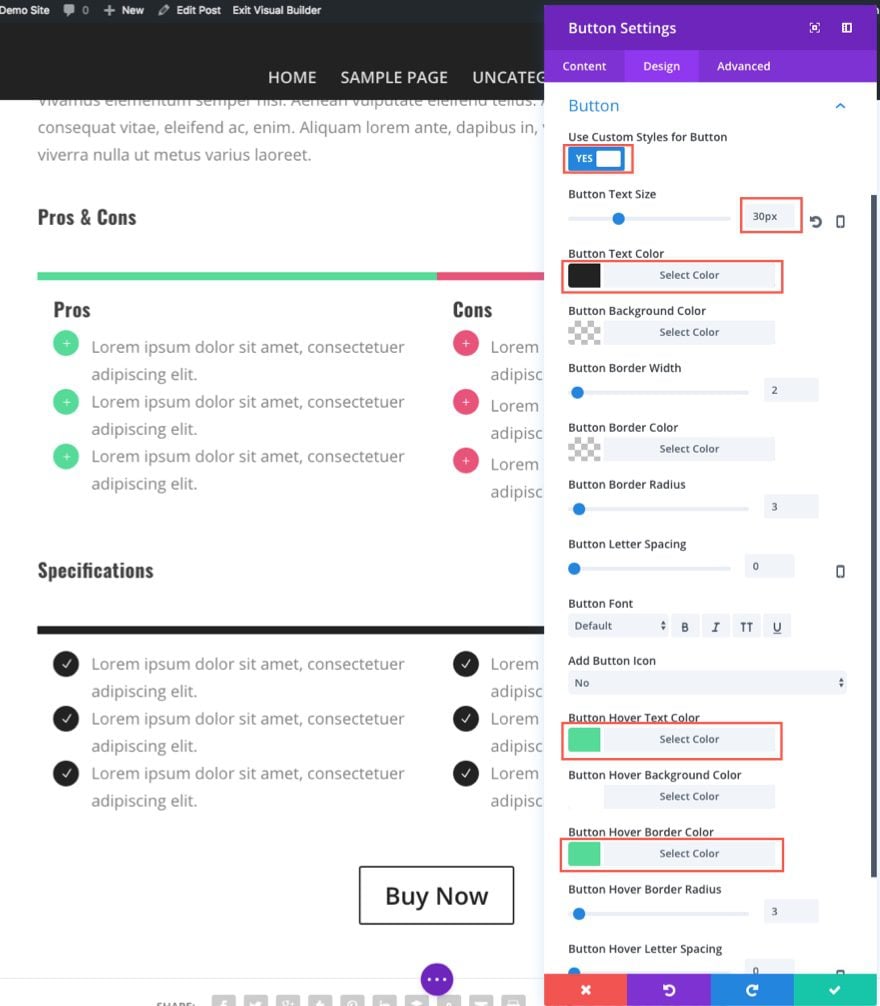
Now the last thing we need to add to this post layout is a “buy” button. Go ahead and create a new one-column row and add a Button Module. Then update the button module settings as follows:
Under the Content tab…
Button Text: Buy Now
Button URL: [enter URL] (most probably this will eventually be an affiliate link to a third party site)
Url Opens: In the New Tab
Under the Design tab…
Button Alignment: Center
Text Color: Dark
Use Custom Styles for Button: YES
Button Text Size: 30px
Button Text Color: #222222
Button Hover Text Color: #5bd999
Button Hover Background Color: #ffffff
Button Hover Border Color: #5bd999
That’s it for your the content section of your product post layout. Make sure you save the page. Once you have saved the page, exit the visual builder to edit the post from the wordpress dashboard.
Adding Reviews to Your Post
Scroll down to the bottom of the post editor page and find the box titled “Review Box Contents”.
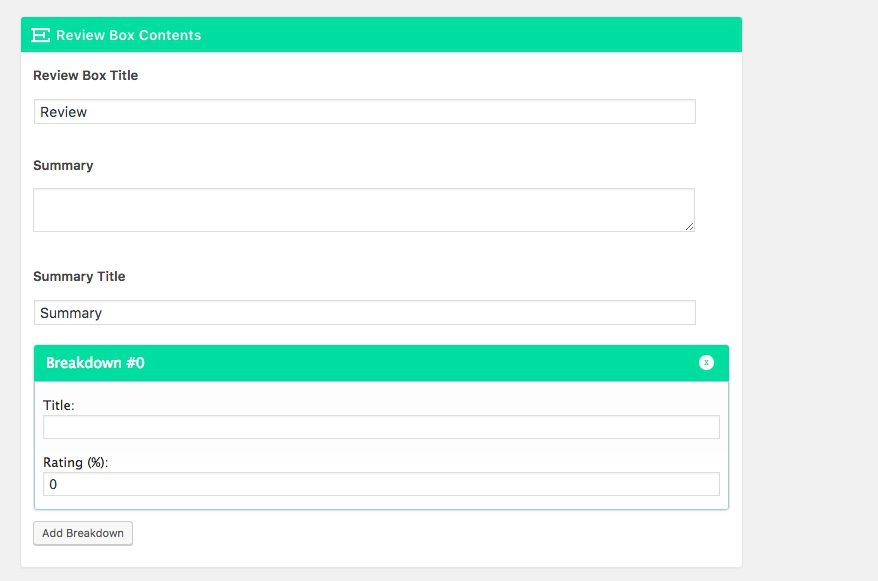
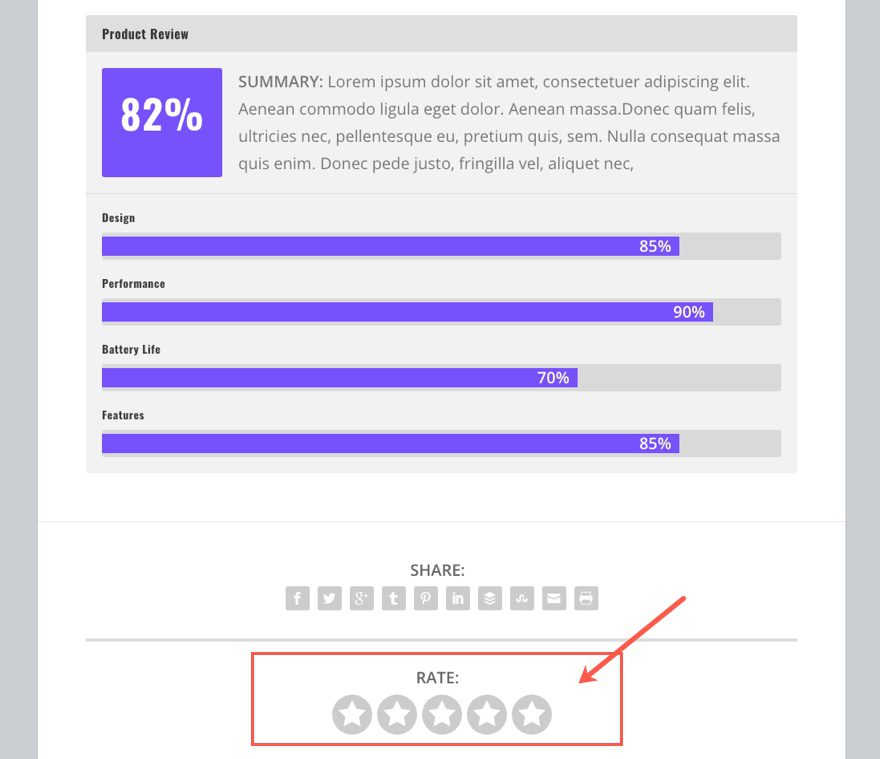
This smart addition to Extra allows you to add a product rating to your posts. The rating system is designed to have one or many breakdowns. A breakdown is a component that makes up the overall rating. For example, if you are going to be rating a camera, example breakdowns would include things like design, performance, battery life, etc… These are components of the camera to which you can add a separate rating percentage. Extra will then calculate the overall rating percentage based on those components and display it in the Review box. The Review box also has helpful input areas for a review box title, summary, and summary title.
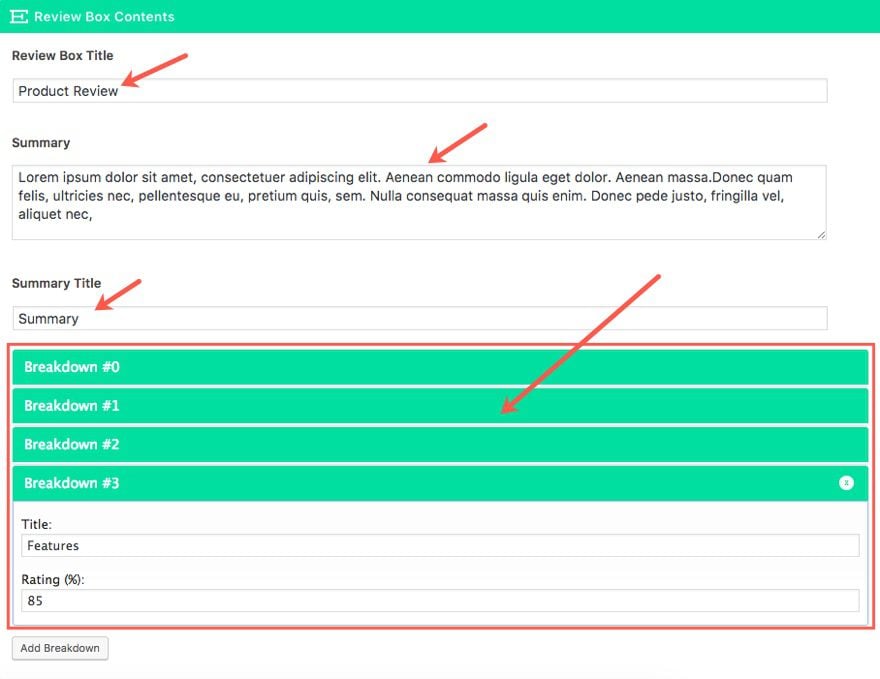
To add your review, update the Review Box Contents with the following:
Review Box Title: [enter title for the review box] (I suggest “Product Review” or “Editorial Review”)
Summary: [enter summary]
Summary Title: [enter a title for the summary] (I’m just using “Summary” to keep it simple)
Next add four breakdowns with a title and a rating percentage as follows:
Breakdown #0
Title: Design
Rating: 85%
Breakdown #1
Title: Performance
Rating: 90%
Breakdown #2
Title: Battery Life
Rating: 70%
Breakdown #3
Title: Features
Rating: 85%
Now that you have your Rating in place lets put some final touches on our post before we publish.
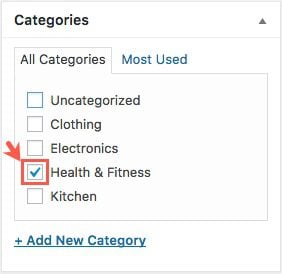
Assign a Category to your Post
Make sure you assign the right category to your post/product by clicking the checkbox next to the category. In this case, since this post is for a fitness tracker, I’m going to select the category “Health & Fitness”. Also, uncheck the box for “uncategorized”.
Here is a breakdown of the products and their categories that I’m using:
- Clothing
- Shoes
- Watch
- Cool Socks
- Kitchen
- Kitchen Knives
- Mixer
- Cutting Board
- Health & Fitness
- Fitness Tracker
- Weights
- Treadmill
- Electronics
- Camera
- Headphones
- Laptop Computer
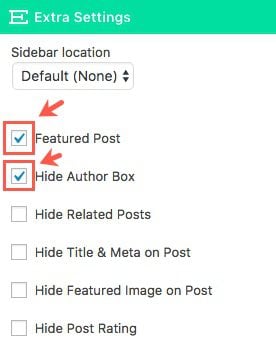
Not far down the page you will find the Extra Settings box. These controls allow you to override the default theme settings for this particular post. You can of course customize this however you want, but for this example, I check the following boxes:
Featured Post (This allows the product to be pulled as a featured post on certain category modules.)
Hide Author Box
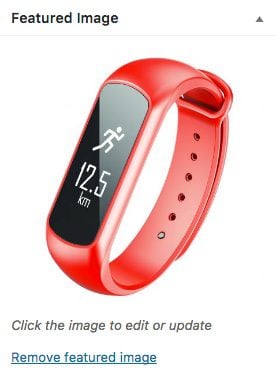
Finally, add your featured image. Make sure it is at least 1280 px wide since we will be using a fullwidth 0ne-column layout for the featured image.
Publish your post.
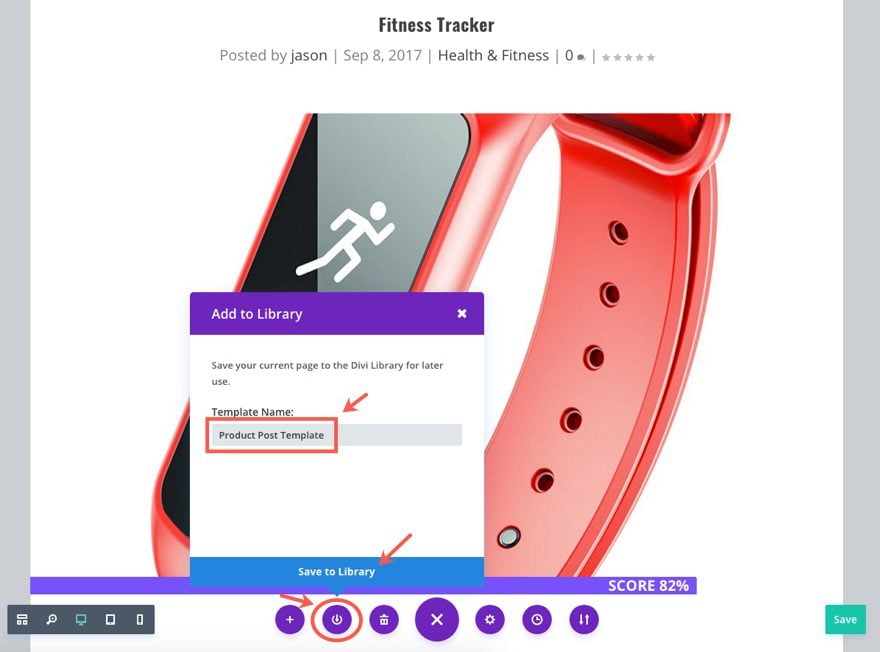
Go ahead and save this template so that you can duplicate this process for all of your products/posts. To save the template, click on the “Save to Library” icon in the visual builder menu at the bottom of the page, enter a template name and click Save to Library.
Now when you go to add the rest of your posts, you can load this template from the library and fill in the content for the new product review. The process then becomes a lot quicker.
Adding Custom CSS
We are almost done. We need to add some custom CSS to our theme to style some elements of the post. To do this, from the WordPress Dashboard, go to Theme Customizer > Additional CSS and enter the following:
/****************************
comment box background
*****************************/
#comment-wrap {
    padding: 75px 40px;
	background: #fff;
	border-radius: 3px;
	box-shadow: -1px 0 2px 0 rgba(0,0,0,0.12), 1px 0 2px 0 rgba(0,0,0,0.12), 0 1px 1px 0 rgba(0,0,0,0.24);
}
@media (min-width: 980px) {
/***************************
Post Header Size
****************************/
h1.entry-title {
    font-size: 48px;
}

/***************************
Fancy Subtitle
****************************/
.subtitle {
  margin: 1em 0 !important;
font-size: 48px;
}
.fancy {
  text-align: center;
  padding-bottom: 0px;
}
.fancy span {
  display: inline-block;
  position: relative;
  line-height: 1.3em;
}
.fancy span:before,
.fancy span:after {
  content: "";
  position: absolute;
  height: 5px;
  border-bottom: 4px solid #333;
  border-top: 4px solid #333;
  top: 40%;
  width: 100%;
  max-width: 200px;
}
.fancy span:before {
  right: 100%;
  margin-right: 15px;
}
.fancy span:after {
  left: 100%;
  margin-left: 15px;
}

/***************************
Star Rating and Social Icons Style
****************************/
.post-footer .rating-stars .rating-star {
width: 50px;
height: 50px;
}

.et_extra_layout .et_pb_column .module-head h1, .module-head .module-filter {
font-size: 28px;
}

.post-footer .rating-stars #rate-title, .post-footer .social-icons .share-title  {
	display: block;
    font-size: 20px;
}

.post-footer .rating-stars, .post-footer .social-icons {
width: 100%;
margin: 0 auto;
padding: 30px 0;
}

.post-footer .social-icons {
border-bottom: 4px solid #dddddd;
}
}

/***************************
Mobile Adjustments
****************************/
@media (max-width: 980px) {
.subtitle {
font-size: 30px;
text-align: center;
}
}
Save & Publish
Now let’s check out our result.

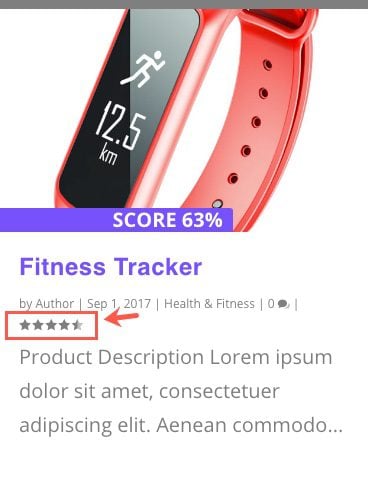
The User Rating System
Notice that at the bottom of the post you have a user star ration system.
Here your visitors can submit a start rating on any product simply by hovering over the star icons and clicking on the star level of their choosing.

The overall user rating will be displayed in the meta data on the post excerpt.
You can always choose to disable this feature in the Extra Settings box.
Well, that’s it. I hope you enjoyed part 2 of this series.
Coming Up: Building Category Layouts to Display Your Products
In part 3, I’m going to show you how to build the category layouts for the Homepage and the All Categories page. Make sure that you use your new post template to add at least 3 products for each of the 4 categories to prepare for part 3 of the series. You will need those to populate the category modules that will display your products.
Here is what you can expect to build in part 3:
Feel free to submit questions or comments below. I look forward to hearing from you.
The post Building a Product Review Site With Extra – Part 2 appeared first on Elegant Themes Blog.