
I love taking courses online. There is something about starting a well designed, well-organized e-course with some great content. If done well, these e-courses can keep you motivated with a sense of accomplishment. But learning from a great e-course and creating one are two totally different experiences. And in my experience, creating a Learning Managment or E-Course website can be an overwhelming process.
In this post, I’m hoping to take the edge off of the intimidation of building your own e-course by showing you how to use Divi’s premade Learning Management Layout pack to create a fully functional e-course website.
Before we get into building, here is a breakdown of what we will accomplish together:
- 1. Create a Lesson Page using pieces of the existing layout.
- 2. Create a Course Menu to be displayed on each lesson page that shows all the lessons for the course.
- 3. Use the WP Complete Plugin to give users ability to keep track of their progress for each course.
- 4. Use the Restrict Content Pro plugin to setup both Free and Paid membership levels.
- 5. Learn how to quickly design the membership pages to match the website using elements from existing layout.
- and more…
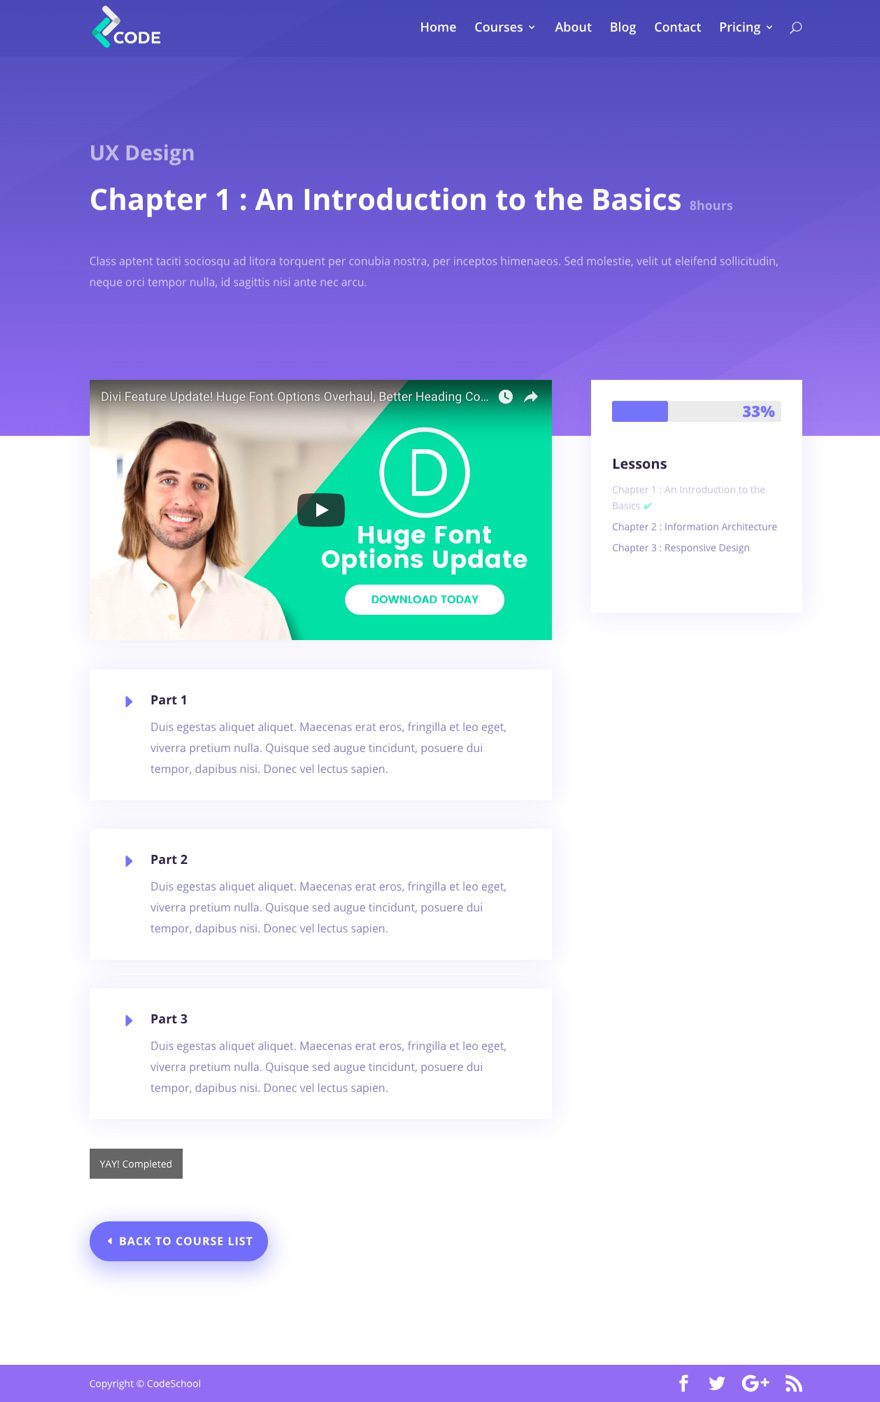
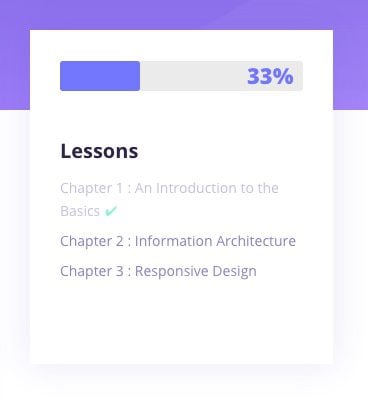
And, to satisfy your curiosity, here is a sneak peak of the lesson page you will be creating with the complete button and the progress bar above the course menu in the sidebar…
But first, let’s get things set up.
Creating a Learning Management (LMS) Website with Divi
Subscribe To Our Youtube Channel
Setting Everything Up
#1 – Install Divi
Make sure you have the most updated version of Divi installed. And, it is always good to have a child theme active as well.
#2 – Upload The Layout Pack to Your Divi Library
We will be using Divi’s Learning Management (LMS) Layout Pack. Download the layout pack, unzip it, and install the coding-school_All.json file to your Divi Library. Then create nine new pages by using the each of their corresponding layouts.
#3 – Install and Activate the Restrict Content Pro Plugin
This is the plugin we will be using for the membership functionality of the e-course site. We will use this to set up a free and premium (paid) subscription to the course.
#4 – Install and Activate the WP Complete Pro Plugin
This plugin will be used to keep members (or students) aware of their progress as they complete each lesson of each course. It has cool circle and bar graph visuals to show progress as well as a handy check mark next to each completed lesson the navigation menu.
Once you are all set up, you are ready to build your e-course.
Let’s get started.
Rename the Course Page
Your layout pack comes with a courses page layout.
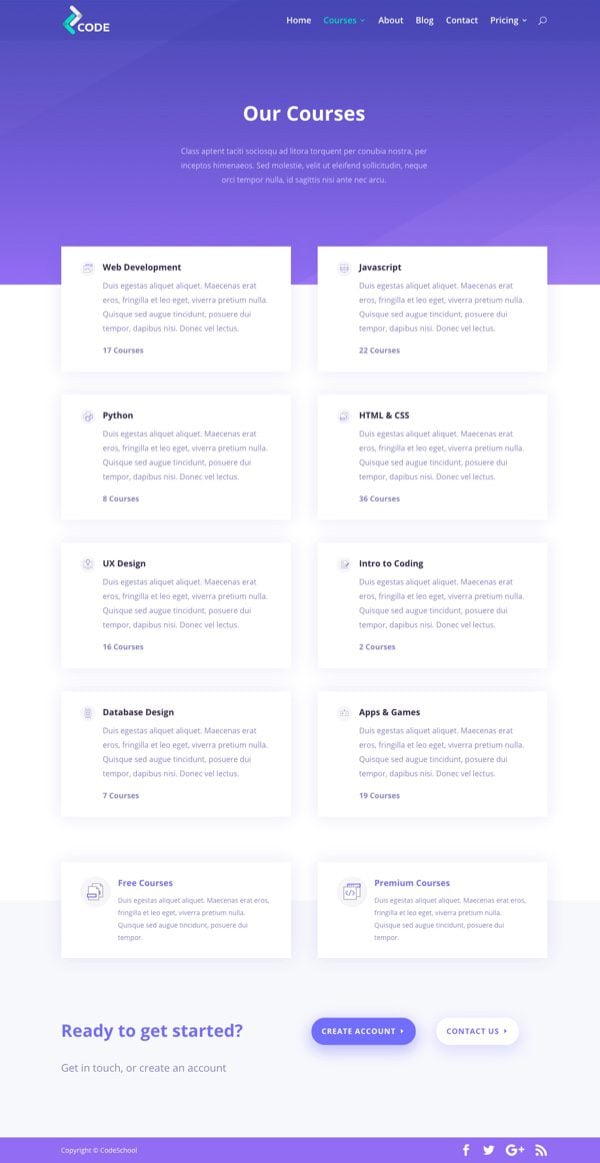
Each of the courses listed on that layout should (if you plan on teaching all those courses) link to a specific course page which uses the course page layout.
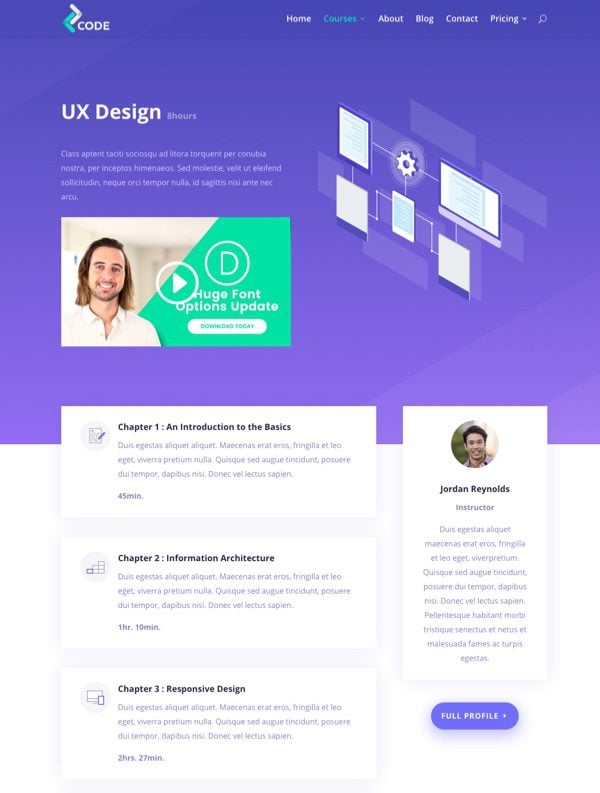
Note: Notice that I replaced the button in the header of the course page above with a video module. That way I don’t have to redirect to a different page to show the preview of the course. Just an idea.
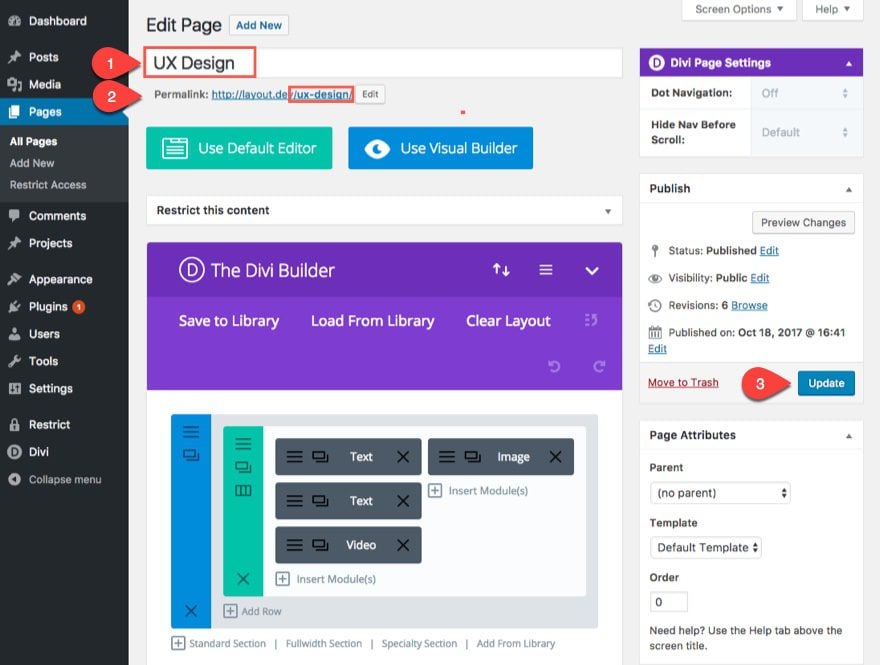
As you can see, for this example, the course page layout is using the UX Design course, so go ahead and edit the page and change the Course Page name from “Course” to “UX Design”. And update your permalink as well.
Building the Lesson Page
Your new course page, now named “UX Design”, is broken down by chapters (you can also think of them as lessons) with a short description of each. Each of these chapters/lessons will need to redirect to its own lesson page. To build this lesson page, we are going to use the course page layout and make some adjustments.
The first chapter/lesson listed in the UX Design course page is called “Chapter 1 : An Introduction to the Basics”. Let’s build our lesson page for this one.
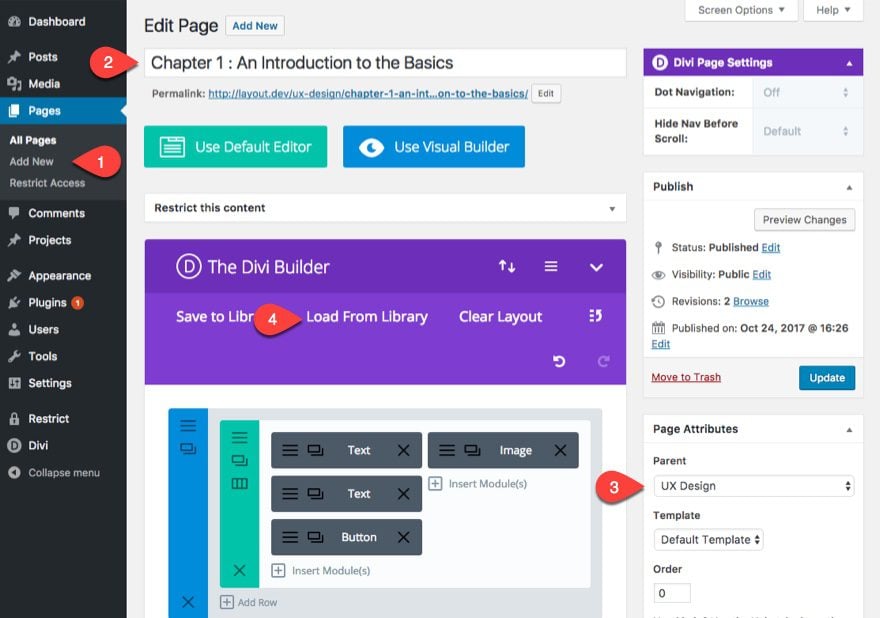
Go ahead and add a new page and enter “Chapter 1 : An Introduction to the Basics” for the title.
Since this lesson is a child page of the UX Design course page, click the parent dropdown inside the Page Attributes box in the right sidebar and select UX Design as the parent.
Next click to use the Divi Builder, click Add From Library, and select the Course Layout.
Save Draft
Adjust the Header Layout
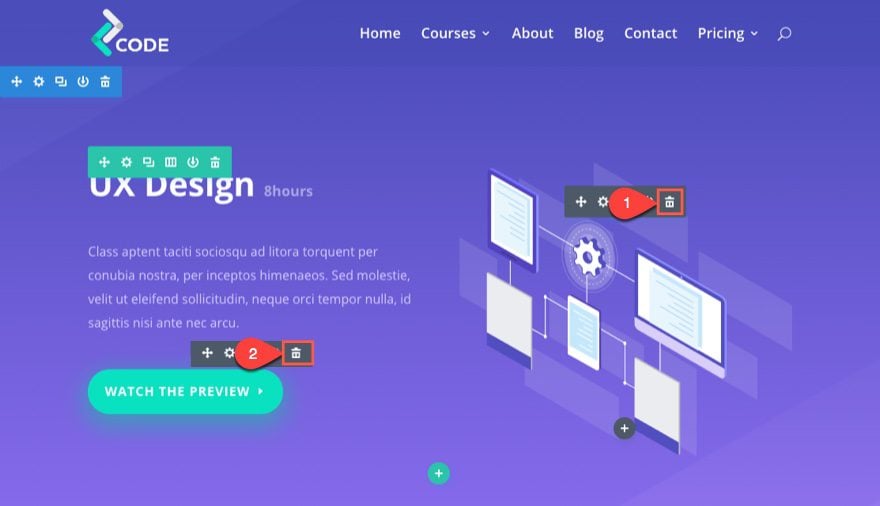
Now click to use the Visual Builder to make some adjustments to the page layout. First, let’s change the layout of our header in the top section a bit. From the visual builder, delete the image module in the right column and the green button at the bottom of the first column.
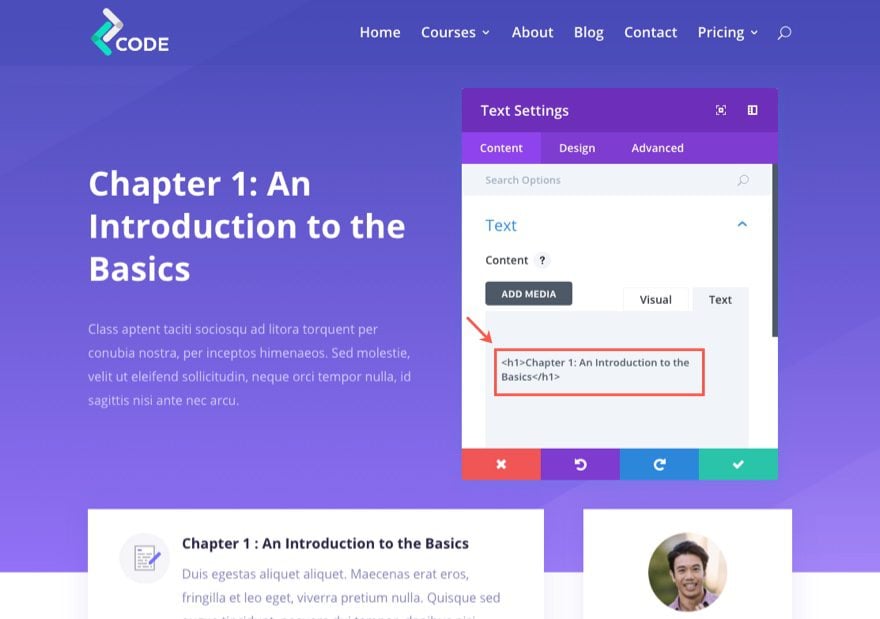
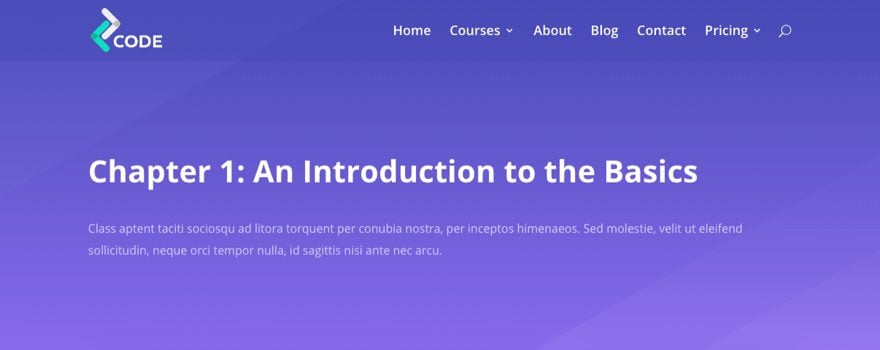
Next click to edit the settings of the top text module in the first column and change the h1 header text to “Chapter 1 : An Introduction to the Basics”.
Then change the column structure of the row to one column instead of two.
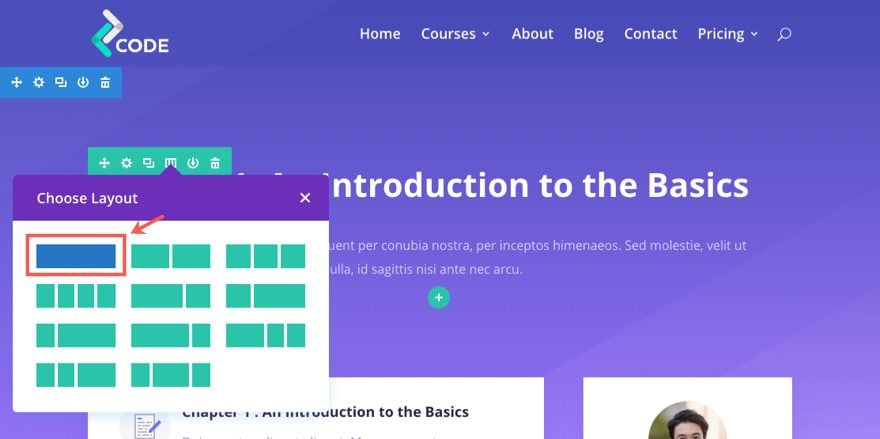
Now your header should look like this.
Change Blurb Content
In the specialty section below, edit the settings of the first blurb in the left content section and update the following:
Content Tab
Title: Part 1
Content: [This will become your content for the course; I’m leaving the mock content in there for now]
Use Icon: YES
Icon: select right arrow icon
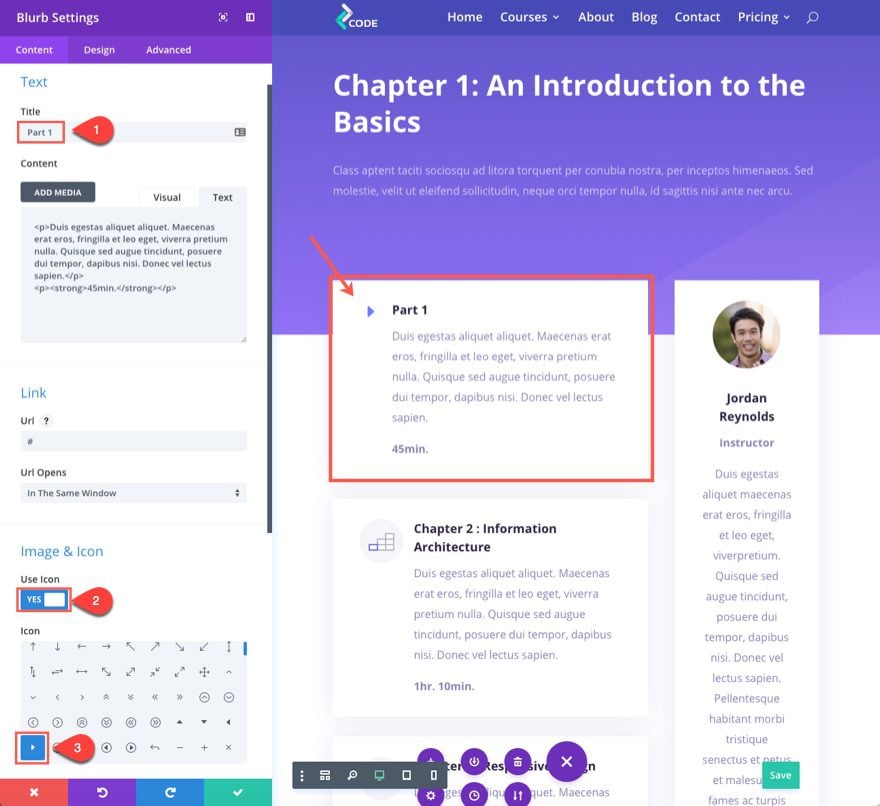
Note: the icon color will be taken from the Theme Accent Color set in the theme customizer so make sure you update the color there with a color that matches the site.
Save Settings
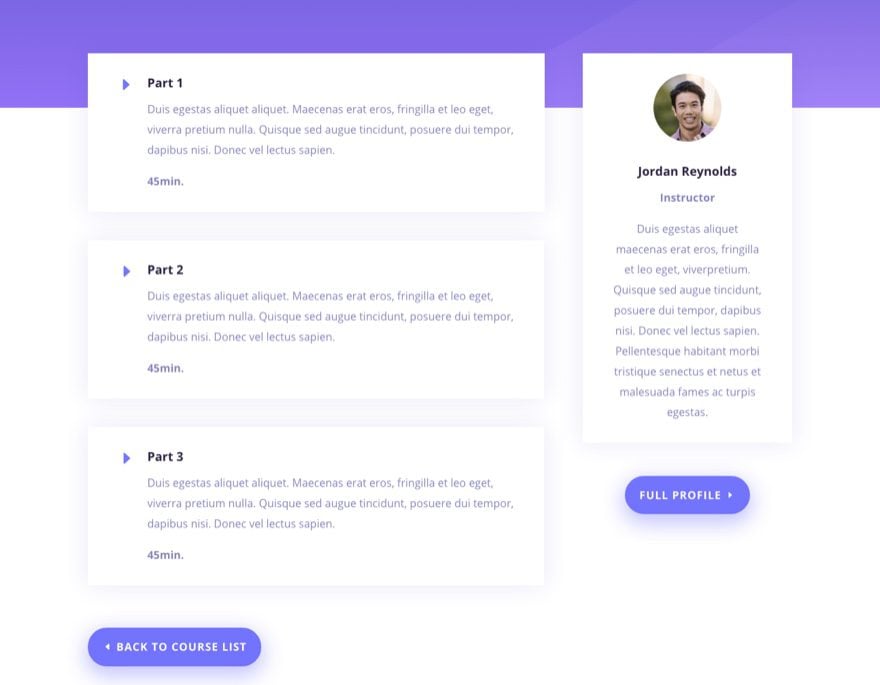
Now that you have one blurb module created, we can use this as a template for breaking up each part of the lesson on the page. Go ahead and duplicate the module you just created two times (or however many parts you want) and update each with a different title (i.e. Part 2, Part 3, ect…).
Then delete the other blurbs that we won’t be needing any more.
Now your layout should look like this.
Adding the Sidebar Widget
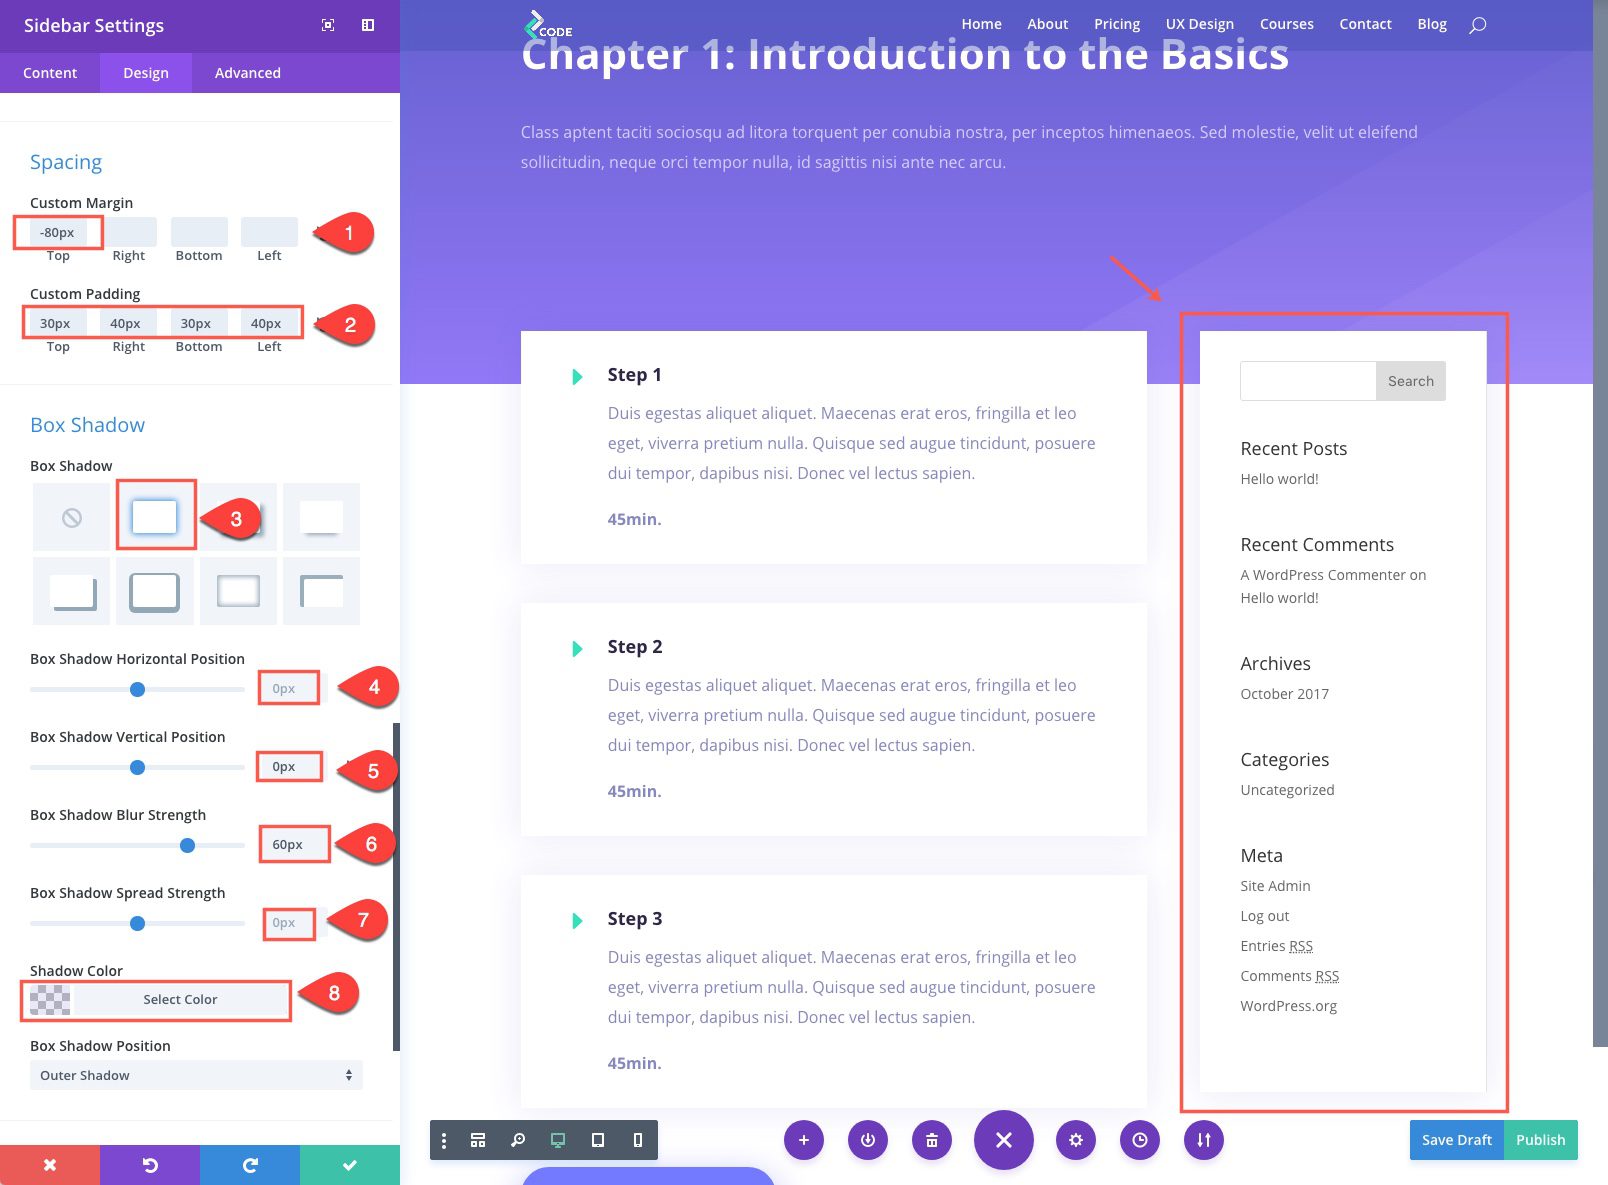
Add a Sidebar Module under the button module in the right sidebar of the specialty section. And, for now, just leave the default content settings that pulls the sidebar widget area content. We will eventually change that as soon as we create a custom widget area that includes the menu for the course.
Under the content tab, add a white background to your module.
To have your sidebar module match the design of the page, update the settings in the design tab as follows:
Custom Margin: -80px Top
Custom Padding: 30px Top, 40px Right, 30px Bottom, 40px Left
Box Shadow Horizontal Position: 0px
Box Shadwo Vertical Position: 0px
Box Shadow Blur Strength: 60px
Box Shadow Spread Strength: 0px
Shadow Color: rgba(71,74,182,0.12)
Animation Style: Zoom
Animation Direction: Up
Animation Intensity: 20%
Animation Starting Opacity: 100%
Save Settings
Note: It’s a good idea to go ahead and make this a global module so that you only have to make adjustments to one module for future updates. To do this select add to library, name it “lesson menu sidebar module”, select to make it a Global Module, and click Save.
Finally, delete the blurb module with the instructor and the “Full Profile” button module. Your page should look like this:
Save Page
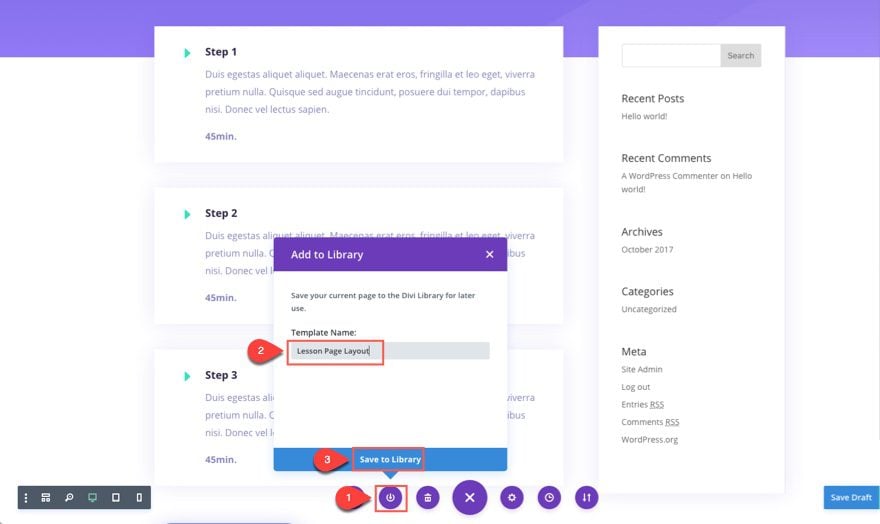
Now that we have one of our lesson pages built, let’s save it to our library so that we can use it for other lessons. From the visual builder, click the “Add to Library” button in the botton menu, enter “Lesson Page Layout” for the name of the template, and then save it.
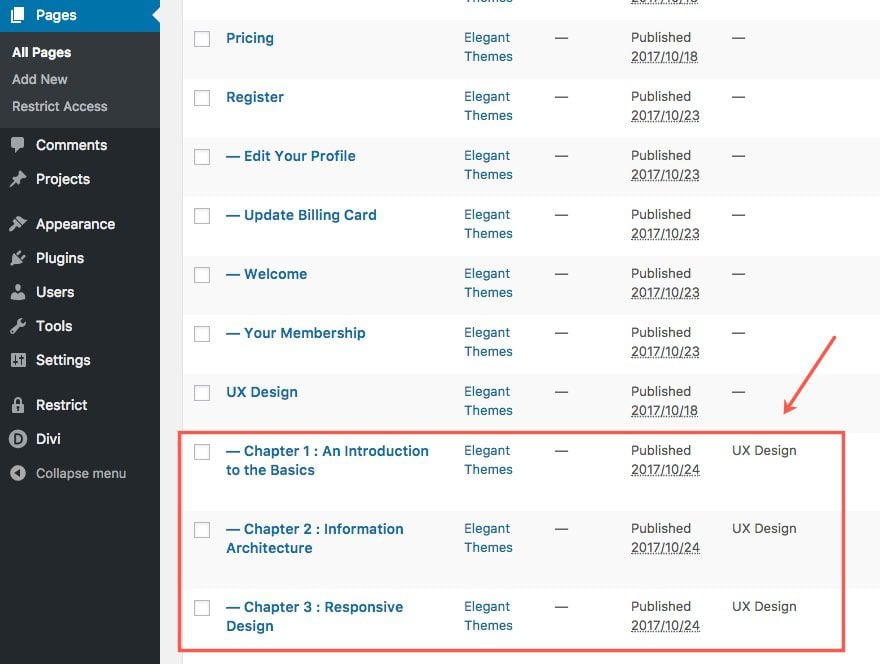
Go ahead and repeat the steps above to add two more lesson pages. Only this time, instead of using the course page layout, use the new layout you created called “lesson page layout”.
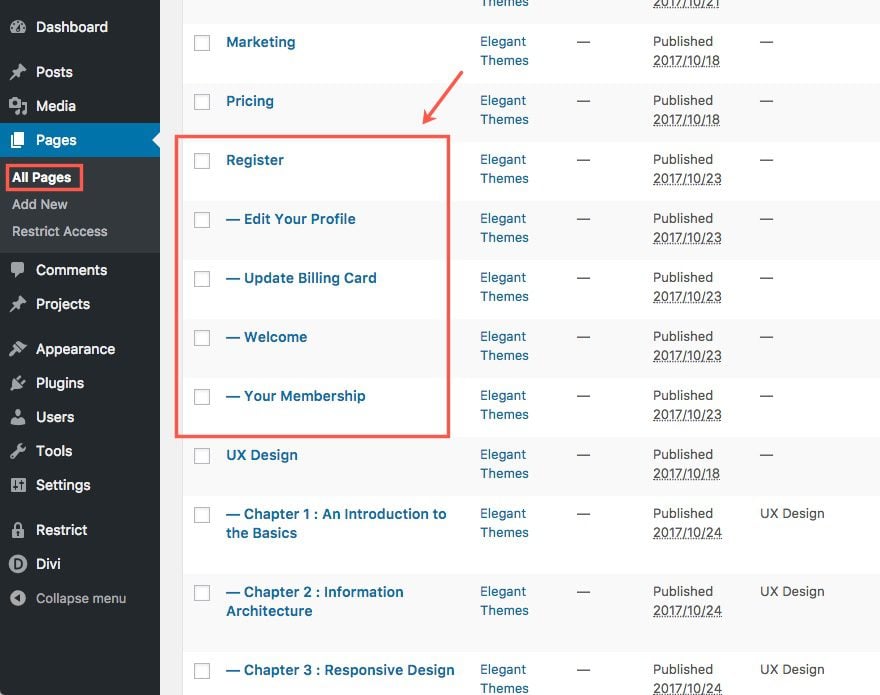
Once you are done you should have three lesson pages created with the following titles:
1. Chapter 1 : An Introduction to the Basics
2. Chapter 2 : Information Architecture
3. Chapter 3 : Responsive Design
Creating the Course Menu
Now that you have your lessons created, we can build our course menu. From the WordPress dashboard, go to Appearance > Menus.
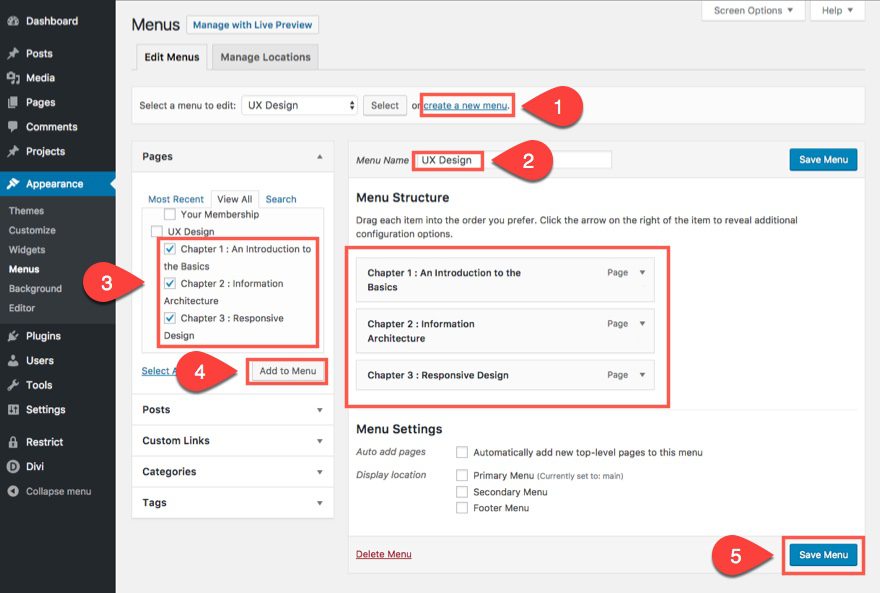
From the Menus page, complete the following steps:
1. Select “Create a New Menu”
2. Name it “UX Design”
3. Select the three lessons pages/chapters to the menu that you just created.
4. Click Add to Menu
5. Save the menu
Create the Custom Widget Area
To add the menu to our lesson page, we first need to create a custom widget area for it. From the WordPress Dashboard, go to Appearance > Widgets. Under the existing widget areas, locate the box used to create a new widget area. Enter the name “UX Design” and click “Create”. Now refresh the page. You should now see the new custom “UX Design” widget area. Drag the Custom Menu widget over inside of the “UX Design” widget area. In the Custom Menu widget, select the menu “UX Design”. Then click Save.

Update Lesson Page Sidebar Module with New Widget Area
Now that you have your widget area created with your course menu, go back to the course pages you created and update the sidebar module to select the widget area “UX Design”. Now your menu should appear in the sidebar.
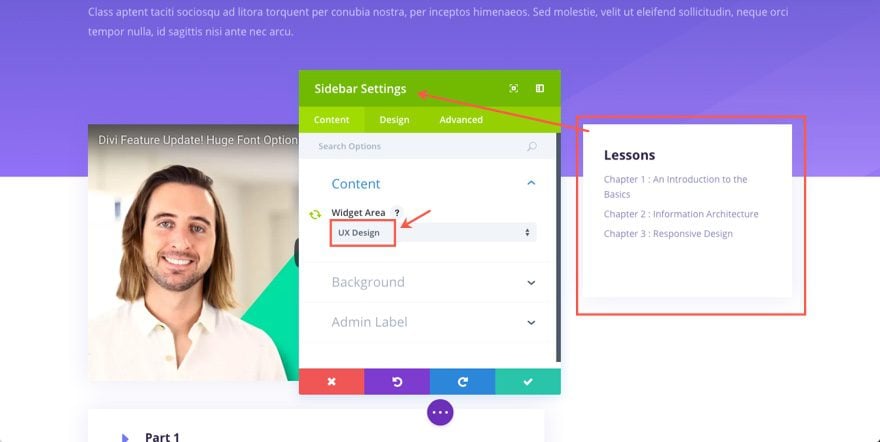
Note: if you made the sidebar module global, you will only have to make this adjustment once to this module, the other two will automatically be updated.
At this point, we have a pretty good base for creating our courses and our lessons, so let’s improve our UX by incorporating course progression tracking.
Add Course Progression Tracking
Adding course progression tracking to your e-course website is a great way to boost the user experience, engagement, and motivation when taking your course. To show progress for each of our courses, I’m going to use the WP Complete Pro plugin. If you haven’t already make sure you install and activate the plugin.
Once the plugin is activated, from your WordPress Dashboard, go to Settings > WPComplete. This will take you to the plugin settings.
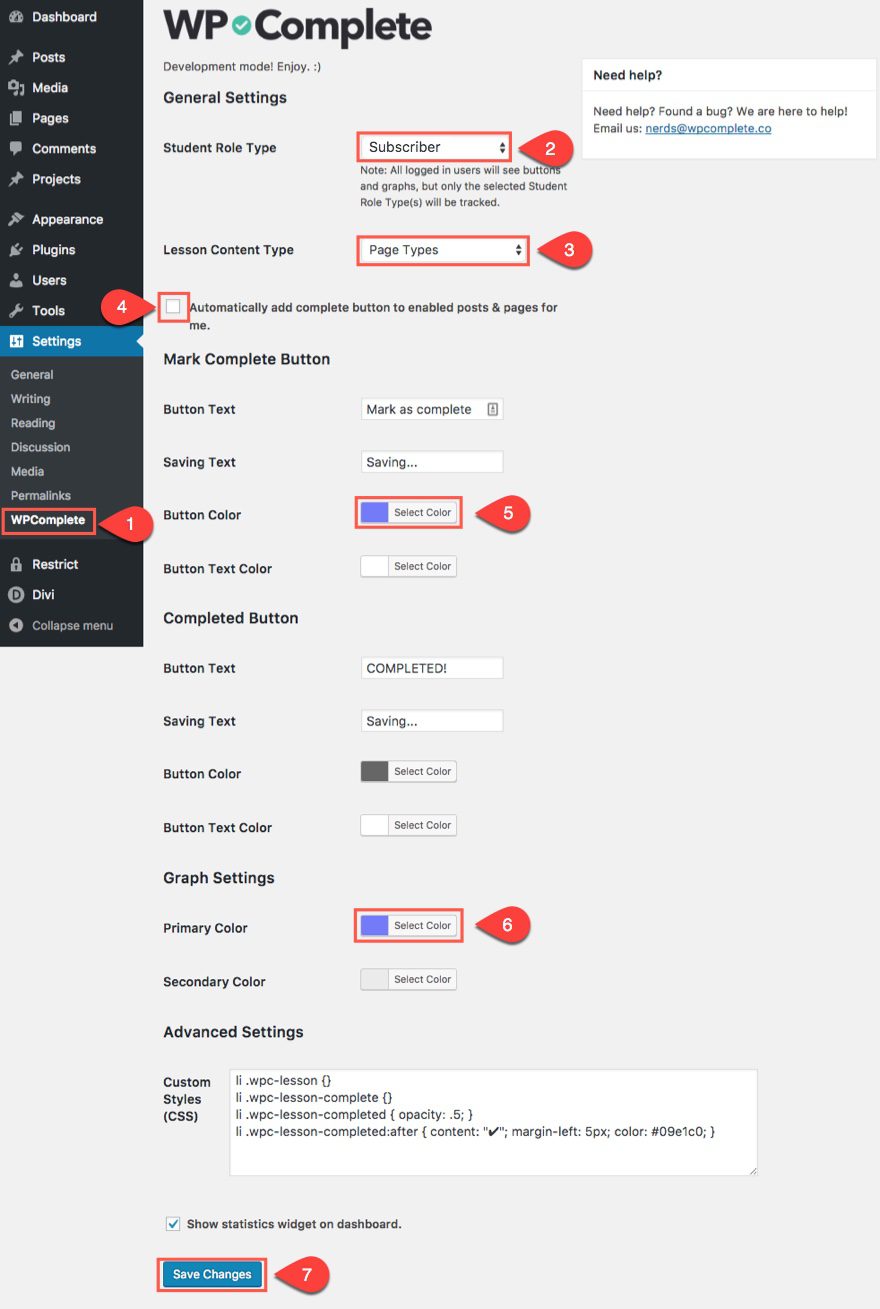
Update the following settings:
Student Role Type: Subscriber
Lesson Content Type: Page Types (since we are building our lessons with pages instead of posts)
Uncheck the option to “Automatically add complete button to enabled posts & pages for me.” (we are going to manually add those buttons with a shortcode.)
Mark Complete Button Color: #7377fc
Graph Settings Primary Color: #7377fc
Then click Save Changes.
Enable Complete Buttons to Lesson Pages
Now that we have WP Complete setup. Let’s add our “complete” buttons to our lesson pages.
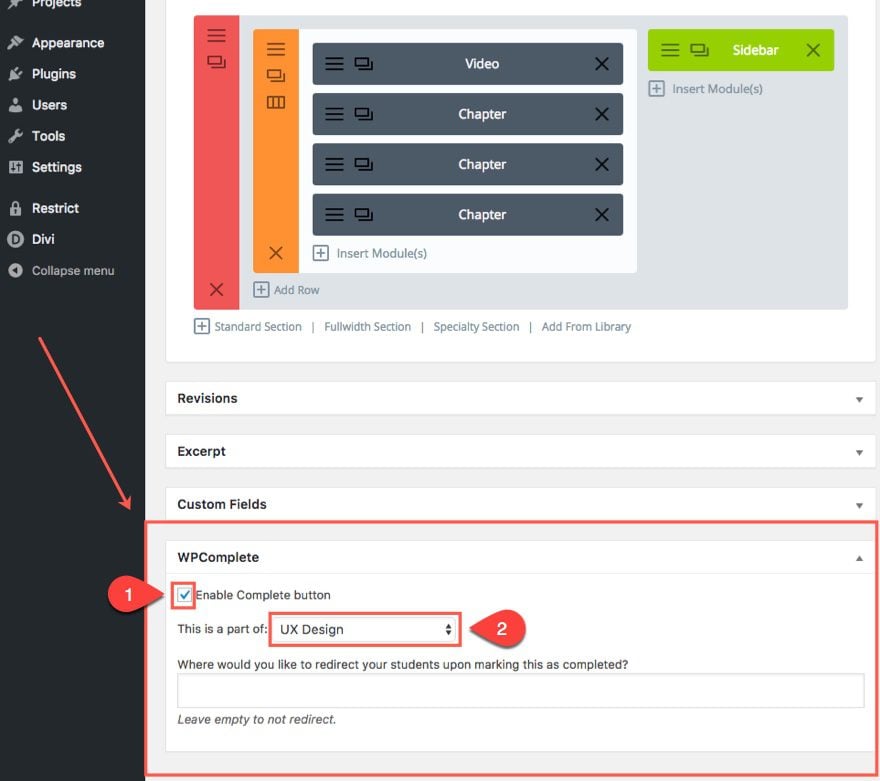
Go to the first lesson page we created titled “Chapter 1: Introduction to the Basics” and click to edit the page. From the default page editor, find the WPComplete box at the bottom of the page. Inside the box, click to the option to “Enable Complete button”. This will tell the plugin that you want to track this page for the user. Next, in the input box right after it says “This is a part of:” enter “UX Design” which is the name for the course you want to track. This is how you group the lessons under each course. For example, if you have three lessons and on each of those lesson pages you select “UX Design” as the course, when a user completes a page by clicking the complete button, the plugin is able to record that the user has completed 33% (1 out of 3 lessons) of that course. If you have multiple courses, you can simple enter a new course name in the box and it will start a new course group.
Add Complete Buttons to Lesson Pages
To add the “Complete” button to your lesson page, deploy the visual builder on the same lesson page you were just editing.
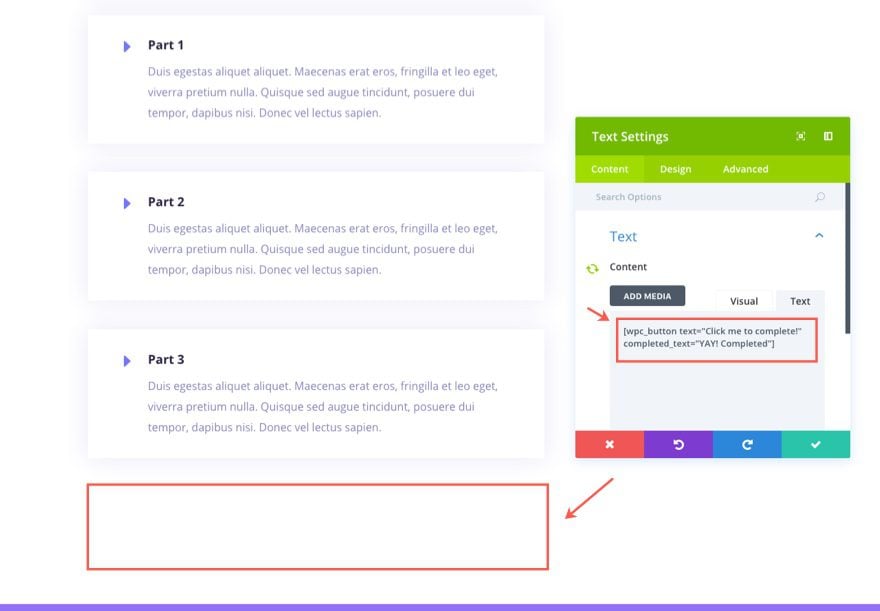
Add a text module under the last blurb module at the bottom of the page. In the Text Settings, enter the following shortcode in the content box:
[wpc_button text=”Click me to complete!” completed_text=”YAY! Completed”]
Note: You can change the text and completed text displayed on the button by modifying the text in the shortcode.
Save Settings
This shortcode creates a button that allows the user to click on it and record the lesson as complete.
Notice that when you click on the button to complete the lesson, the menu item in the sidebar for the corresponding lesson will fade slightly and display a check mark on the right of it.
Go ahead and save that text module you just created to your library with the name “Complete Button”. Now you can use that library item to enter the same module on all of your pages as needed.
Note: You may want to go ahead and save a new version of your lesson page layout to your library with you complete button included so that you don’t have to keep adding it as a secondary item when building future lesson pages.
Add Progress Bar Graph to your Sidebar
The WPComplete plugin also allows you to display graphs that show the user their progress for a specific course. We are going to add a bar graph to show the progress of the UX Design course in the sidebar of our lessons.
Remember how we created a custom widget area for our UX Design course to display a course menu in the lesson page sidebar? Well now we are going to add a progress bar graph right above our course menu. That way the user can see their progress in a cool visual display.
To add the bar graph, go to you WordPress dashboard and navigate to Appearence > Widgets. Then toggle open the “UX Design” custom widget you created earlier and drag an HTML widget into the widget area on top of the custom menu widget that is currently there. In the HTML content box, enter the following shortcode:
[wpc_progress_bar course=”UX Design”]
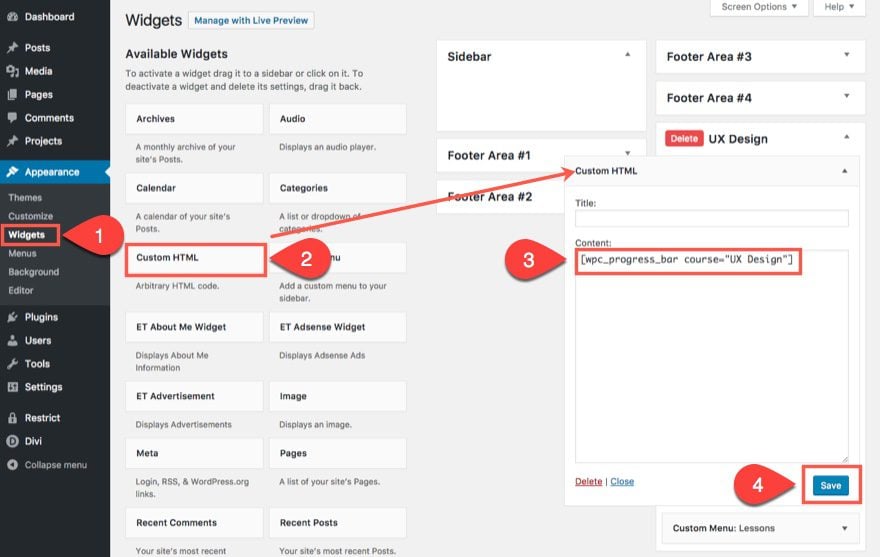
This shortcode will display the progress bar graph for the specific course “UX Design”. This course name corresponds to what you put in the WPComplete box option next to “This is a part of:”. If you have another course in the future, just enter the new course name in the place of “UX Design” when adding the shortcode for that course.
Note: For a complete list of shortcodes available for this plugin, go to there shortcodes cheatsheet.
Now go to “Chapter 1: Introduction to the Basics” to see how it looks.
Click on the Complete button at the bottom of the page. Now check out the sidebar to see what changed. The bar graph now shows that you have completed 33% of the course. And the menu item for the lesson page now shows as faded with a check mark on the right to show that that lesson has been completed.
Pretty cool huh?
Let’s review what we have so far:
1. We have a new lesson page template to serve as our go to template for lessons going forward
2. We have a system for creating a custom menu for each course.
3. We have a system for setting up custom widget areas for each course to display custom menu for that specific course on the lesson page.
4. We have the ability to add a complete button to our lesson pages that when clicked, represents the progress in a bar graph and in the corresponding menu link.
The final stage of turning our site into a functioning e-course is to integrate membership levels in order to restrict our content to paying customers.
Building the Membership Pages
If you haven’t done so already, install and activate the Restrict Content Pro plugin. Once installed, the plugin will automatically create 5 pages for handling the membership process.
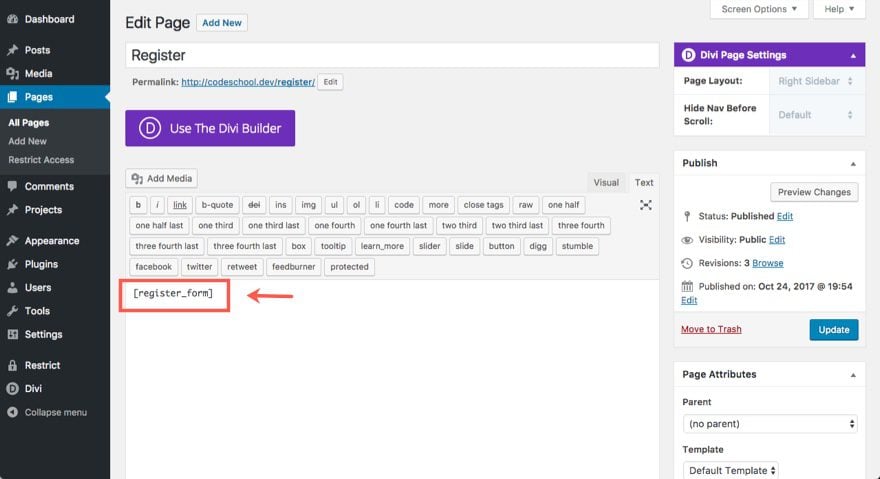
If you look at each page in the default page editor, you will see that the only thing added to the content for each page is a shortcode. For example, if you go to the Register page, you will see that the only thing in the content editor is the shortcode “[register_form]” which will display the registration form.
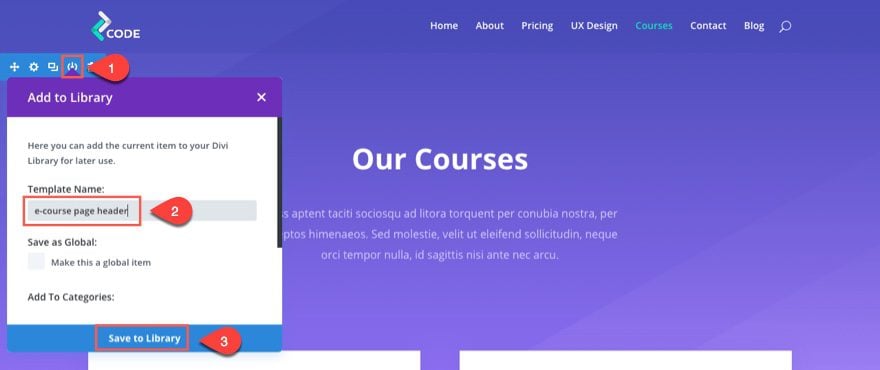
Since all you need to display the content for each of these auto-generated pages are the shortcodes, you can easily build a layout for these pages using the Divi Builder. For example, if you would like a quick and easy way to customize your register page, go to your Courses Page and deploy the visual builder. Save the top section of the layout to your library with the name “e-course page header” (or something like that).
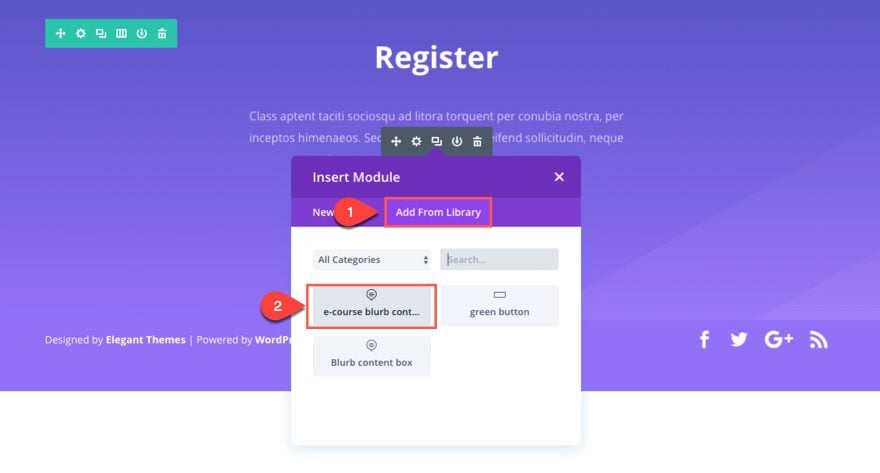
Then click on one of the blurbs that show the course and save that module to your library with the name “e-course blurb content box” (or something like that).

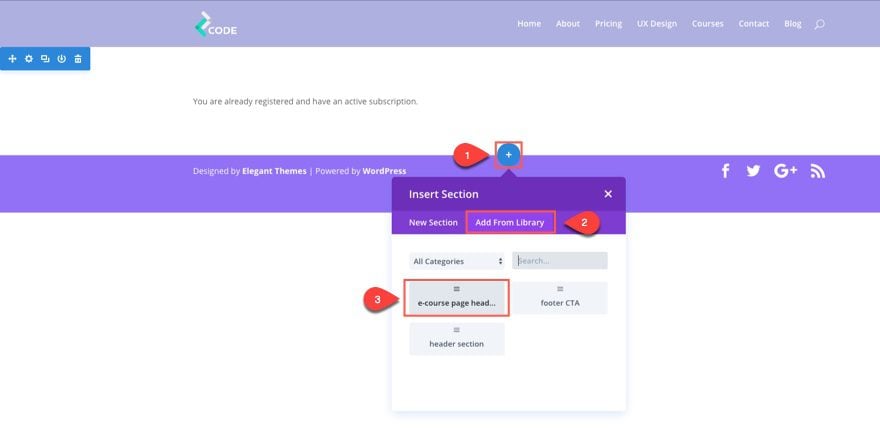
Now go to your Register page, copy the shortcode to your clipboard (highlight shortcode and click ctrl + c). Then deploy the Divi Builder, then the visual builder. Add your new saved section called “e-course page header” from your library.
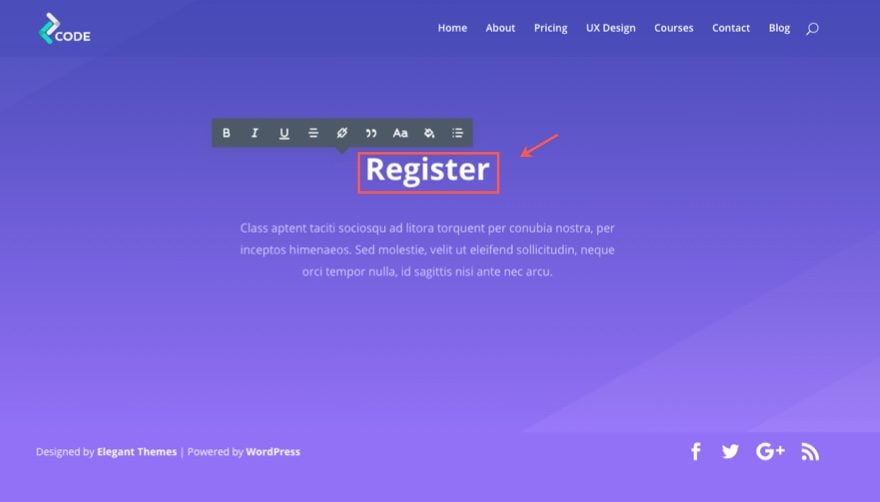
Update the text module that contains the title to say “Register” instead of “Courses”.
Then click to add a module from your library under the current modules in the section. Select the “e-course blurb content box” module you just saved to the library.
Then update the settings as follows:
Under the content tab…
Erase Title
Content: enter the shortcode [register_form] that you have saved to your clipboard by pressing ctrl + v.
Erase the image url
Save Settings
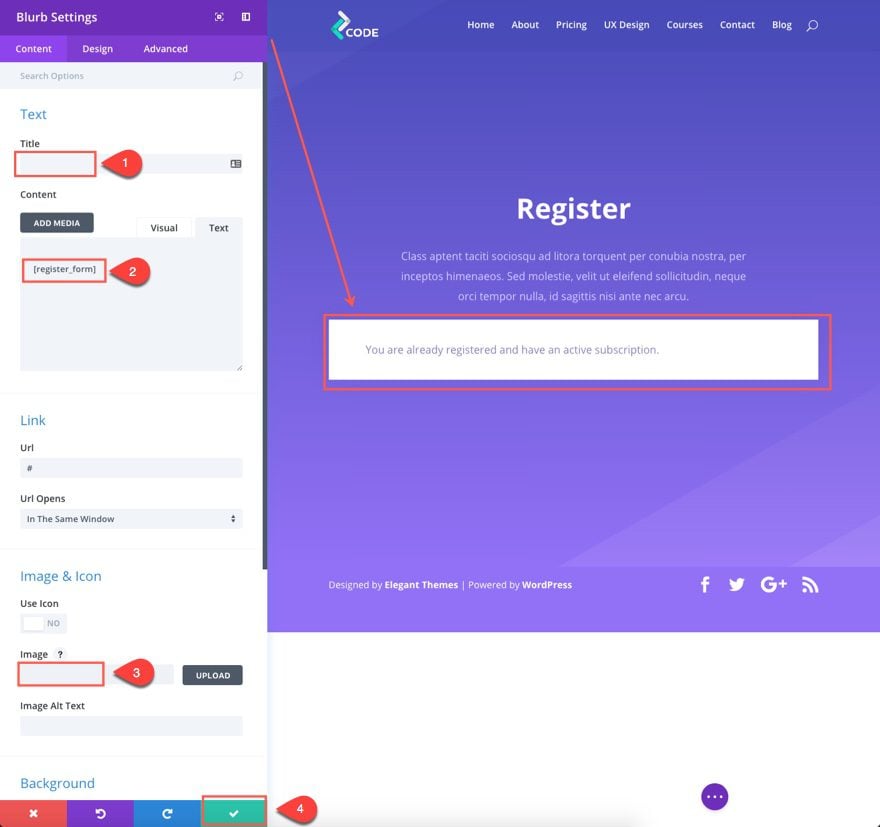
Note: That was the quick and easy way. I used a blurb module because that was the quickest way to bring over the style of the module. You will probably want to use a text module instead.
Now look at your registration page in an incognito browser.
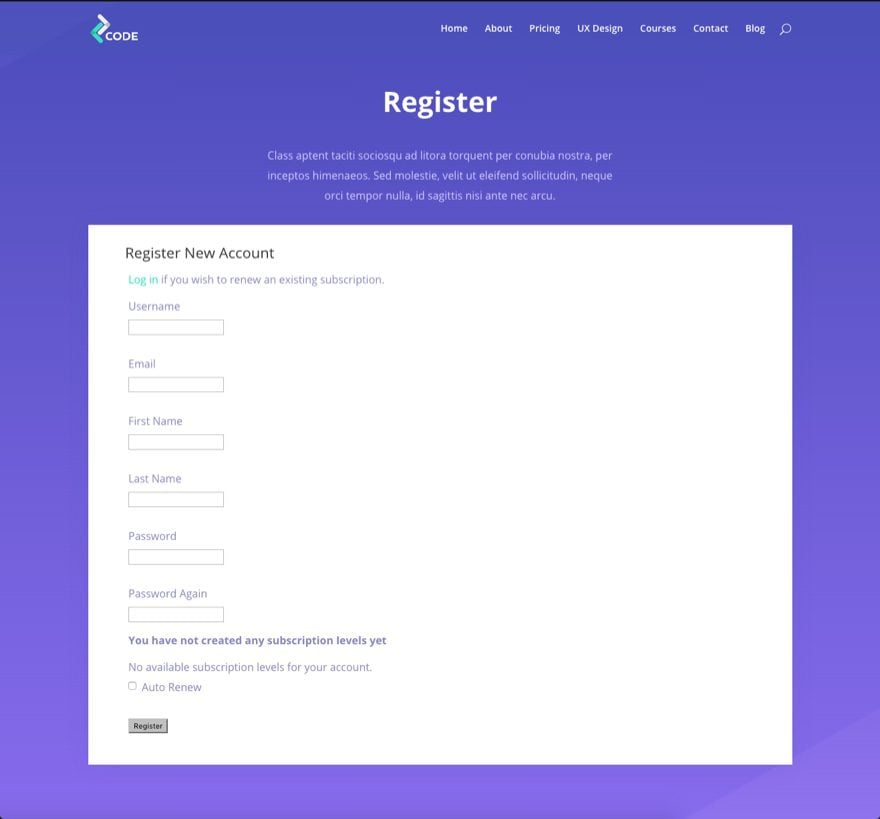
You still need to customize the design of the form (not going to do that on this tutorial) but that can easily be done with some inspection and custom CSS.
You can follow that same process to update all of 5 of the membership pages generated by the plugin. To view which pages are being used to handle membership, go to the WordPress dashboard and navigation to Restrict > Settings and you will see a list of all the pages that are being used under the General tab.
Adding a FREE Subscription Level
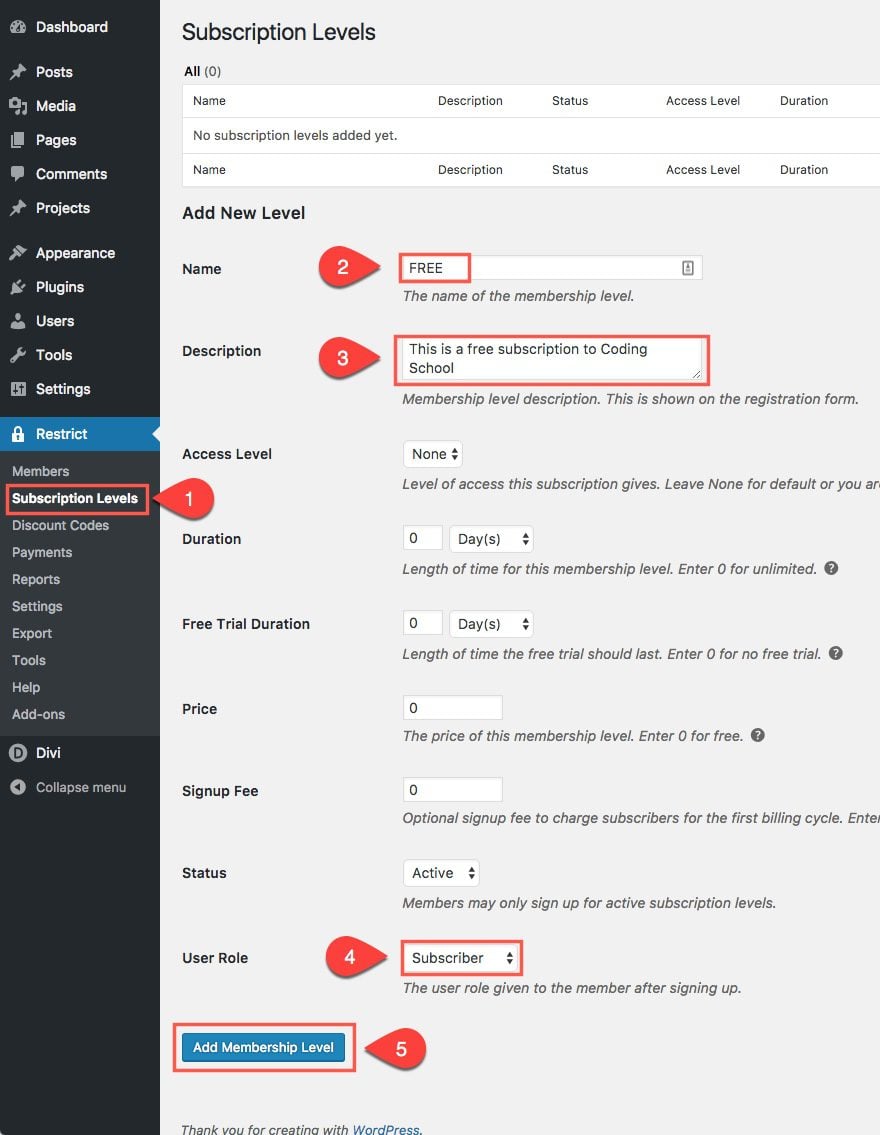
Adding a FREE subscription level to your e-course is a great way to capture leads, add them to a email marketing campaign, and upsell them on a premium membership. To add a FREE Subscription level, go to the WordPress Dashboard and navigate to Restrict > Subscription Levels. Then fill in the settings to create your FREE membership. Here is an example of what to enter for a free subscription level:
Name: FREE
Description: This is a FREE subscription to Coding School.
User Role: Subscriber
Leave the other options to their default setting.
Then click Add Membership Level
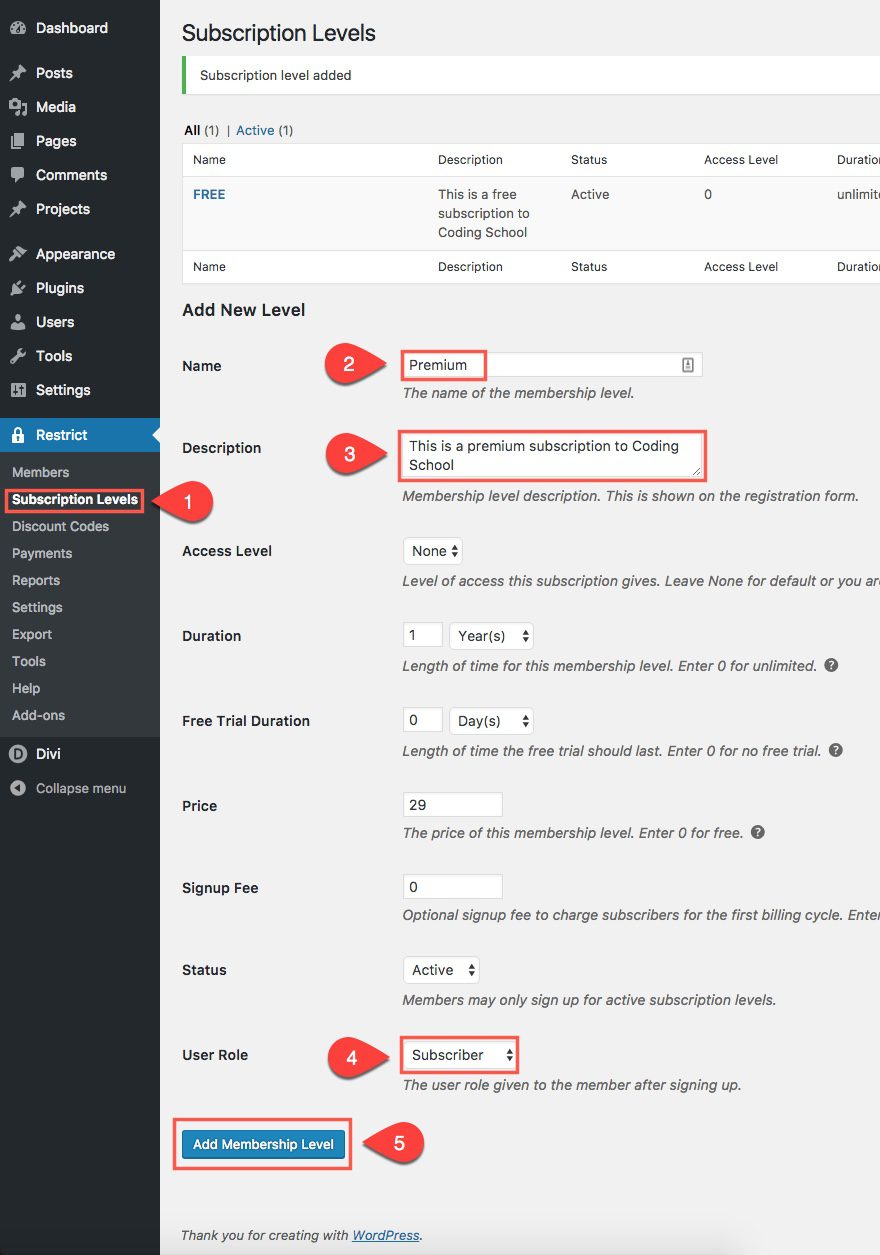
Adding a Premium Subscription Level
A Premium Membership is usually where you can charge money to have access to higher level content that can’t be access with a free membership. Like a FREE membership, the user would have to register on the registration form. The only difference is that they will be directed to a payment form to purchase the subscription. If the user is already a FREE member, they can upgrade to a Premium Subscription using their current registration info and then paying for the upgrade.
To add a Premiumn Subscription Level, go to the WordPress Dashboard and navigate to Restrict > Subscription Levels. Then fill in the settings to create your Premium subscription. Here is an example of what to enter for a Premium subscription Level:
Name: Premium
Description: This is a premium subscription to Coding School
Duration: 1 year
Price: 29
User Role: Subscriber
Restrict Lessons Based on Subscription Level
Now that we have our Free and Premium Subscription Levels created. We can choose to restrict pages/posts or even specific content based on the users subscription level. The plugin makes this process really simple. Let’s go a head and restrict access to the first lesson we created to a FREE subscription. To do that, go to edit the Lesson Page titled “Chapter 1: Introduction to the Basics”. Notice the “Restrict this content” box at the top of the page editor. In the box you have a dropdown input box that allows you to select who should have access to the content. You are going to select Members of subscription level(s). Once selected, you will see more options appear. Select the first option that says “Members of any subscription level(s). That’s because we want members that will have the premium subscription to also have access to this content as well.

Note: This setting will hide the entire page from non-subscribed users. If you want to hide certain pieces of content on the page and make it available only to Free or Premium subscribers you can use shortcodes to wrap the content you want hidden. Since we are using the divi builder, using the shortcodes to wrap content may be challenging but one thing you could consider doing is wrapping only the content in the actual content boxes of the blurbs with shortcodes and leaving the titles visible.
For the next lesson titled “Chapter 2: Information Architecture”, we are going to restrict the page to Premium subscribers only. To do that, go to edit the page and in the “Restrict this content” box at the top of the page editor, select Members of subscription level(s). Then select the option “Members of specific subscription levels. Then select “Premium”. Now only people with a Premium subscription will be able to access that page.
Save your changes by updating the page.

Change Your Redirect Page for Restricted Content
When a user tries to access the content that is restricted, you can redirect the user to a certain page. Since we are going to want the user to register to gain access to the course, it makes sense that we redirect the user to the register page. To do that go to the WordPress dashboard and navigate to Restrict > Settings and click the Misc tab. Find the Redirect Page option and select the Register page from the dropdown input box.
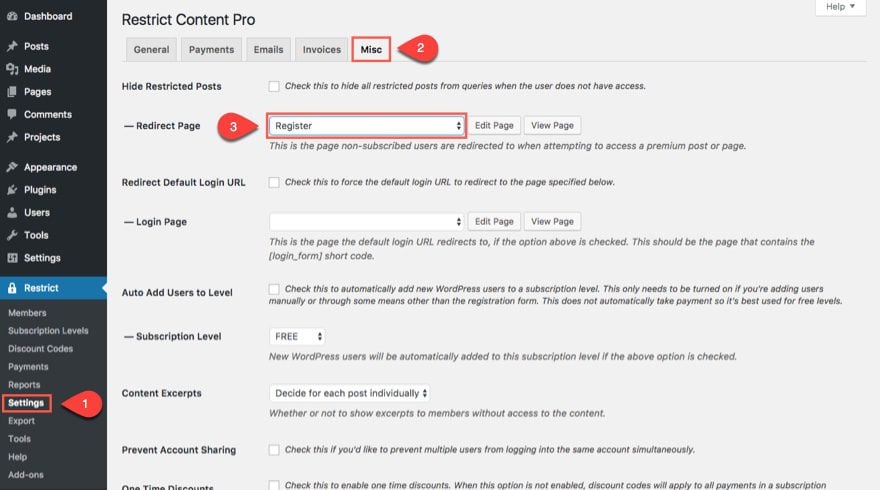
Save Options
Now everytime a non-subscribed user tries to access restricted pages, they will automatically be redirected to the Register page.
You can test this real quick. Save the page and open the page in an incognito browser to see what a user sees when they aren’t registered yet.
Note: If you want you can create an additional register page for this use case so that you can include a more specific call to action like “Sorry, you currently don’t have access to this content, please register below.” with the register form below that.
Adding your payment gateway
At this point you will want to make sure your payment gateway is integrated with Restrict Content Pro. You can do this by navigating to Restrict > Settings and clicking the Payments tab. There you can choose which gateways you want to enable as well as enter the info needed to integrate the gateway. You have nine options to choose from including Stripe and Paypal.
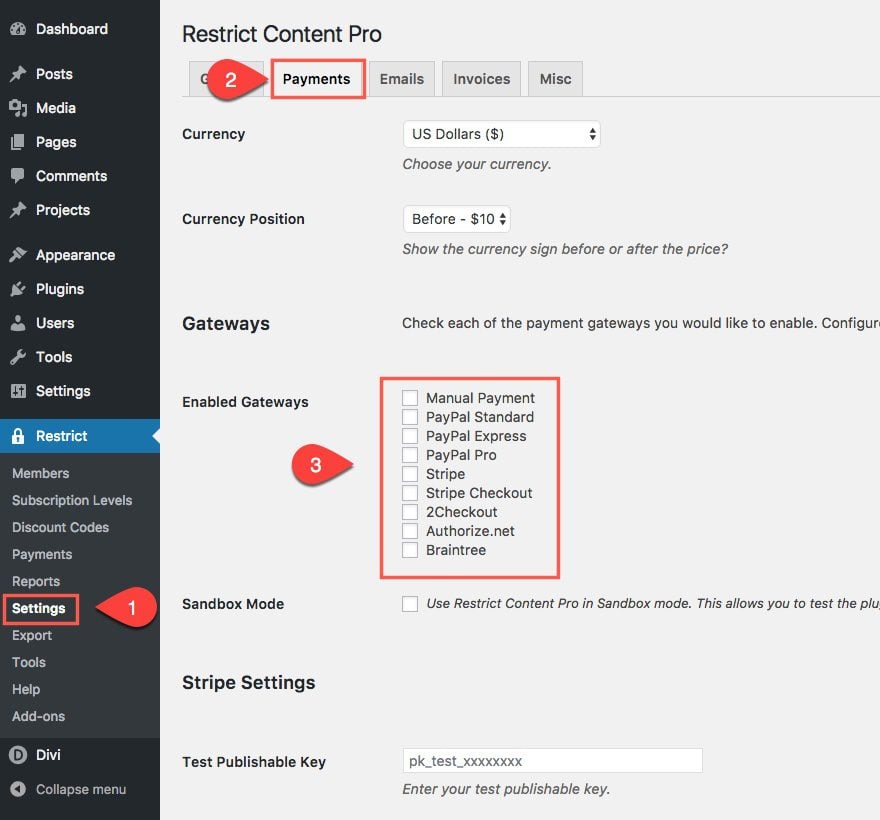
I won’t go into the detail involved in setting those up, but my advice is to make sure and test your payment gateways thoroughly to make sure they work. You don’t want to lose money.
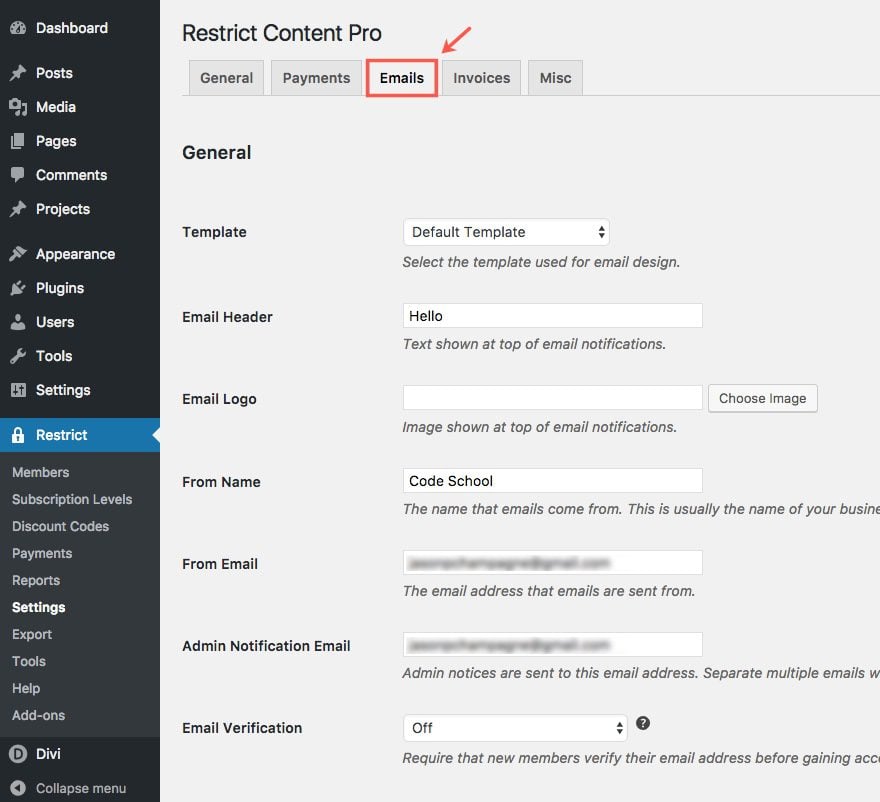
Customizing your email Notifications
Restrict Content Pro allows you to customize a notification email both for the new member and the admin whenever a new member registers. Take advantage of this option by including a good call to action in the email body that encourages the user to start the course with a link to the first lesson. You can find the email setting by going to Restrict > Settings and click the Emails tab.
Optional Email Marketing Integration
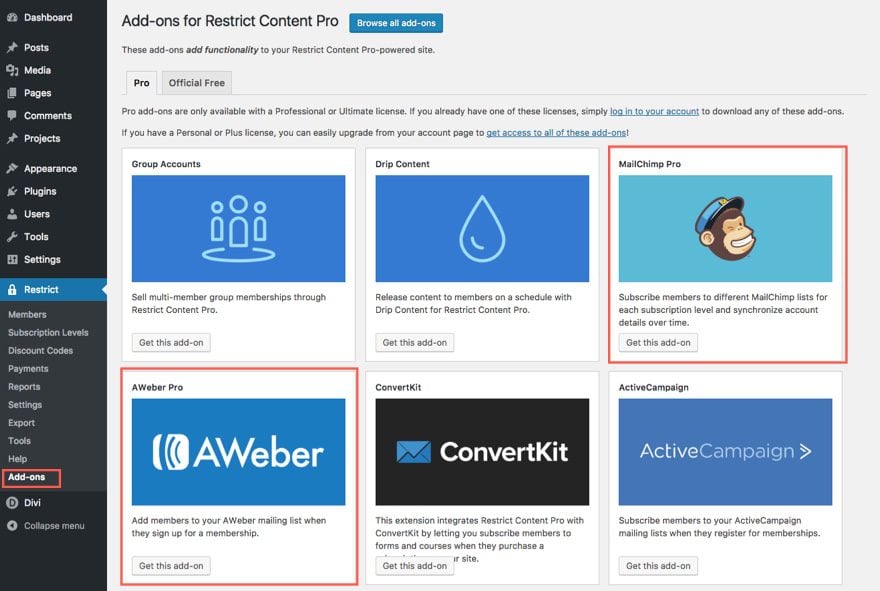
You may have a Mailchimp or Aweber account that you want to add members to when they register. You can do that by with one of the many add-ons available with the Restrict Content Pro plugin. Simply navigate to Restrict > Add-ons and find the email platform you want.
What Now?
Now that you have setting up your e-course website, you will still have to finish setting up all of your content for each page, adding url’s to the buttons, many other tweaks. But the foundation has been set. Hopefully this gets you set up with a platform you can easily build upon.
Final Thoughts
One could argue that with all of the great tools out there in the world of WordPress, you can get an online course up and running pretty easily. But then there is the challenge of design. Getting those sites to look decent isn’t easy if design is not your forte. Fortunately, the pre-made Divi layouts like the “Learning Management Layout Pack” offer a great solution to the design problem. The layout is functional and beautiful right out of the box.
But then there is the problem of finding the right plugins to transform your beautiful layout into a functional online course. There are many great membership plugins and Learning Management Systems out there with varying degrees of cost and complexity. The goal of this post was to get you up and running with a great looking e-course site with simple membership at a low cost. For those of you hoping to create this using free plugins, sorry to disappoint. I’m all about the free plugins, but I thought it best to use the Pro versions for this tutorial because the end result is worth every penny in my opinion.
I look forward to hearing from you in the comments
Cheers!
The post Creating a Learning Management (LMS) Website with Divi appeared first on Elegant Themes Blog.