
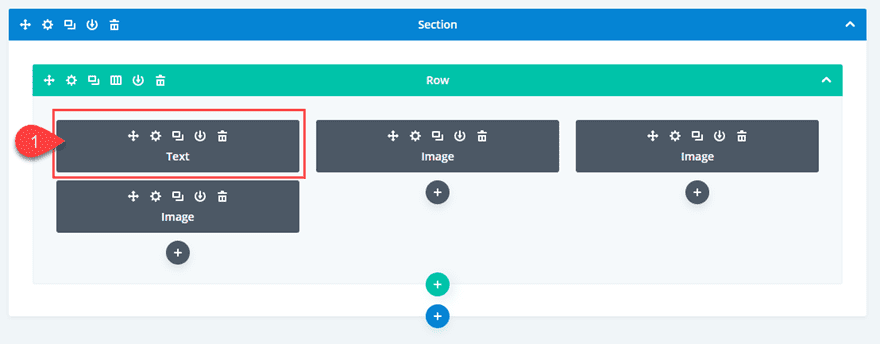
Whether it’s in a portfolio page or an image gallery, web designers need to showcase their designs for clients as a crucial part of driving business. And, many times, these examples of their work include images of entire web page designs which can take up a lot of space. That’s why adding a scroll down hover effect to these images can set your portfolio apart. This allows the user to see a compact portion of the design initially. But when the user hovers over the image, the image scrolls to slowly reveal the rest of the design as if they are scrolling down a web page. You can see this type of effect being used on our very own Divi Layout Packs page.
In this tutorial, I’m going to show you how to use Divi to add a scroll down hover effect to images that will allow users to preview web page designs. This is an elegant interactive element that I think you are going to love.
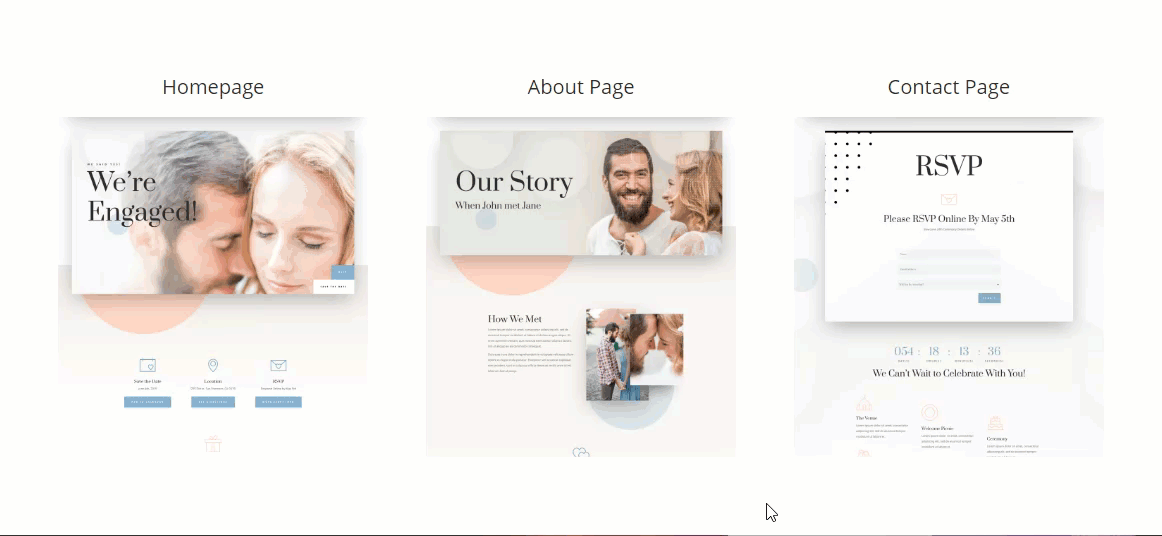
Sneak Peek
Here is a preview of the scroll down hover effect we will build together in this tutorial.
Download the Scroll Down Hover Effect Layout for FREE
To lay your hands on these example scroll down hover effect designs, you will first need to download it using the button below. To gain access to the download you will need to subscribe to our Divi Daily email list by using the form below. As a new subscriber, you will receive even more Divi goodness and a free Divi Layout pack every Monday! If you’re already on the list, simply enter your email address below and click download. You will not be “resubscribed” or receive extra emails.
@media only screen and ( max-width: 767px ) {.et_bloom .et_bloom_optin_1 .carrot_edge.et_bloom_form_right .et_bloom_form_content:before, .et_bloom .et_bloom_optin_1 .carrot_edge.et_bloom_form_left .et_bloom_form_content:before { border-top-color: #ffffff !important; border-left-color: transparent !important; }
}.et_bloom .et_bloom_optin_1 .et_bloom_form_content button { background-color: #f92c8b !important; } .et_bloom .et_bloom_optin_1 .et_bloom_form_content .et_bloom_fields i { color: #f92c8b !important; } .et_bloom .et_bloom_optin_1 .et_bloom_form_content .et_bloom_custom_field_radio i:before { background: #f92c8b !important; } .et_bloom .et_bloom_optin_1 .et_bloom_border_solid { border-color: #f7f9fb !important } .et_bloom .et_bloom_optin_1 .et_bloom_form_content button { background-color: #f92c8b !important; } .et_bloom .et_bloom_optin_1 .et_bloom_form_container h2, .et_bloom .et_bloom_optin_1 .et_bloom_form_container h2 span, .et_bloom .et_bloom_optin_1 .et_bloom_form_container h2 strong { font-family: “Open Sans”, Helvetica, Arial, Lucida, sans-serif; }.et_bloom .et_bloom_optin_1 .et_bloom_form_container p, .et_bloom .et_bloom_optin_1 .et_bloom_form_container p span, .et_bloom .et_bloom_optin_1 .et_bloom_form_container p strong, .et_bloom .et_bloom_optin_1 .et_bloom_form_container form input, .et_bloom .et_bloom_optin_1 .et_bloom_form_container form button span { font-family: “Open Sans”, Helvetica, Arial, Lucida, sans-serif; } p.et_bloom_popup_input { padding-bottom: 0 !important;}

Download For Free
Join the Divi Newlsetter and we will email you a copy of the ultimate Divi Landing Page Layout Pack, plus tons of other amazing and free Divi resources, tips and tricks. Follow along and you will be a Divi master in no time. If you are already subscribed simply type in your email address below and click download to access the layout pack.
You have successfully subscribed. Please check your email address to confirm your subscription and get access to free weekly Divi layout packs!
To import the layout to your page, simply extract the zip file and drag the json file into the Divi Builder.
Now let’s get to the tutorial shall we?
What You Need to Get Started
For this use case tutorial, we are going to build our design from scratch using Divi. You will also need some images/screenshots to use for the portfolio items. I would suggest using images that are at least 1080px in width.
Creating the Three Column Row
If you haven’t already, create a new page. Then give your page a title and deploy the Divi builder on the front end. Then create a new section with a three-column row.
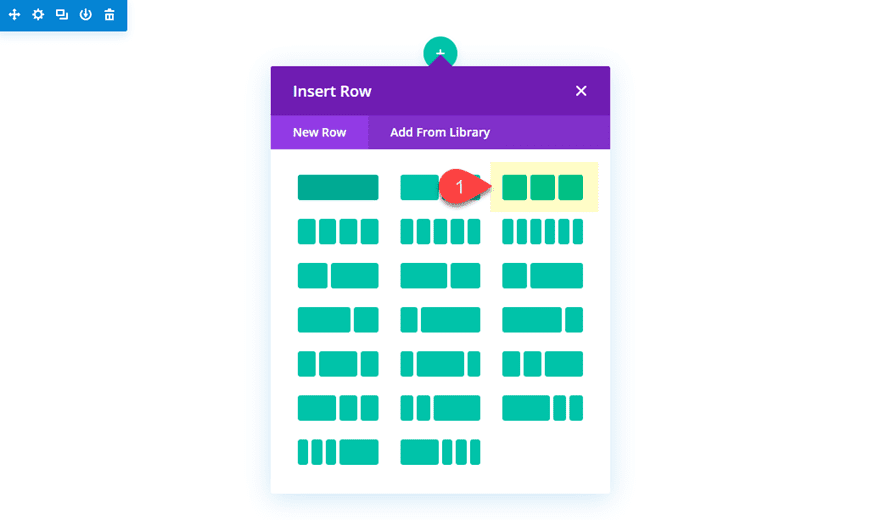
Update the row settings as follows:
Custom Width: 100%
Custom Padding (desktop): 5% left, 5% right
Custom Padding (tablet): 25% left, 25% right
Custom Padding (phone): 15% left, 15% right
Next, we need to add the following custom CSS snippets to each of the column main elements. Under the advanced tab, add the following CSS:
Column 1 Main Element CSS:
overflow: hidden;
height: 400px;
Column 2 Main Element CSS:
overflow: hidden;
height: 400px;
Column 3 Main Element CSS:
overflow: hidden;
height: 400px;
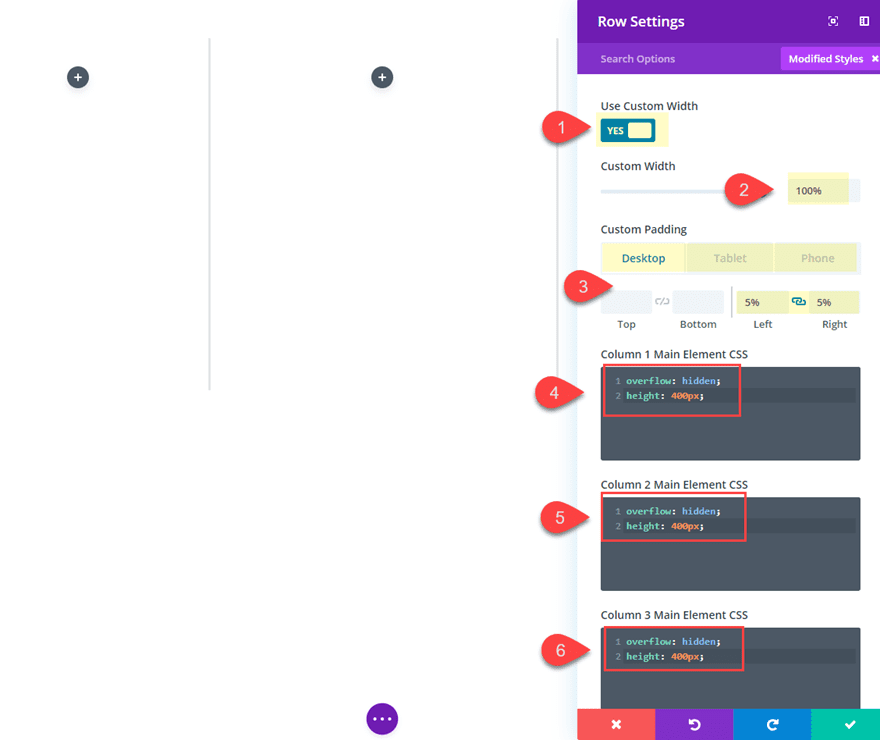
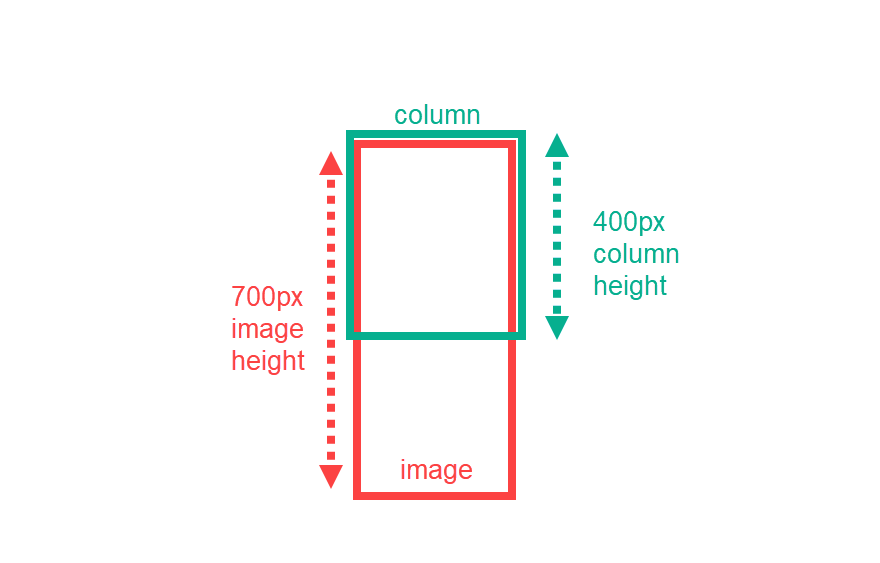
Notice the height of each of the columns is 400px. This will ultimately serve as the height of the viewport of the image that will scroll on hover. The “overflow: hidden” property will make sure the portion of the image that is moved outside the column (on hover) remains hidden. This should make more sense whenever we add the transform hover effect to the image.
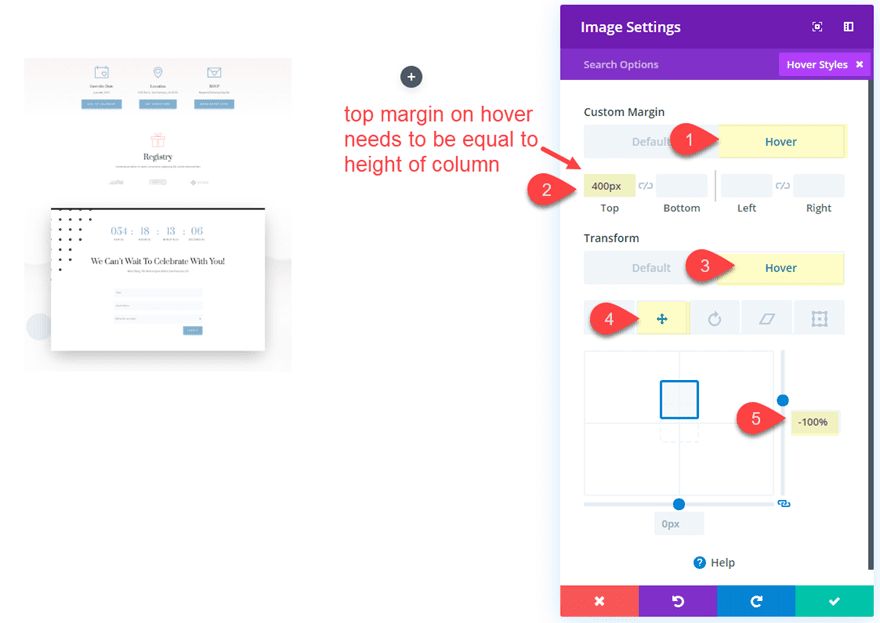
Creating the Image with Scroll Down Hover Effect
Now we are ready to start creating our image with the scroll down hover effect. This is surprisingly simple if you understand how the effect works. Basically, all we are going to do is add an image and then use the transform translate property to move the image upward by 100% on hover. Then in order to make sure the image stops at the right position, we need to add a top margin equal to the height of the column on hover. This will make sure the image stops scrolling at the exact point the bottom of the image is in view.
Here’s how to do it.
Add an image module to the column 1. Then add the following hover options:
Custom Margin (hover): 400px top
Transform Translate Y-axis (hover): -100%
Make sure the custom top margin on hover is equal to the height given to your column in custom CSS above.
Also, the transform translate Y-axis value is a percentage (-100%), not pixels, so you will need to enter this manually by typing the value in the input box of the transform translate controls.
How the Scroll Down Hover Effect Works
It might help if I explain the functionality of this setup with a few visual illustrations. Let’s say that the image you are using has a height of 700px. The column height is only 400px. This means that By default (before hover), the bottom overflow of that image will be hidden since it extends outside the column.
Once the user hovers over the image, two things happen.
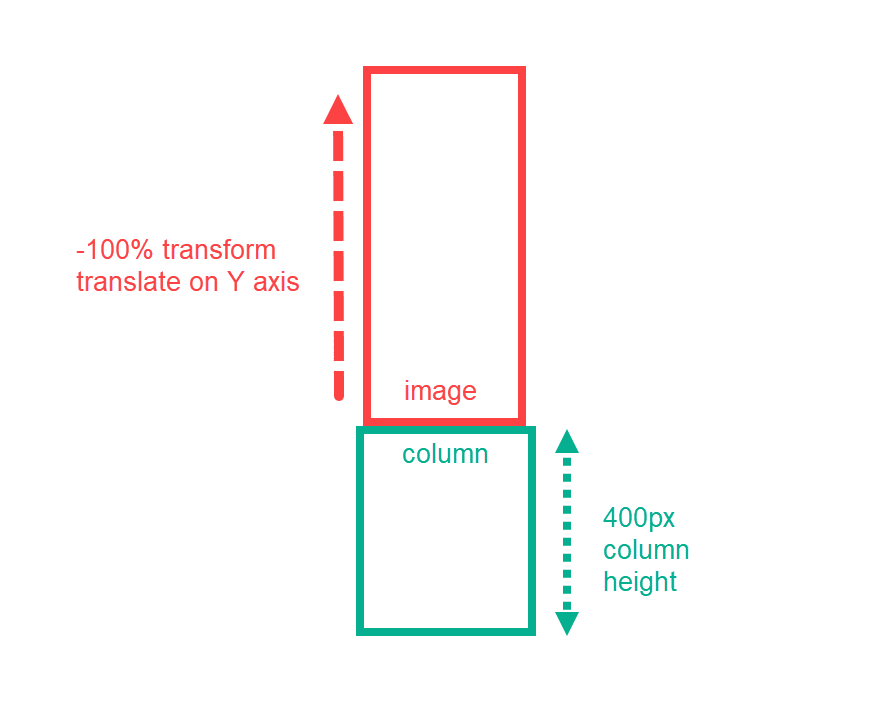
First, the transform translate property moves the image upward with a Y-axis value of -100%. In other words, the image moves up 100% of whatever the image height is (700px).
Next, the image is given a top margin of 400px to bring the image back down into the column viewport so that its sits perfectly at the bottom.
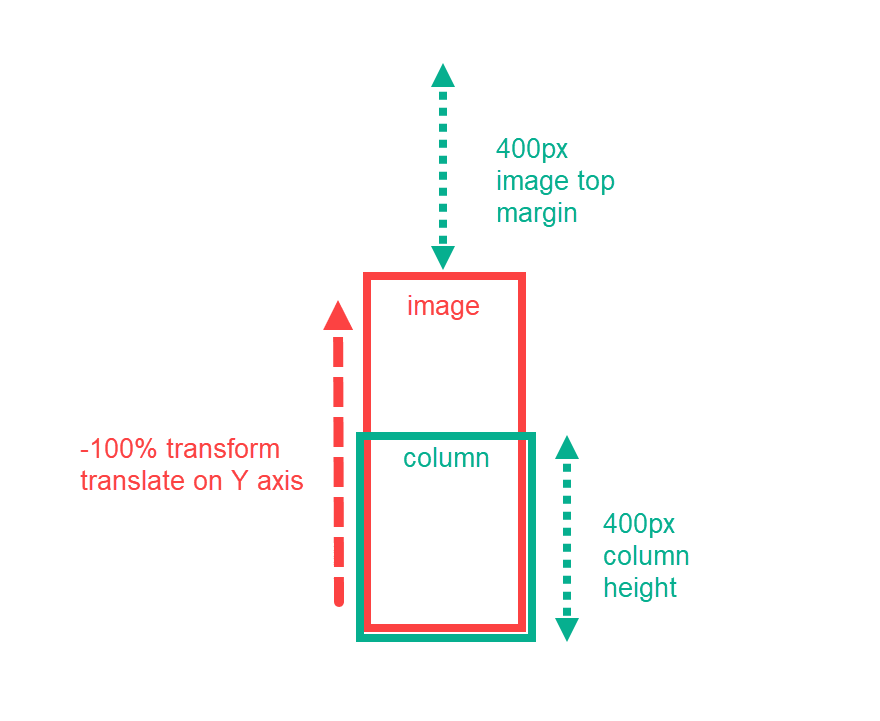
This happens simultaneously along with the transform hover effect so the result is a smooth scroll that ends in perfect placement.
Here is what the result looks like on the live example.

Adjusting Transition Duration and Speed Curve
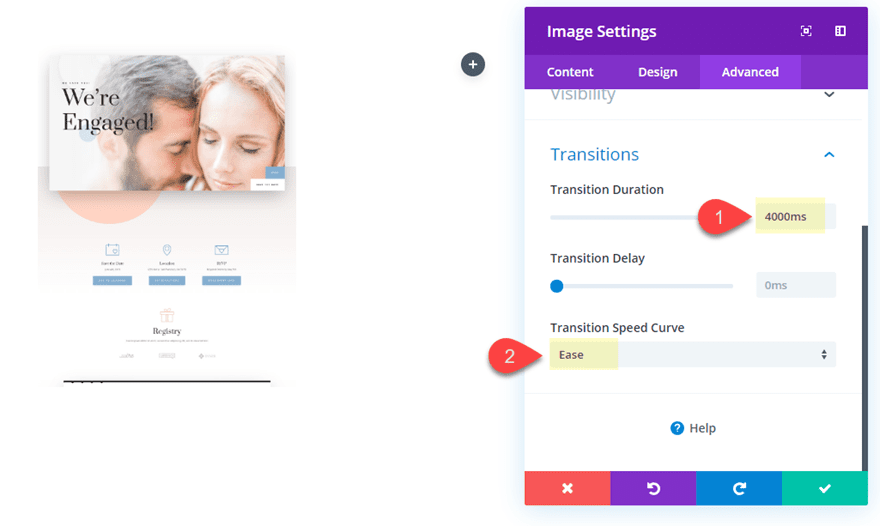
As you can tell, the transition duration is too fast for previewing the image on hover. To slow it down, you can update the transition duration. You can also adjust the speed curve to change the speed during the duration.
Update the following:
Transition Duration: 4000ms
Transition Speed Curve: Ease
In general, you will want to increase the transition duration for images with greater height to give the user time to process the image as the hover scroll effect occurs.
Copy and Paste the Image Module into remaining columns
Now all you will need to do is copy the image module and paste it into column 2 and column 3. Then update the images for each to whatever new image you want. That’s it!

Adding a Heading Above Each Image Using a Text Module
If you would like to add a heading to each of your images, you can do this using the text module. However, we will need to make some adjustments to the text module and the image module to make it work.
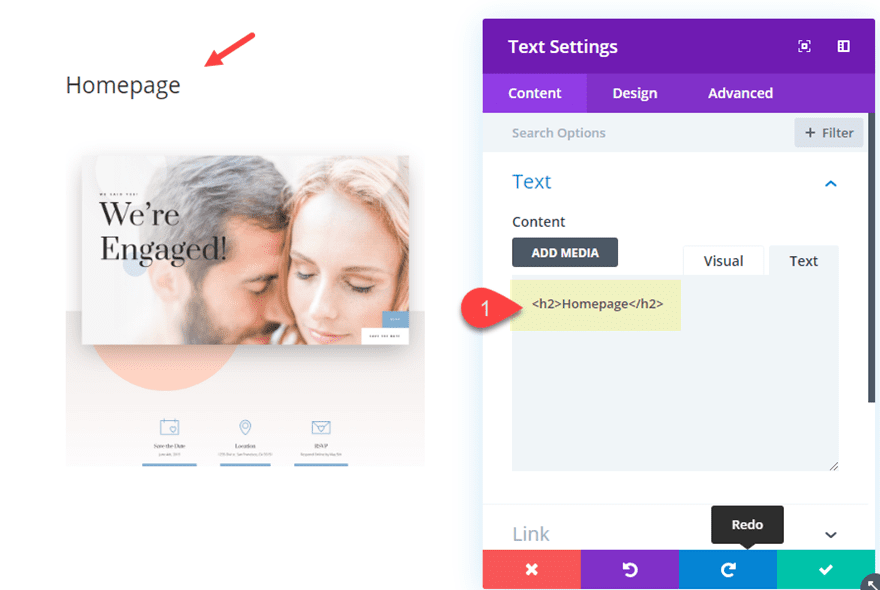
Go ahead and add a new text module above the image in column 1. You will be easier to use wireframe view mode since your column is set to a column height.
Then update the content with an h2 heading as follows:
Homepage
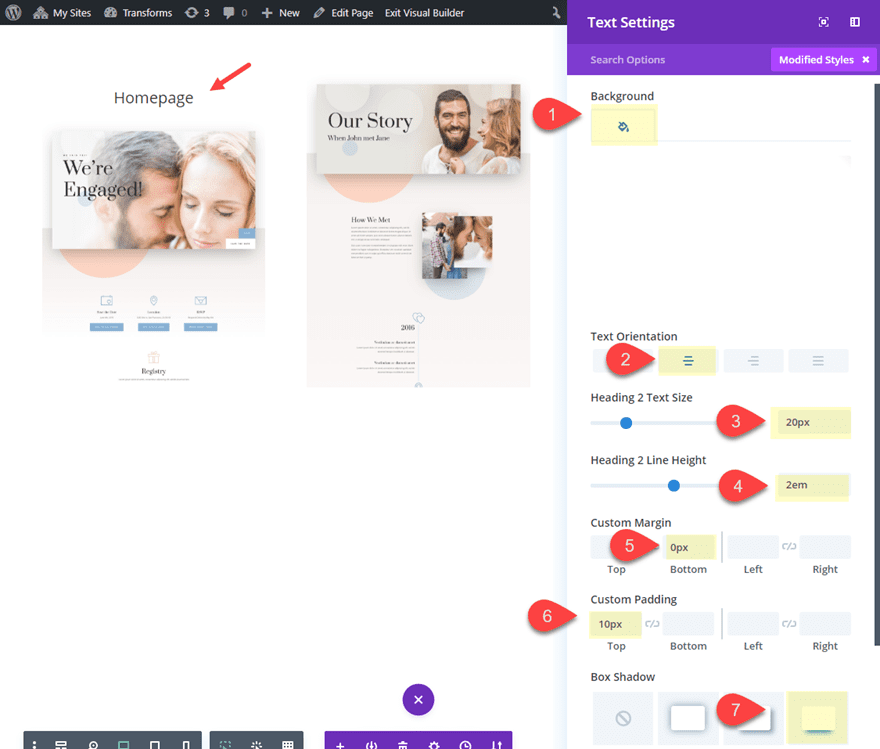
Then update the design settings as follows:
Background Color: #ffffff
Text Orientation: center
Heading 2 Text Size: 20px
Heading 2 Line Height: 2em
Custom Margin: 0px bottom
Custom Padding: 10px top
Box Shadow: see screenshot
These settings may seem arbitrary, but they aren’t. These values can predict what the height of the text module will be which is important to know for later. For example, I know that the text module will have a height of 60px. Let’s do the math…
The line height is 2em which is 2 times the heading 2 text size (20px). This means my line height is going to be 40px.
The custom top padding is set to 10px. And there is hidden bottom padding of 10px that exists already for all headings by default in Divi. The top and bottom padding combine for 20px of added height.
So… 40px (of line height) + 20px (of padding) = 60px
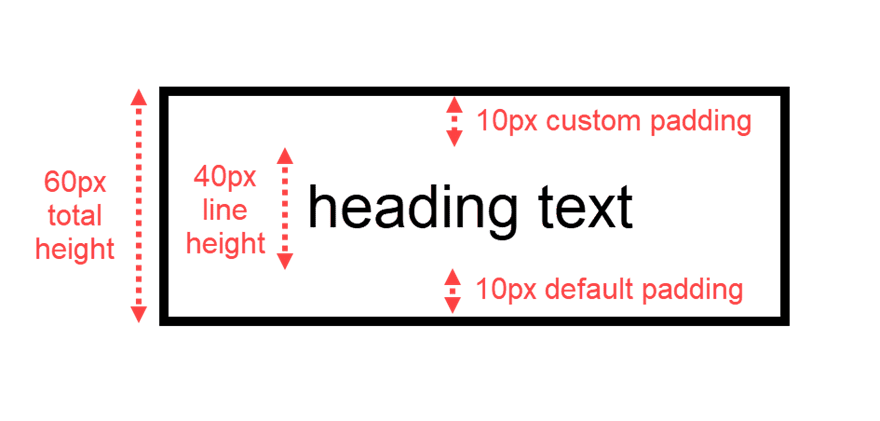
Now we know the height of the text module. Of course, you can always inspect the element using dev tools just to make sure.
The custom bottom margin of 0px is needed to take out the default margin that exists below the module (added by gutter width).
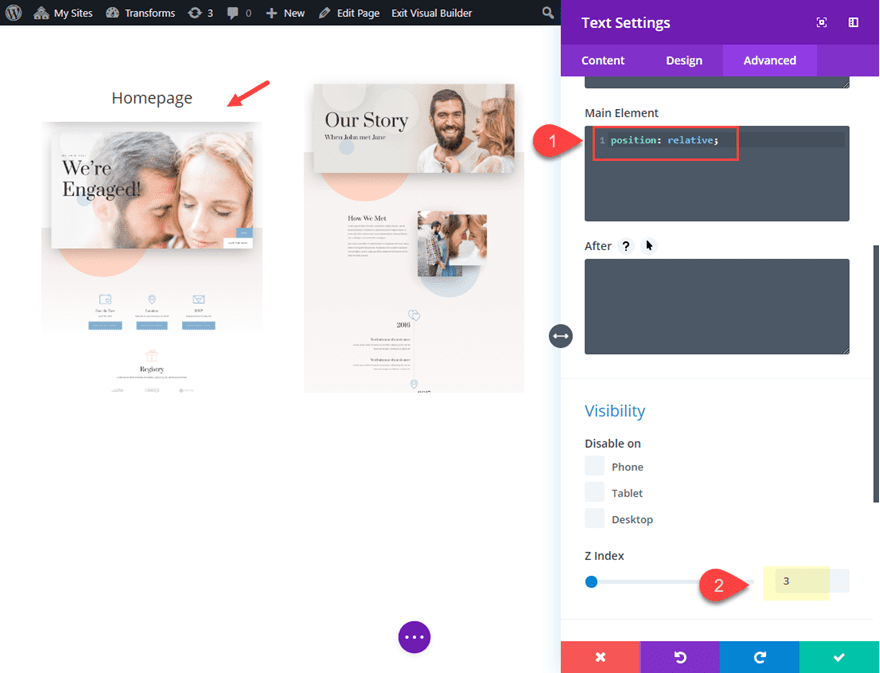
Since there will be some overlapping of the image with the text module on hover, we need to make sure the text module stays layered above the image. We can do this by giving the text module a relative position and changing the z-index value as follows:
Add the following custom CSS to the Main Element:
position:relative;
Then update the z index:
Z Index: 3
Copy and Paste the Text Module
Now that the text heading is done, we can copy and paste it (using wireframe view mode) above the images in column 2 and 3.
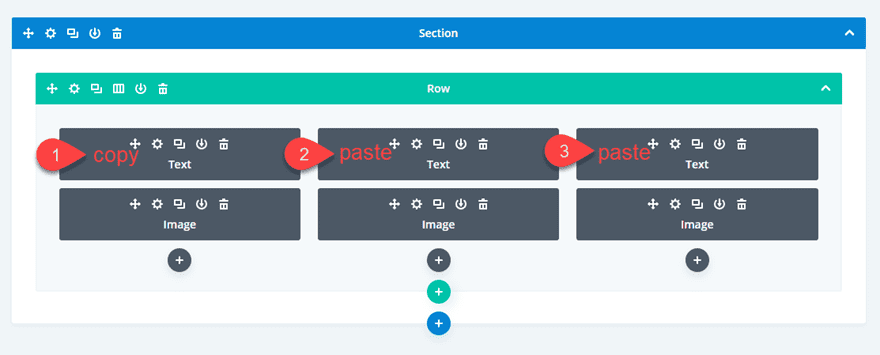
Then all you need to do is update the content for each.
Update the Top Margin Value on Hover for Each Image to Accommodate for the Text Module Height
Currently, each of the images in columns 1, 2 and 3 have a custom top margin of 400px on hover. This was set to equal the height of the custom height of the column. However, since the text module is now taking up some of the column space (a height of 60px), we need to adjust the top margin hover value.
To do this, use the multiselect feature to select all three images. Then update the element settings as follows:
Custom Margin (hover): 340px top

Now your images will stop perfectly at the bottom of the column at the end of the hover state.
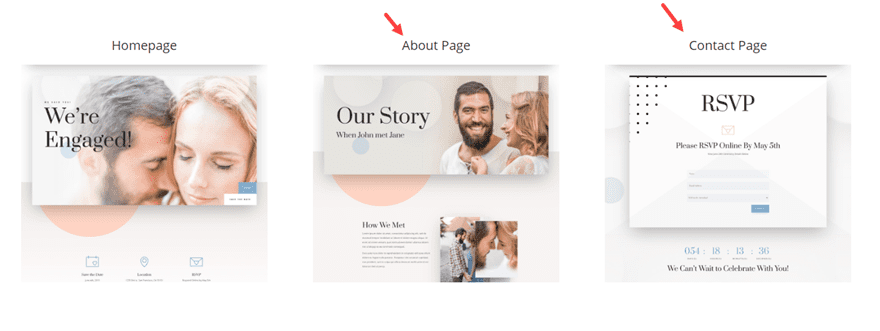
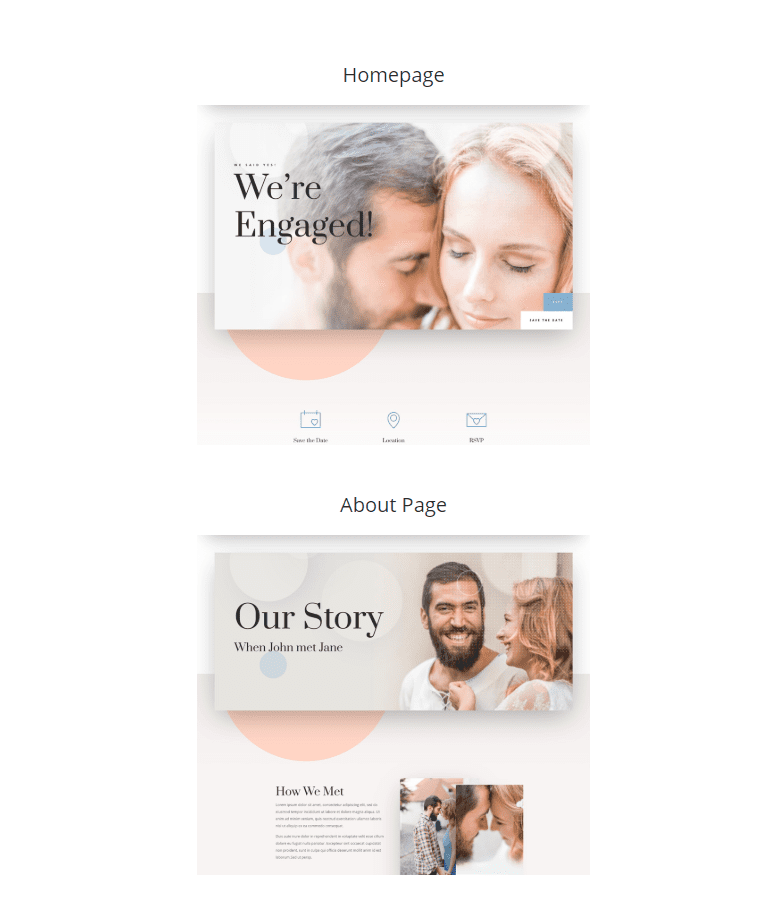
Final Result
Here is the final result of the design.
Feel free to duplicate the row and update the images and heading text as needed for more portfolio displays.

Here is what it looks like on tablet and phone.

Final Thoughts
Showcasing your web page designs with a custom scroll down hover effect not only adds a really cool interaction, but it also saves a lot of space. This allows you to display a lot of images in a compact and symmetrical layout. This kind of functionality is usually something we would get with a plugin. However, with Divi, you have complete control over the design and functionality without having to add another plugin. I hope this inspires you to create beautiful portfolio galleries for you next project.
I look forward to hearing from you in the comments.
Cheers!
The post How to Add a Scroll Down Hover Effect to Preview Web Page Designs in Divi appeared first on Elegant Themes Blog.