
In today’s Divi tutorial, we’re going to show you how to add a search field to your secondary menu. The secondary menu is also known as the header of your page and the place where you try to fit in some practical information about your website or company. Adding a search field to it might be a request you’ve had from a client or a need you have for your own website. Either way, we’ll show you how you can easily integrate this search field into your secondary navigation when you’re using the Divi theme.
Result
Before we dive into the different steps you’ll have to take to get there; it might be interesting to show you the result in advance. By following the steps in the post and adding CSS appearance changes, you’ll obtain the following result on a default secondary menu:

Why Add a Search Field to Your Secondary Menu
Adding a search possibility to your secondary menu is one of the things you might have tried to do. But unlike the primary menu, the header doesn’t have a separate page within WordPress that helps you add things manually, without having to add PHP code lines to the header.php file of your website.
However, adding a search possibility in your secondary menu can be an interesting thing. Let’s take a look at some reasons on why you’d want to add one.
Offer Your Visitors a Search Possibility From The Start
You have all kinds of visitors on your website. Some of them are looking to explore things and take their time, while others want to find specific information right away. By adding your search field to the secondary menu, you’ll be guaranteed that the visitors who are looking for something specific, have the ability to do that right away. Since a secondary menu is located at the top of the page, the visitors that are in a hurry will appreciate the effort that improves their user experience.
To Save Your Primary Menu From The Search Field
Of course, another thing you could do is add the search field to the primary menu. But in some cases, you might not want to do that. For example; if you want to keep the focus on your menu items or if you don’t want to mix the menu items with the search field. Another reason could be that you already have quite some menu items that make your primary menu look busy, and you don’t want to add a search field on top of that.
Emphasize The Search Field Without Having a Flashy Primary Menu
Most people tend to keep their primary menu sober and make their secondary menu pop. Primarily, because they want to show the obvious difference between the two menus. And secondary, because the secondary menu often has some things they want to emphasize (such as the social media icons). When you decide to integrate the search field within your secondary menu as well, it’ll automatically be highlighted as well and it’ll stimulate your visitors to search and find exactly what they’re looking for.
Add Search Field to Header PHP File
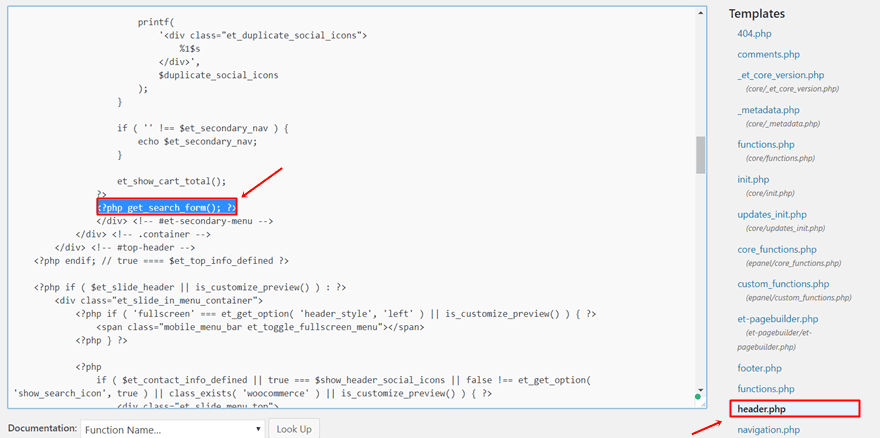
Now, to actually add the search field to your header as shown in the image below, you’ll primarily have to add something to the header.php file of your website. The code line you’ll be needing is the following:
<?php get_search_form(); ?>
Go ahead and copy this PHP code line and go to your WordPress Dashboard. Within your WordPress Dashboard, go to Appearance > Editor > header.php.
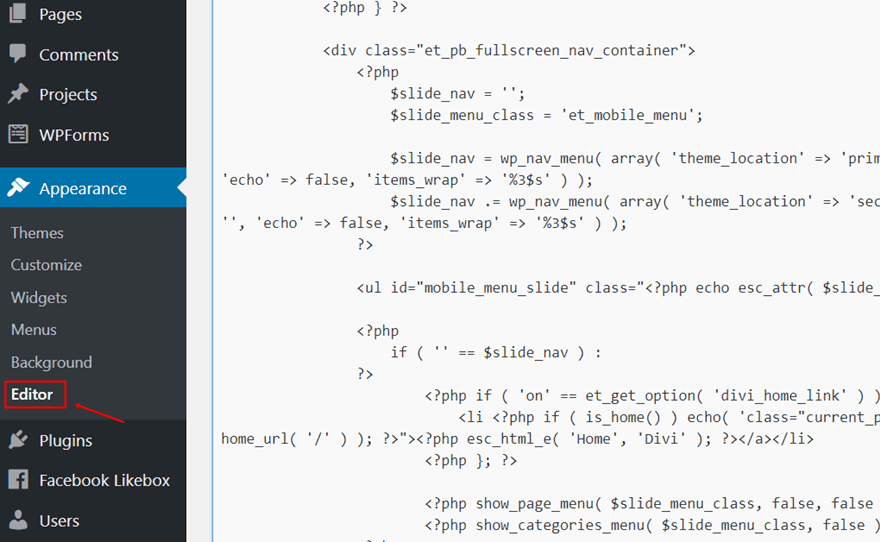
You can now place the code line wherever you want your search bar to appear. Since we want it to appear right next to the social media icons, we’re going to show you where exactly to place it in the code. We’ll need to place it right before the secondary menu, the container and the top header close.
Style Your Search Field
By default, the search field looks a bit outdated. You’ll probably want to change some things just to make it look the way you want it to and to make it fit with the look and feel of the rest of your website. These are three things you’ll probably want to change: the search label, the search input and the button input.
If you don’t make any CSS modifications to the search field, it’ll by default look like this in your secondary menu:
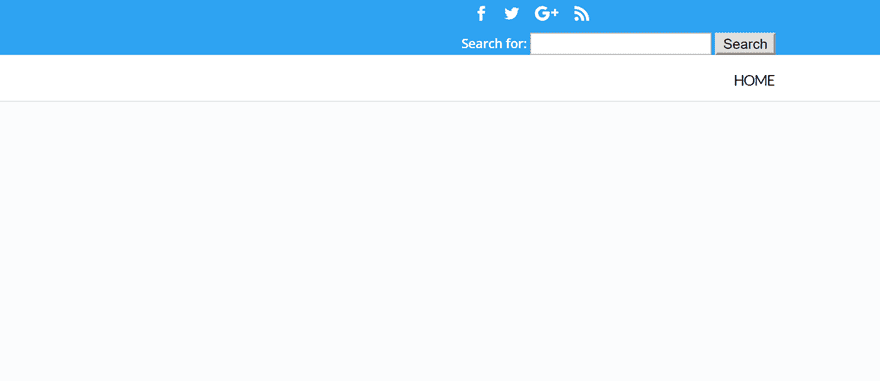
Which is obviously not the final result we want to achieve. Luckily, we can make as many modifications to the field as we want to. In the next part of this post, we’ll show you how to modify all the elements of the search field and we’ll also share the CSS code lines to achieve the following result:
Remove/Modify Search Label
The first element that is part of the search field is the search label. This is the text that appears that explains to people that they can search for anything on the website by using the field. However, this label is not necessary. Everyone knows nowadays how a search field works. You can always make the search label disappear by adding ‘display:none;’ to the CSS of that label. Or, you can change the appearance of the label.
The class you’ll be needing to make any modifications to the search label is “.screen-reader-text”. Like shown in the example below, you can disable it from appearing.
.screen-reader-text {
display: none;
}
Style Your Search Input
The next thing you might want to style is the search input. To make any adjustments to this input, place all the CSS code lines between the following brackets:
 input#s
{

}
Style Your Button Input
And lastly, we have the button style as well. To make any modifications to this part of the search field, place your CSS code lines between the following brackets:
input#searchsubmit
{
}
Needed CSS Code For Our Example
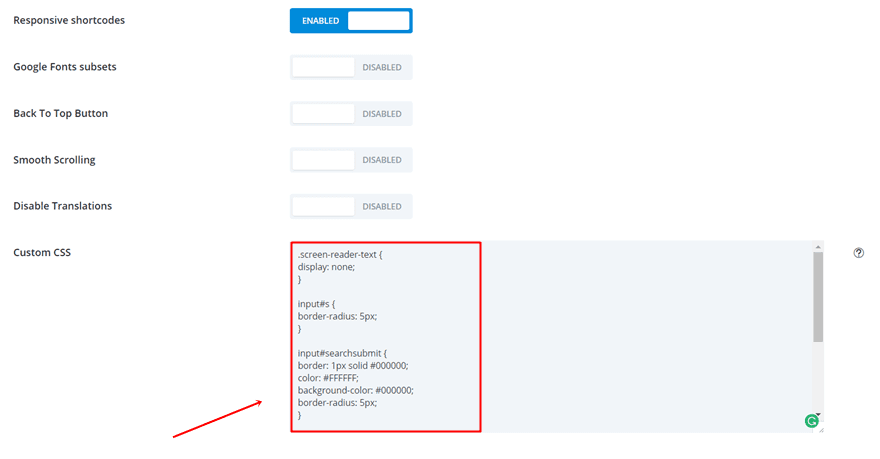
After you’ve made the PHP modification, you can instantly achieve the result that is shown above by going to your WordPress Dashboard > Divi > Theme Options > General > And adding the following lines of CSS code to the Custom field:
.screen-reader-text {
display: none;
}

input#s {
border-radius: 5px;
}

input#searchsubmit {
border: 1px solid #000000;
color: #FFFFFF;
background-color: #000000;
border-radius: 5px;
}

form#searchform {
float: right;
}
@media screen and (min-width: 480px) {
#top-header .container {
padding-bottom: 5px;
}

#et-secondary-menu .et-social-icons {
margin-top: 6px;
}} 
Result
Now that we’ve been through all the steps, let’s take another look at how your header should look like:
Final Thoughts
In this tutorial, we’ve shown you how to add a search field to your secondary menu. Besides that, we’ve also shown you how to modify the elements within that search field and presented you with an example of CSS code lines that you can just copy and paste for your own use. If you have any questions or suggestions, feel free to leave a comment in the comment section below!
Be sure to subscribe to our email newsletter and YouTube channel so that you never miss a big announcement, useful tip, or Divi freebie!
Featured Image by D Line / shutterstock.com
The post How to Add a Search Field to Divi’s Secondary Menu appeared first on Elegant Themes Blog.