
In today’s Divi tutorial, we’ll show you how to add animation effects to sections and rows in Divi. The Divi theme itself provides some relevant animation effects that help you bring an extra level of interaction to your website. These effects are easy to assign to an image within your Divi Builder in the Animation subcategory of the Advanced tab.
However, if you’re looking for a way to add these animation effects to other modules, sections or rows of your website, that’s possible as well. In this post, we’ll show you exactly how to do that. Besides showing you how to add the built-in animation effects, we’ll also show you how to integrate wow.js and animate.css into your Divi website.
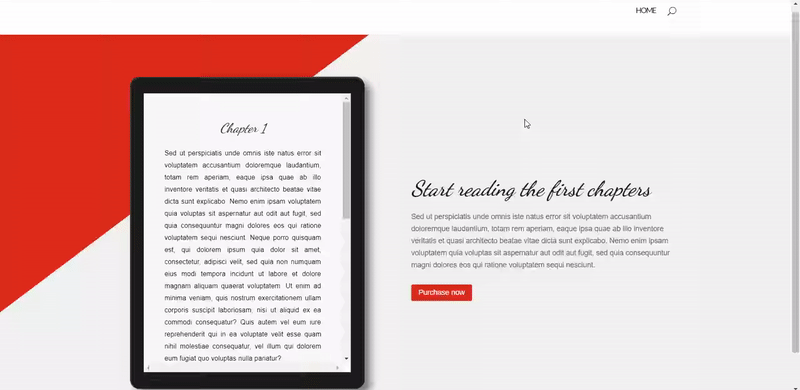
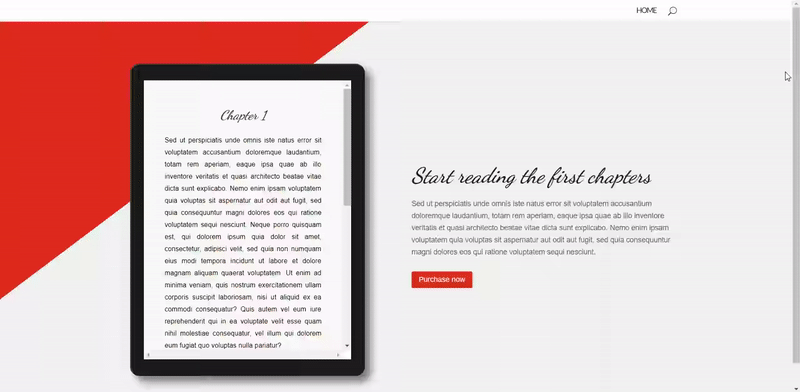
At the end of this post, you’ll be able to add nice effects to both your rows and sections. To help you visualize the process, we’d like to share the following example (which we’ll show you how to achieve at the end of this post):
Divi Animations or Wow.js & Animate.css?
You’re probably wondering in what cases you should consider using the Divi animations and in which cases the wow.js & animate.css would do the job better. While using the Divi built-in animation is the easiest solution if you’re not looking to create some advanced animation effects, the wow.js & animate.css effects will definitely bring a great added value to your website as well.
When to Use Divi Animations
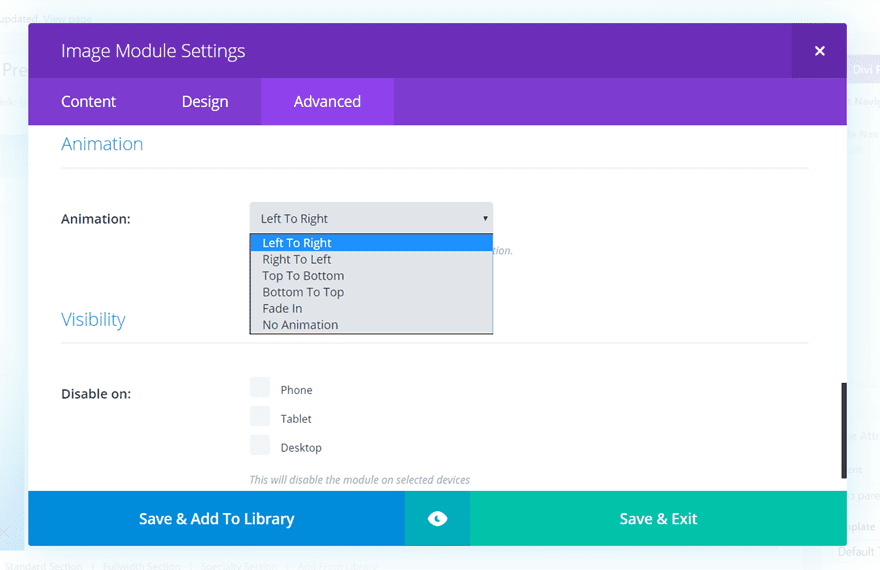
There are five available animation effects within Divi that you can use:
- The fade-in
- The bottom slide
- The left slide-in
- The right slide-in
- The top slide-in
Although there are only five possibilities, they are the most frequently used ones as well. They’re simple and to the point. If you want to give a nice extra effect to your website, without putting in too much effort, the Divi animation effects are the way to go. Each one of these effects gets activated from the moment you scroll and have a view of the module, row or section you’ve added the effect to. That way, your visitors won’t miss out on the effects that are located on the bottom of the page, for example.
To integrate the Divi animation effects, you don’t have to have a child theme uploaded on your website. You can easily add these effects while still working on the parent theme.
When to Use Wow.js & Animate.css

Integrating wow.js & animate.css into your website is something you’ll probably really like because of the many options you have. There are 14 animation effects categories that contain different effects that are relevant to that category. The categories from which you can choose are the following:
- Attention Seekers
- Bouncing Entrances
- Bouncing Exits
- Fading Entrances
- Fading Exits
- Flippers
- Lightspeed
- Rotating Entrances
- Rotating Exits
- Sliding Entrances
- Sliding Exits
- Zoom Entrances
- Zoom Exits
- Specials
You can view all the effects that are available by clicking on the following link. These animation effects also appear when scrolling.
How to Add Animation Effects to Sections/Rows in Divi
Subscribe To Our Youtube Channel
Use The Built-In Animation Effects
The first possibility we’ll show you is the built-in animation effects. We’re going to show you how to apply the effects to both a section and a row. Open the page where you’d like to make the modifications.
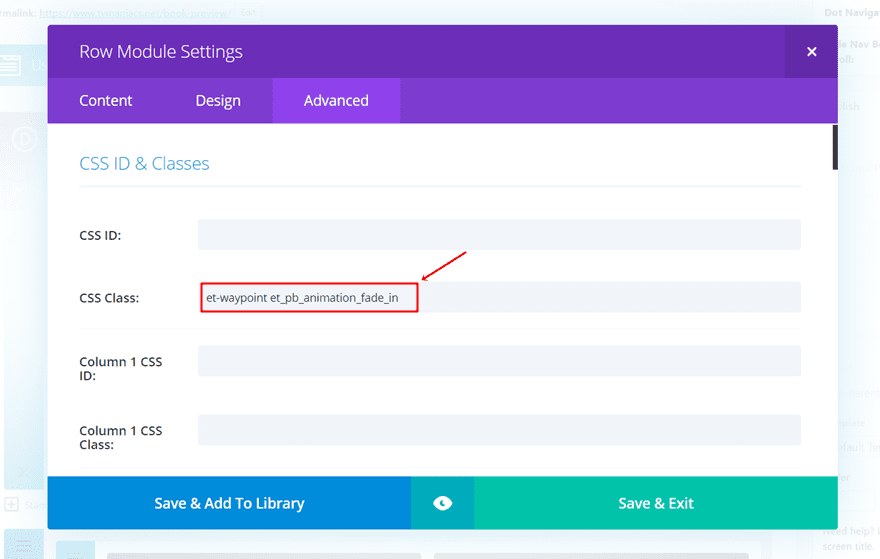
In our example, we’re going to add the animation effects to the first section and row of our page. Adding the animation for the section or the row is in both cases the same. The CSS class codes for the different animation effects are the following:
- Fade-in CSS class: et-waypoint et_pb_animation_fade_in
- Bottom slide-in CSS class: et-waypoint et_pb_animation_bottom
- Left slide-in CSS class: et-waypoint et_pb_animation_left
- Right slide-in: CSS class: et-waypoint et_pb_animation_right
- Top slide-in CSS class: et-waypoint et_pb_animation_top
Add Animation Effect to Row
To add the Animation to a certain row, open the settings of that row and go to the Advanced tab. Within the Advanced tab, place the animation effect CSS class in the CSS Class field. In this case, we’re going to show you how to add the fade-in animation.
Add Animation Effect to Section
The same method for you adding an animation effect to a row applies to a section as well. Go to the Advanced tab and place the animation effect CSS class of your choice in the CSS Class field. In this example, we’re going to show you how to add the top slide-in animation effect.

The Result
Once you’ve added the effects to your section and row, you’ll see the following result fall into place:
Add Wow.js & Animate.css to Your Child Theme
In this next part, we’re going to show you how to add wow.js and animate.css to your WordPress website and how to use it throughout your Divi theme.
First of all, I want to give credit to Jeremy Cookson for this post on how to integrate the wow.js and animate.css into WordPress. In this part of the post, we’ll show you exactly how to make the integration happen for a WordPress website that’s built with the Divi theme.
To add wow.js & animate.css to your web page, you’ll have to use a child theme on your website. If you’re wondering how to create a child theme, check out this post. After you’ve created the main files of your child theme, you’ll need to add two other files to complete your child theme with the animation effects.
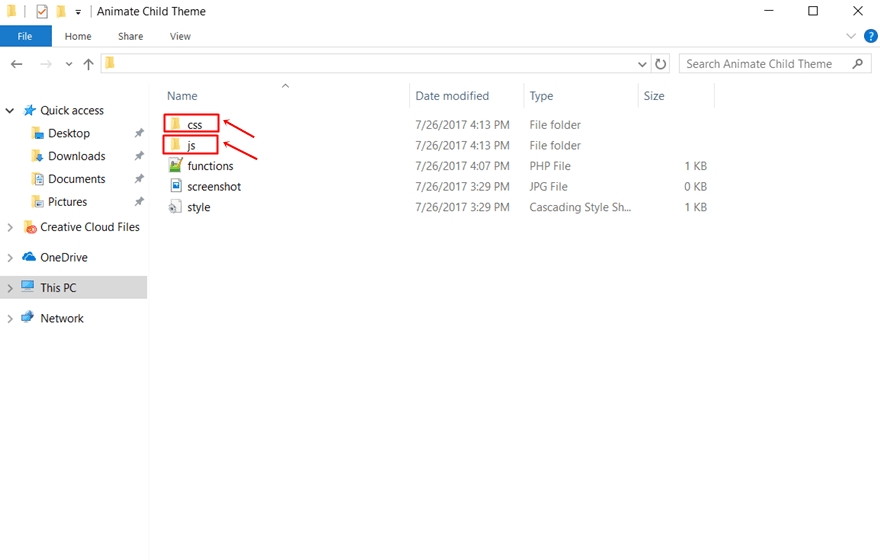
Download The Files & Add Them to Your Child Theme
Keep your child theme within reach and download the following two files in the mean time by clicking on the following two links:
Once you’ve downloaded the two files, create subfolders within your child theme. Name one of them CSS and the other JS. After that, place the animate.min.css in the CSS folder and the wow.min.js in the JS folder.
Upload Child Theme
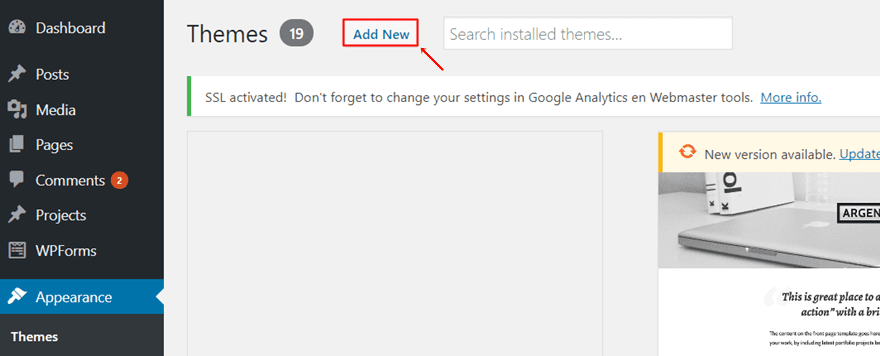
The next thing you’ll need to do is upload and activate the child theme you’ve just added the wow.js and animate.css to. Go to your WordPress Dashboard > Appearance > Themes > And click on ‘Add New’ at the top of the page.
Add PHP Code to Your Functions.php File
Once you’ve uploaded the child theme, add the following lines of PHP code to the functions.php file of your child theme:
//* Enqueue Animate.CSS and WOW.js
add_action( ‘wp_enqueue_scripts’, ‘sk_enqueue_scripts’ );
function sk_enqueue_scripts() {
wp_enqueue_style( ‘animate’, get_stylesheet_directory_uri() . ‘/css/animate.min.css’ );
wp_enqueue_script( ‘wow’, get_stylesheet_directory_uri() . ‘/js/wow.min.js’, array(), ”, true );
}
//* Enqueue script to activate WOW.js
add_action(‘wp_enqueue_scripts’, ‘sk_wow_init_in_footer’);
function sk_wow_init_in_footer() { add_action( ‘print_footer_scripts’, ‘wow_init’ );}
//* Add JavaScript before </body>function wow_init() { ?>
<script type=”text/javascript”>
new WOW().init(); </script><?php }
Add Animations to Rows & Sections
The system for adding the wow.js and animate.css effects to rows and sections is the same as for the Divi animation effects. You’ll have to open the settings of the row or section you want to add the animation effect to. Next, you can place the CSS class assigned to the animation into the CSS Class field of your section or row.
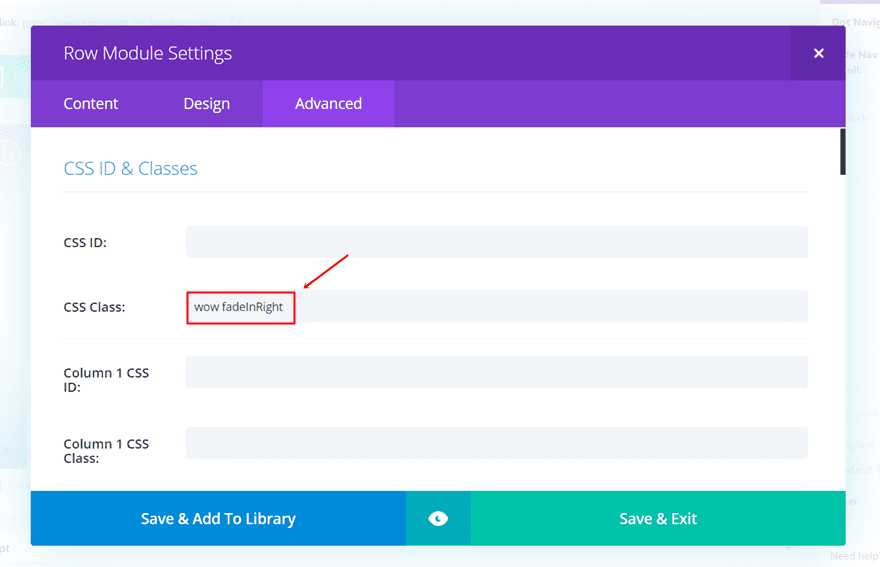
Add Animation to Row
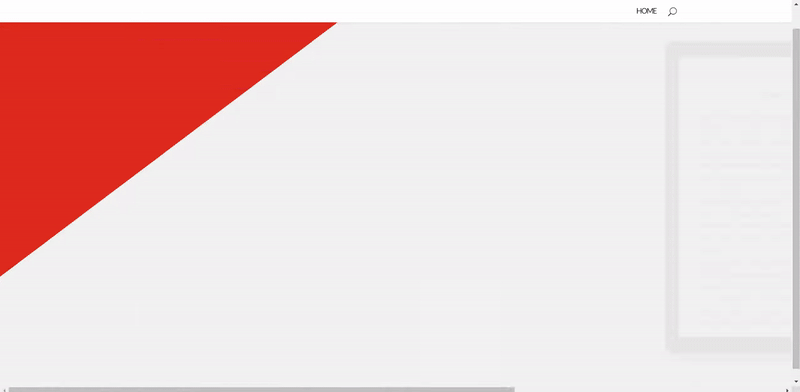
For the example we’re going to show you with the row, we’re using the fadeInRight effect we found in the list of animation effects. Go to the Advanced tab of your Row settings and add the ‘wow fadeInRight’ to the CSS Class field. Every time you want to add an effect to a part of your website, make sure you put ‘wow’ in front of the effect you’re using.
Result
When you’ve added the CSS class and preview the page you’re working on, you should have achieved the following result:
Add Animation to Section
The same method applies to adding an animation effect to a section. Go to the Advanced tab and add the ‘wow bounceInDown’ CSS Class to the CSS Class field of your section.
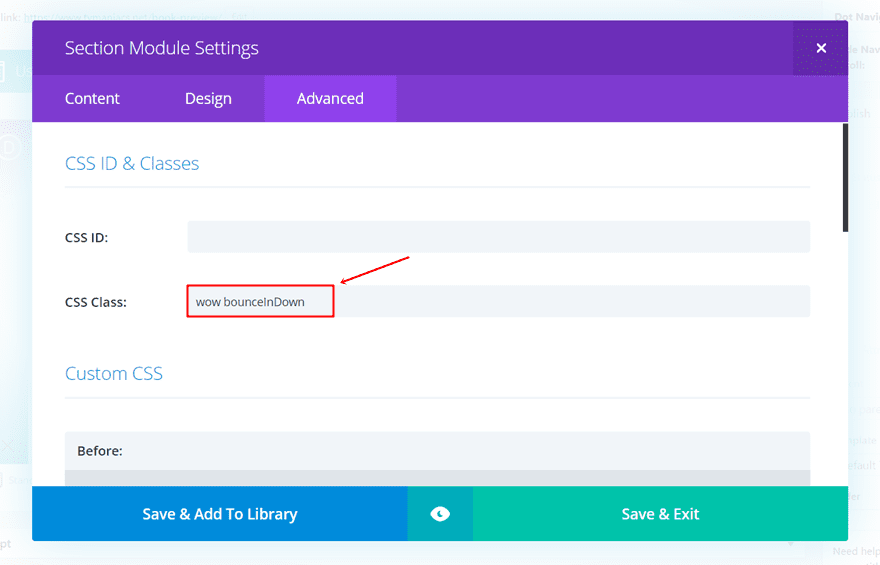
Result
If you followed all the steps properly, you should achieve the following result:
Advanced Options
In case you want to add some additional specifications to your animation, you can do that as well. You can, for instance, add a delay time to one of your animation effects. This might come in handy when you’re combining a section animation with row animation within that same section. That way, you make sure that the animation effects don’t overlap one another.
To show you how to add this delay time, we’re going to combine the two effects we’ve used in the previous part of this post. One animation effect is assigned to the section and the other to the row. To make sure the row animation effect doesn’t get lost, we’ll add a delay time of 2 seconds to it.
Open the row settings and go back to the Advanced tab. Within the CSS Class field, add another class called ‘delay’. This class doesn’t exist yet but we’re about to add it in our next step.
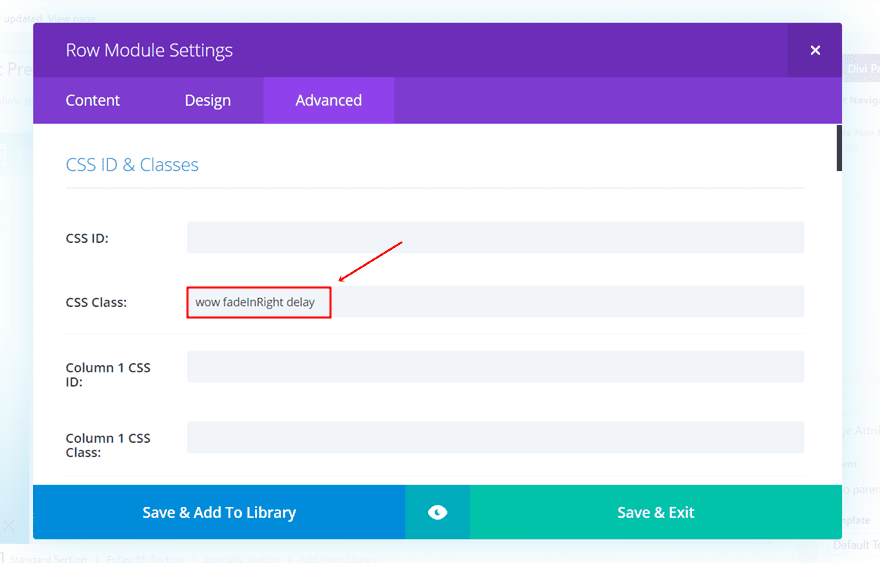
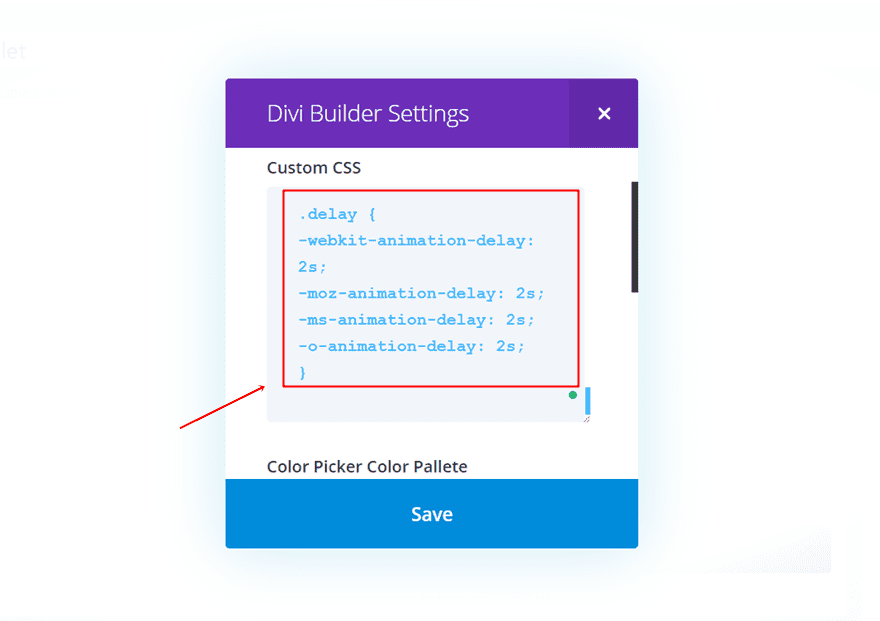
Now, add the delay CSS class to the settings of the page you’re working on by clicking on the following button:
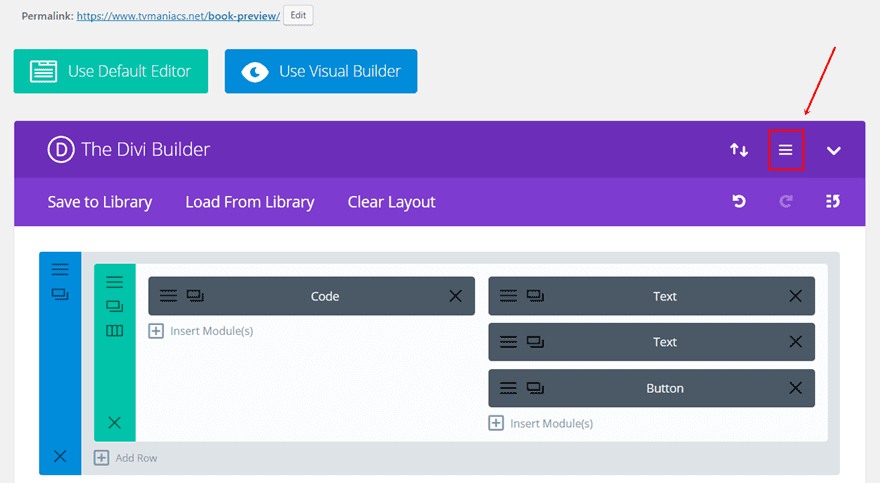
Next, add the CSS class with the CSS code lines to the Custom CSS field. If you want to add a delay time of 2 seconds, like we’re going to do in this example, you’ll be needing the following CSS code lines:
.delay {
-webkit-animation-delay: 2s;
-moz-animation-delay: 2s;
-ms-animation-delay: 2s;
-o-animation-delay: 2s;
} 
Result
Once you’ve added the delay time, the result should look like this:
Final Thoughts
In this post, we’ve shown you how to add animation effects to your Divi website. We provided you with two possibilities. The first one shows you how to use the standard animation effects provided by Divi. The second possibility allows you to integrate wow.js and animate.css. Using animation effects on your website can help you emphasize the content you want to share with your visitors. Besides that, it also just looks great. If you have any questions or suggestions; make sure you leave a comment in the comment section below.
Be sure to subscribe to our email newsletter and YouTube channel so that you never miss a big announcement, useful tip, or Divi freebie!
Featured Image by Stocker top / shutterstock.com
The post How to Add Animation Effects to Sections/Rows in Divi appeared first on Elegant Themes Blog.