Divi’s new background masks and patterns feature is more commonly used for sections on a page. But, we can also add them to headers as well! In this tutorial, we’ll show you how to add background masks and patterns to a Divi header template using the theme builder. This is a great way to create completely unique header designs for your website.
Let’s get started.
Sneak Peek
Here is a quick look at the design we’ll build in this tutorial.
Download the Layout for FREE
To lay your hands on the designs from this tutorial, you will first need to download it using the button below. To gain access to the download you will need to subscribe to our Divi Daily email list by using the form below. As a new subscriber, you will receive even more Divi goodness and a free Divi Layout pack every Monday! If you’re already on the list, simply enter your email address below and click download. You will not be “resubscribed” or receive extra emails.

To import the header template to your Divi Library, do the following:
- Navigate to the Divi Theme Builder.
- Click the Import button at the top right of the page.
- In the portability popup, select the import tab
- Choose the download file from your computer (make sure to unzip the file first and use the JSON file).
- Then click the import button.
Once done, the section layout will be available in the Divi Builder.
Let’s get to the tutorial, shall we?
What You Need to Get Started
To get started, you will need to do the following:
- Navigate to the Divi Theme Builder.
- Click the Add Global Header area of the default website template (or use a new template if you don’t want it to be global.
- In the dropdown menu, select Build Global Header.
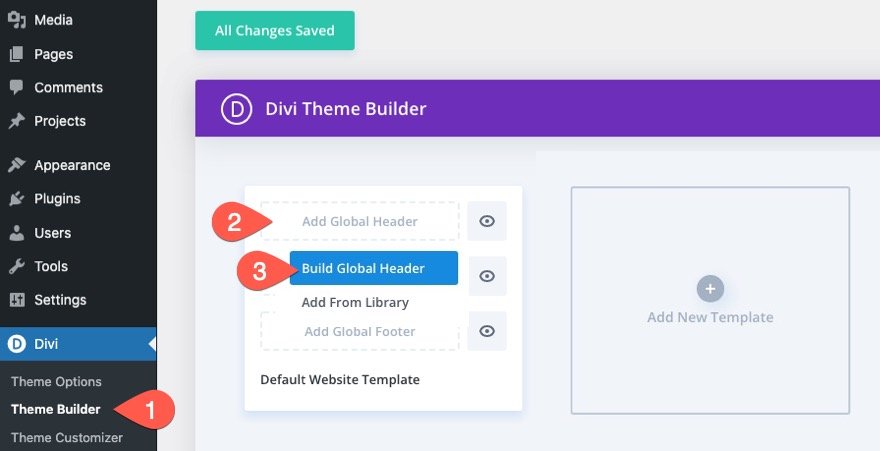
After that, you will be able to start designing a new header using the Divi Builder.
How to add Background Masks and Patterns to a Divi Header
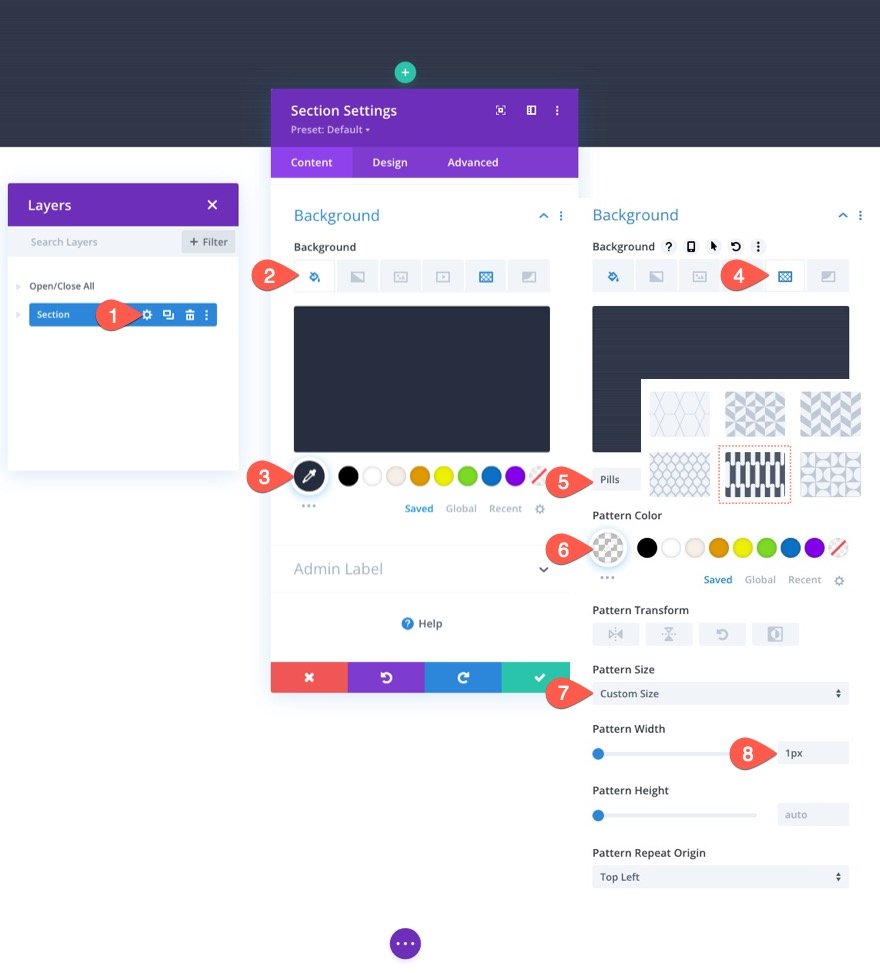
1. Creating the Section Background with a Background Color and Pattern
To start, open the settings of the existing section. Under the content tab, update the background options with the following background settings:
Background Color:
- Background Color: #262d3f
Background Pattern:
- Pattern: Pills
- Pattern Color: rgba(255,255,255,0.1)
- Patter Size: Custom Size
- Pattern Width: 1px
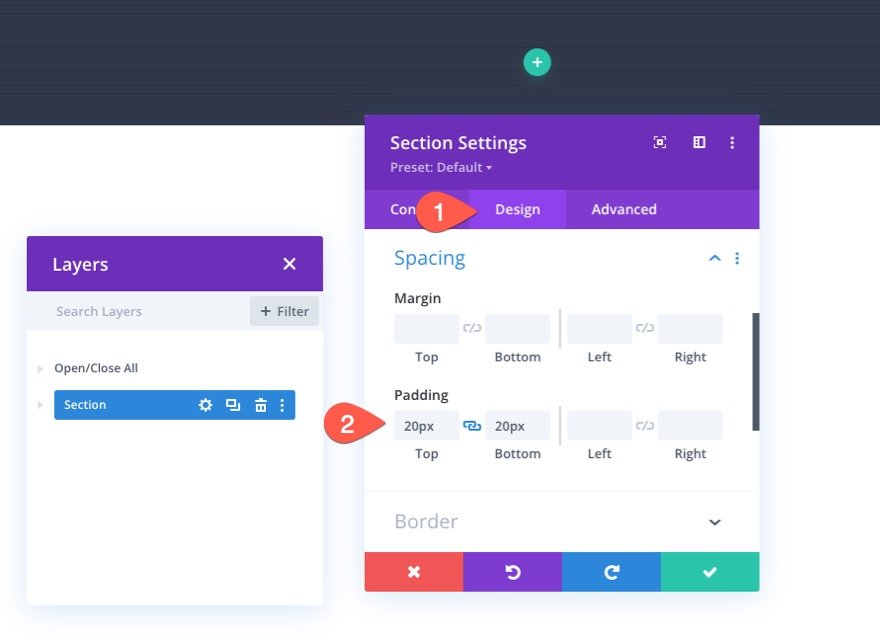
Section Padding
Under the design tab, update the section padding as follows:
- Padding: 0px top, 0px bottom
This will decrease the vertical space of the header a bit.
2. Adding the Row Layout
Once the section background is complete, we are ready to add the content of the header. In this case we are going to add a menu on the left and a cta button on the right so we need to add a row layout that will work. Add a three-fourths one-fourths (two-column) layout to the section.
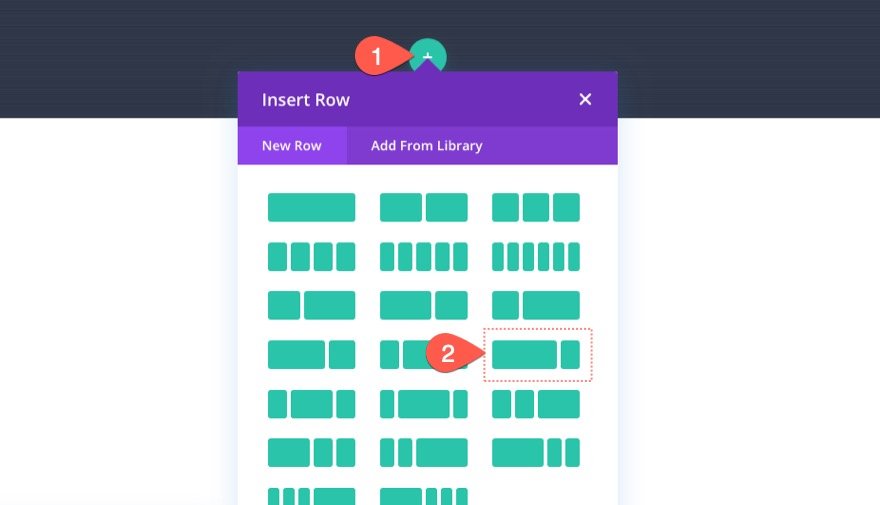
We’ll come back to the row settings in a bit. For now, let’s add some mock content.
3. Adding the Header Mock Content (a Menu and Button)
Now we are ready to add a menu and a CTA button to our header. Since this tutorial is focusing on the background design of the header, we won’t list all the design settings for the mock content. But, feel free to download the free template from this tutorial to take a closer look at the settings used in this illustration.
In the left column of the row, add a new menu.
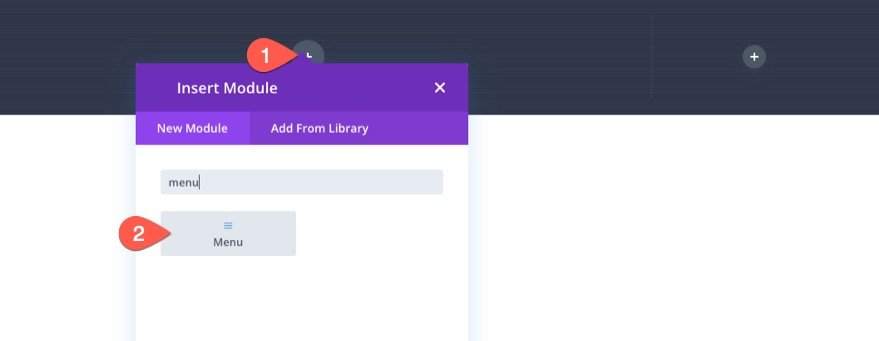
Make sure to select a menu and add a logo. Then use the design settings to design the menu to your liking.
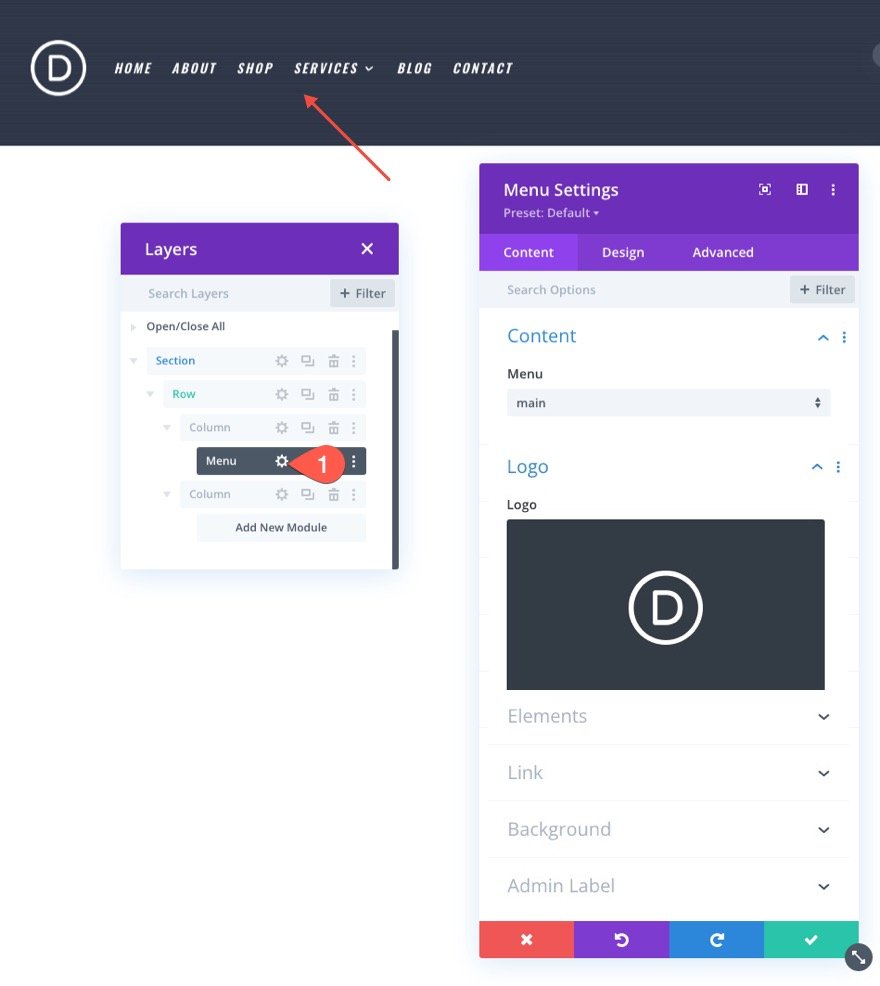
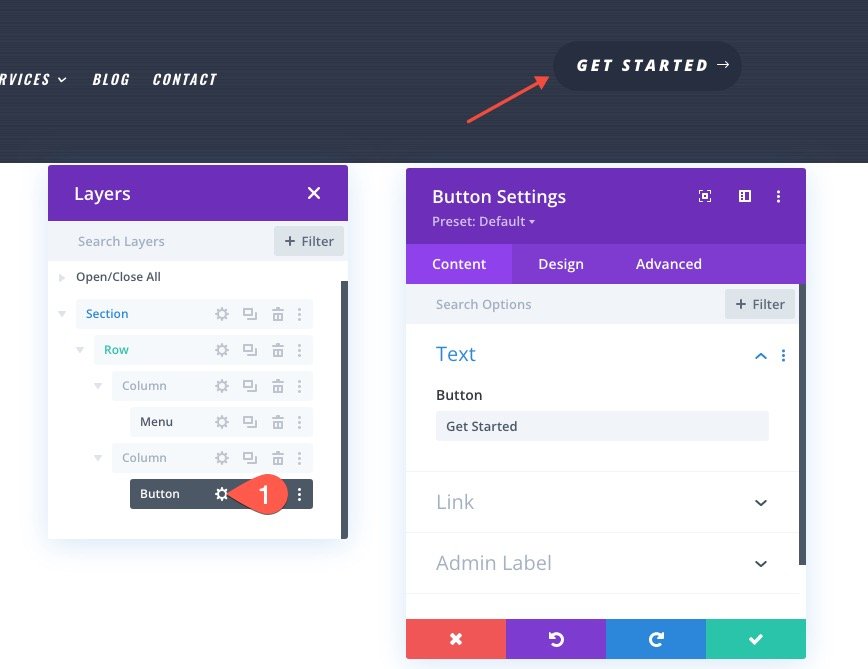
In the right column, add a button module and customize it to your liking as well.
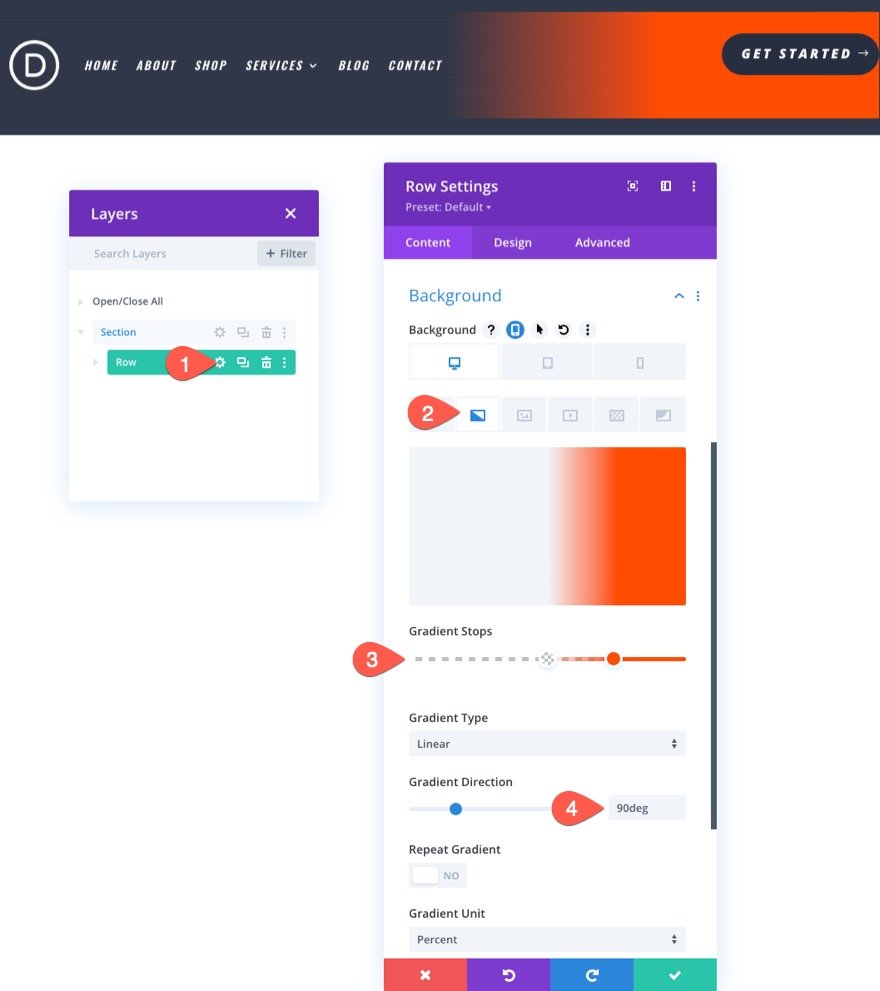
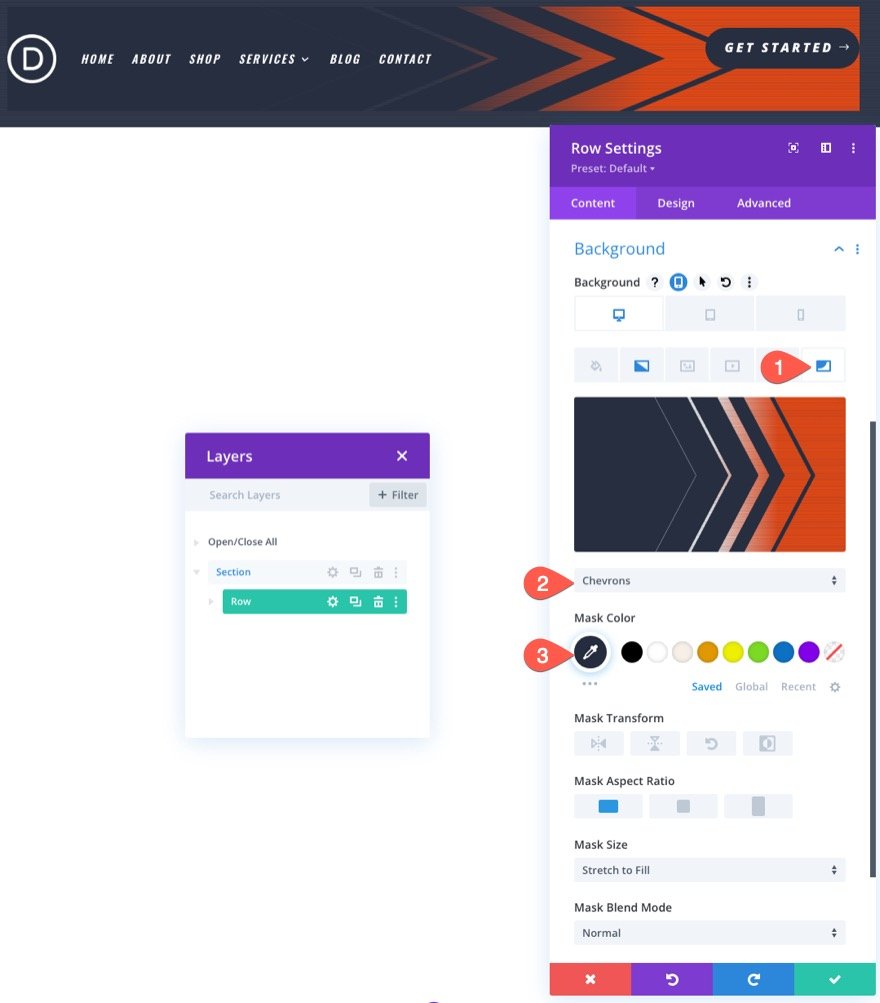
4. Creating the Row Background with Gradient, Mask, and Pattern
The Gradient
Open the settings of the row containing your menu and button. Then update the background options with the following background settings:
Background Gradient:
- Gradient Stop 1 Color: Trasparent
- Gradient Stop 1 Position: 50%
- Gradient Stop 2 Color: #ff4c00
- Gradient Stop 2 Position: 75%
- Gradient Direction: 90 deg
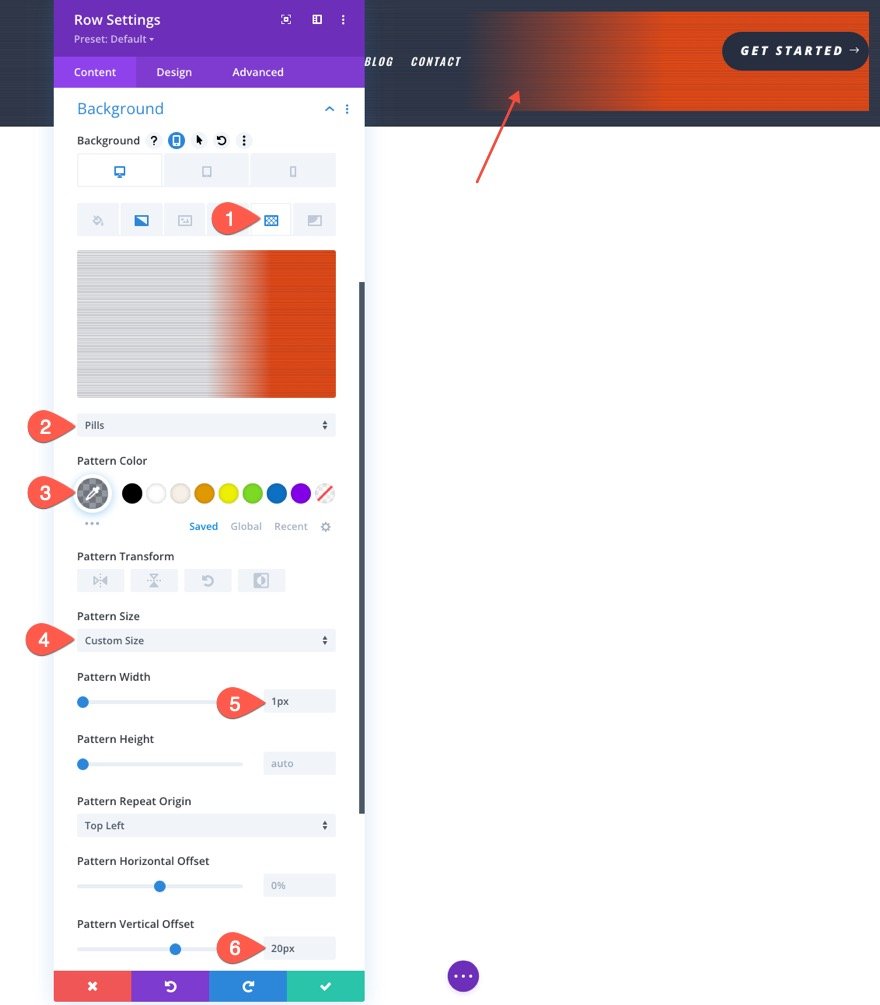
The Pattern
- Pattern: Pills
- Pattern Color: rgba(38,45,63,0.48)
- Pattern Size: 1px
- Pattern Vertical Offset: 20px
Note: The vertical offset of the pattern is set to 20px because there is a 20px top padding on the section above the row. This makes sure the pattern of the section aligns with the pattern of the row.
The Mask
- Mask: Chevrons
- Mask Color: #262d3f
For headers, it works best if you use masks that have symmetrical designs. The Chevrons mask is a great option because it not only looks cool but also leads the user to look at the button on the right.
NOTE: For headers, it is best to keep the mask size set to “Stretch to Fill” so that it covers the horizontal space without compromising the mask design.
5. Final Touches to the Row
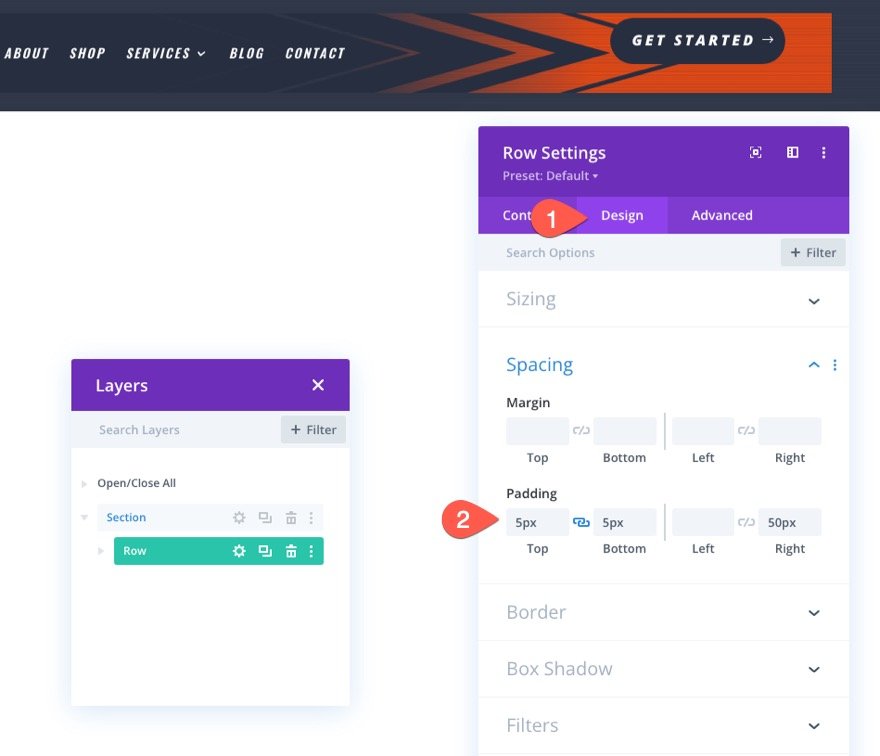
To round off the design (literally), we are going to add a border-radius and a few more tweaks to the row.
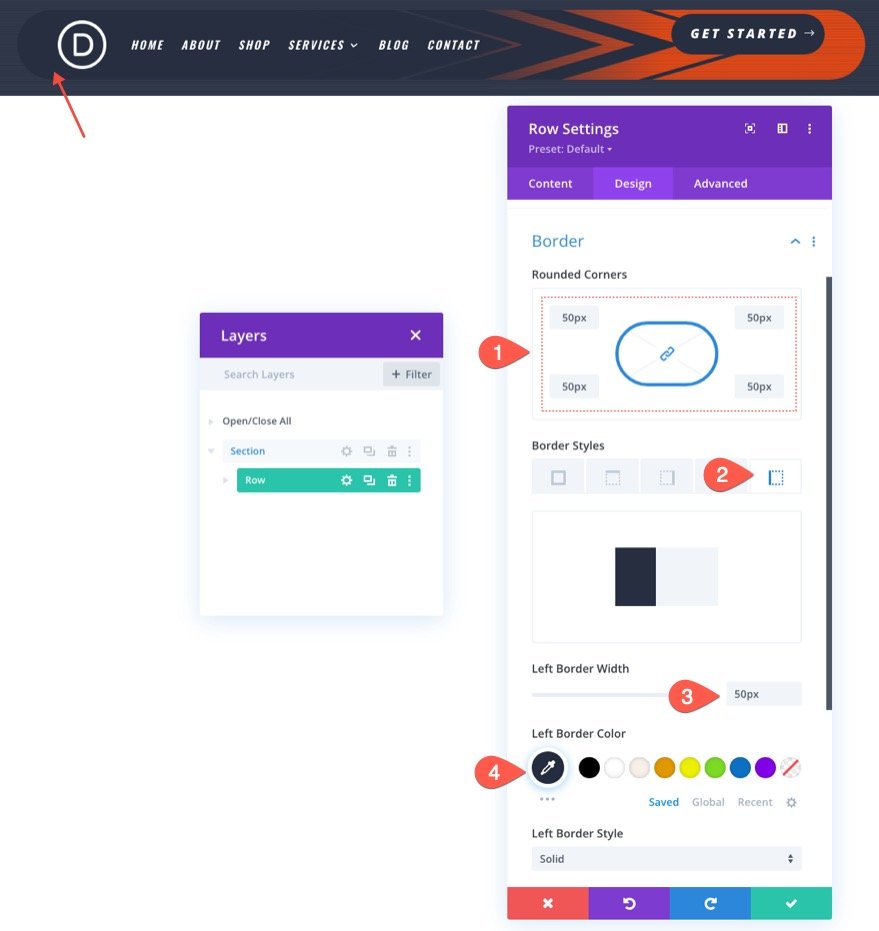
The Border Radius, Border, and Spacing
Under the design tab, update the padding as follows:
- Padding: 5px top, 5px bottom
Then give the row a nice rounded corner for an additional design element.
- Rounded Corners: 50px
- Left Border Width: 50px
- Left Border Color: #262d3f
We need to give the left side of the row a border because the square edge of the mask will overflow the row despite the rounded corners.
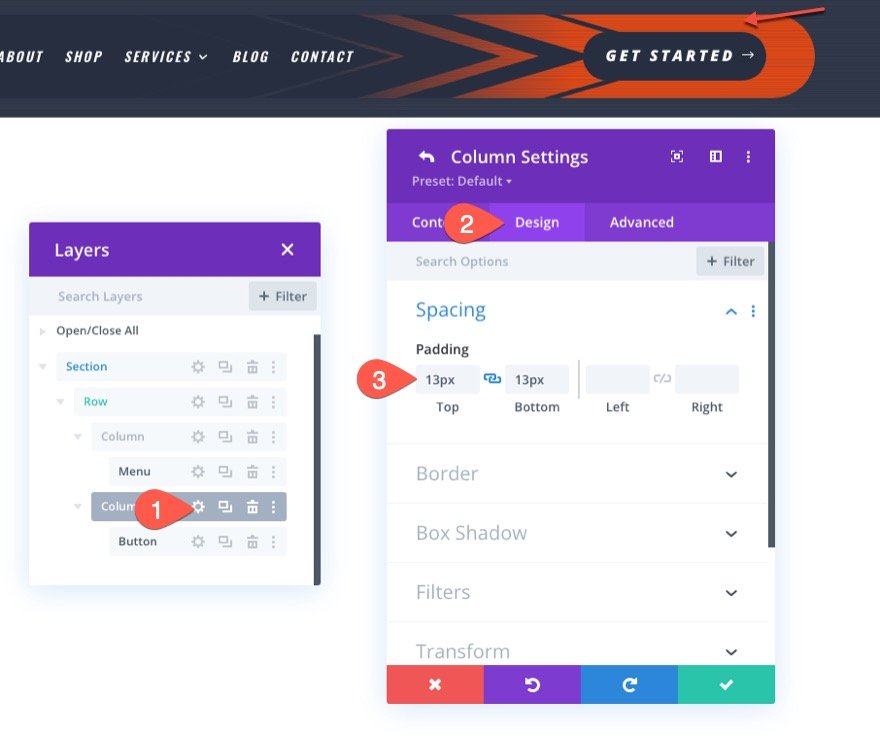
Column Spacing for Vertical Alignment of Content
And for one last touch, add some padding to the second column to center the button vertically.
- Padding: 13px top, 13px bottom
Final Result
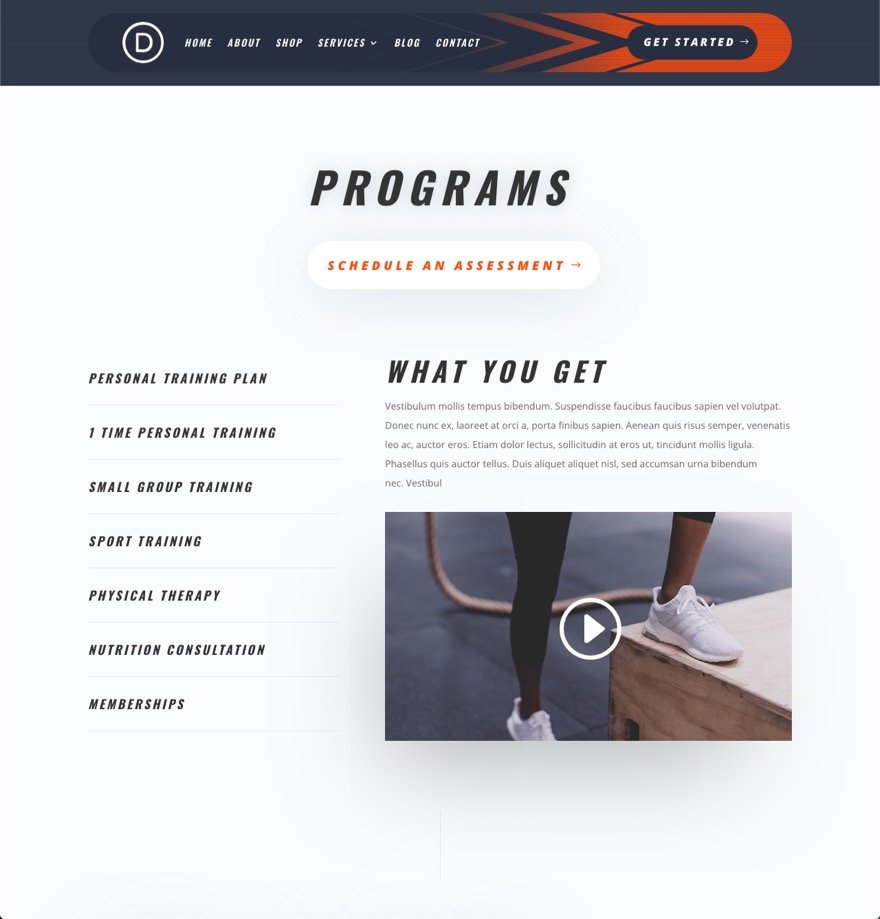
Let’s check out the final result. Here is our new header being used on one of the pages from our Personal Trainer Layout Pack.
The gradient is a bit subtle so here is a closer look at what it looks like.

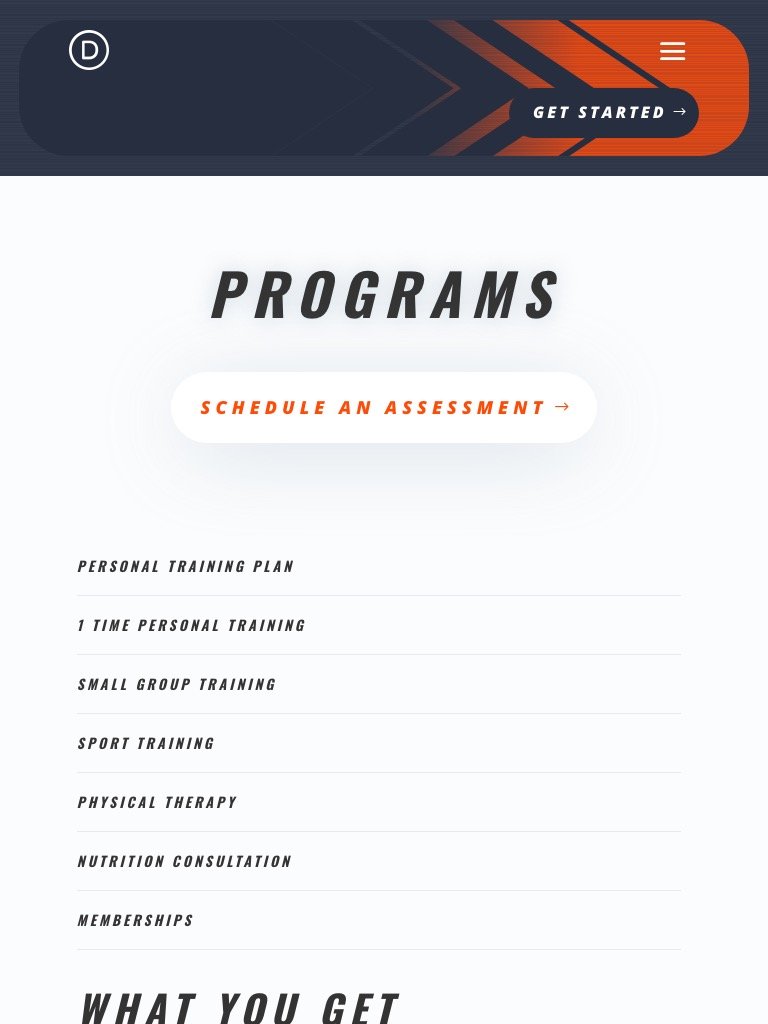
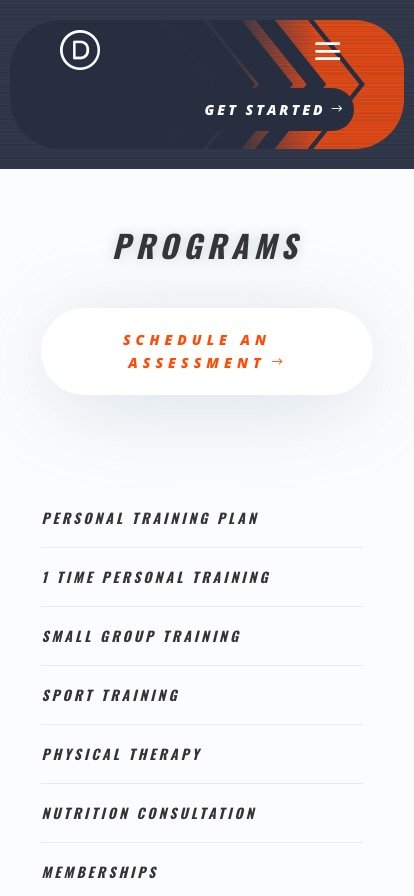
And here is the header design on desktop and mobile.
Have Fun Experimenting
The header background design is only the tip of the iceberg. There is much exploration to be done with the background options available in Divi. For example, with just a few clicks, we can add a diagonal stripes pattern and a diagonal lines mask combo to create the header illustrated below.

Final Thoughts
Hopefully, this tutorial has helped you understand how Divi’s background masks and patterns can work harmoniously to create a unique background design for your headers. Feel free to experiment with more background design combinations to fit the design of your own website or upcoming project.
For more, check out how to combine Divi’s new gradient builder with masks and patterns.
I look forward to hearing from you in the comments.
Cheers!
.inline-code{padding: 0px 4px; color: crimson; font-family: Monaco,consolas,bitstream vera sans mono,courier new,Courier,monospace!important} video.with-border {border-radius: 8px;box-shadow: 0 8px 60px 0 rgba(103,151,255,.11), 0 12px 90px 0 rgba(103,151,255,.11);display:block;margin: 0 auto;}
The post How To Add Background Masks and Patterns to your Divi Header appeared first on Elegant Themes Blog.