
The way your pages show up in Search Engine Result Pages (SERPs) play a significant role in how much organic traffic you get. If you don’t hook viewers in, they’ll ignore your website and move on to the next option without a second thought.
Fortunately, there are a lot of ways you can improve your meta descriptions. For example, by using schema markup you can overhaul their style and transform simple descriptions into ‘rich snippets’. In this article, we’re going to talk about what schema markup is and show you a few examples of how it works. Then we’ll teach you two ways to add schema markup to WordPress.
Let’s get to it!
An Introduction to Schema Markup (And Why You Should Use It)
Schema markup is a type of code you can add to your pages to help search engines better understand their contents. Using schema markup, you transform your regular meta descriptions into rich snippets.
To give you an example, imagine that you’ve published a recipe on your WordPress blog. The standard route would be to use a normal meta description, which appears in search results as plain text:

By adding schema markup to the page, you can transform it into a rich snippet to make it stand out, like this:

To make this possible, you must add markup to our recipe. You can either do this with a plugin, or adding the necessary code to your pages manually using microdata, RDFa, or JSON-LD. We’ll discuss both of these methods in more detail later on.
Creating rich snippets for your pages may seem like a hassle, but it can benefit you in a lot of ways. First off, rich snippets makes your pages stand out in search results, which will help you get more clicks. Secondly, there are almost 600 types of schemas to use, so chances are no matter what your content is, you’ll find markup to match. This enables you to do many exciting things with your rich snippets, which we’ll take a look at next.
What You Can Do With Schema Markup
As we mentioned earlier, there are hundreds of types of schema you can use on your pages depending on what their contents are. We’ve already looked at how you can use this with a recipe, so let’s look at other ways you can use schema for your WordPress content.
For example, if you’re running a blog, you’ll probably get a lot of mileage out of the article schema markup. This enables you to include elements such as images and author names right next to your meta descriptions:

A lot of blogs also focus on reviewing products or services. Here’s an example of a product review rich snippet, which enables you to display rating scores:

Another example is the event schema. This type can show dates, times, and locations so people can have easy access to all the information they might need:

We could go on and on about all the types of schema you can use, but this should give you an idea of the possibilities. WordPress enables you to implement any type of schema markup you want, you just need to know how.
How to Add Schema Markup to WordPress (With and Without Plugins)
To use schema markup in WordPress you can either use a plugin or do it manually. We’re going to cover both approaches and explain why you might want to use either method.
1. Use the All In One Schema Rich Snippets Plugin

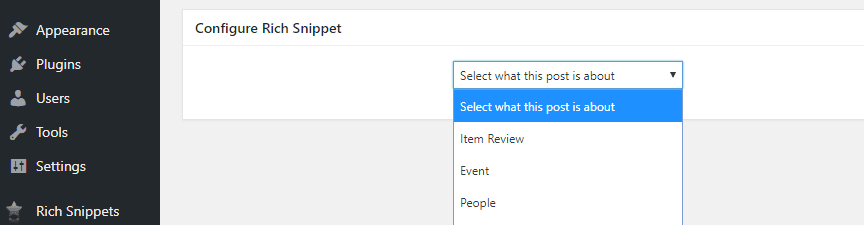
The All In One Schema Rich Snippets plugin enables you to add schema markup to WordPress without the need to use any code. Once you enable the plugin, a new widget will show up below the WordPress editor. To start, all you need to do is choose the type of content you’re working on:
Once you’ve done this, you’ll be shown extra fields where you can add information regarding the rich snippet:
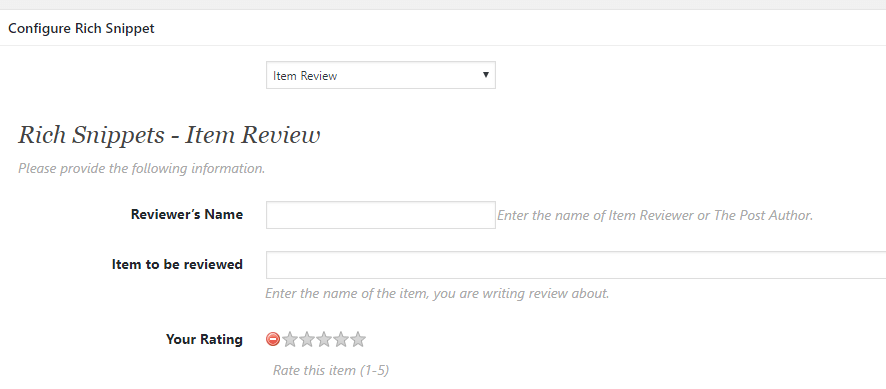
The fields will vary depending on what class of content you choose. It shouldn’t take you more than a couple of minutes to fill out all the necessary schema data for your rich snippets.
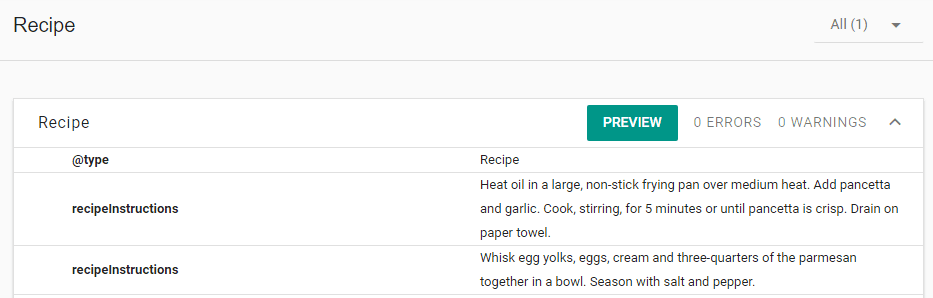
Unfortunately, this plugin doesn’t enable you to preview how your snippets will look. To do that, you’ll need to publish your post or page after adding the necessary data and use Google’s Structured Data Testing Tool. When you access the testing tool, it’ll ask you to either enter a URL or a code snippet. If the post to which you’ve added the schema markup is live, you can test it by entering its URL:

Google will pull the markup from the page and show it to you on the right side of the page:
From here, you can click on the Preview button to check out what your rich snippet will look like when someone sees it in the search results:
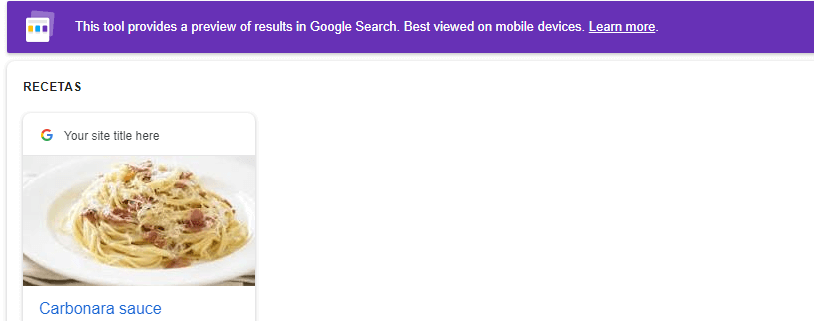
If there are any errors in your markup, the tool will let you know at this stage. However, you shouldn’t run into any problems while using the All In One Schema Rich Snippets plugin as it handles all the coding for you.
2. Add Schema Markup to Your Posts Using WordPress Custom Fields
If you’re an advanced user and want more control over the markup you use in WordPress, you can use custom fields to add the schema markup manually. This approach will enable you to use schema classes that aren’t available using the plugin. However, it does require an additional bit of work.
To get started, open the editor for the page or post where you want to add the markup. Look for the Screen Options tab at the top of the screen and click on it. You’ll be able to choose which widgets you want to show up alongside the WordPress editor. Go ahead and enable the Custom Fields option and a new widget will show up under the editor:
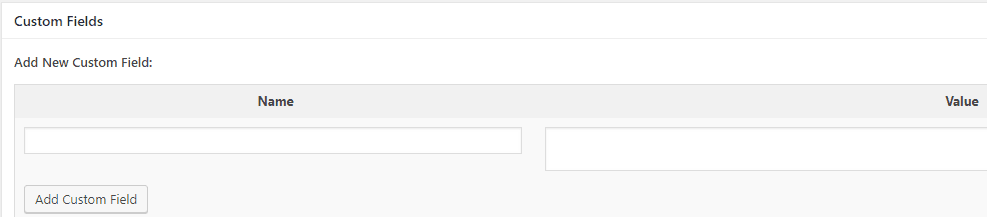
You’ll need to create a new custom field, so set a name for it in the field to the left. To the right, you have an empty field where you can add the code you want. For example, if you want to showcase an event, here’s an example of how that JSON-LD code could look like:
<script type="application/ld+json">
{
 "@context": "https://schema.org",
 "@type": "Event",
 "location": {
 "@type": "Place",
 "address": {
 "@type": "PostalAddress",
 "addressLocality": "Denver",
 "addressRegion": "CO",
 "postalCode": "80209",
 "streetAddress": "7 S. Broadway"
 },
 "name": "The Hi-Dive"
 },
 "name": "SOLD OUT! Typhoon with Radiation City",
 "offers": {
 "@type": "Offer",
 "availability": "https://schema.org/SoldOut",
 "price": "13.00",
 "priceCurrency": "USD",
 "url": "https://www.ticketfly.com/purchase/309433"
 },
 "startDate": "2013-09-14T21:30"
}
</script>
This code example contains placeholder information, which you’ll need to replace with your own information. Once the code is ready, click on the Add Custom Field button to save it. The data is now added to your content, but you still need to configure your theme to load it. Save your post or page now and open your FTP client.
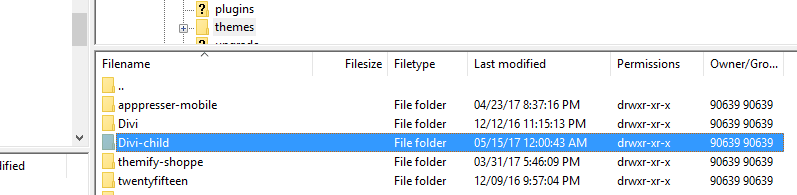
Connect to your website via FTP and go to the public_html/wp-content/themes folder. You’ll find folders for each of your themes inside. To implement the functionality we need, you’ll have to edit one of your theme’s core files. If you haven’t done so yet, you’ll want to set up a child theme before you make the changes we’ll discuss below. Once your child theme is ready to go, return to the themes directory and look for its folder:
Open that folder now and locate the header.php file within. Right-click on it and choose the View/Edit option. This will enable you to edit the file and add the following PHP code within the <head> tags, near the top of the document:
$schemamarkup = get_post_meta(get_the_ID(), ' nameofyourcustomfield ', true);
if(!empty($nameofyourcustomfield)) {
  echo $ nameofyourcustomfield ;
}
This code tells your child theme to load the information in the custom field you created earlier when it’s available. You’ll still need to add that field for each post if you want to use schema markup for it. Without this code, search engines won’t be able to access your posts’ schema markup.
Before you save the file, you’ll notice the nameofyourcustomfield placeholder shows up three times. You need to replace this with the same name you set for your custom field a minute ago. When that’s done, you can save the changes to your header.php file. Afterward, go ahead and check your schema markup loads properly using Google’s Structured Data Testing Tool, as we showed you how to in the previous section.
Conclusion
Your website’s content is paramount, but so is the way it appears in search results. Using schema markup can help you enable rich snippets for your content, which will raise visibility of your content and help lead more traffic to your site. All you have to do is add schema markup to your content, and you’re off to the races.
When it comes to adding schema markup to WordPress, we’ve shown you two methods of doing this:
- Use the All In One Schema Rich Snippets plugin.
- Add schema markup to your posts using WordPress custom fields.
Do you have any questions about how to add schema markup to WordPress? Let’s talk about them in the comments section below!
Article thumbnail image by Keep Calm and Vector / shutterstock.com
The post How to Add Schema Markup to WordPress appeared first on Elegant Themes Blog.