
In this Divi post, we’ll be showing you how you can combine the background and shadow options of an Image Module. This post is meant to stimulate your imagination and show you how new Divi features can work with existing ones–leading to creative results. To help you with the creative process, we’ve created 4 combinations which we’ll show you how to recreate step by step. Let’s take a look at the examples.
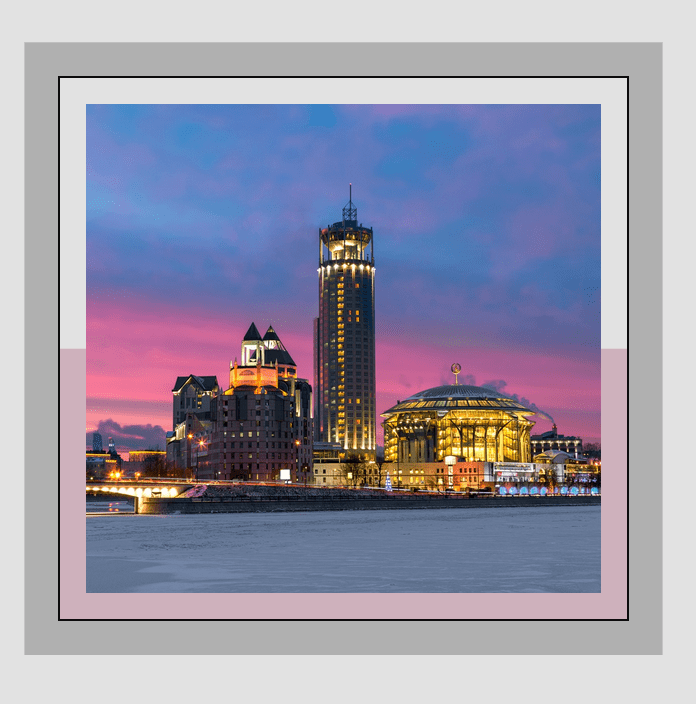
First Example
Desktop
Mobile

Second Example
Desktop
Mobile
Third Example
Desktop
Mobile
Fourth Example
Desktop
Mobile
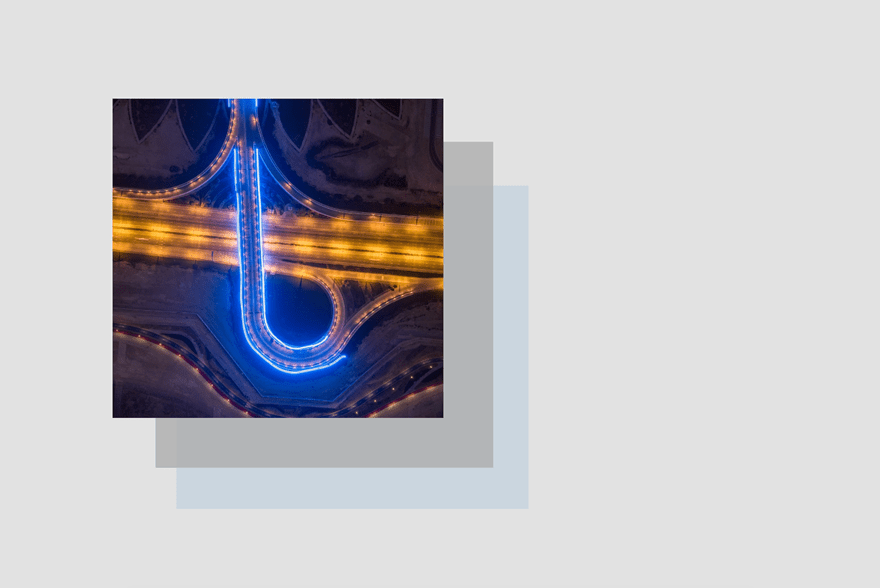
First Example
Now that we’ve shown you what you can expect from this post, let’s take a look at how you can recreate the following example with only a few steps within Divi and no additional CSS code:
Add Two-Column Row
Column 1 Background Color
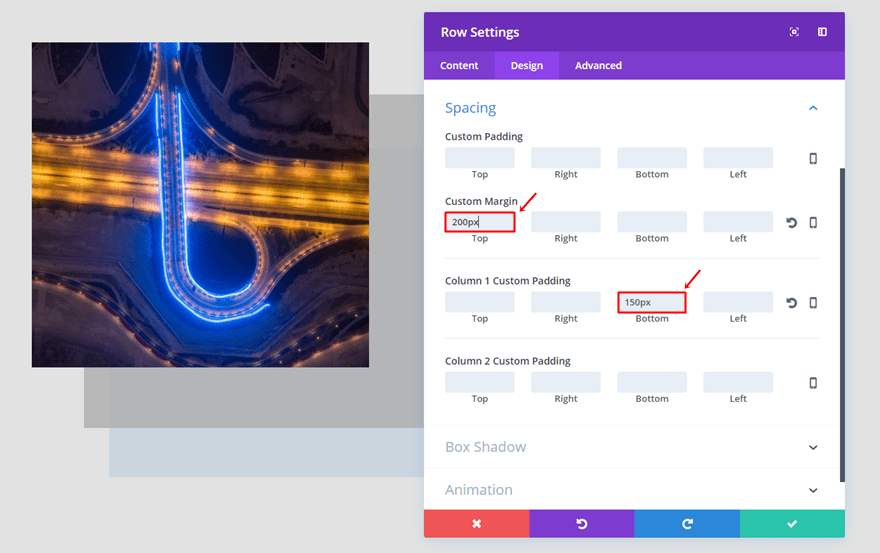
Add a two-column row to a standard section and choose ‘rgba(12,113,195,0.11)’ as the Column 1 Background Color.
Spacing
Then, move on to the Design tab. Add ‘200px’ to the top margin and ‘150px’ to the bottom padding of the first column.
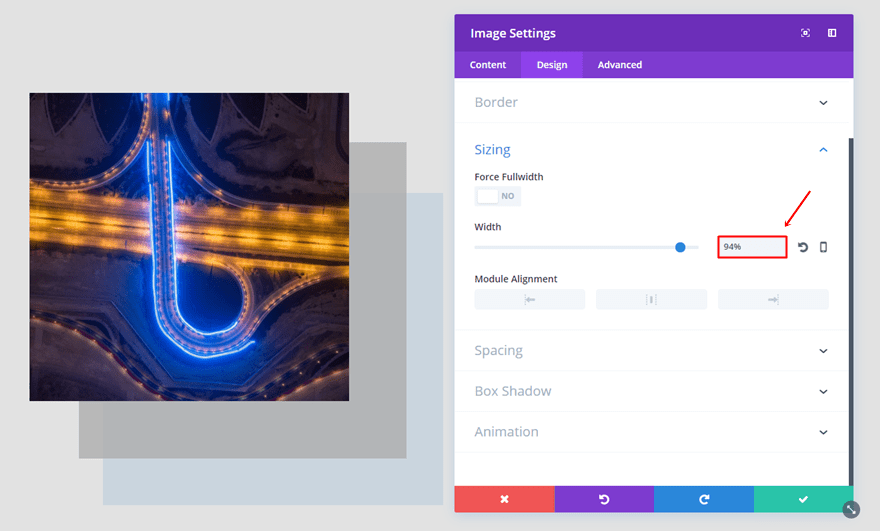
Add Image Module to First Column (Desktop & Tablet)
Sizing
Then, add an Image Module to the first column of the row you’ve created. This Image Module will apply to desktops and tablets only. The first thing you’ll need to do is change the Width to ‘94%’.
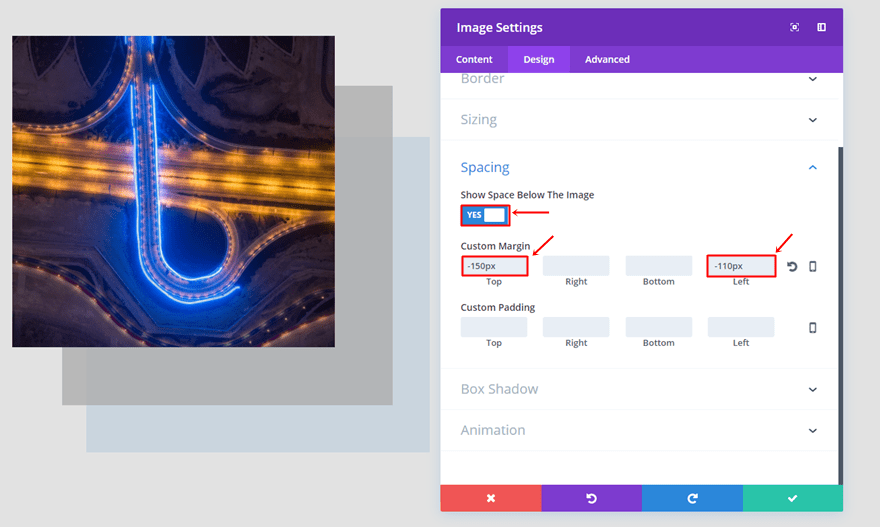
Spacing
Then, open the Spacing subcategory, enable the ‘Show Space Below The Image’ option, add ‘-150px’ to the top margin and ‘-110px’ to the left margin of the image.
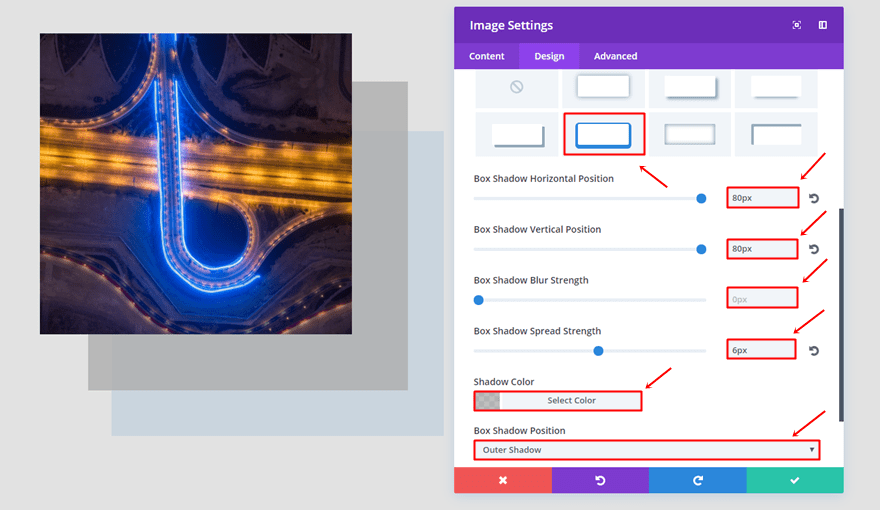
Box Shadow
Scroll further down the tab and apply the following box shadow to the image:
- Box Shadow Horizontal Position: 80px
- Box Shadow Vertical Position: 80px
- Box Shadow Blur Strength: 0px
- Box Shadow Spread Strength: 6px
- Shadow Color: rgba(173,173,173,0.79)
- Box Shadow Position: Outer Shadow

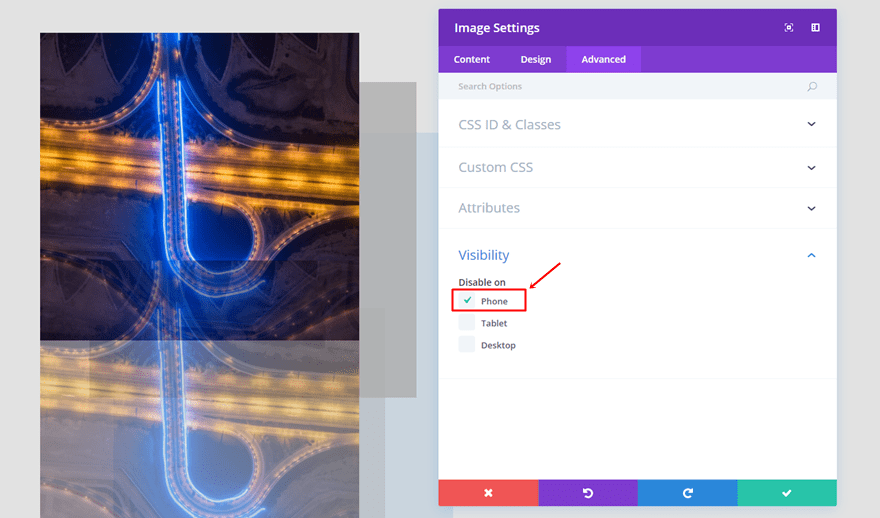
Visibility
Lastly, go to the Advanced tab and disable the Image Module on mobile.
Clone Image Module (Phone)
Most of the settings that we’ve used for the desktop and tablet version of the Image Module are the same for the mobile version as well. That’s why we’re going to clone the Image Module and make some additional changes that’ll match the mobile screen.
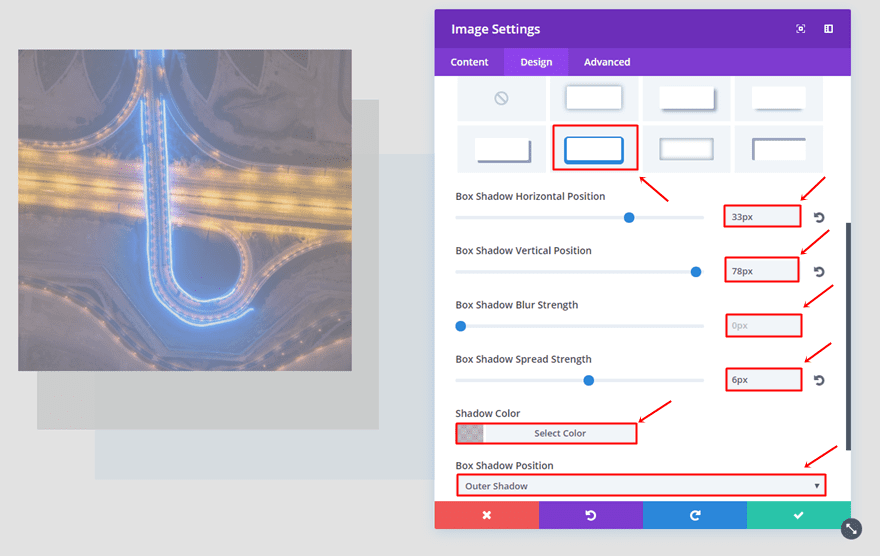
Change Box Shadow
The first thing we’ll need to change is the box shadow. Instead of using the desktop settings, use the following settings instead:
- Box Shadow Horizontal Position: 33px
- Box Shadow Vertical Position: 78px
- Box Shadow Blur Strength: 0px
- Box Shadow Spread Strength: 6px
- Shadow Color: rgba(173,173,173,0.79)
- Box Shadow Position: Outer Shadow
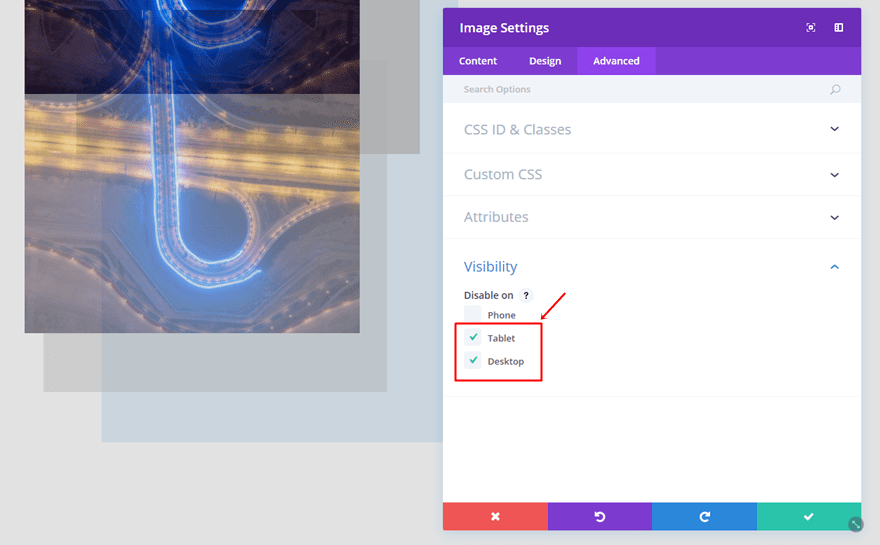
Visibility
The next and last thing we’ll need to do is change the visibility of this second Image Module. Instead of disabling it on phone, go ahead and disable it on both tablet and desktop.
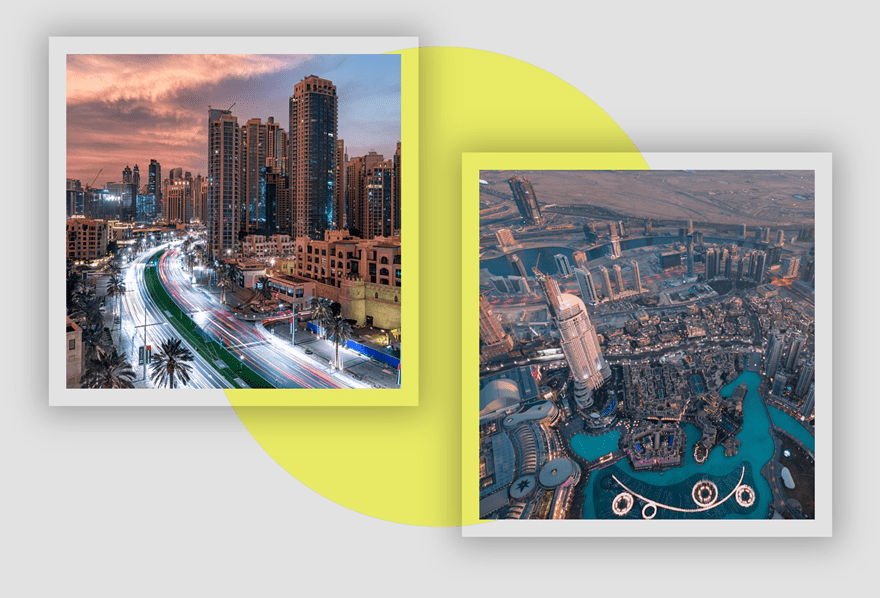
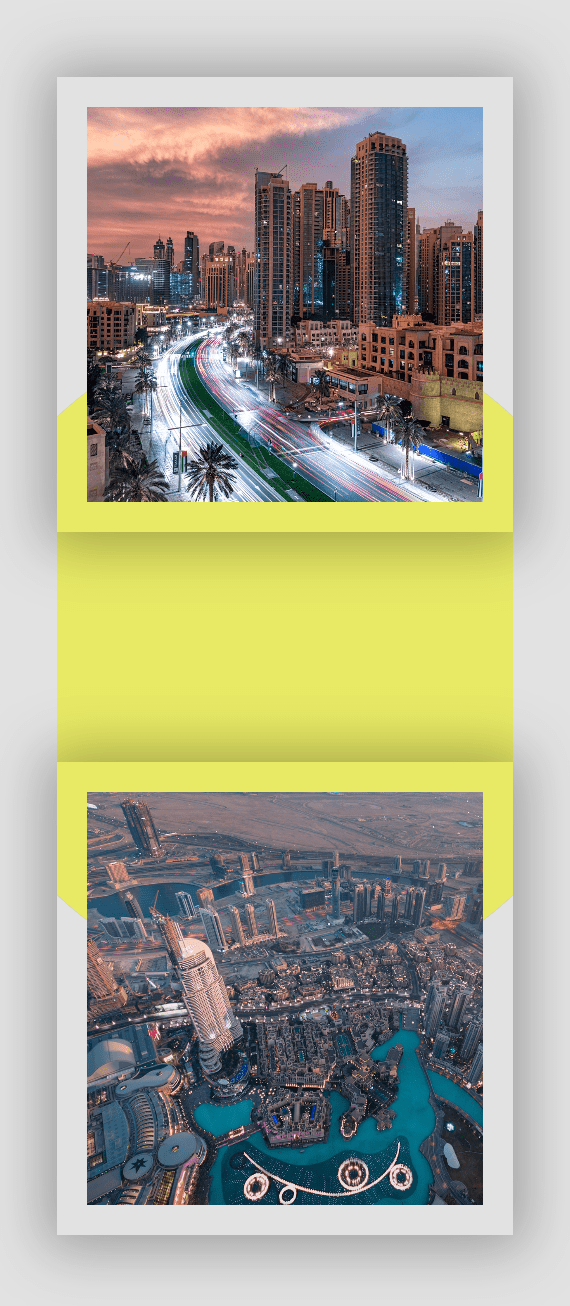
Second Example
Next, we have the second example which looks like this on desktop:
Add Two-Column Row
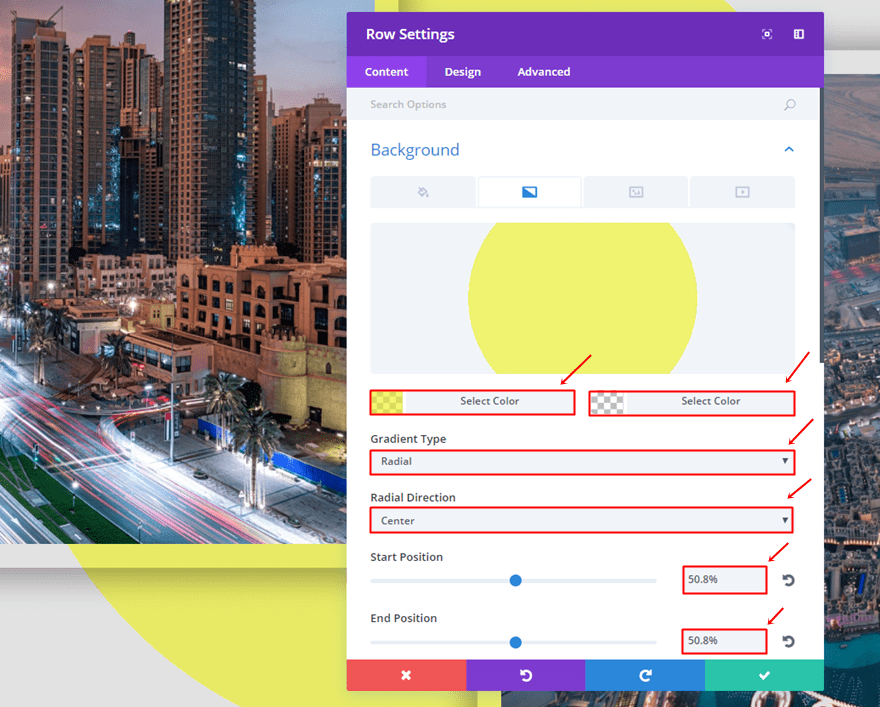
Row Gradient Background
Add a new two-column row to the section you’re working on and use the following gradient background for it:
- First Color: rgba(237,240,0,0.55)
- Second Color: rgba(255,255,255,0)
- Gradient Type: Radial
- Radial Direction: Center
- Start Position: 50.8%
- End Position: 50.8%
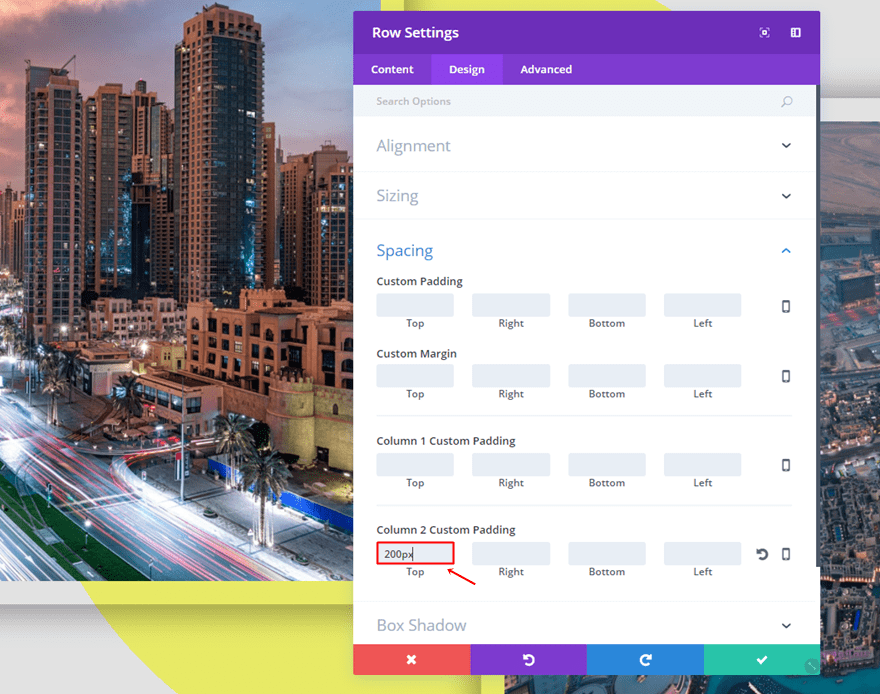
Sizing
Move on to the Design tab and enable the ‘Make This Row Fullwidth’ option.
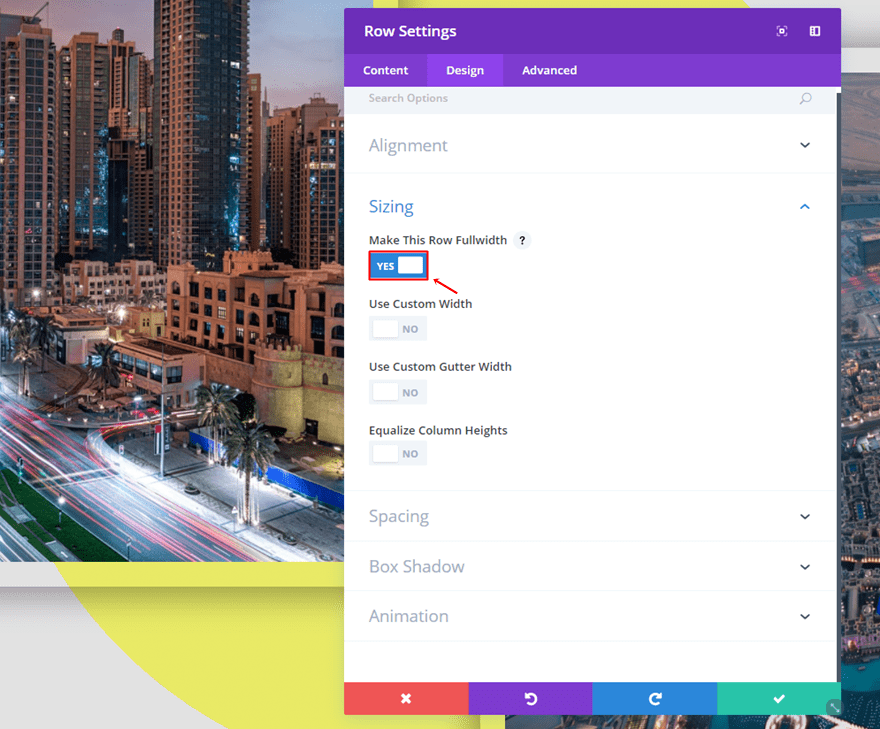
Spacing
Lastly, add a top padding of ‘200px’ to the second column.
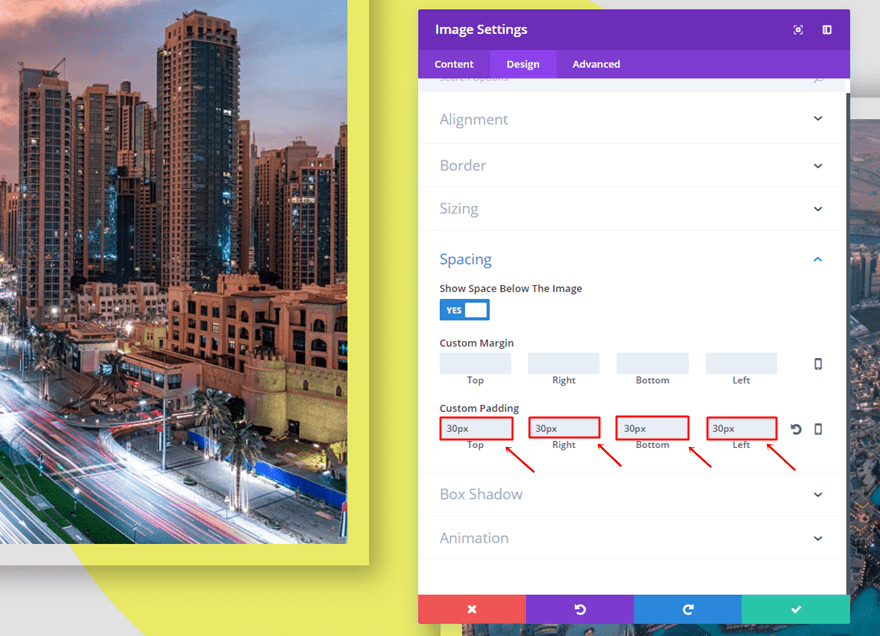
Add Image Module to First Column
Spacing
Once done with the row settings, go ahead and add an Image Module to the first column. Open the Spacing subcategory within the Design tab and add ’30px’ to the top, right, bottom and left padding.
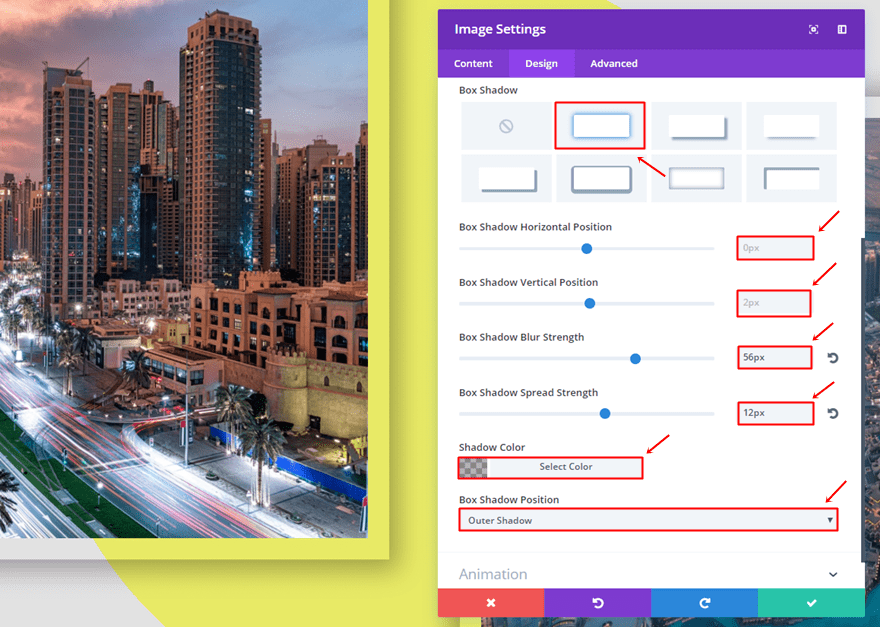
Box Shadow
Scroll down the same tab and use the following settings for the Box Shadow subcategory:
- Box Shadow Horizontal Position: 0px
- Box Shadow Vertical Position: 2px
- Box Shadow Blur Strength: 56px
- Box Shadow Spread Strength: 12px
- Shadow Color: rgba(0,0,0,0.3)
- Box Shadow Position: Outer Shadow
Clone Image Module & Place in Second Column
The settings for the Image Module within the second column are the same. Go ahead, clone the Image Module and place it in the second column.
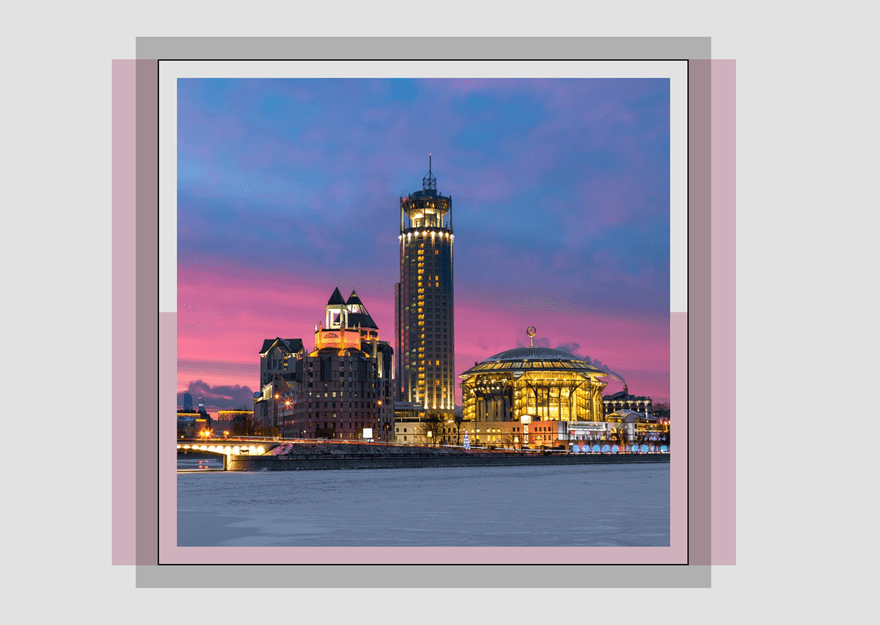
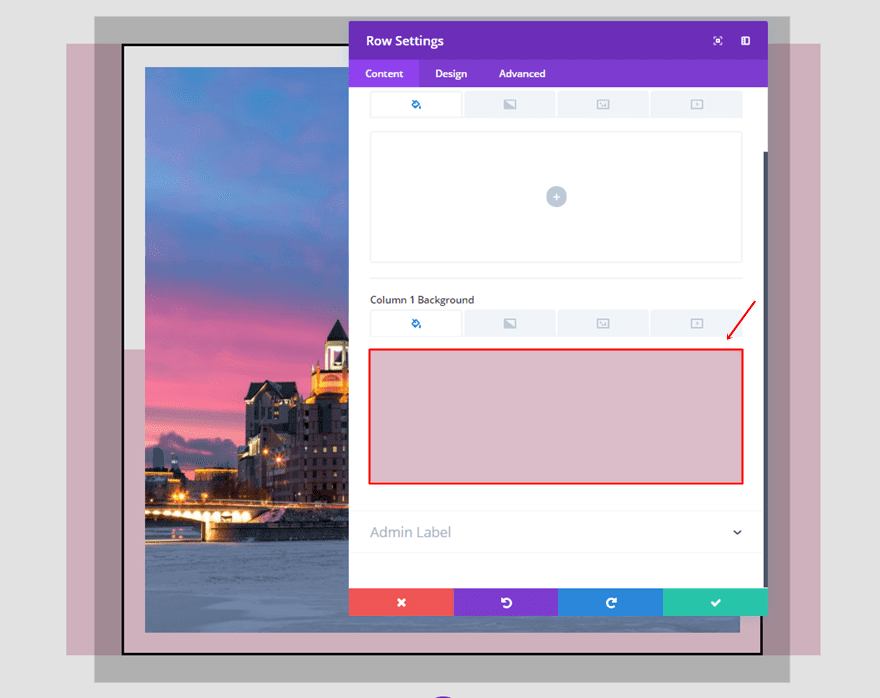
Third Example
Moving on, we’re going to show you how to achieve the following result:
Add One-Column Row
Column 1 Background Color
Add a one-column row and choose ‘rgba(193,145,163,0.6)’ as the background color of the first column.
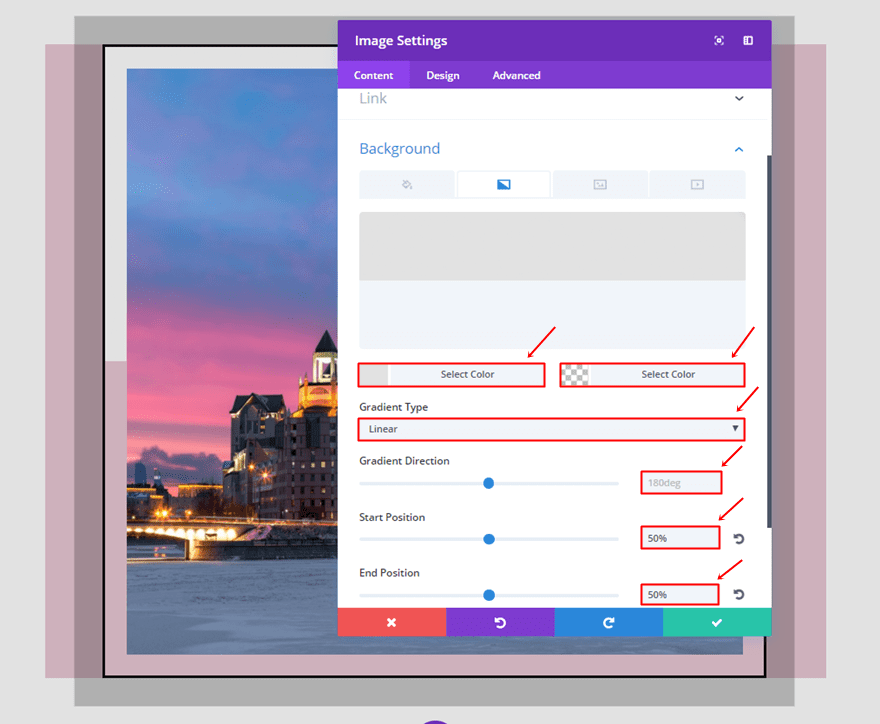
Add Image Module
Gradient Background Image
Then, add an Image Module to the column and use the following gradient background for it:
- First Color: #e2e2e2
- Second Color: rgba(255,255,255,0)
- Gradient Type: Linear
- Gradient Direction: 180deg
- Start Position: 50%
- End Position: 50%
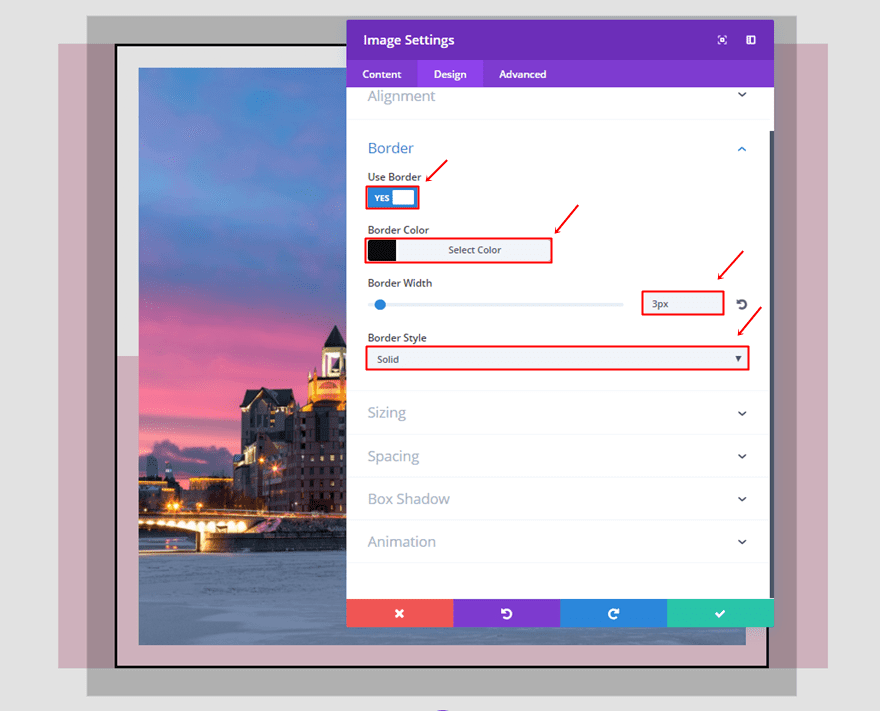
Border
Move on to the Design tab and make the following settings apply to the Border subcategory:
- Use Border: Yes
- Border Color: #000000
- Border Width: 3px
- Border Style: Solid
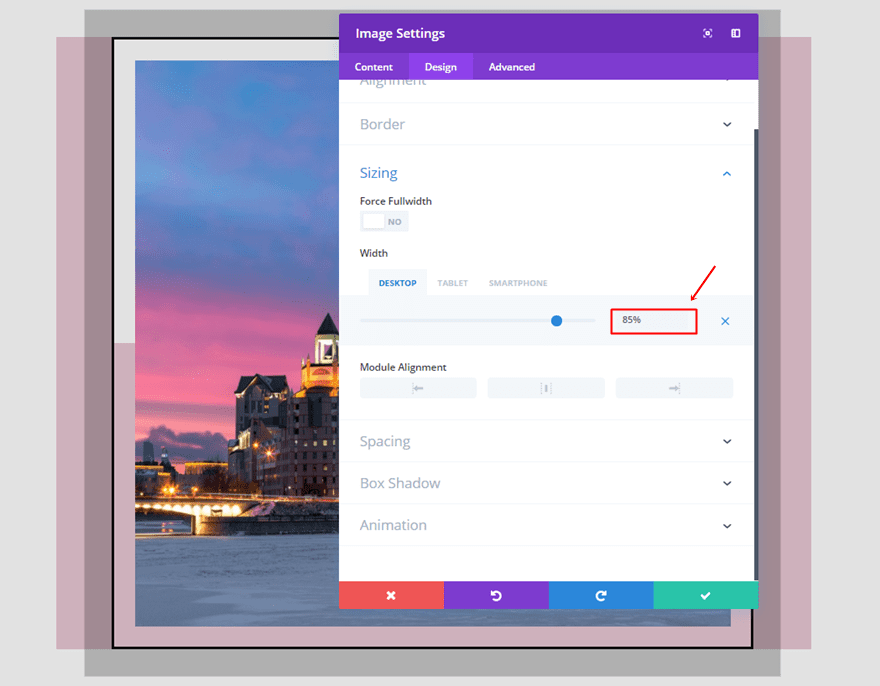
Sizing
Next, add the following Width to the Image Module:
- Desktop: 85%
- Tablet & Phone: 100%
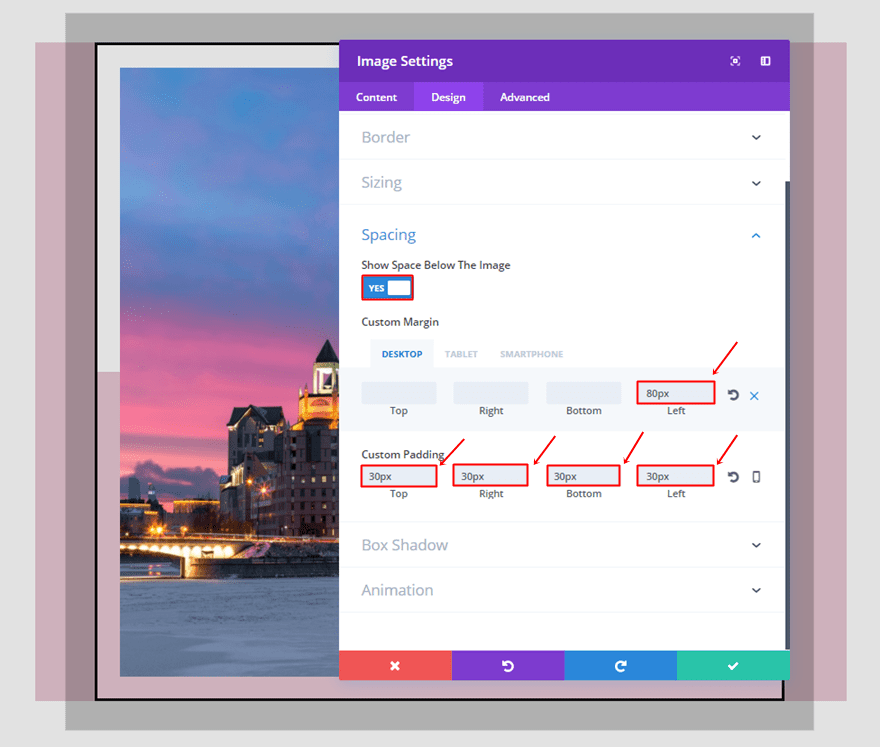
Spacing
Then, open the Spacing subcategory and make the following padding and marign apply to the Image Module:
- Left Margin: 80px (Desktop), 0px (Tablet & Phone)
- Top, Right, Bottom & Left Padding: 30px
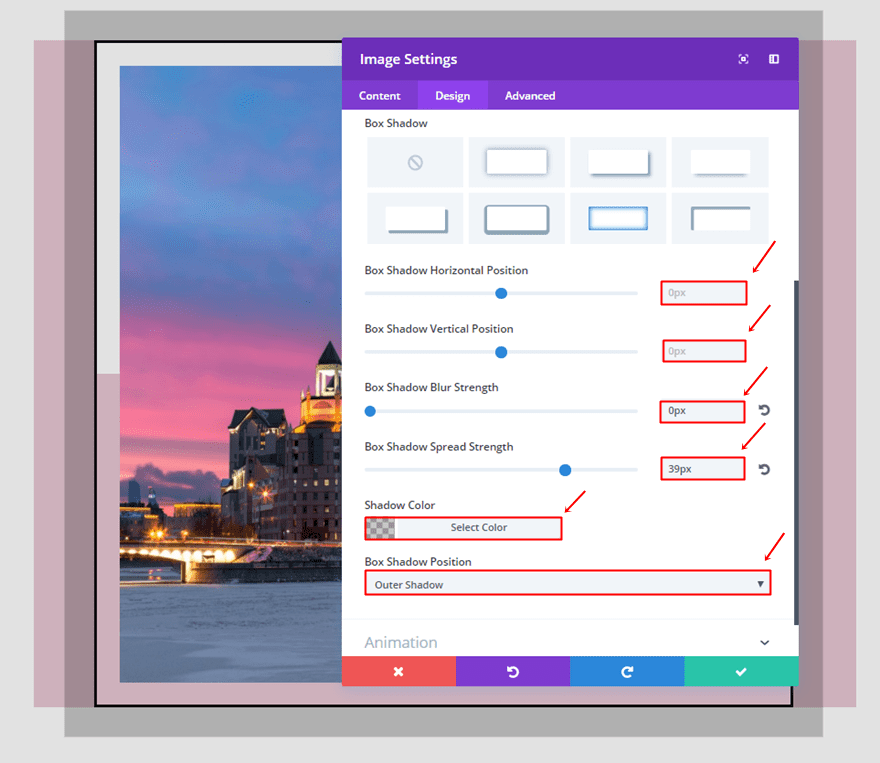
Box Shadow
Lastly, add a box shadow with the following settings:
- Box Shadow Horizontal Position: 0px
- Box Shadow Vertical Position: 0px
- Box Shadow Blur Strength: 0px
- Box Shadow Spread Strength: 39px
- Shadow Color: rgba(0,0,0,0.22)
- Box Shadow Position: Outer Shadow
Fourth Example
And finally; the last example that we’ll show you how to recreate looks like this:
Add Two-Column Row
Start by adding a two-column row. This row will, unlike the previous examples we’ve handled in this post, not need any additional settings.
Add Image Module to First Column
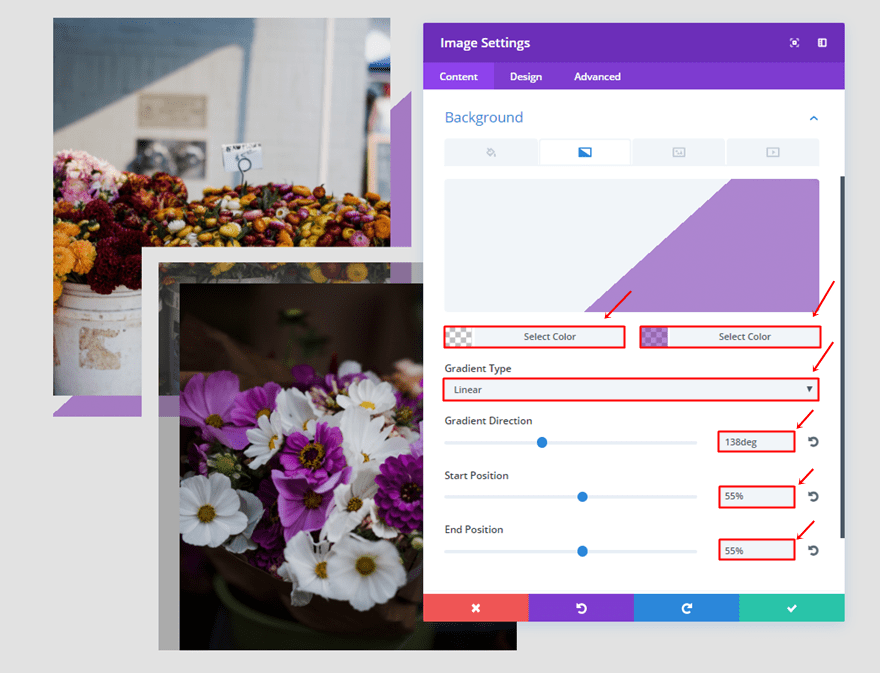
Gradient Background
Add an Image Module to the first column of the row you’ve just created and use the following gradient background for it:
- First Color: rgba(255,255,255,0)
- Second Color: rgba(92,0,158,0.46)
- Gradient Type: Linear
- Gradient Direction: 138deg
- Start Position: 55%
- End Position: 55%
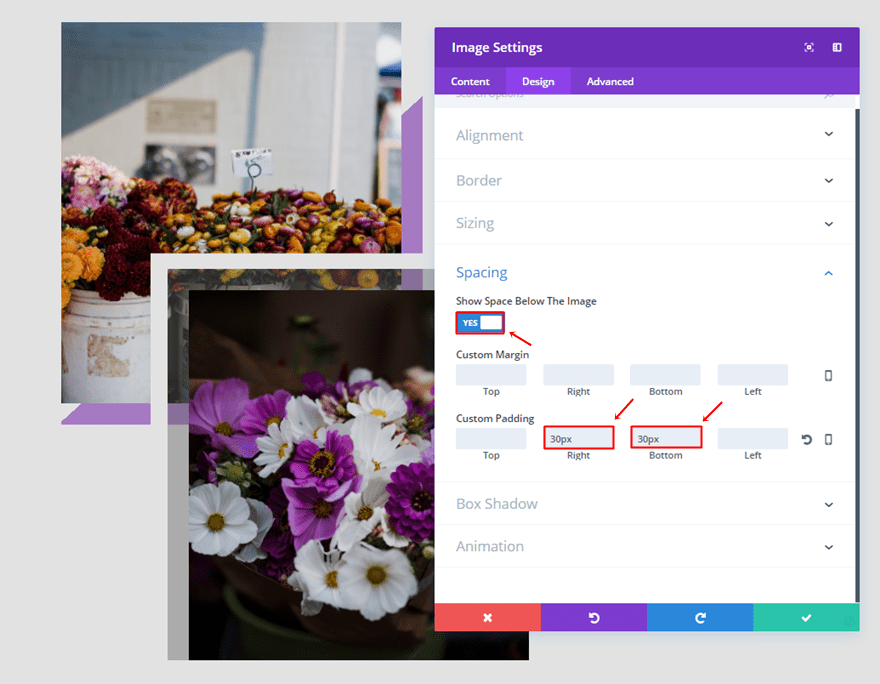
Spacing
Then, move on to the Design tab and use the following settings for the Spacing subcategory:
- Show Space Below The Image: Yes
- Right Padding: 30px
- Bottom Padding: 30px
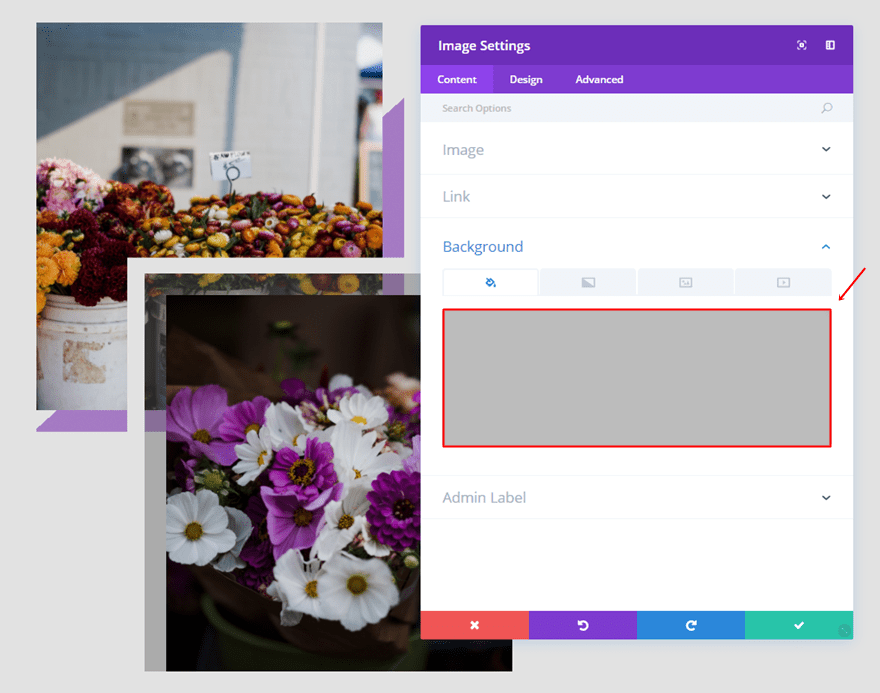
Add Second Image Module to First Column
Background Color
Continue by adding another Image Module right below the previous one and use ‘rgba(96,96,96,0.42)’ as its background color.
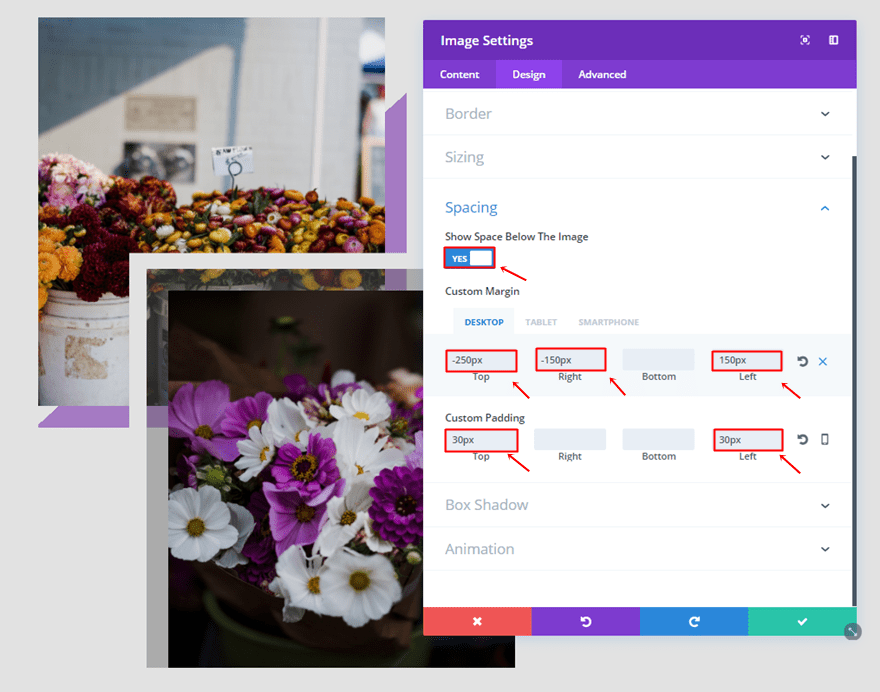
Spacing
Then, go to the Design tab and use the following settings for the Spacing subcategory:
- Show Space Below The Image: Yes
- Top Margin: -250px (Desktop), -150 (Tablet), -100 (Phone)
- Right Margin: -150px (Desktop), 0px (Tablet & Phone)
- Left Margin: 150px
- Top Padding: 30px
- Left Padding: 30px
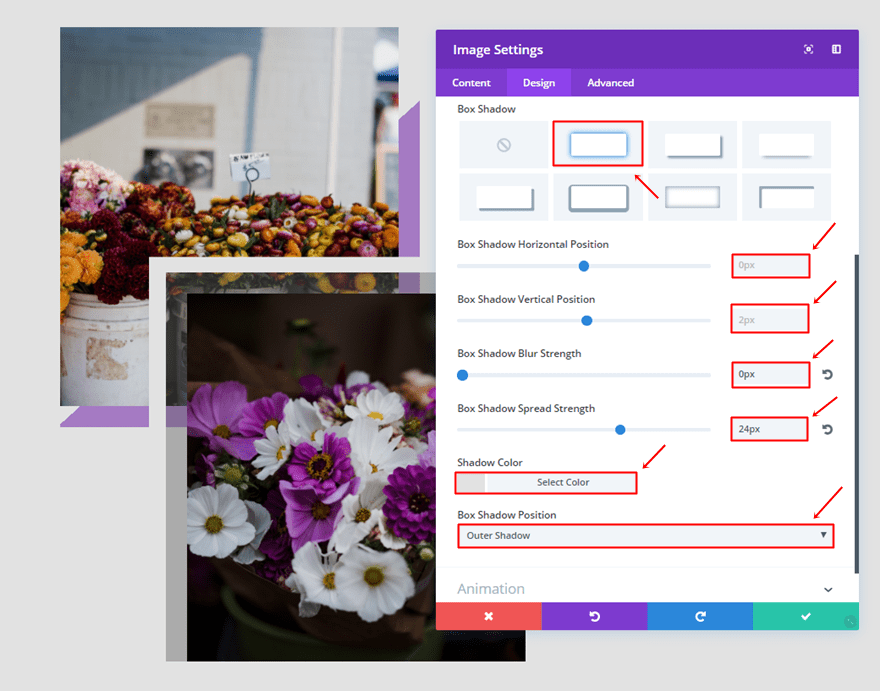
Box Shadow
Lastly, open the Box Shadow subcategory and use the following settings:
- Box Shadow Horizontal Position: 0px
- Box Shadow Vertical Position: 2px
- Box Shadow Blur Strength: 0px
- Box Shadow Spread Strength: 24px
- Shadow Color: #e2e2e2
- Box Shadow Position: Outer Shadow
Final Thoughts
The examples we’ve shared in this post are just a fraction of how far you can go with Divi’s box shadow and background options. You can create unique designs using the Image Module that will enhance the overall look and feel of your website. If you have any questions or suggestions; make sure you leave a comment in the comment section below.
Be sure to subscribe to our email newsletter and YouTube channel so that you never miss a big announcement, useful tip, or Divi freebie!
Featured Image by Creative Stall / shutterstock.com
The post How to Combine Image Background & Box Shadow Options with Divi appeared first on Elegant Themes Blog.