
Many WordPress websites use custom code or functions somewhere within their posts and pages. The platform makes it easy to add this code, but if you’re going to reuse snippets throughout your site, it can be a pain to add code manually whenever you need to.
Instead of having to insert your code snippets by hand every time they’re needed, it makes more sense to both organize and save them using plugins. In this article, we’ll talk about the benefits of keeping your code snippets organized, then show you how to do it using the Code Snippets Extended plugin in two steps. Let’s get to work!
Why You Should Organize Your Code Snippets

Even if you’re not a developer, chances are you’ll have to add some code to your website manually.
A lot of WordPress users add custom code snippets to their posts and pages. Regardless of your niche and size, there are plenty of situations where you’ll need to add a little code to your site. Take Google Adsense or Facebook Pixel, for example, which both require you to add a few lines of JavaScript to your website before they can work. Plenty of WordPress plugins also require you to use shortcodes, so the chances of adding custom code to your website are high.
Given this, it’s an excellent idea to find a way to save all of those snippets of code you’re using on your site. Here’s why:
- You can reference your code whenever necessary. Sometimes, you may forget what lines of custom code you added to your files, so it pays to organize your snippets using a library.
- You’ll be able to reuse your code snippets more easily. If you need to use the same code multiple times, it makes sense to store it for later use.
You could, of course, just save those code snippets using regular text files on your computer or within the cloud. However, using the right WordPress plugin can provide you with a more suitable way to store them within your site. That way, you’ll know what code you’ve added to each specific website you work with.
Introducing the Code Snippets Extended Plugin

The Code Snippets Extended plugin is an interesting tool that enables you to set up a simple code library within WordPress. It lets you save custom code, identify it using any name you want, then add it to any of your posts and pages with a few clicks.
Plus, the plugin also enables you to preview the effects of your code snippets, as long as they are simple JavaScript or CSS. It also supports PHP, but those snippets don’t usually display as well using the tool’s preview functionality.
While the plugin plays nicely with the Divi Builder on the whole, there’s one issue that requires a workaround. By default, the tool adds a new button to the editor, which enables you to add any of your library’s snippets to your post or page. However, the button disappears when switching over to the Divi Builder. The fix is simple though, and we’ll explore it more in a minute.
Key Features:
- Save all of your custom code snippets to a centralized library within your dashboard.
- Identify each snippet using a unique name.
- Assign easy-to-use shortcodes to each item in your library.
- Add snippets to your posts and pages using a new option on the WordPress editor, without having to touch the code.
Price: FREE | More Information
How to Create a Library of Post Snippets to Use in Your Posts and Pages (In 2 Steps)
Before we get started, you’ll need to install and activate the plugin. Once you’re ready, jump into step number one!
Step #1: Add New Snippets to Your Library
After installing the plugin, you’ll see a new tab called Snippets on your WordPress dashboard. Click it and look for the Add Snippets option. On the next screen, you’ll be able to set a name to identify your code within the library, as well as upload any media files that are needed for the code to execute:
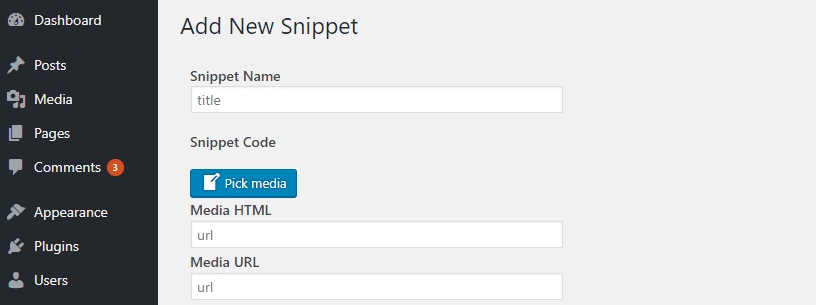
Keep in mind – the code will still work even if you don’t upload the necessary media from this page, as long as it’s in your library. This feature is only there so you can preview the effects of your code using the Test button at the bottom of the page.
Moving on, you’ll also see an editor into which you’ll type your CSS, JavaScript, PHP, and jQuery code. However, it will need to be wrapped in specific tags for each language. Here are some quick examples for reference:
<style>CSS goes between these tags.</style>
<?php PHP tags, on the other hand, are different, so keep that in mind. ?>
<script type="text/javascript"> Same goes for JavaScript, which uses this tag type. </script>
<script type="text/javascript"> jQuery(function($) {
$(document).ready(function(){
// jQuery uses the most complex tags – they need to be set up exactly as shown, and any code should go within this section.
});
});
</script>
You can reference all of these tags below the editor whenever you’re adding a new snippet, and as long as you remember that each language requires a different one, you don’t need to memorize them. Plus, you can use multiple languages within the same snippet – just be sure to wrap them using their respective tags.
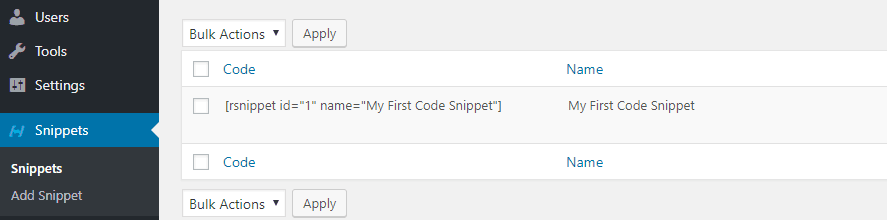
Once you’re done typing or pasting your code, use the Save Snippet button at the bottom of the page, and it’ll show up within the Snippets > Snippets tab on your WordPress dashboard:
Now, all that’s left is to test your new snippet using both the WordPress editor and the Divi Builder.
Step #2: Insert Your Snippets Into Your Divi Posts and Pages
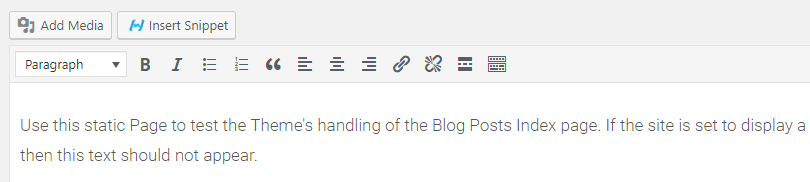
If you’re not using the Divi Builder, you can just open any of your posts or pages using the regular WordPress editor. At the top you’ll see a new Insert Snippet button:
Clicking on it will bring up an overlay displaying all of the items in your library, and you can select whichever one you want:

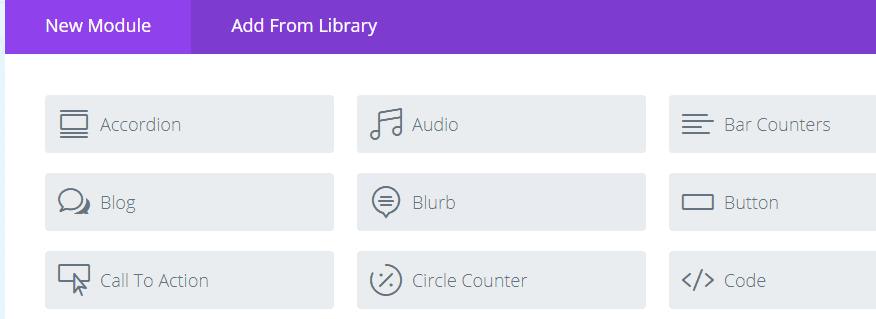
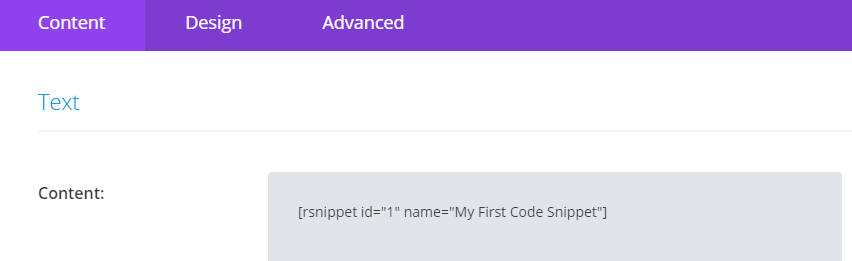
Now the plugin will add the code to the editor, and you’re set – it’s that simple. However, if you’re using the Divi Builder, you won’t be able to access this option. The easiest way to work around this problem is to open your dashboard’s Snippets tab in a new window and copy the corresponding shortcode for the code you want to add. Once you have it, return to the Divi Builder and add a Code module to the page you’re working on:
Once you’re in, paste your shortcode within the Content field and save your changes:
Now, your snippet will work as usual. Using the Divi Builder adds one step to the process, but you still get to store all your code snippets in an internal library that’s easy to access.
Conclusion
If you’re anything like us, you value efficiency in all of your projects. Adding the same code to multiple pages or posts by hand is possible, but it’s not a good use of your time. Instead, it’s far better to test the code once, save it to your library, and then keep it in your virtual back pocket for whenever you need it.
The Code Snippets Extended plugin enables you to do just that. Simply install it and follow these two steps:
- Add new snippets to your library.
- Insert your snippets into your Divi posts and pages.
Do you have any questions about how to add code snippets to your Divi website? Ask away in the comments section below!
Article thumbnail image by Andrii Bezvershenko / shutterstock.com.
The post How to Create a Library of Post Snippets to Use in Your Posts and Pages appeared first on Elegant Themes Blog.