
This post is part 5 of 5 in our miniseries How to Create an Elegant Wedding Website with Divi. In this series, we’ll guide you through the most important parts of creating a wedding website for yourself or a client with Divi.
In the first four parts of the miniseries, we showed you how to create:
- an elegant wedding announcement page
- a gallery page
- a gift list page
- and how to use the Automatic Divi Testimonials plugin on your wedding website.
The layouts we created were consistent in style and easy to create.
In this last part of the miniseries, we’ll show you how to make a timeline for your wedding website with the Divi Timeline Module plugin by Elegant Marketplace. We’re going to give you an example on how to create a good-looking vertical timeline that will keep your wedding guests up-to-date about what’s going to happen during the wedding couple’s big day.
Example Vertical Timeline
The layout we’re creating will look like the example shown below. We’ll talk about the most important steps that will help you find your way with the timeline. After reading this post, you can quickly get started, create one your own and give that extra touch to your wedding website.

Purchasing the Plugin
If you don’t own the Divi Timeline Module plugin yet, you’ll need to buy it on the website of Elegant Marketplace. The plugin costs $11. After having purchased the plugin on their website, you’ll receive the ZIP file that contains the new module you’ll be adding to your website.
Installing the Plugin
Log into your WordPress website and go to ‘Add new’ in the Plugin section.
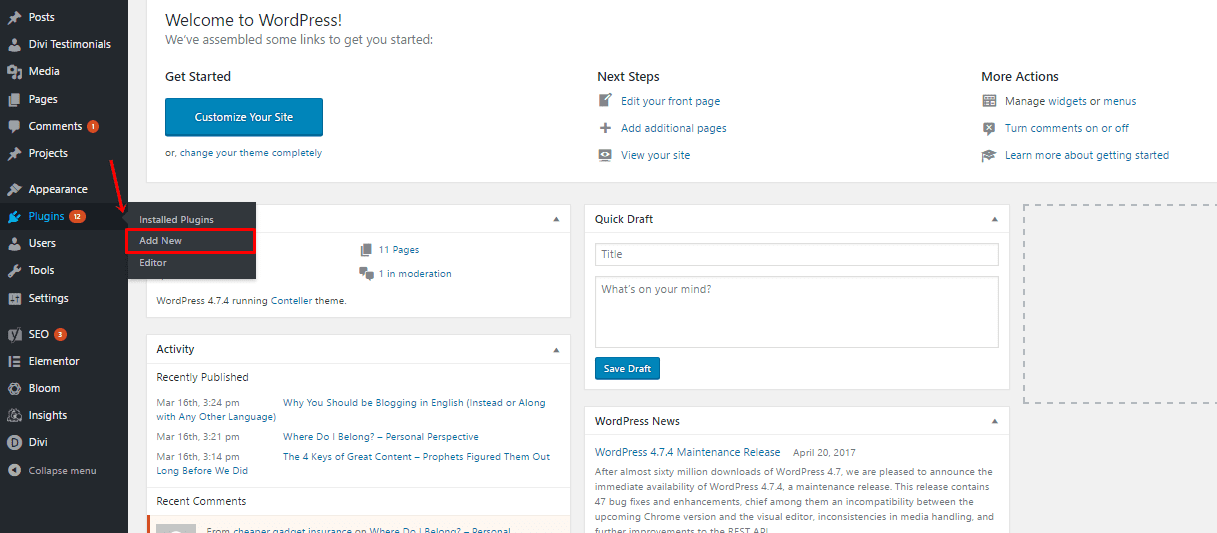
Upload the ZIP file you received from the purchase.
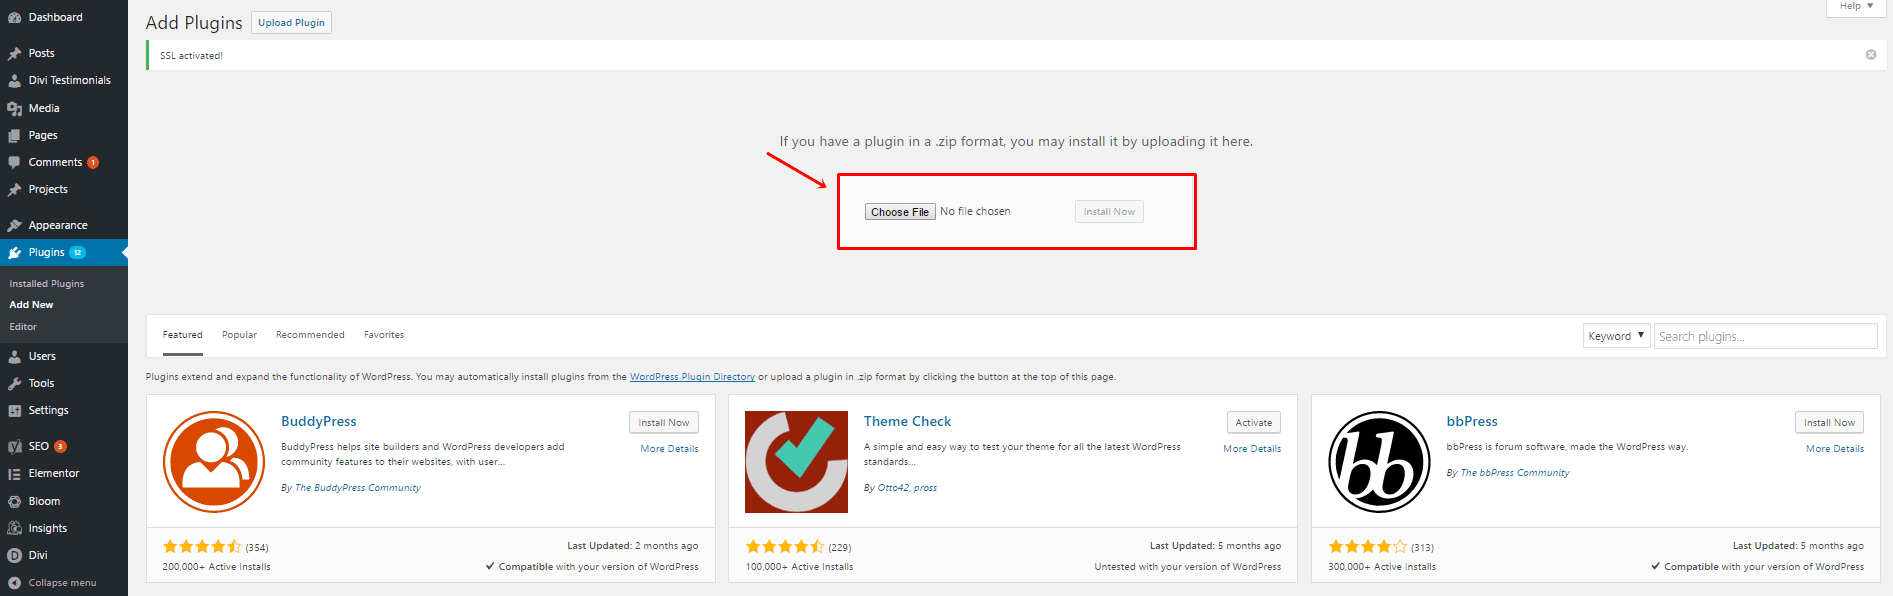
Activate the plugin and you’re good to go. The plugin will now automatically add Timeline Modules to your Divi builder.
Two Different Ways to use the Divi Timeline Module on your Website
Showing the Wedding Schedule
A timeline on your wedding website can really give that extra added value to your website. You can use the timeline to showcase how the wedding day will look like. This online transparency helps your guests find their way through the busy schedule the wedding has.
You’ll just have to remember to share the link to your wedding website with your guests in advance. That way, they’ll be able to access the information anywhere and at anytime.
You can make a separate page for the timeline, or decide to include it in one of your other pages. Since a timeline takes up a lot of place on a screen, we recommend you dedicate a whole new page to the timeline.
Showing the Wedding Couple’s Relationship Timeline
Besides making a wedding schedule with the plugin, you can also use the timeline module to showcase the wedding couple’s relationship timeline. By including the way the couple met and the different phases they’ve experienced in their relationship, you can engage a little bit more with the guests and put the story out there.
The Different Types of Testimonial Modules
When downloading the plugin, you’ll notice four extra modules appear in your list of modules. All of them are timelines but with a different focus.
You have one for posts, content, featured images, post titles and just a regular vertical one. For the timeline example we’ll be creating in this post, we’ll only use the Timeline – Vertical one. This module allows us to write down information in the content box right away, without being linked to anything else on the website such as your posts.
Get Started
We’re showing you step by step how to create the following timeline:
The module is responsive and will look good on your desktop as well as on your phone or tablet. Let’s get started!
Add the Timeline and Timeline items
Because the Timeline Module is a third-party plugin, we won’t be able to make any visual modifications with the Visual Builder. That’s why we’re just going to stay on the backend part of the website to make the needed changes.
Start by adding a new page that you’ll dedicate to your timeline. Within that page you’ll, of course, need a hero section. However, apart from that, you’ll only need one standard section for the timeline. Add a new standard section with a fullwidth row to the page. Next, place the Timeline – Vertical Module in that fullwidth row.

Now, within the settings of the Timeline – Vertical Module, you’ll be able to add different timeline items to the timeline you’re creating.

There is a standard flow that usually gets followed during a wedding. We’re going to make a new timeline items for each of the following happenings:
- Bride’s hair and makeup
- Wedding shoot
- Pre-ceremony
- Ceremony
- Cocktail hour
- Start of dinner
- Toasts
- First dance
- Dancing time
- Desert
- Last thank you word
Of course, this all depends on how you’ve planned out your wedding day. You can add as many Timeline Items as you like.
Timeline Module Modifications
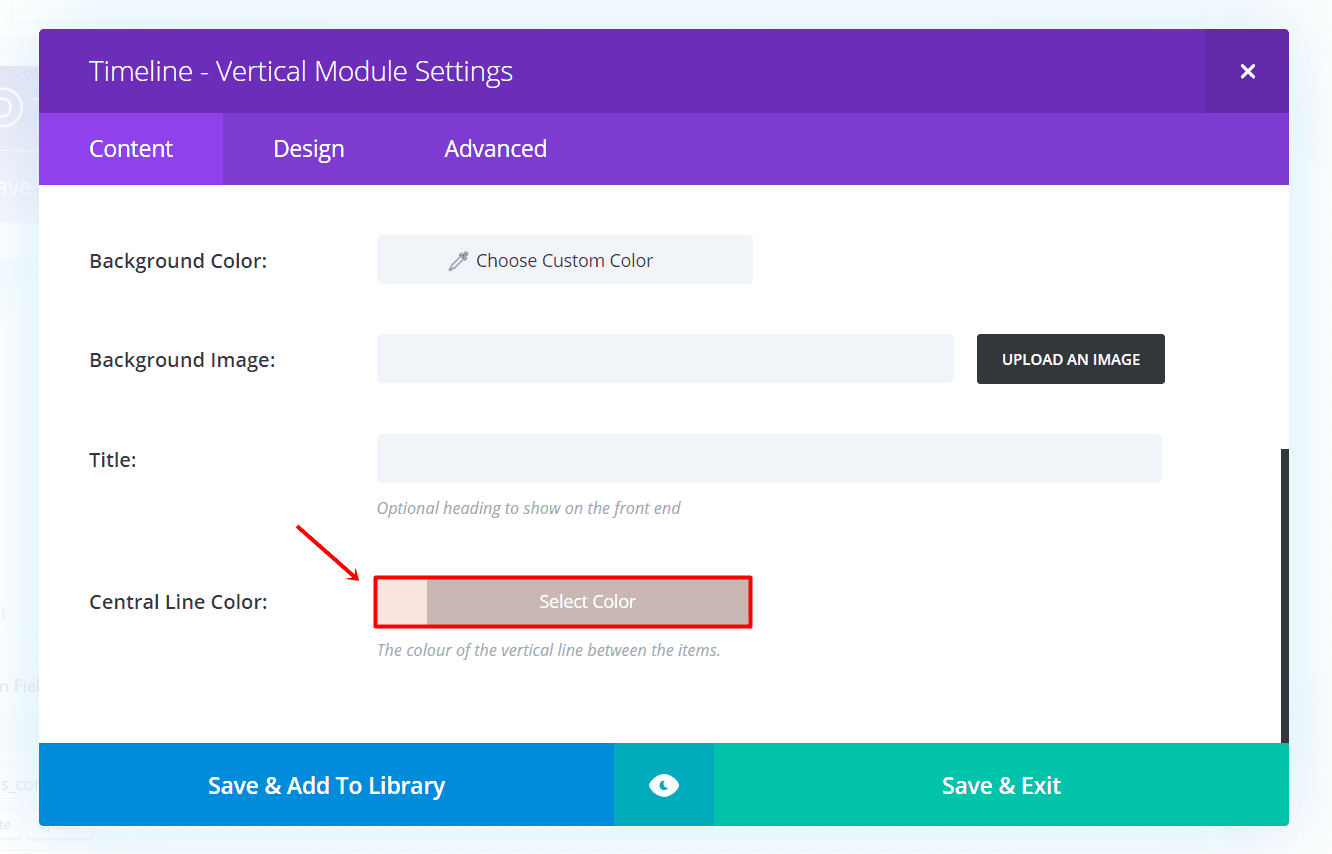
But before adding the Timeline Items, let’s make the modifications that will need to apply to all of the Timeline Items through the Timeline – Vertical Module. Go to the Content tab of your Timeline – Vertical Module and change the Central Line Color to ‘#fae4de’ in the Background subcategory. This color will be applied to all the lines within the Timeline Module that let the different Timeline Items interact with one another.
Next, go to the Design tab. First of all, open the Text subcategory and make the following changes:
- Text Font: Raleway Light
- Text Font Style: Bold
- Text Font Size: 14px
- Text Color: #9b857b
- Text Line Height: 1em

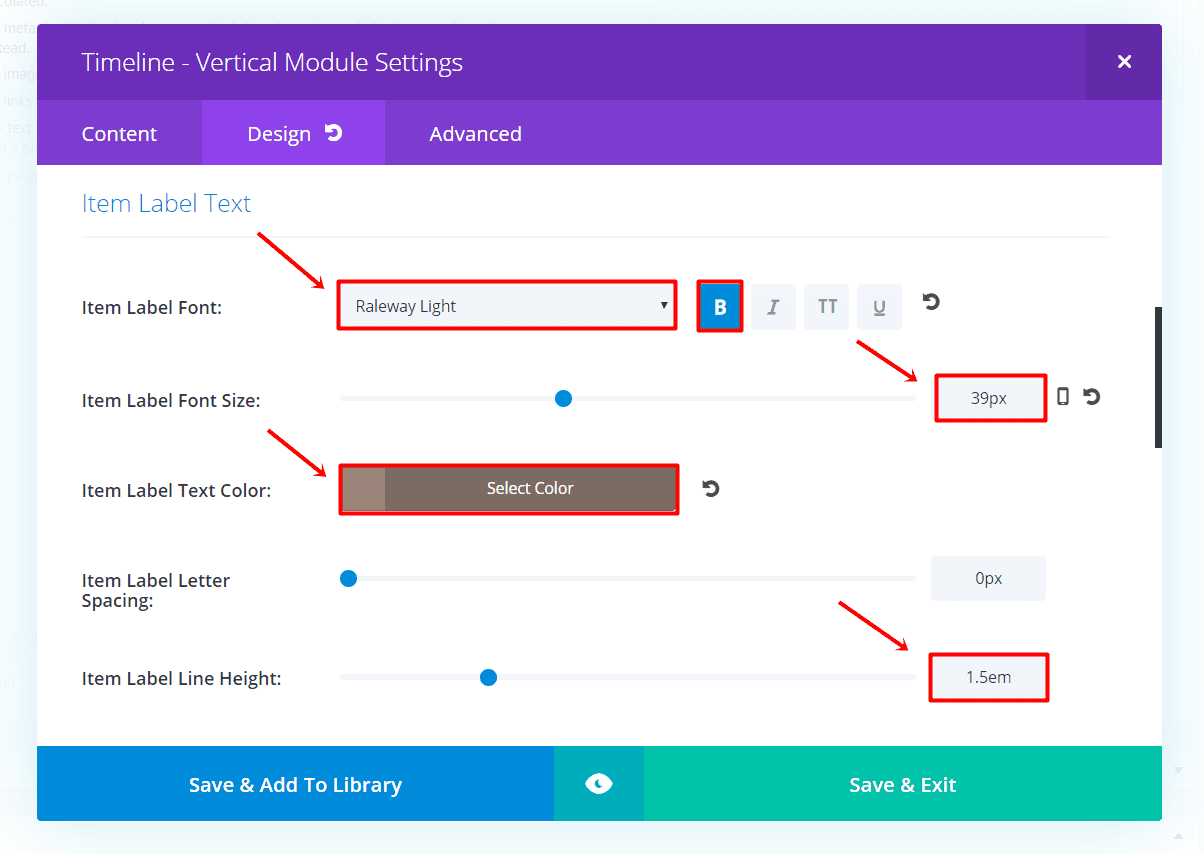
Scroll down the same tab and make the following changes to the Item Label Text subcategory:
- Item Label Font: Raleway Light
- Item Label Font Style: Bold
- Item Label Font Size: 39px
- Item Label Text Color: #9b857b
- Item Label Line Height: 1.5em
Furthermore, make the following changes to the Headings Text subcategory:
- Headings Font: Tangerine
- Headings Font Size: 70px (Desktop & Tablet), 60px (Tablet)
- Headings Text Color: #9b857b
- Headings Line Height: 1.5em
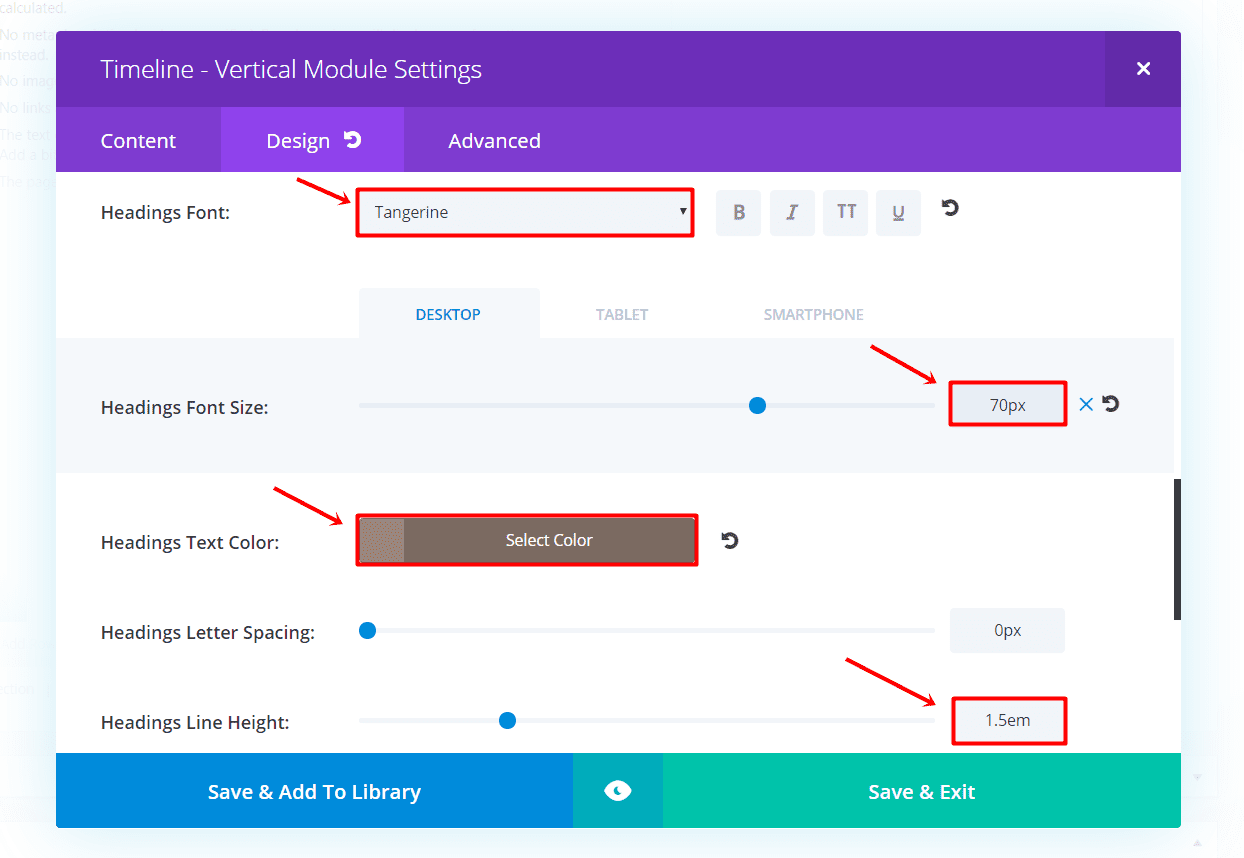
All the modifications mentioned above will apply to each timeline item. Click Save & Exit.
Timeline Item Modifications
When you look at the result so far, you can notice that the modifications have been made to the total picture. Now, we have to make individual changes to the Timeline Items. Start by adding only one Timeline Item. Then, go to the Content tab of that Timeline Item. Continue by adding a title to your Timeline Item in the Background subcategory.
Next, add the content you would like to appear in the content box (including the time in italic) and write the time of the day in the Timeline Label field. You can also add the location in that same field if you want to.
Timeline Item Content
The content that is written down in the field will appear on the opposite side of the timeline when someone visits your website with a desktop. This label doesn’t show up when someone looks at your timeline on their phone. That’s why we recommend placing the practical information you want to share in the Item Label in the content box as well. That way, people who visit the website through phone can also see the information.

Scroll down the same tab and look for the heart icon in the list of Item Icons, change the Icon Color to ‘#9b857b’ and the Icon Background Color to ‘#fae4de’.

Click Save and the Timeline Item will be added to your timeline. In the example we made, we used the same settings for all the Timeline Items. Therefore, why we recommend you just clone the first Timeline Item and make further adjustments accordingly.
Create as many Timeline Items as you need to make your wedding schedule as clear as possible for the wedding guests. Every time you add a new Timeline Item, it will automatically be located on the opposite side of the previous Timeline Item without you having to make any manual adjustments.
Wrapping Up
This was the last part of the miniseries How to Create an Elegant Wedding Website with Divi. We hope this was a valuable series of posts that will help you create an elegant and stunning wedding website for yourself or your clients. If you have any questions regarding this tutorial, or if you have any requests for future tutorials/miniseries; make sure you leave a comment in the comment section of this blog post so we can get back to you with answers!
Be sure to subscribe to our email newsletter and YouTube channel so that you never miss a big announcement, useful tip, or Divi freebie!
The post How to Create a Timeline for Your Wedding Schedule with Divi & the Divi Timeline Module Plugin appeared first on Elegant Themes Blog.