
The hero (or above the fold) section of the homepage is prime real estate. And like most real estate developers, you want to maximize your space. That is where an inline contact form comes in handy. An inline form is basically a form in which all its fields or controls stay side-by-side, in-line, and left-aligned. This compact layout is great for increasing conversions on a homepage or a landing page.
Today I’m going to show you how to create an inline contact form for you website using Divi’s Visual Builder. The work needed to pull this off is really all about adjusting both the width and the alignment of the form fields. To accomplish this, we will be taking advantage of the design features of the contact module as well as adding some Custom CSS within the Advanced tab.
If you are new to Divi, don’t let the Advanced tab deter you from tackling this tutorial. I’ve tried my best to keep things simple and clear.
Enjoy.
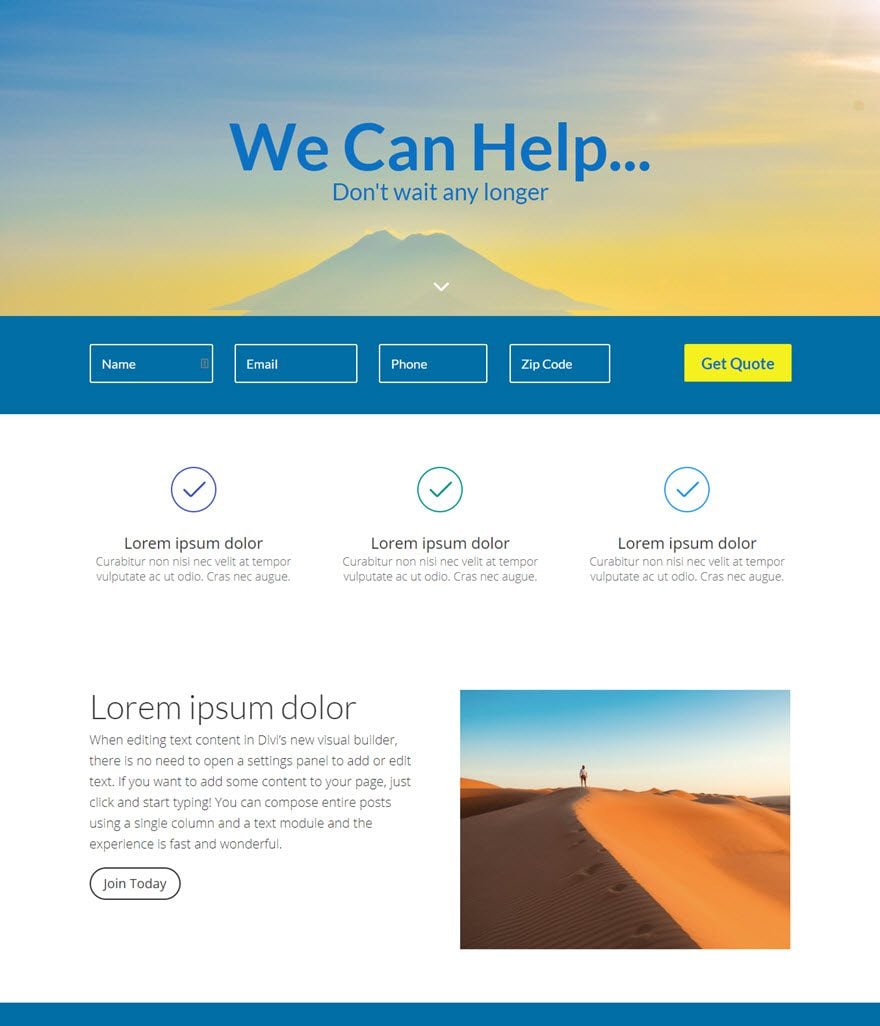
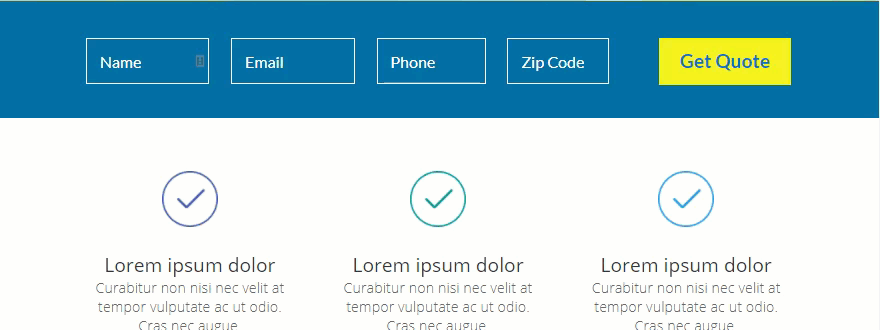
Here is an Example of what the Inline Contact Form Will Look Like
The Concept & Inspiration
If you ever had to shop for car insurance or search for a new home online, you have probably seen an inline form that is purposefully compact with minimal input fields so that you (the user) would be more inclined to get the ball rolling on a new quote. So I wanted to create a simple in-line contact form that would do something similar for Divi users. Although this contact form won’t be able to do things like generate a quote or pull up a list of houses, it does fit the need of business owners or bloggers who want to provide an easy way for clients or users to reach out.
Implementing The Design With Divi
Subscribe To Our Youtube Channel
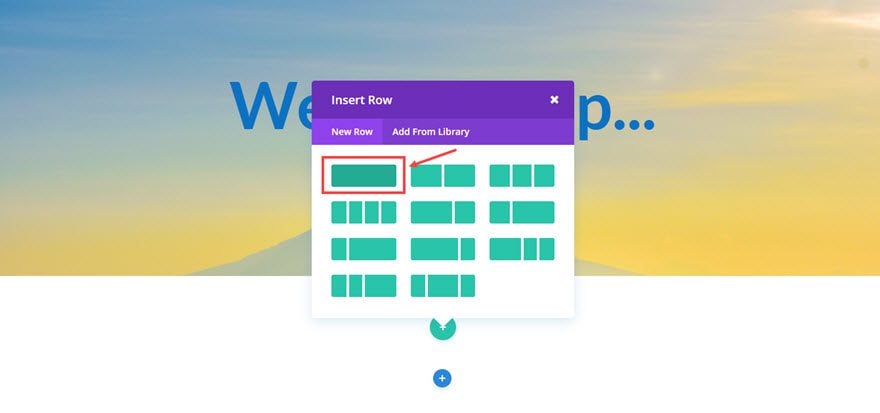
We start by adding a Regular Section with a single column structure row.
Since the rest of our elements will be hard to see on a white backround, let’s go ahead and add the background color to our section by going to Section Settings and updating the following:
Content Options
Background Color: #006ea5
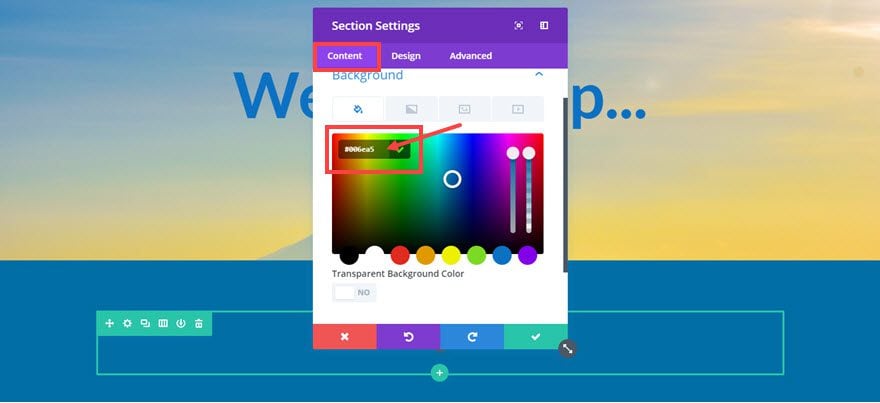
Save settings
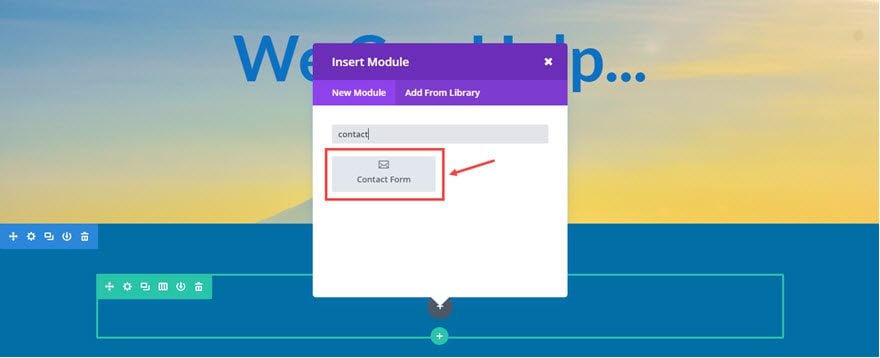
Now we can add our Contact Form Module to the row.
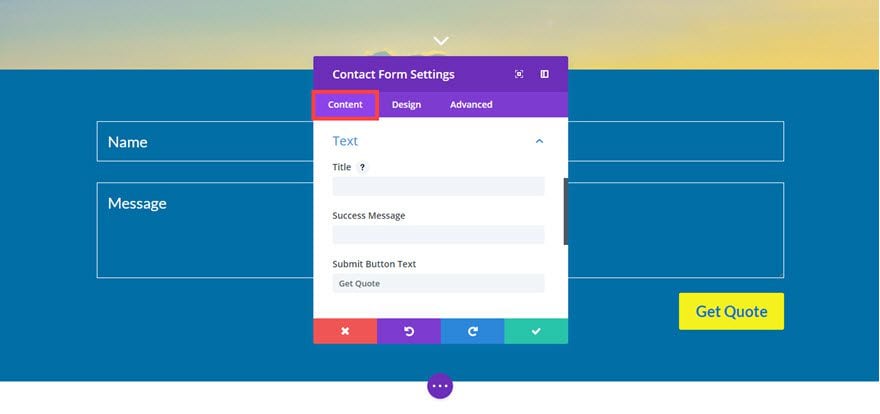
Update the Contact Form Settings as follows:
Content Options
Submit Button Text: “Get Quote”
Email: [Input the email address where messages should be sent]
Display Captcha: NO
Form Background Color: rgba(255,255,255,0)
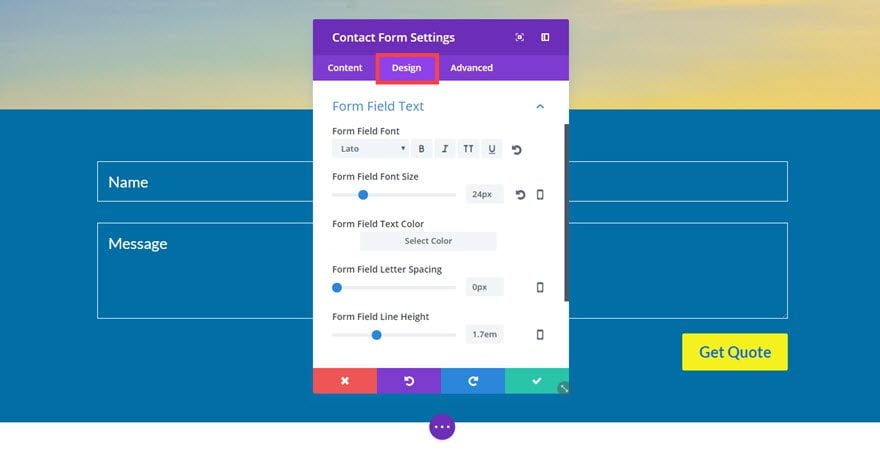
Design Options
Form Field Font: Lato
Form Field Font Size: 24px
Form Field Text Color: #ffffff
Input Border Radius: 3px
Use Border: YES
Border Color: #ffffff
Border Width: 1px
Button Text Size: 24px Desktop, 20px Tablet, 20px Smartphone
Button Text Color: #0c71c3
Button Background Color: #f4f11f
Button Border Width: 3px
Button Border Radius: 3
Save settings
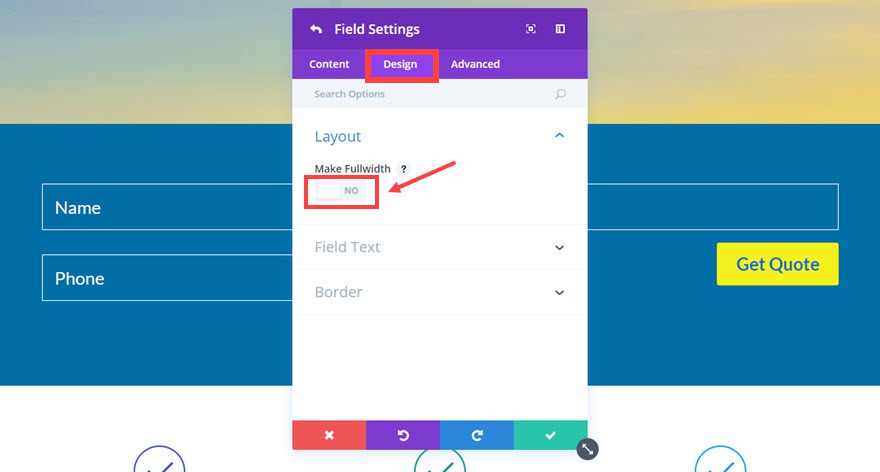
Go back to the Content tab and delete the message field by clicking on the trash can icon on the right of the field bar. Then a add new field by clicking the gray circle button with the white plus sign located under the individual field bars. This will be the Phone field.
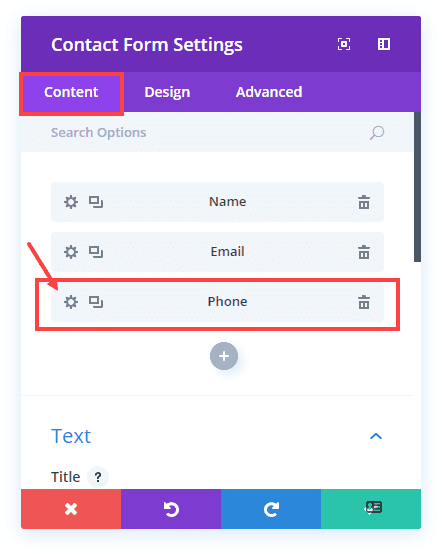
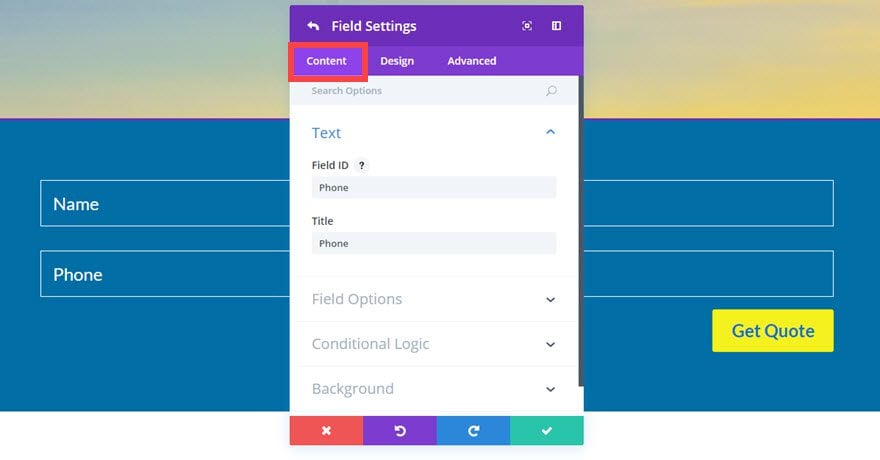
Update the Field Settings as follows:
Content Options
Field ID: “Phone”
Title: Phone
Design Options
Make Fullwidth: NO
Allowed Symbols: Numbers Only (0-9)
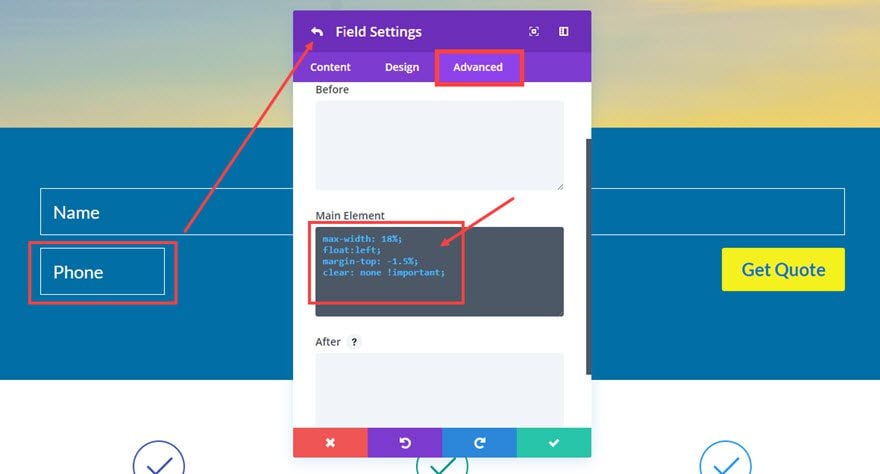
Advanced Options
Enter the following Custom CSS inside the Main Element box:
Max-width: 18%;
Float: left;
Margin-top: -1.5%;
Clear: none !important;
Save settings
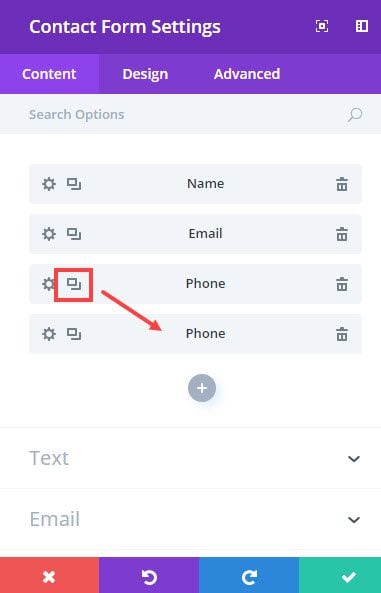
Now go back to the Content tab of your Contact Form Settings and duplicate the Phone field you just created and turn it into a Zip Code field.
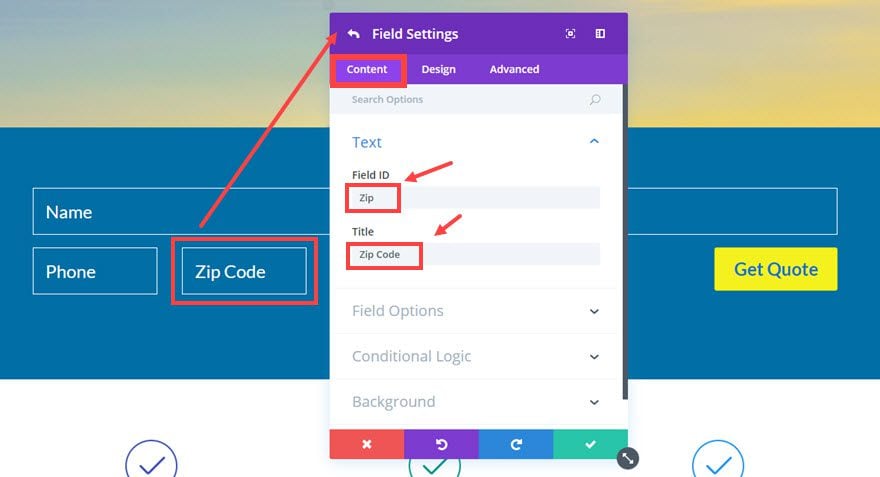
Update the Field Settings as follows:
Content Options
Field ID: “Zip”
Title: Zip Code
Advanced Options
Enter the following Custom CSS inside the Main Element box:
Max-width: 17%;
Margin-top: -1.5%;
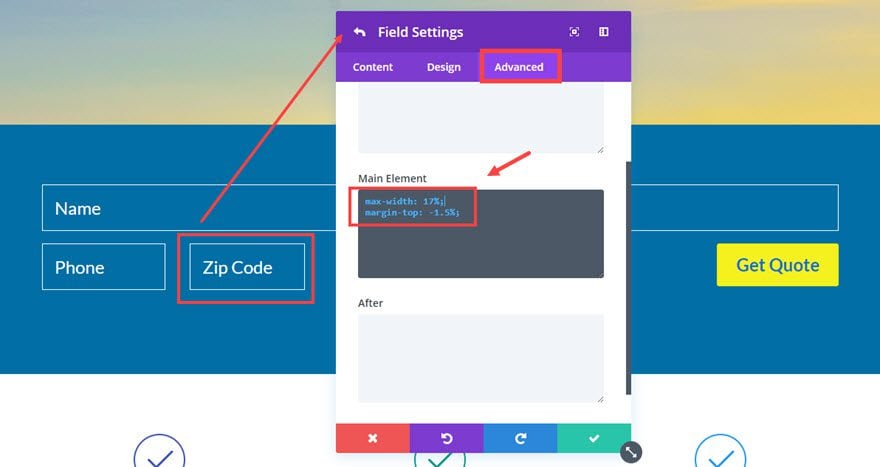
Save Settings
So far we have adjusted the width and alignment of our Phone and Zip Code fields. Now we need to do the same for the Name and Email fields.
Go to the Name field settings and update the Advanced Options with the following Custom CSS inside the Main Element box:
Max-width: 20%;
Margin-top: -1.5%;
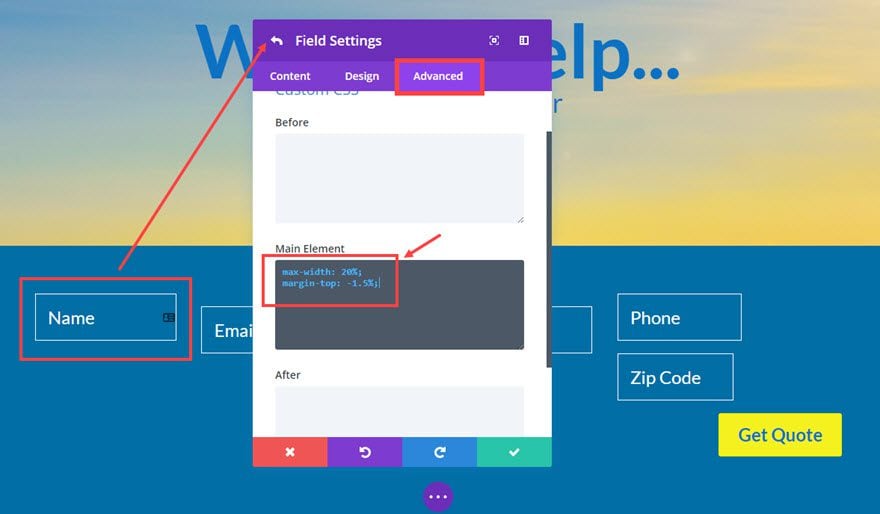
Save Settings
Next go to the Email field settings and update the Advanced Options with the following Custom CSS inside the Main Element box:
Max-width: 20%;
Margin-top: -1.5%;

Save Settings
Important Note: Notice that the custom CSS used for each of the fields has a max-width property set to a certain percentage. This percentage dictates how wide your fields will be related to the width of your content area. For example, Divi’s default content area is 1080px so the name field is 20% of 1080px. This is important to know if you want to create more space for your inline form. All you would need to do is adjust the percentage value for the max-width property as needed.
Almost finished. Now all we have to do is clean up the spacing of the section and row that holds the form. Go to the Section Settings, under the Design tab, and update the following:
Custom Padding: 12px Top, 14px Bottom
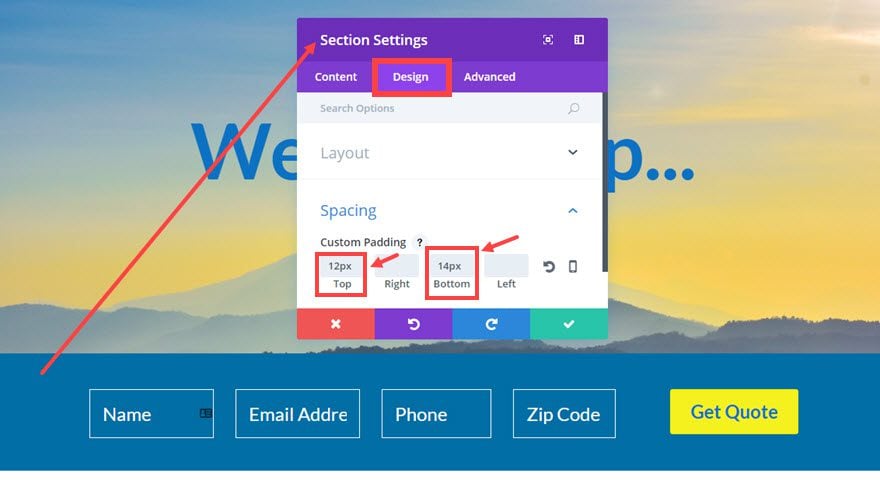
Save Settings
Now go to the Row Settings, under the Design tab, and update the following:
Custom Padding: 48px Top, 0px Right, 0px Bottom, 0px Left
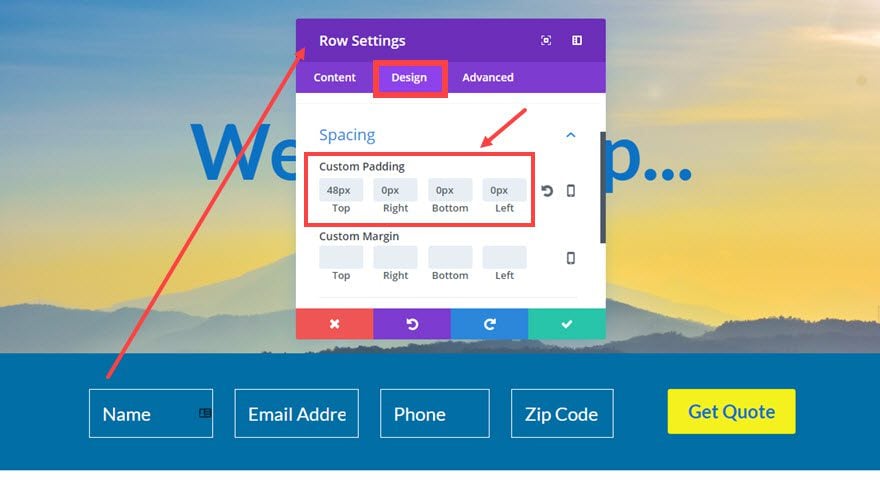
Save Settings
Making it Responsive
Because this is a horizontal form, the form fields will need to be adjusted on mobile devices. To fix this, all that it takes is one small snippet of custom CSS. Go to Page Settings, under the Advanced tab, and the following in the Custom CSS box:
@media (max-width: 767px) {

p.et_pb_contact_field {
max-width: 100% !important;
}
}
Here is how the form responds to the different screen sizes.
Creating a Three Field Inline Contact Form

Now that you have created a inline form with four fields, you can easily convert it to a three form field by updating a few options. Here are the steps:
- Edit the inline form you just created or duplicate the form.
- Delete Zip Code Field (now you only have three fields)
- Update the Phone Field (or whatever is the third field) Settings, under the Advanced tab, with the following Custom CSS in the
Main Element box:max-width: 25%;
float:left;
margin-top: -1.5%;
clear: none !important;
- Update the Email Field (or whatever is the second field) Settings, under the Advanced tab, with the following Custom CSS in the Main Element box:
max-width: 25%;
margin-top: -1.5%;
- Update the Name Field (or whatever is the first field) Settings, under the Advanced tab, with the following Custom CSS in the Main Element box:
max-width: 25%;
margin-top: -1.5%;
Note: Notice the max-width property for each of the fields is now 25% in order to increase the width of the fields.
Creating a Two Field Inline Contact Form

You can also convert your inline form to a two field form by updating a few options. Here are the steps:
- Edit the inline form you just created or duplicate the form.
- Delete Zip Code Field and the Phone Field so that you only have two fields (name and email)
- Update the Name Field (or whatever is the first field) Settings, under the Advanced tab, with the following Custom CSS in the Main Element box:
max-width: 37%;
margin-top: -1.5%;
- Update the Email Field (or whatever is the second field) Settings, under the Advanced tab, with the following Custom CSS in the Main Element box:
max-width: 37%;
margin-top: -1.5%;
clear: none !important;
Adding Other Field Types
This tutorial is mainly for regular input field types, but you can easily change it to a different field type. For example, if you want to use a select dropdown field type, you can apply all the same styling as you did for the other fields. However, you will need to add a background color (#006ea5) to that particular field so that you can see the options.
Here is what a drop down field would look like…

Final Thoughts
In my experience, inline contact forms can be a powerful tool for your business. There are more advanced plugins out there with more robust options out of the box, but if another plugin is not your cup of tea and a more simple solution makes sense, give this a try. Hope you like it.
Looking forward to hearing from you in the comments.
The post How to Create an Inline Contact Form with Divi appeared first on Elegant Themes Blog.