
In today’s Divi tutorial, we’re going to show you how to create beautiful image borders on the next website you build. The purpose of this post is to demonstrate how you can create beautiful results that match the images you are using (and the rest of your website as well).
With the new Divi options, achieving stunning results is easier than ever. You’ll only have to make some modifications that we’ll show you how to make and you’ll be ready to take your web design to the next level. All 8 examples we’ll share with you will use nothing else than the built-in options that the Divi Builder and Image Module offer.
Sneak peek
Let’s take a look at the results you can expect from this post:
Gradient Background
The first possibility you have to achieve beautiful image borders is using a gradient background only. By experimenting with the various gradient background settings, you can achieve simple yet elegant results. We’ll show you three examples of image borders that consist solely of a gradient background.
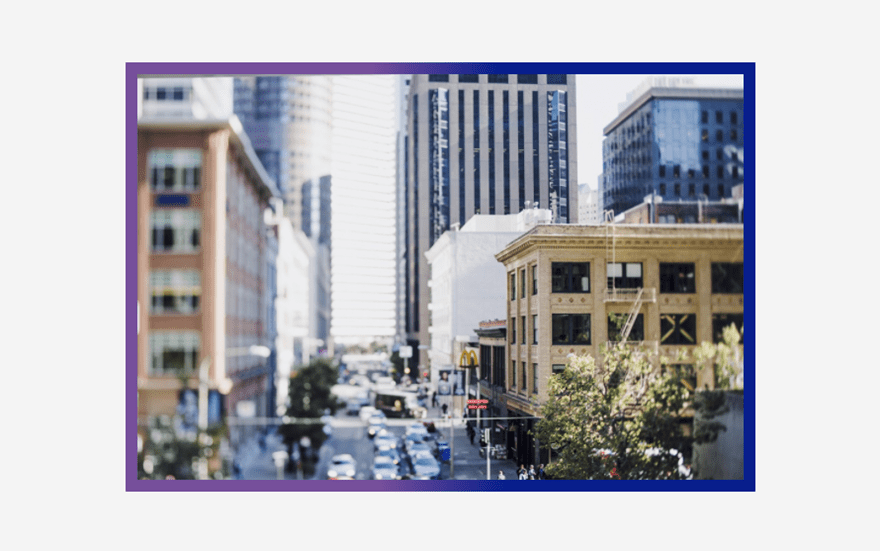
Standard
The first example we’ll be handling is the simplest and most modest of them all; a standard gradient image border. The result we’ll show you how create looks like this:
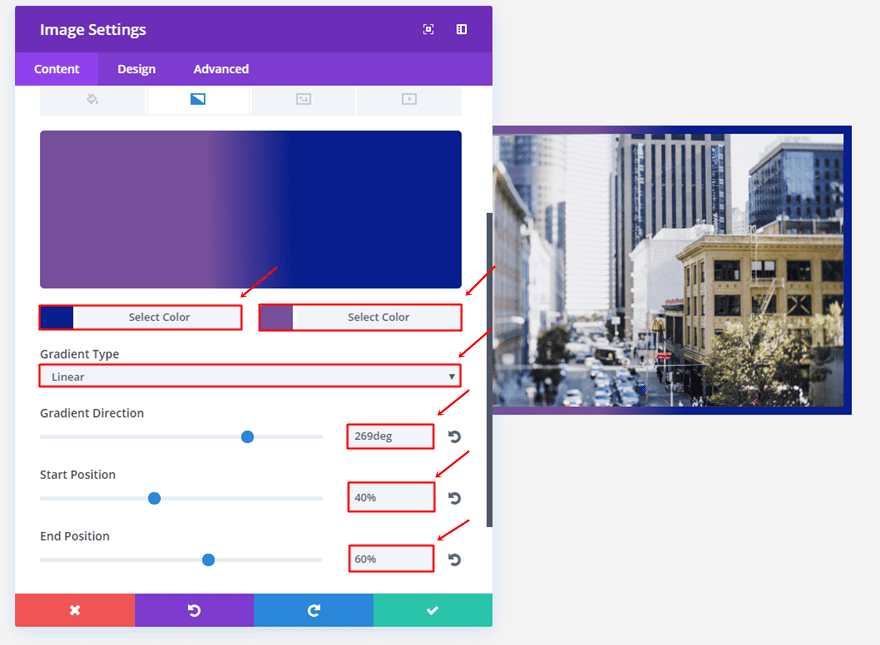
Content Tab
Start by choosing a gradient background in the Content tab. For this example, we’ve used the following settings:
- First Color: #081e8c
- Second Color: #764f9b
- Gradient Type: Linear
- Gradient Direction: 269deg
- Start Position: 40%
- End Position: 60%
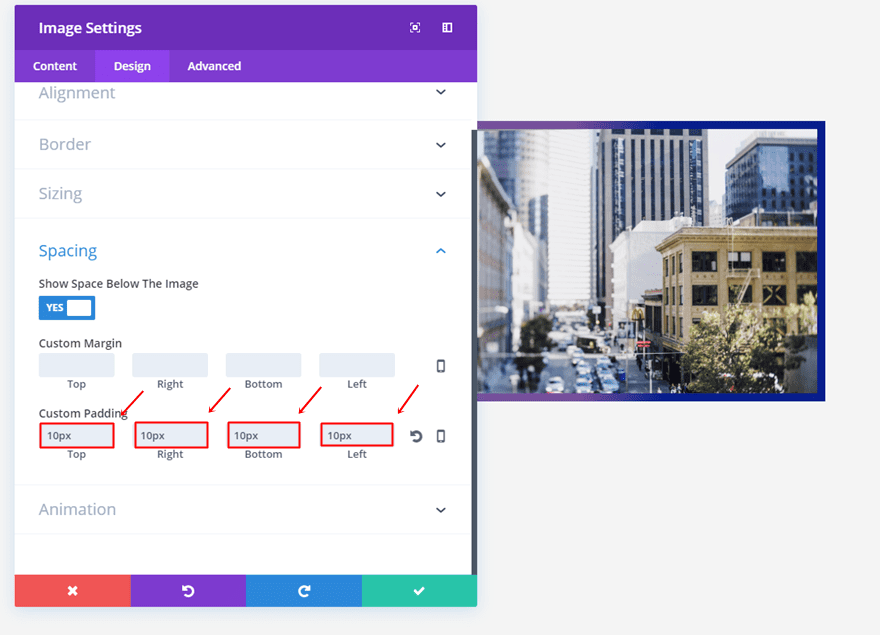
Design Tab
The next and last thing you’ll need to do is add some padding to the image. It’s simple as that. Go to the Design tab and add ’10px’ to the top, bottom, right and left padding.
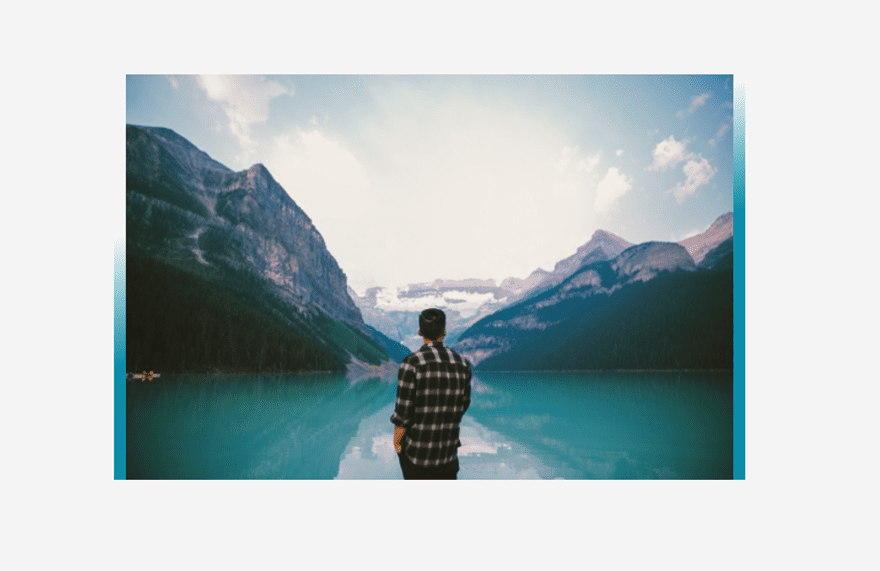
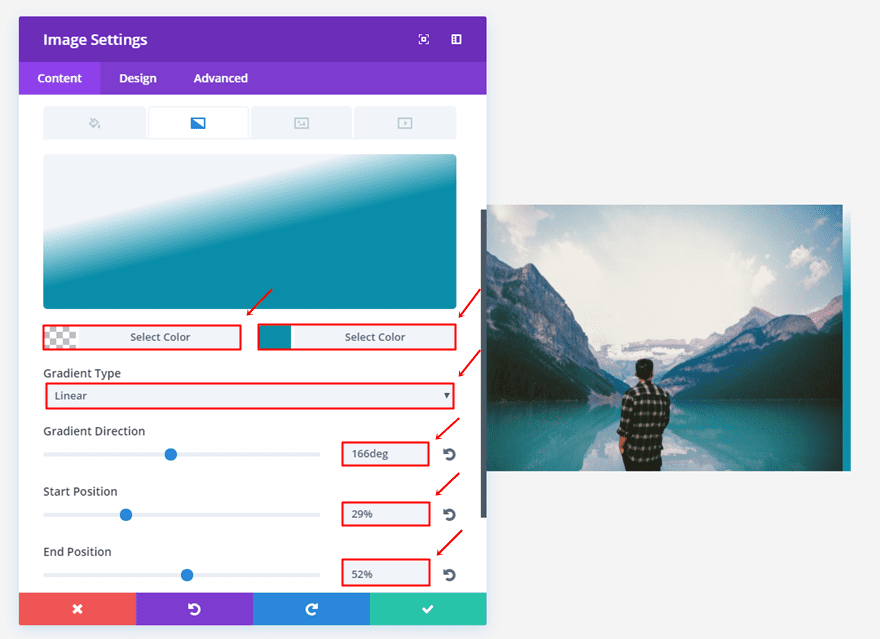
Sides
Next up, we have an image border that only shows at the left and right side of the image. Using this kind of image border gives a nice extra touch to the image without putting too much focus on the border itself.
Content Tab
To achieve this type of image border, start by adding the following gradient background to your image:
- First Color: rgba(255,255,255,0)
- Second Color: #0a8da8
- Gradient Type: Linear
- Gradient Direction: 166deg
- Start Position: 29%
- End Position: 52%
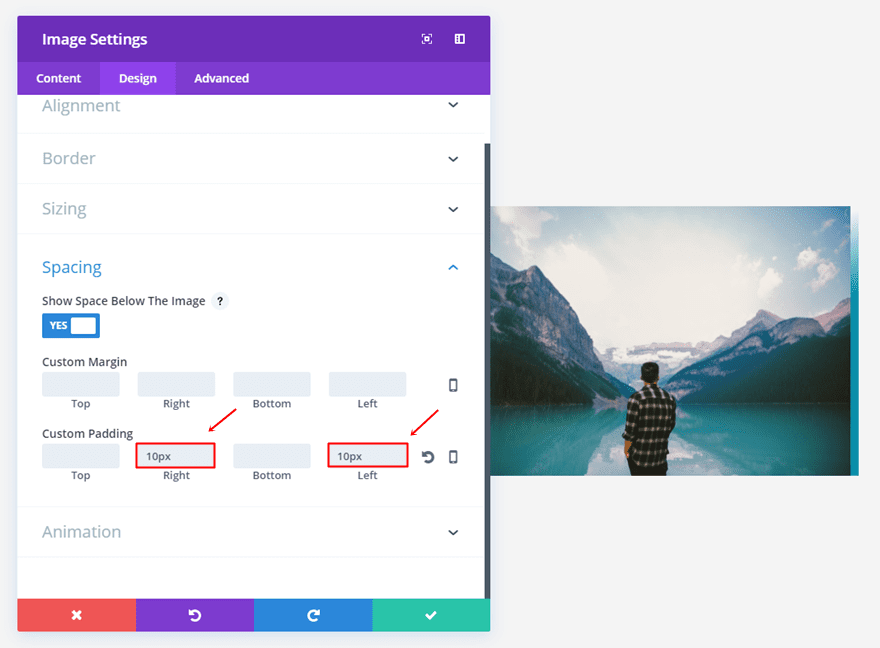
Design Tab
In the Design tab, the only thing you’ll need is ’10px’ of padding for the right and left side.
One Corner
Moving on, you can also create corner backgrounds for the images on your website. This type of border is great to use when you want to emphasize a color that is being used within the image.
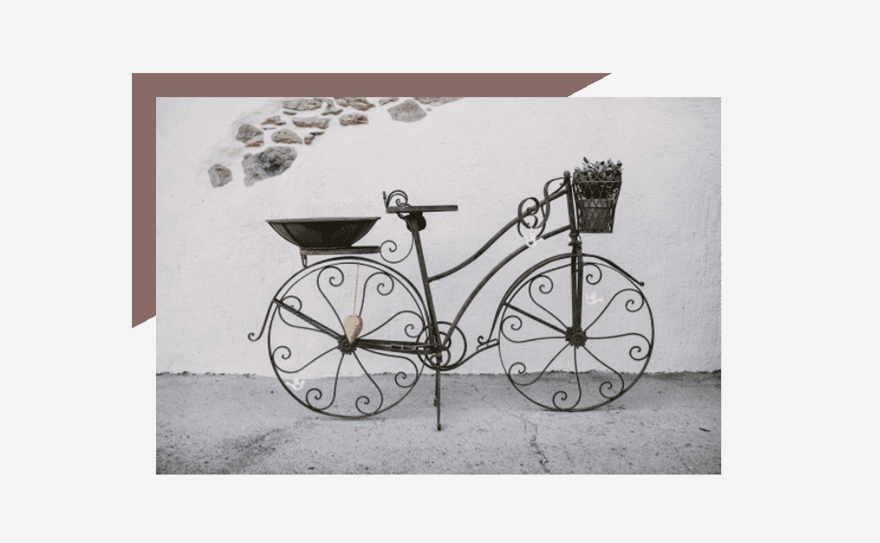
Content Tab
For the third image example, use the following gradient background:
- First Color: rgba(58,8,1,0.58)
- Second Color: rgba(41,196,169,0)
- Gradient Direction: 152deg
- Start Position: 34%
- End Position: 28%
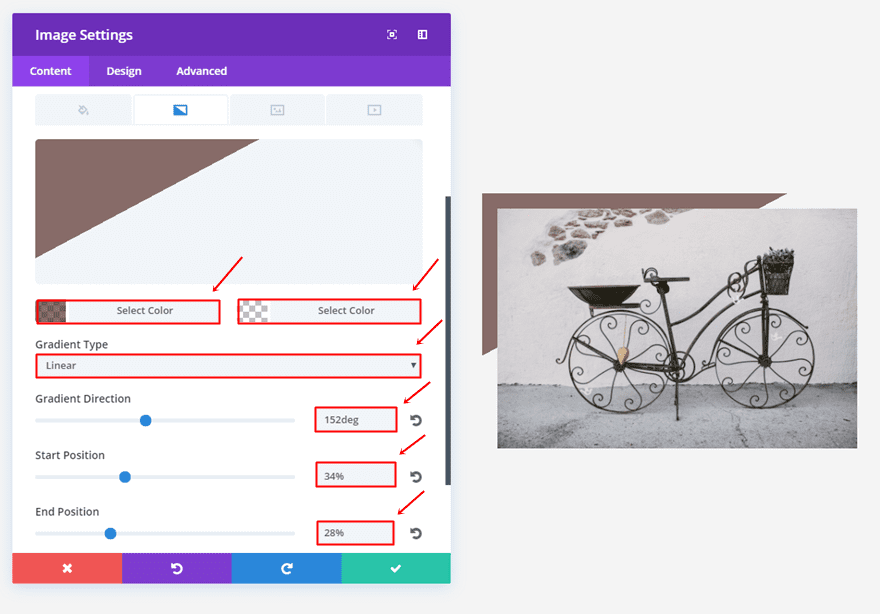
Design Tab
Then, add ’20px’ to each one of the paddings as well.

Image Border & Gradient Background
Another possibility you have is combining a gradient background with an image border. This, too, can deliver stunning results as you’ll be able to witness in the next four examples.
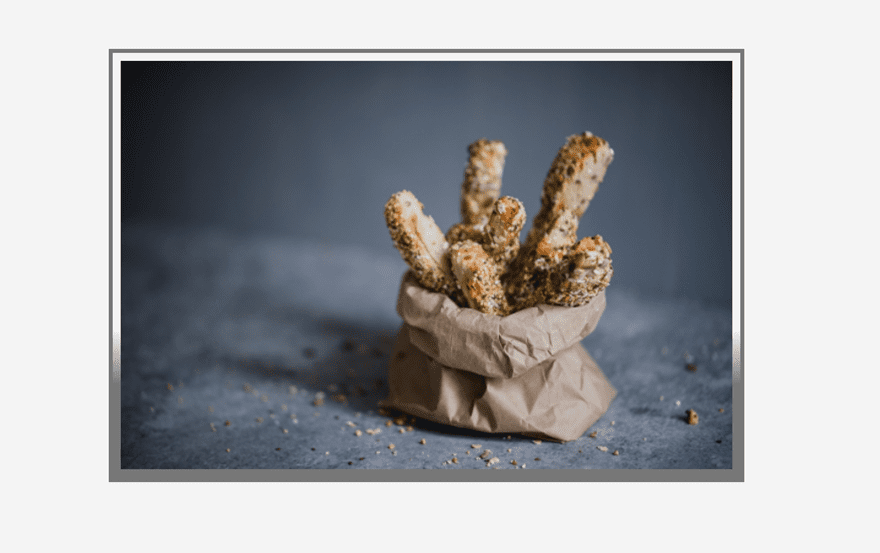
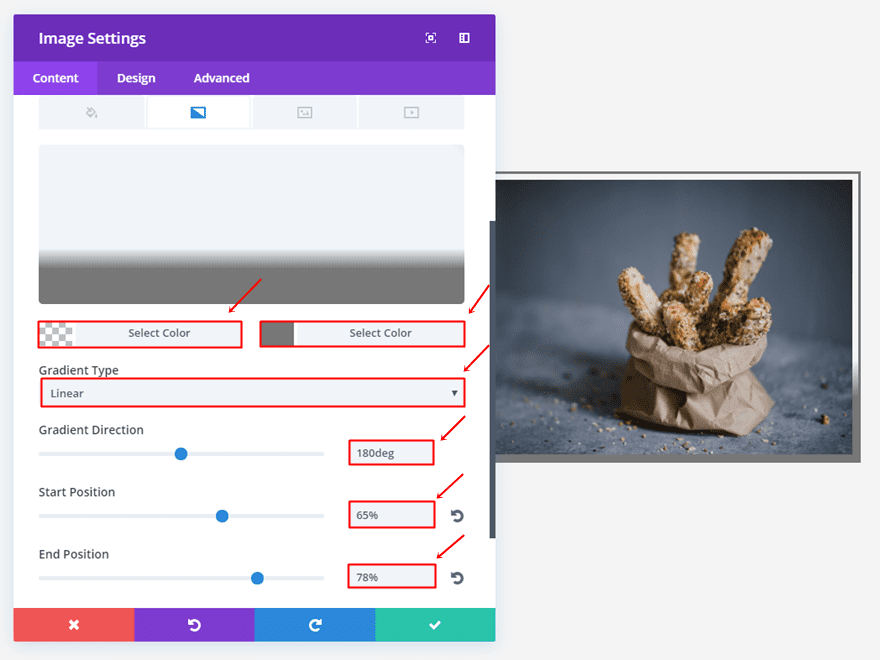
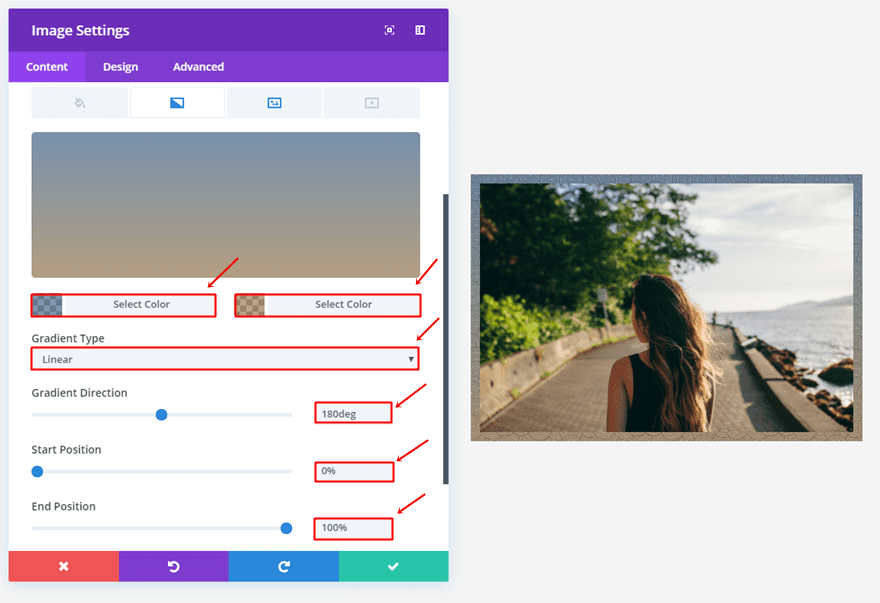
Subtle Gradient
The first combination of gradient background and image border is simple yet beautiful. By using the same colors for the gradient background and the border, the image border somehow feels like it’s getting filled with color.
Content Tab
Start by adding the following gradient background settings to your image:
- First Color: rgba(255,255,255,0)
- Second Color: #777777
- Gradient Type: Linear
- Gradient Direction: 180deg
- Start Position: 65%
- End Position: 78%
Design Tab
Move on to the Design tab and use the following settings in the Border subcategory:
- Use Border: Yes
- Border Color: #777777
- Border Width: 3px
- Border Style: Solid
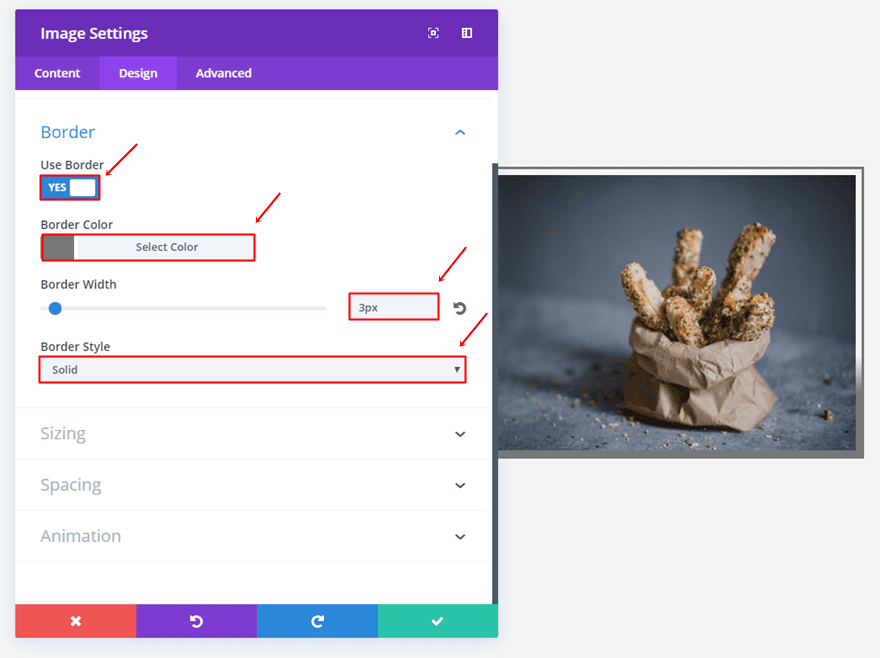
Lastly, add a padding of ‘7px’ to all the padding options.
Shaped
Next, we have an example that is great to draw the attention of the visitors. The image itself contains in this case mostly lighter colors, which creates a nice balance with the darker border.

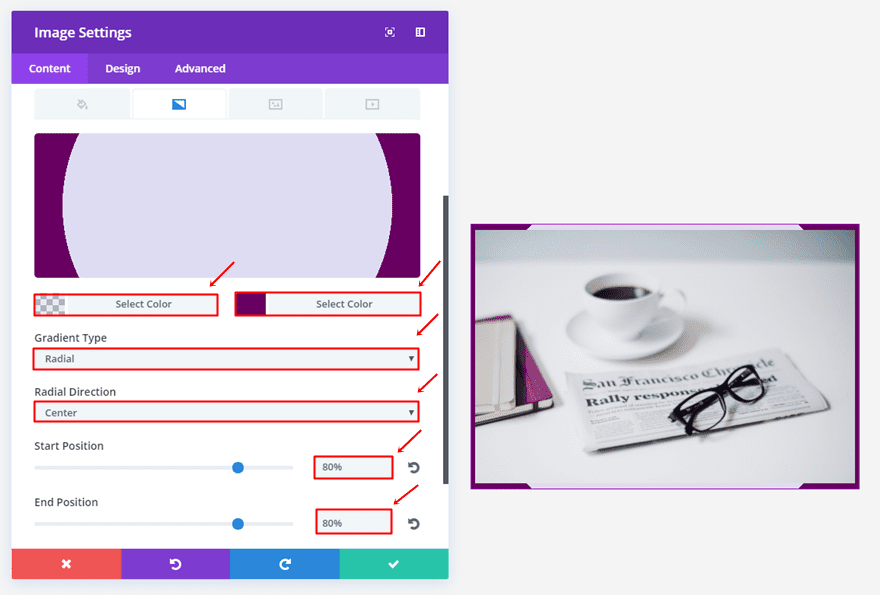
Content Tab
The gradient background settings you’ll be needing for this image border are the following:
- First Color: rgba(53,0,188,0.1)
- Second Color: #680061
- Gradient Type: Radial
- Radial Direction: Center
- Start Position: 80%
- End Position: 80%
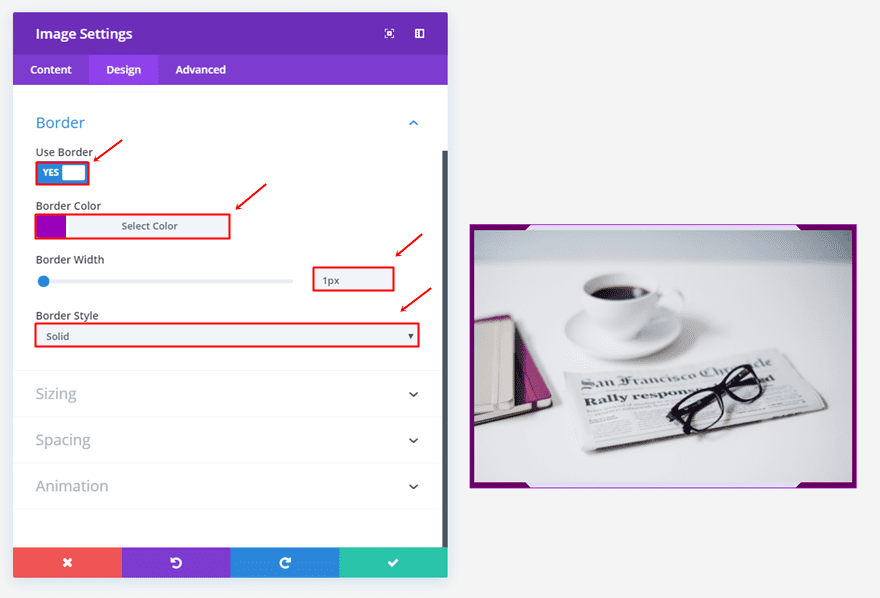
Design Tab
Proceed to the Design tab and use the following border:
- Use Border: Yes
- Border Color: #9a00bc
- Border Width: 1px
- Border Style: Solid
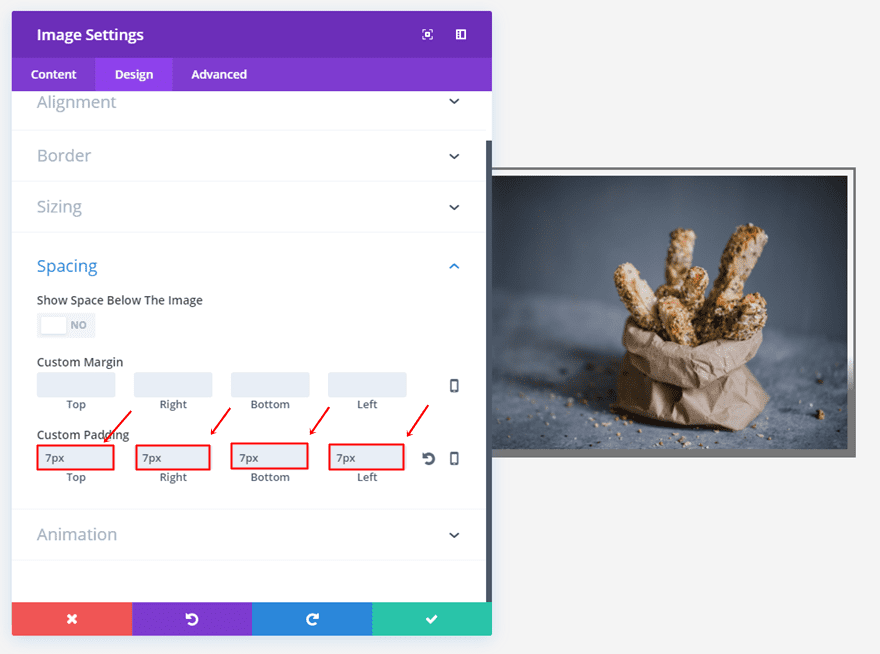
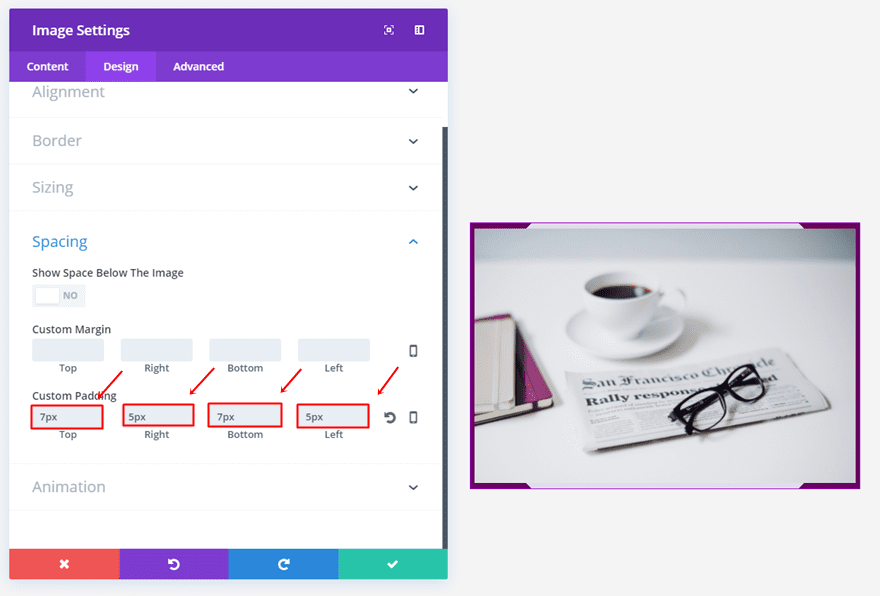
Scroll down and add the following padding to the image:
- Top: 7px
- Right: 5px
- Bottom: 7px
- Left: 5px
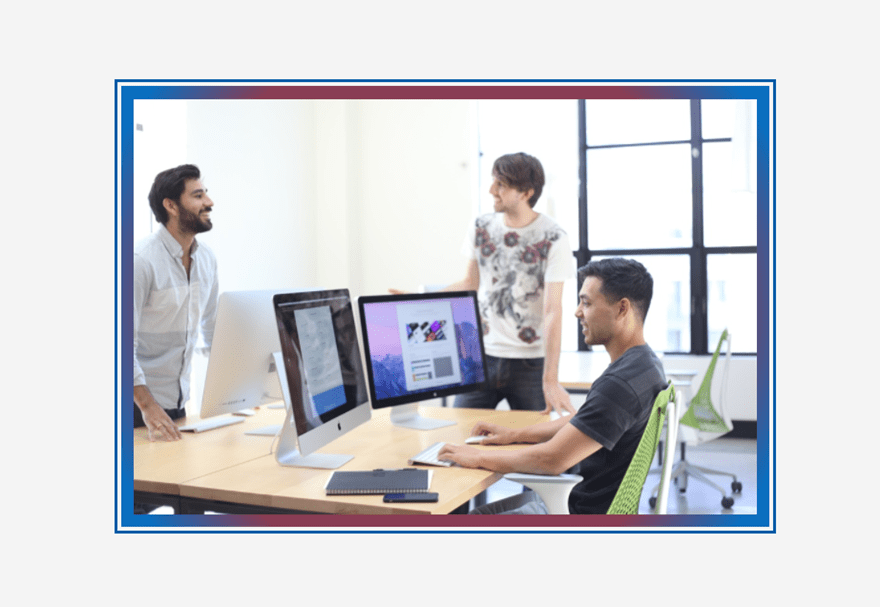
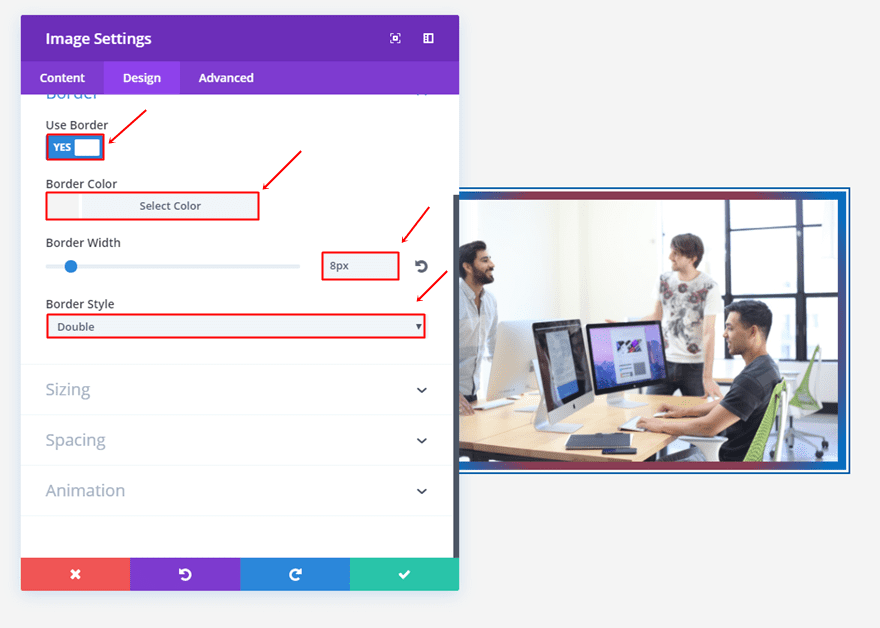
Double Border
Using a double border in combination with a gradient background can deliver some stunning results as well. Take a look:
Content Tab
The gradient background color we’ve used in this example is the following:
- First Color: rgba(224,43,32,0.61)
- Second Color: rgba(12,113,195,0.87)
- Gradient Type: Radial
- Radial Direction: Center
- Start Position: 71%
- End Position: 93%

Design Tab
Moving on, use the following settings for the Border subcategory:
- Use Border: Yes
- Border Color: #f4f4f4 (match with your section background color)
- Border Width: 8px
- Border Style: Double
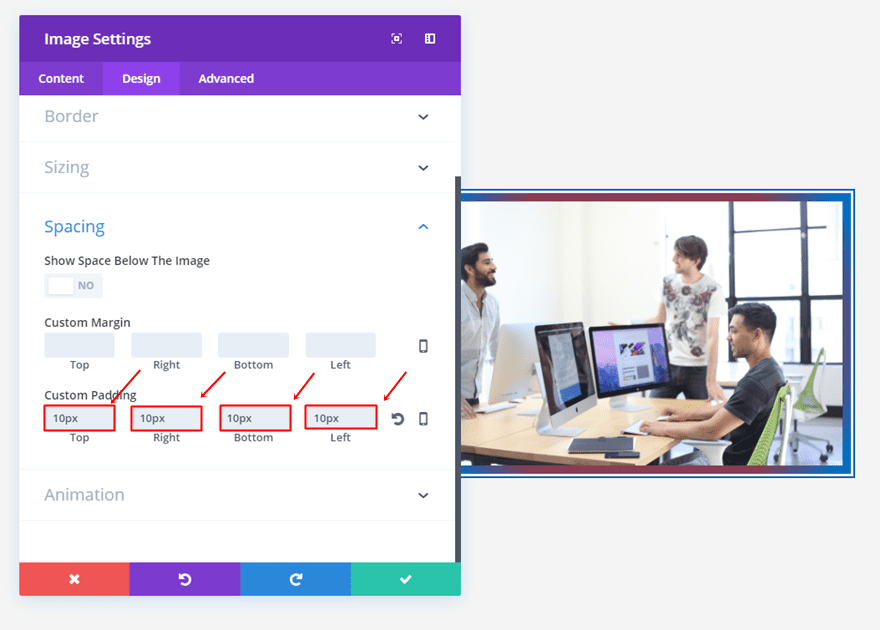
And add ’10px’ to the top, bottom, right and left padding of the image.
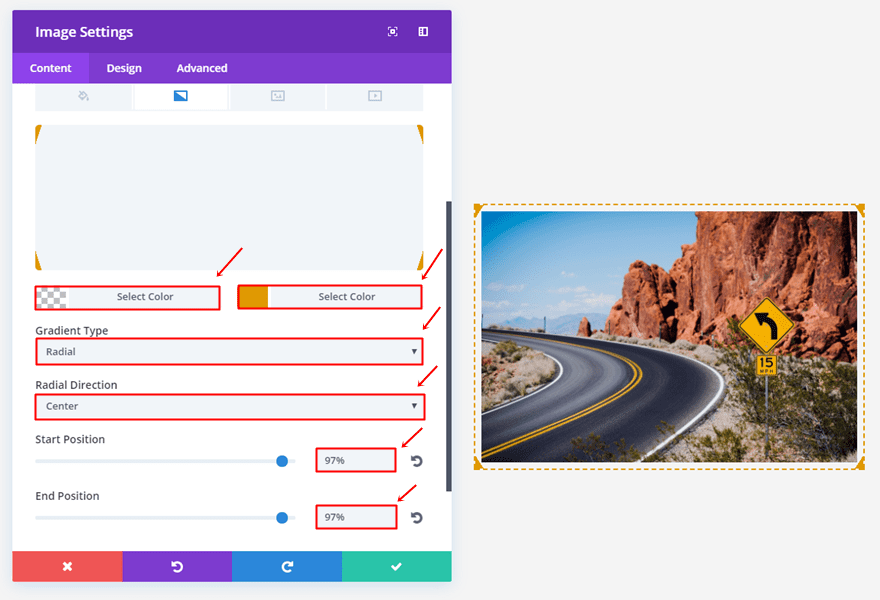
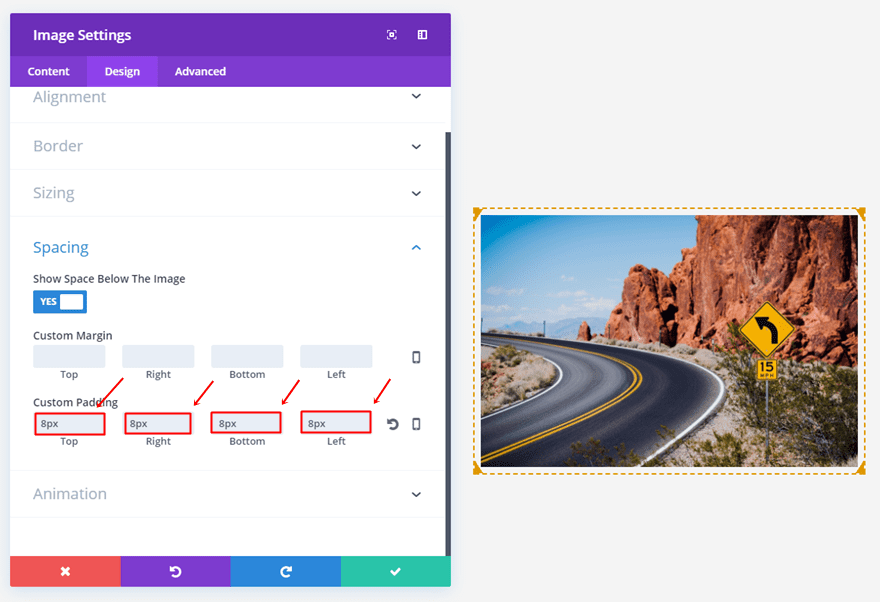
Triangle Corners
Moving on, you can also create some small corners in your border by using the gradient background option in combination with a dashed border.
Content Tab
To achieve the image border we’ve shown you above, use the following gradient background settings:
- First Color: rgba(163,103,6,0)
- Second Color: #e09900
- Gradient Type: Radial
- Radial Direction: Center
- Start Position: 97%
- End Position: 97%
Design Tab
In the Design tab, we’ll need to have the following border settings as well:
- Use Border: Yes
- Border Color: #e09900
- Border Width: 2px
- Border Style: Dashed
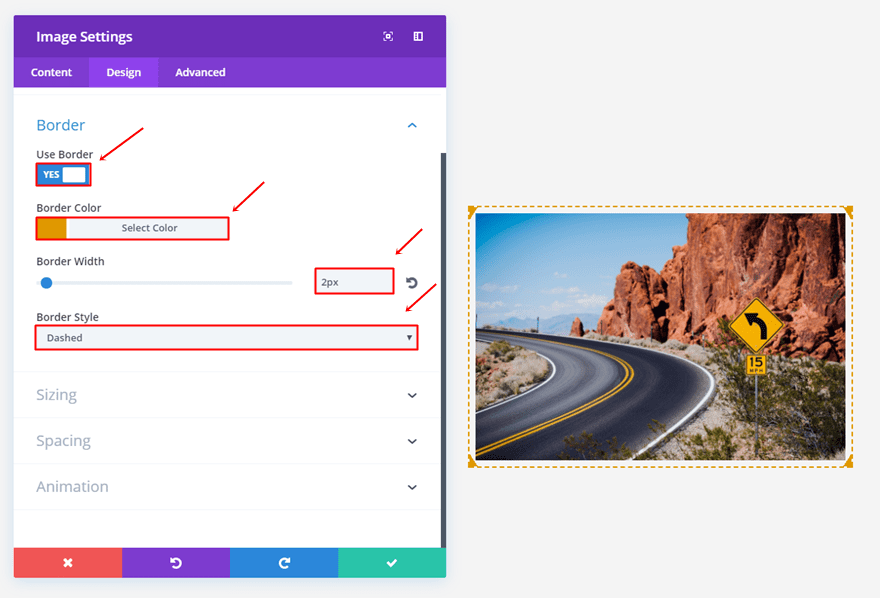
Lastly, we’ll need a padding of ‘8px’ for the top, bottom, left and right padding.
Pattern & Gradient Background
The last possibility we want to put in the spotlight is using a pattern and gradient background at the same time. This allows you to play around with the look and feel of your images.
Playful
This border contains a gradient background of two colors that are used within the image itself as well. By adding a background pattern as well, the image gives a bit more atmosphere to your website.

Content Tab
For the last example, we’ll use the following gradient background settings:
- First Color: rgba(4,49,96,0.51)
- Second Color: rgba(119,74,15,0.51)
- Gradient Type: Linear
- Gradient Direction: 180deg
- Start Position: 0%
- End Position: 100%
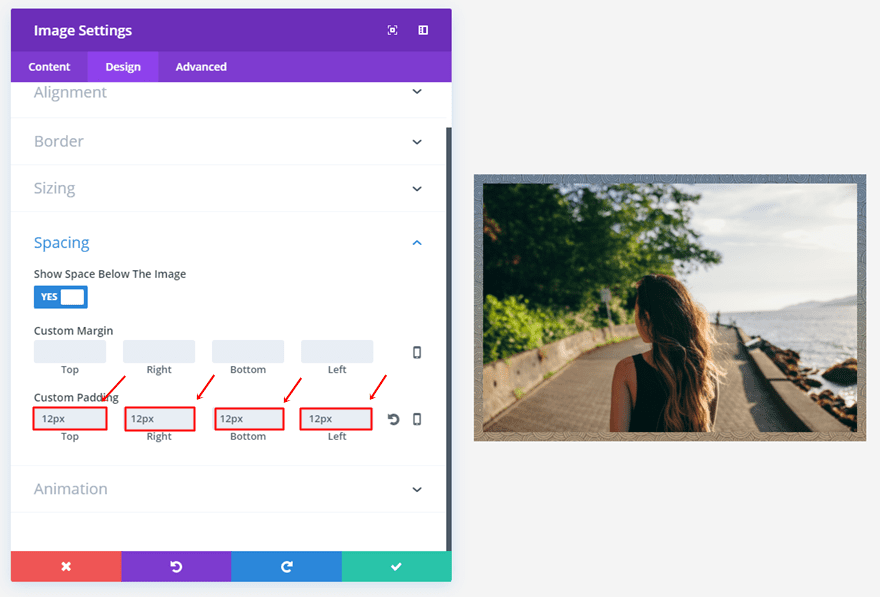
Design Tab
Next, we’re adding a pattern background as well. The pattern we’ve used in this example comes from Toptal. You can use their patterns for all kinds of purposes, just make sure you credit them within your code as mentioned in their FAQ. Once you’ve added the pattern background, use the following settings as well:
- Background Image Size: Cover
- Background Image Position: Center
- Background Image Repeat: No Repeat
- Background Image Blend: Multiply
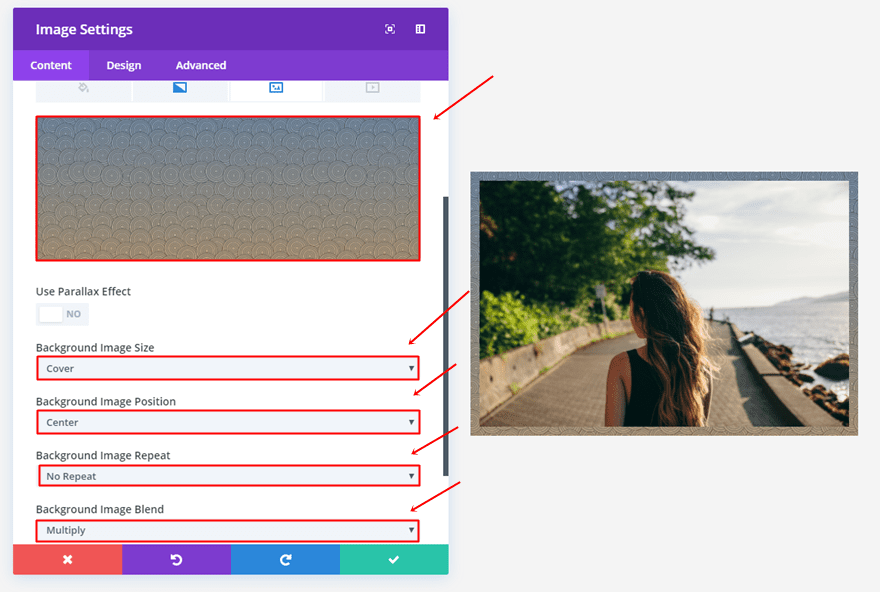
The last thing you’ll need to do is add a padding of ’12px’ to the top, bottom, right and left padding of your image.
Final Thoughts
In this post, we’ve shown you some different ways of creating beautiful image borders. These options give you a perspective on the things you can do with the new Divi options without using any additional CSS. If you have any questions or suggestions; make sure you leave a comment in the comment section below!
Be sure to subscribe to our email newsletter and YouTube channel so that you never miss a big announcement, useful tip, or Divi freebie!
Featured Image by Mr Aesthetics / shutterstock.com
The post How to Create Beautiful Image Borders using Divi’s New Options appeared first on Elegant Themes Blog.