
Every week, we provide you with new and free Divi layout packs which you can use for your next project. For one of the layout packs, we also share a use case that’ll help you take your website to the next level.
This week, as part of our ongoing Divi design initiative, we’re going to show you how to create locked content corner popups with Divi and the Resort Layout Pack. The concept of a locked content optin form is simple. People have to enter their email address and as soon as they do, hidden content will reveal. You can use this hidden content to share a discount code for instance. To make all of this happen, we’re going to use the Bloom plugin and add the locked content optin form shortcode to a Text Module which we’ll style as a popup. The Text Module will also include an animation with an animation delay to make the Text Module appear as if it is a popup.
Let’s get to it!
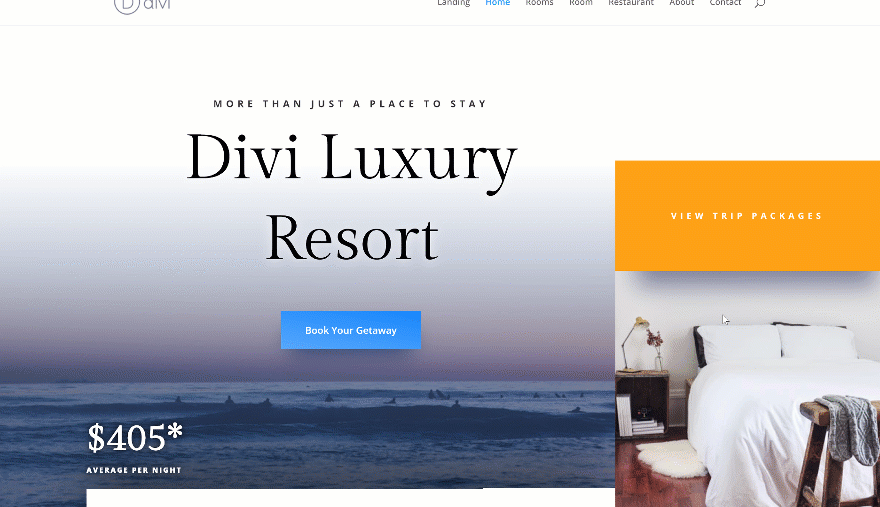
Preview
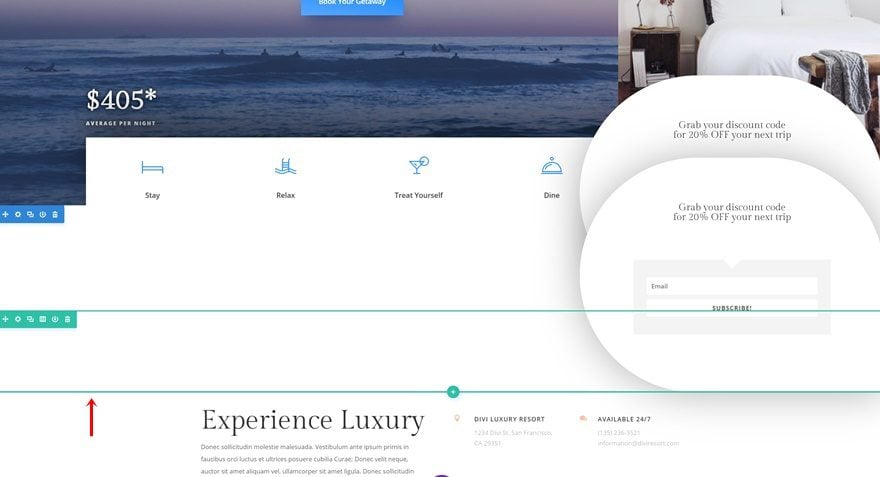
Before we dive into the tutorial, let’s take a quick look at the outcome across different screen sizes.
Desktop
Mobile

Install the Bloom Plugin
Download Bloom
The first thing you will need to do is download the Bloom plugin. If you’re already an Elegant Themes member, you can find the plugin by going to the members area. There, you’ll be able to download the zipped file. If you’re not an Elegant Themes member yet, you’ll need to purchase a membership first.

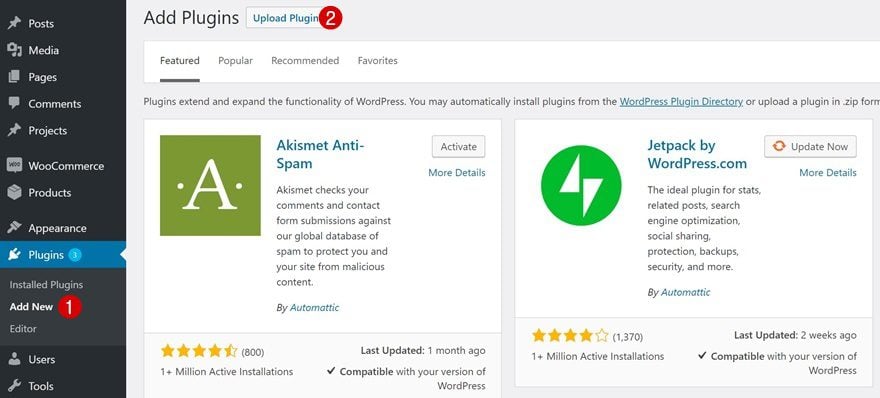
Upload & Install Bloom
Once you’ve downloaded Bloom, you can go ahead and upload it to your WordPress website by going to Plugins > Add New and clicking on ‘Upload Plugin’ at the top of the page.
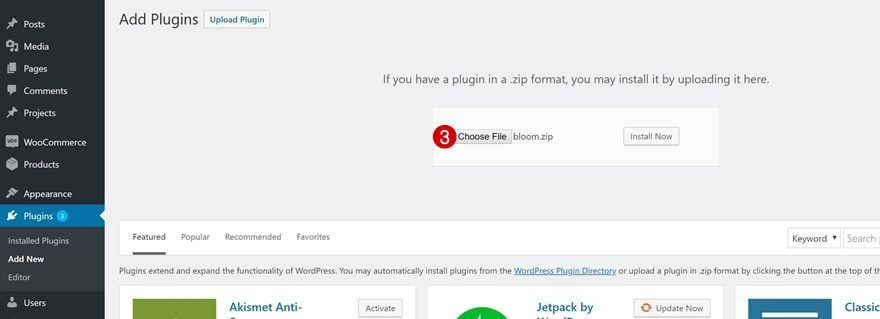
Then, upload the zipped file and click on ‘Install Now’.
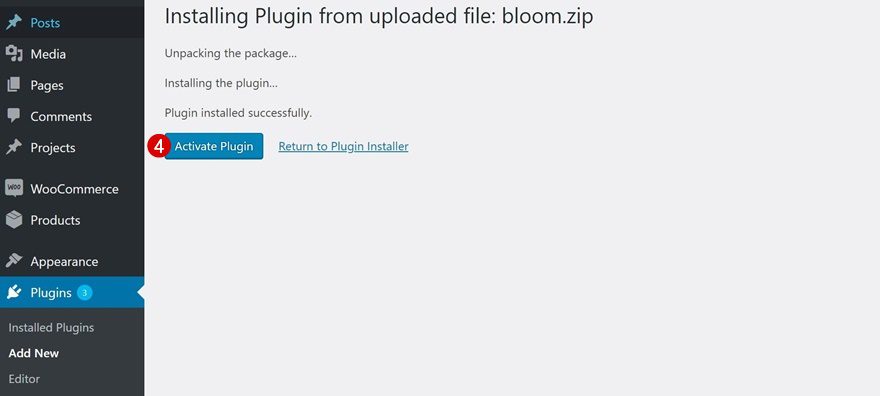
Don’t forget to activate the plugin once it’s uploaded as well.
Setup Bloom Optin Form
Add New Locked Content Form
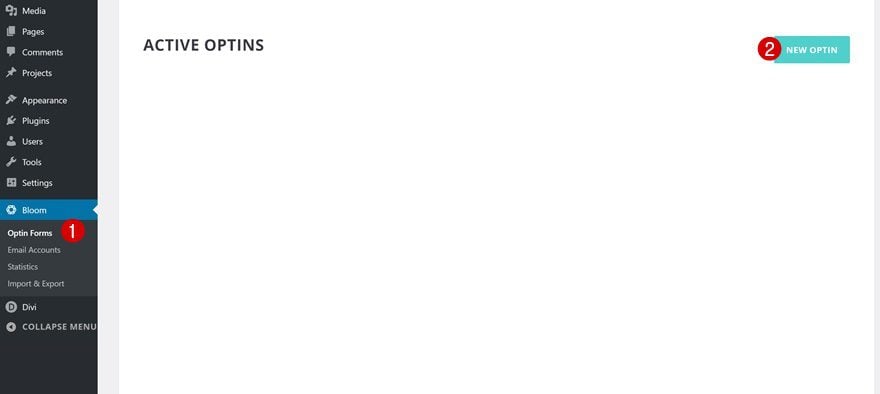
We can now start creating the locked content form which we’ll, later on this post, use in our Divi design! Go to your WordPress Dashboard > Bloom > Optin Forms and create a new optin form.
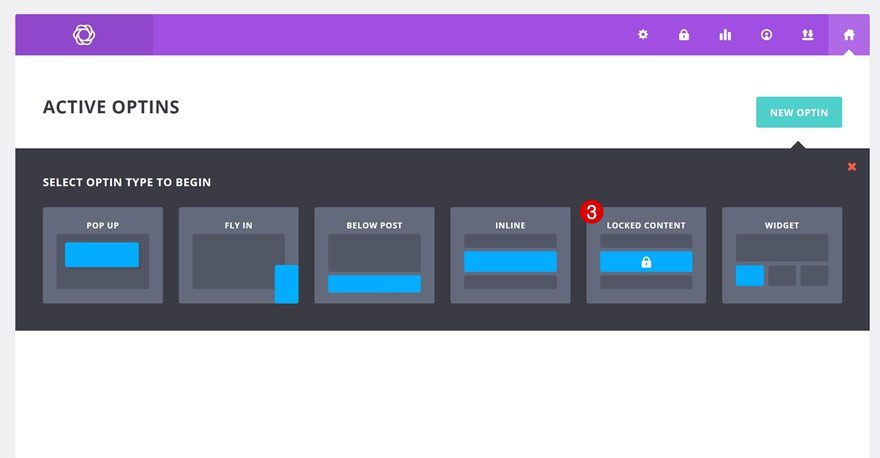
Continue by selecting the ‘Locked Content’ optin type and proceed to the setup settings.
Setup Settings
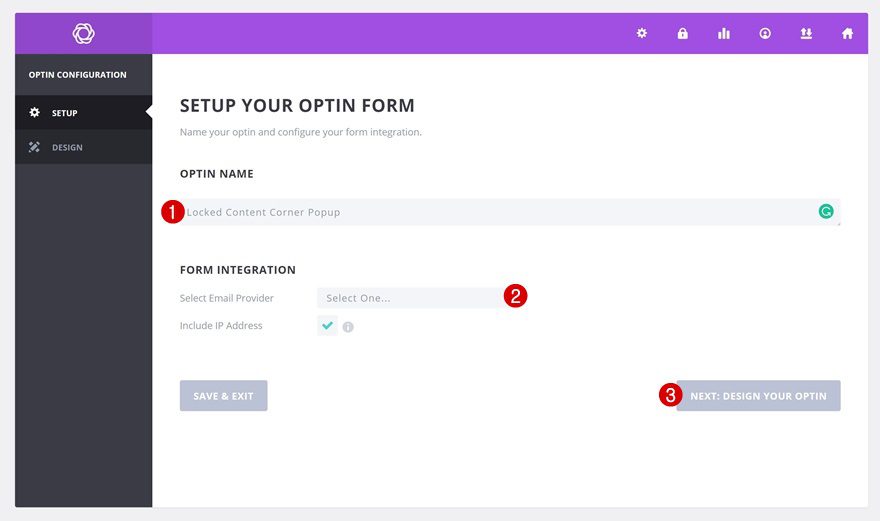
Once you’re in the setup settings, you will need to give your new optin form a name. You’ll also need to select an email provider of your choice and enter the authentication details.
Design Settings
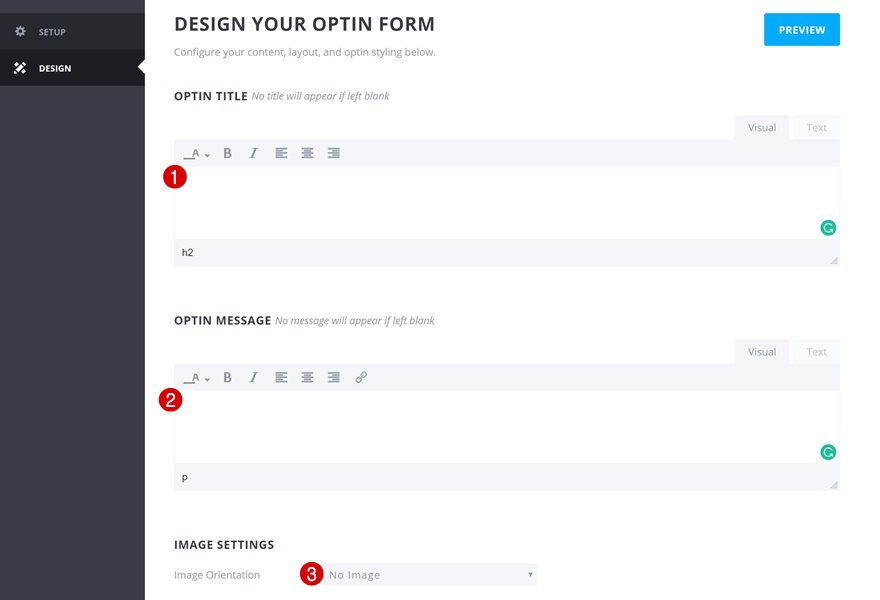
The next step is designing the form. Later on the post, we’re going to use the optin form shortcode in a Text Module which we’ll style, so we don’t need too many settings being applied to the optin form itself. Make sure you leave the optin title and optin message content boxes empty. Change the image orientation as well.
- Image Orientation: No Image
Scroll down the page and make some additional changes to the optin styling and form setup.
- Background Color: #ffffff
- Form Orientation: Form on Bottom
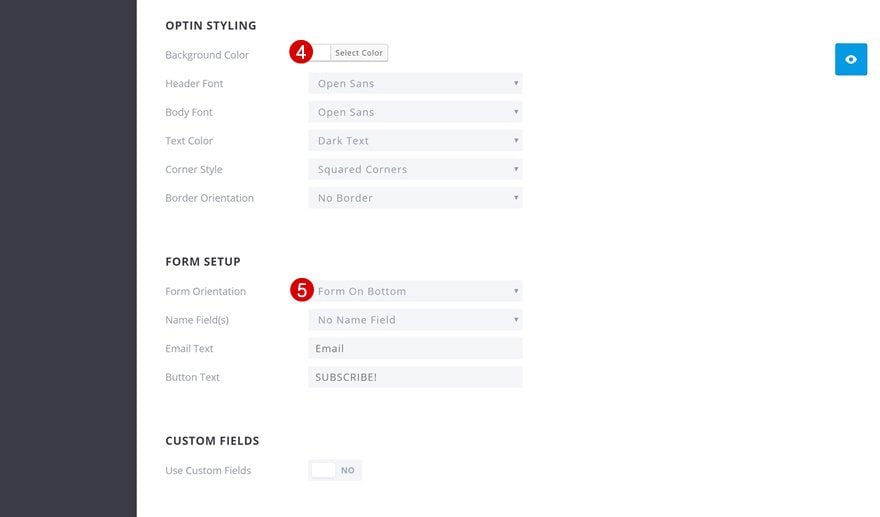
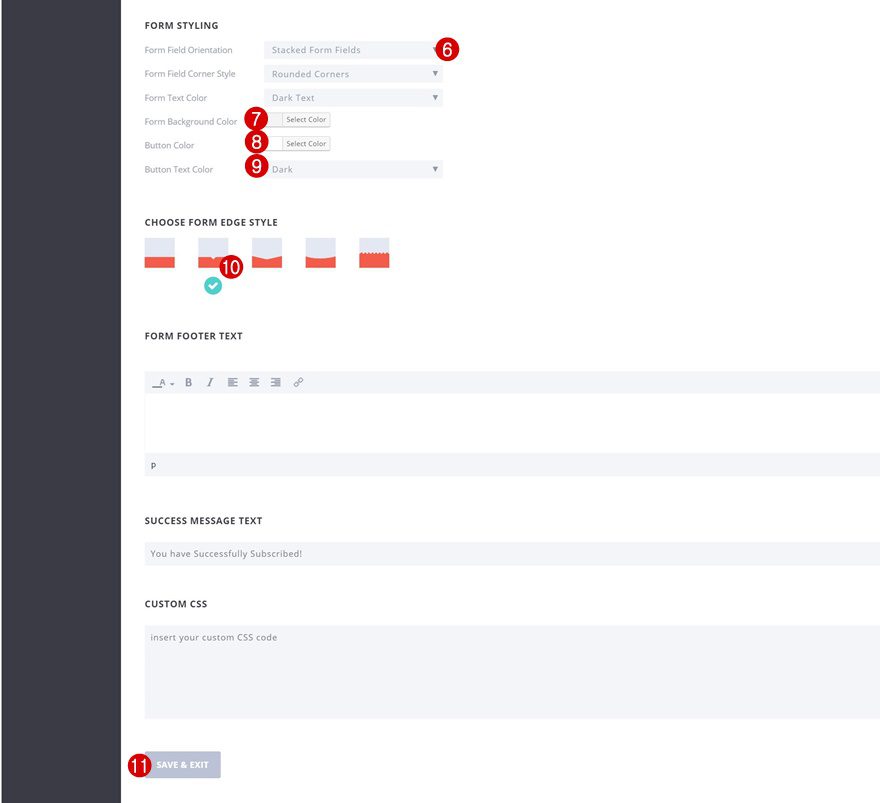
We’re also changing around the form styling settings.
- Form Field Orientation: Stacked Form Fields
- Form Background Color: #f4f4f4
- Button Color: #ffffff
- Button Text Color: Dark
- Choose Form Edge Style: Second Option
Create Design with Divi
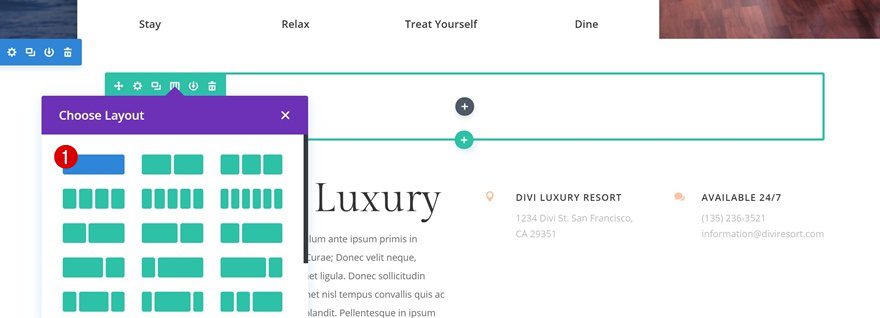
Add New Row
Column Structure
We can now switch over to the Divi Builder! Go ahead and create a new page using the Resort Layout Pack‘s homepage. Once the layout is uploaded, continue by adding a new row at the top of the second section using the following column structure:
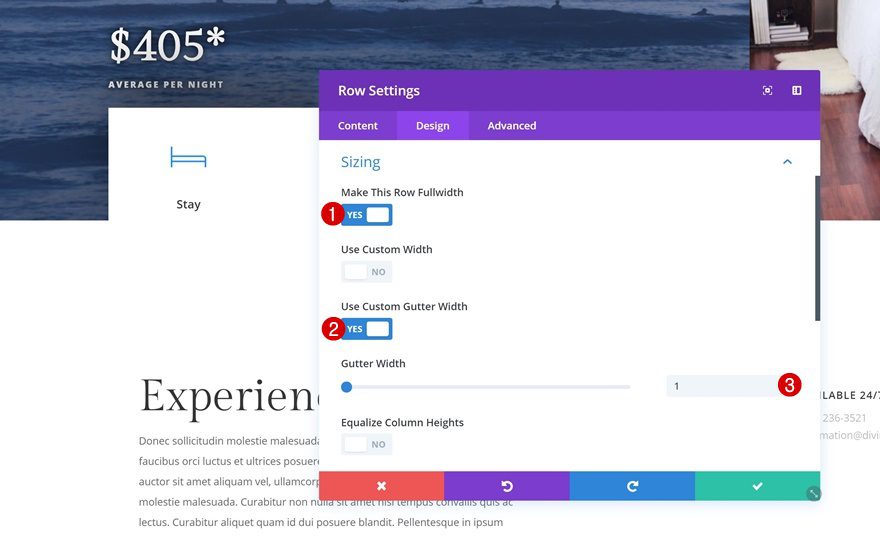
Sizing
Without adding any modules yet, open the row settings and make some changes to the sizing settings.
- Make This Row Fullwidth: Yes
- Use Custom Gutter Width: Yes
- Gutter Width: 1
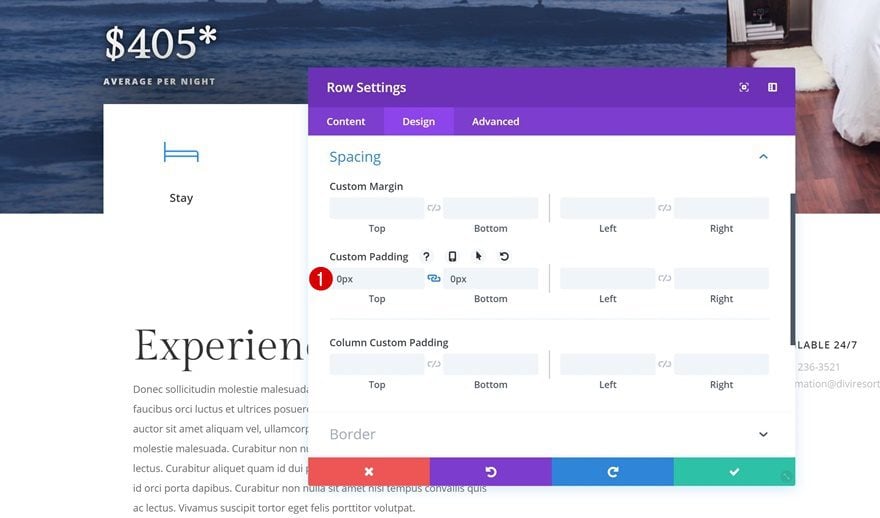
Spacing
Go to the spacing settings next and add ‘0px’ to the top and bottom padding of the row. This will limit the space that is being taken up by the new row we’ve added.
- Top Padding: 0px
- Bottom Padding: 0px
Add Text Module
Add H3 Content
The only module we need to create the locked content corner popup is a Text Module. Add an H3 title of your choice to the content box.
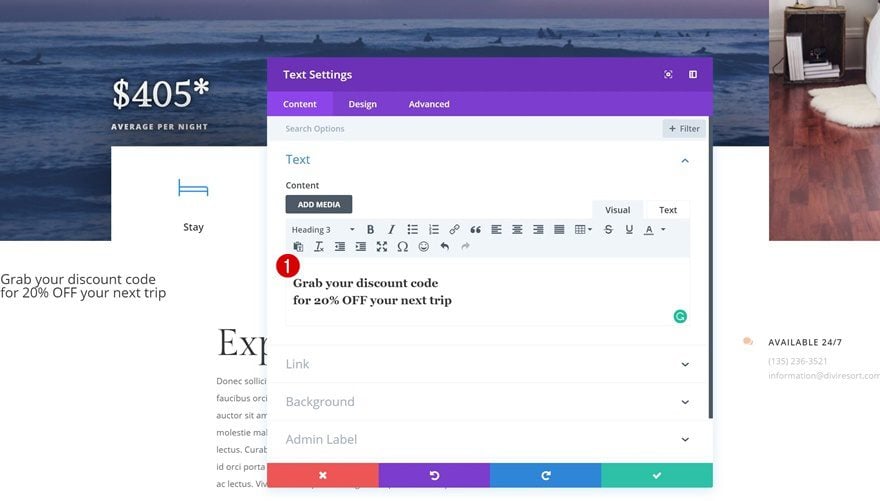
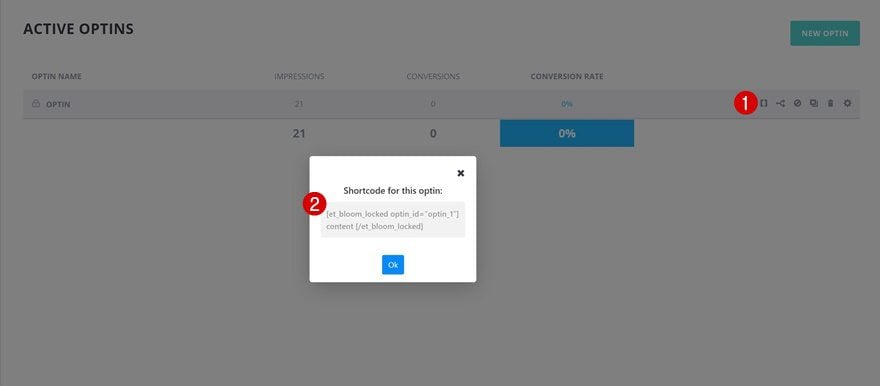
Add Locked Content Optin Form Shortcode
Then, go back to the Bloom plugin and copy the shortcode of the optin form you’ve created in the previous part of this tutorial.
Add whatever content you want to appear after people fill out the optin form. In the example below, you can notice that we’re sharing a coupon code, but you can share any kind of information you want.

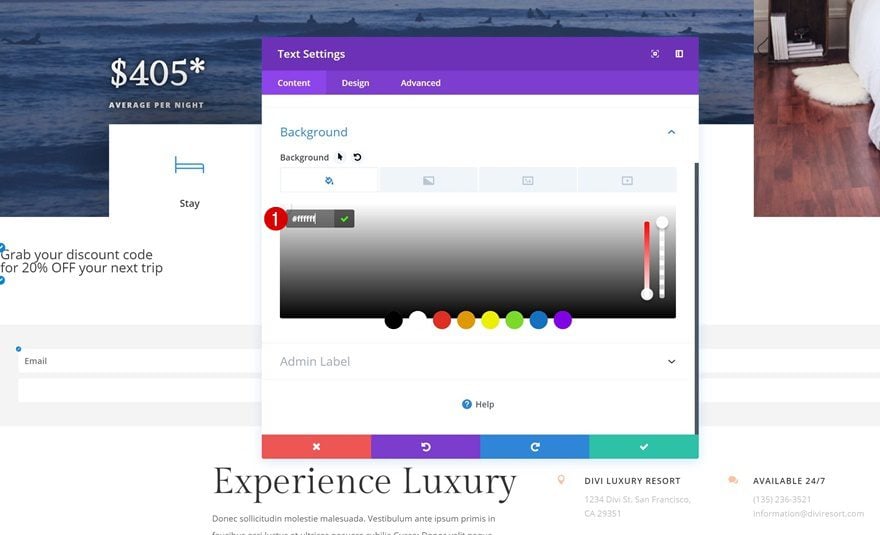
Background Color
Go to the background settings of the module next and add a completely white background color.
- Background Color: #ffffff
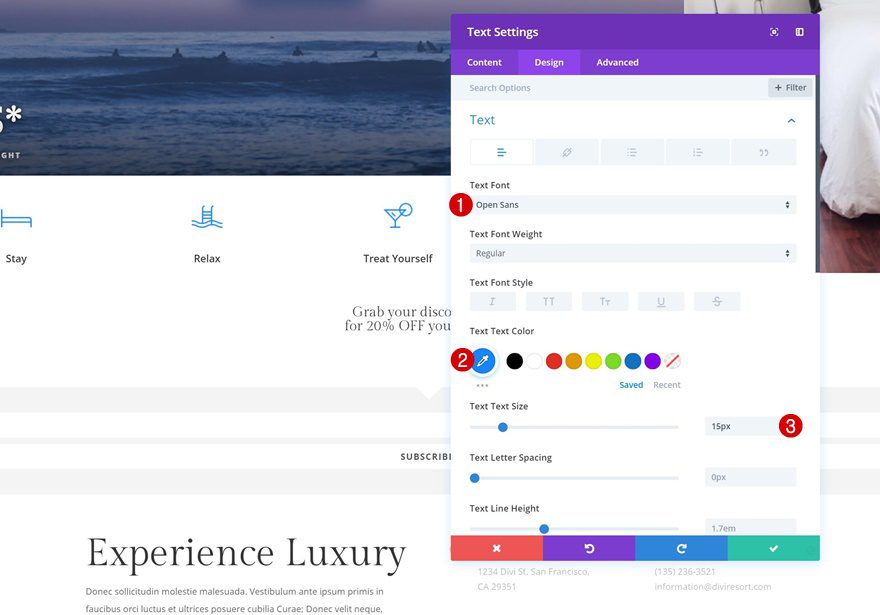
Text Settings
Move on to the design tab and change the text settings next.
- Text Font: Open Sans
- Text Color: #0f87ff
- Text Size: 15px
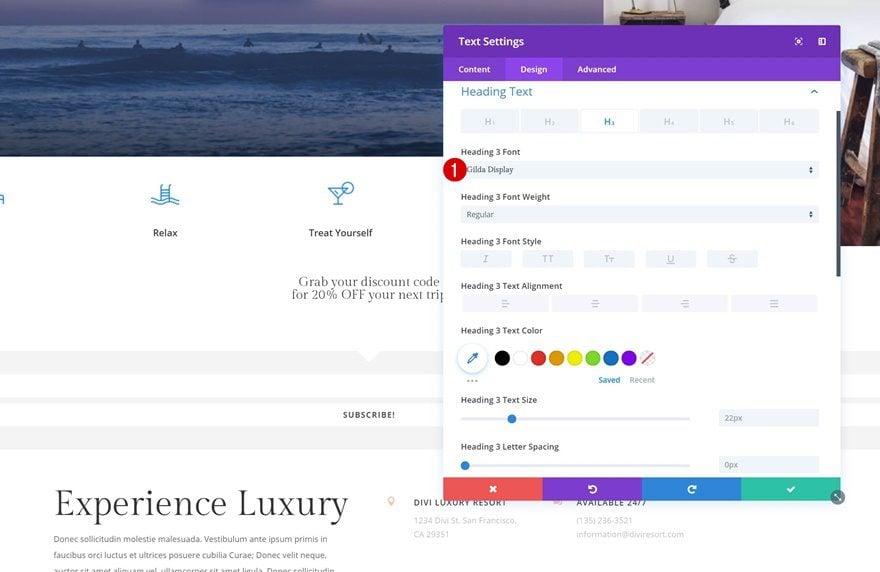
H3 Text Settings
Change the font that’s being used for your H3 copy too.
- Heading 3 Font: Gilda Display
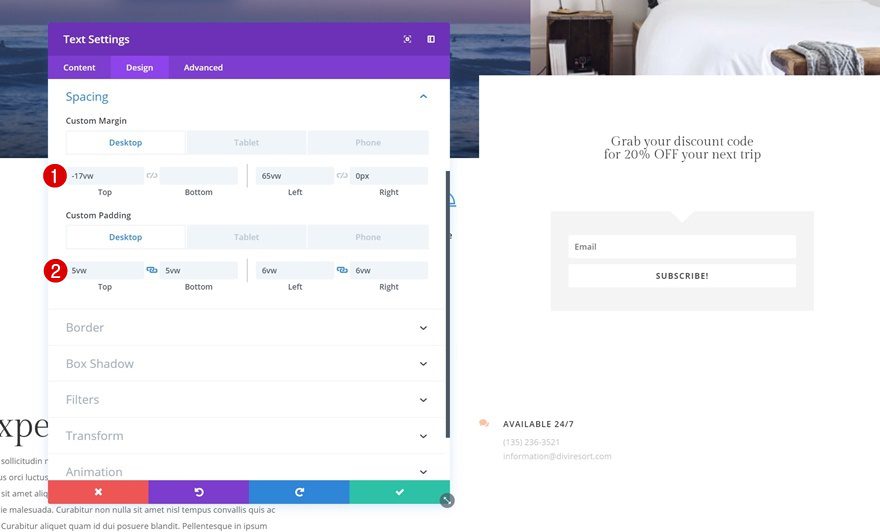
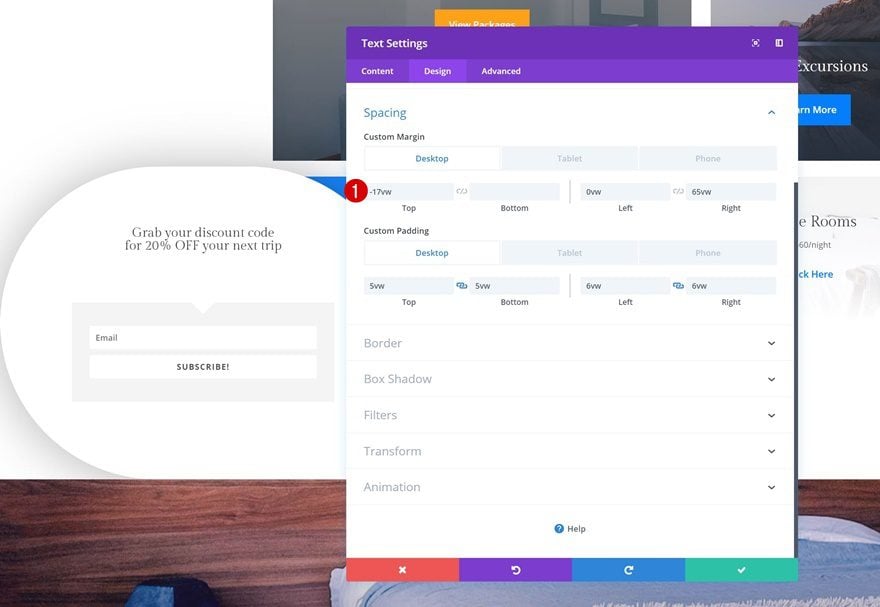
Spacing
And to give the module a shape, we’re going to add some custom margin and padding values. We’re also modifying all of these values to make the design match whatever screen size your visitors are using.
- Top Margin: -17vw
- Left Margin: 65vw (Desktop), 37vw (Tablet), 3vw (Phone)
- Right Margin: 0px
- Top Padding: 5vw (Desktop), 11vw (Tablet), 13vw (Phone)
- Bottom Padding: 5vw, 11vw (Tablet), 13vw (Phone)
- Left Padding: 6vw (Desktop), 11vw (Tablet), 16vw (Phone)
- Right Padding: 6vw (Desktop), 11vw (Tablet), 16vw (Phone)
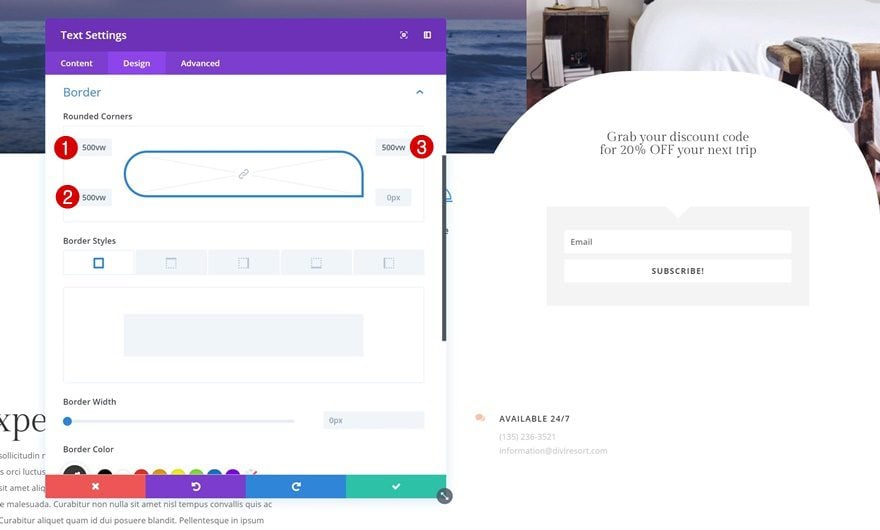
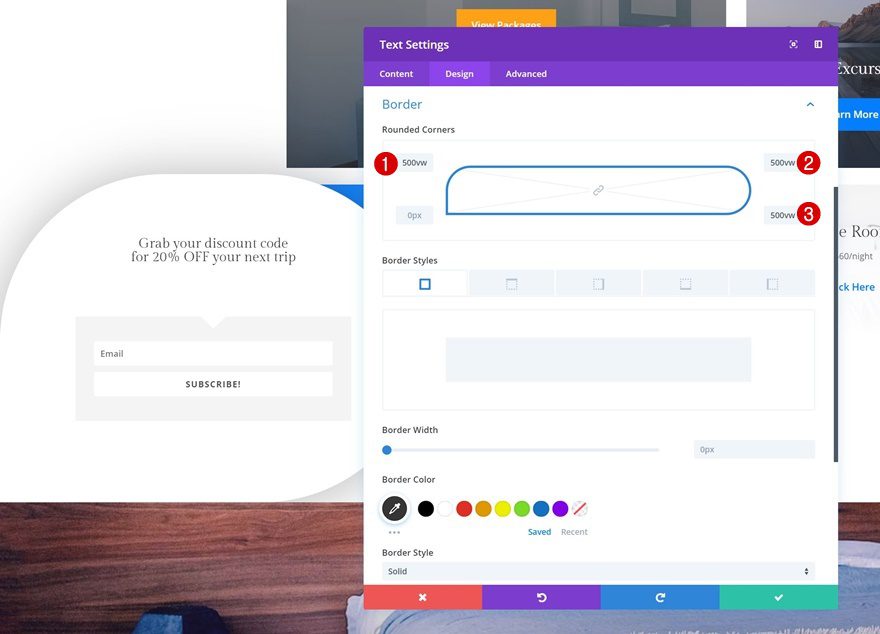
Border
Continue by going to the border settings of the Text Module and add ‘500vw’ to each one of the corners, except for the bottom right one.
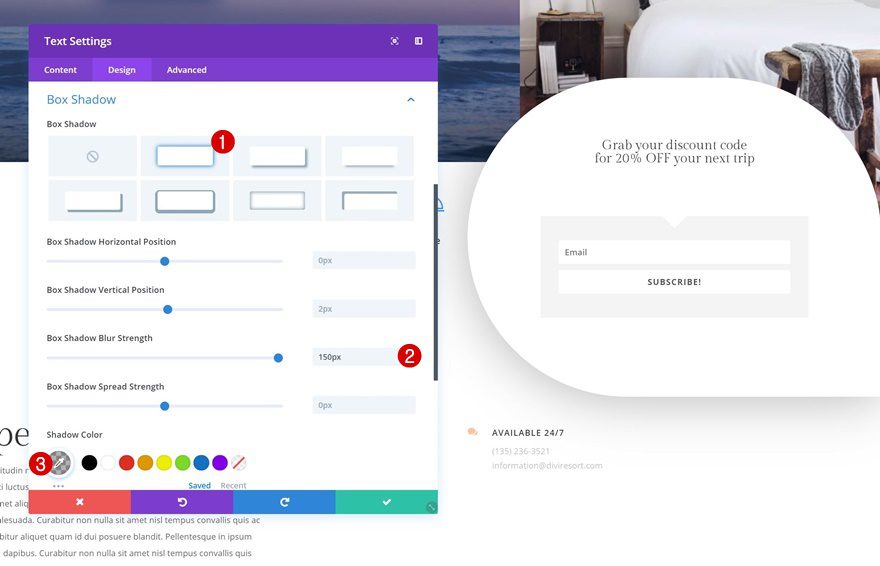
Box Shadow
Add a box shadow next to make the Text Module pop.
- Box Shadow Blur Strength: 150px
- Shadow Color: rgba(0,0,0,0.3)
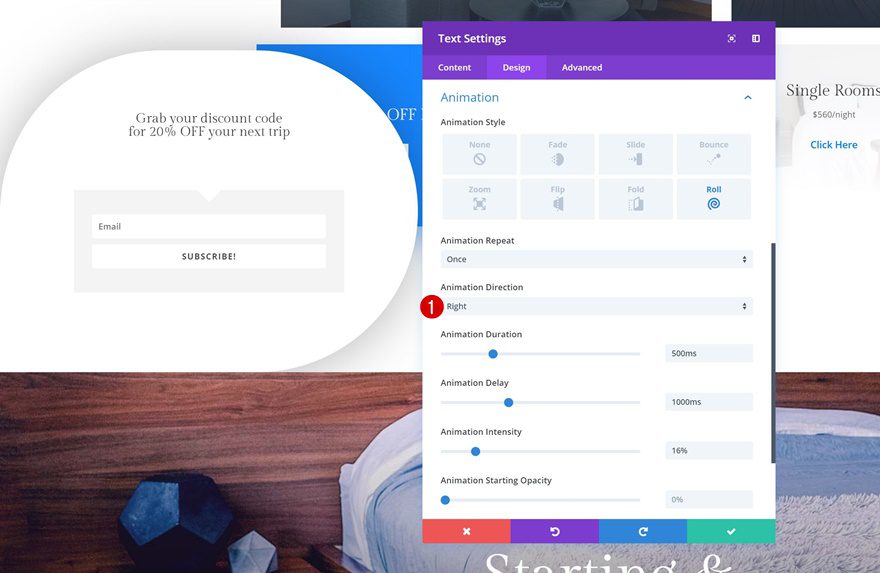
Animation
Lastly, we’re also adding an animation that goes from right to left to create the popup effect.
- Animation Repeat: Once
- Animation Direction: Left
- Animation Duration: 500ms
- Animation Delay: 1000ms
- Animation Intensity: 16%

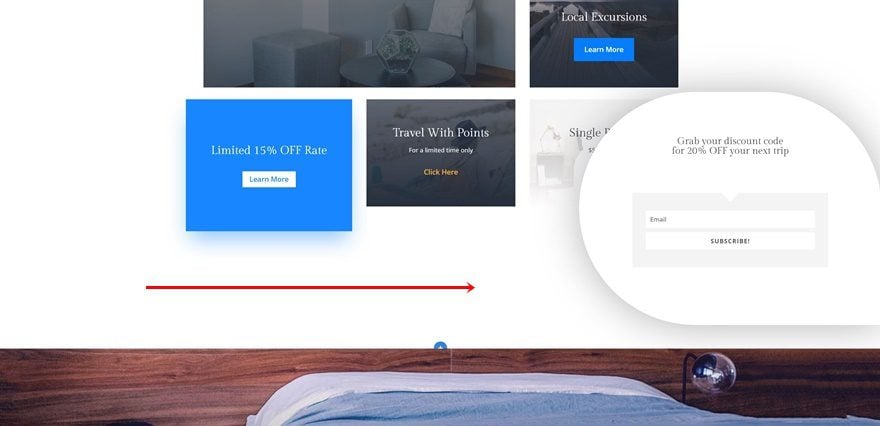
Clone Row
Once you’re done creating the first locked content corner popup, you can go ahead and clone the entire row.
Place the duplicate row right here:
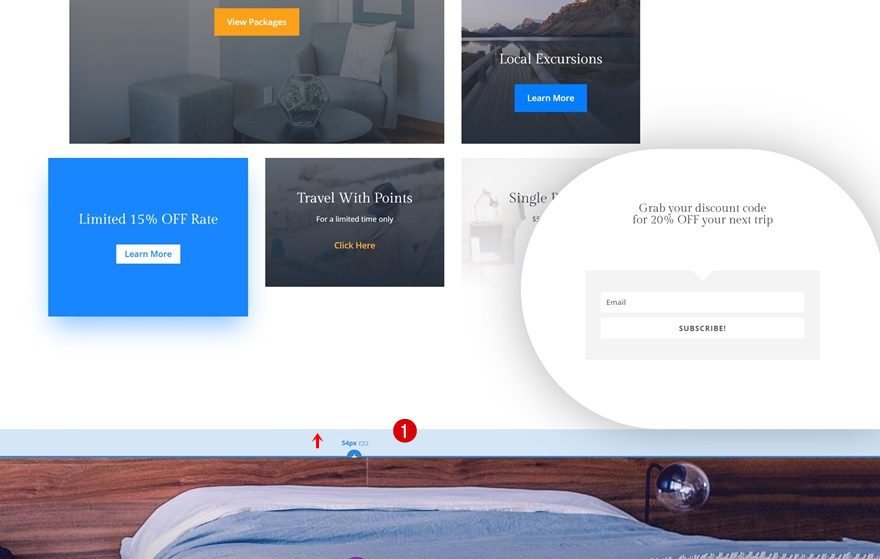
Remove Section Bottom Padding
Remove the bottom padding of the section you’ve placed the row in.
- Bottom Padding: 0px
Change Text Module Spacing Settings
Then, open the Text Module’s settings and change the custom margin values.
- Left Margin: 0vw
- Right Margin: 65vw (Desktop), 37vw (Tablet), 3vw (Phone)
Change Text Module Rounded Corners
Make sure you change the rounded corners too. We’re using ‘500vw’ for each one of the corners except for the bottom left one.
Change Text Module Animation Settings
Last but not least, change the animation direction to right and you’re done!
- Animation Direction: Right
Preview
Now that we’ve gone through all the steps, let’s take a final look at the outcome across different screen sizes!
Desktop
Mobile
Final Thoughts
In this post, we’ve shown you how to create locked content corner popups with Divi, the Bloom plugin and the Resort Layout Pack. You can use this technique to convince people to become part of your email list by offering a coupon code which appears once they’ve filled out the form. This tutorial is part of our ongoing Divi design initiative, where we try to put something extra into your design toolbox each and every week. If you have any questions or suggestions, make sure you leave a comment in the comment section below!
The post How to Create Locked Content Corner Popups with Divi appeared first on Elegant Themes Blog.