
WordPress’ new Block Editor streamlines the writing process for a simpler, more accessible web publishing experience. The main method of doing this is with a variety of content ‘blocks’ encompassing a plethora of formatting and design options. One of these – a ‘reusable block’ – is a handy element to help cut down on the repetitive work involved in creating and placing blocks you use often.
In this article, we’ll explain what reusable blocks are and why they’re useful. Then we’ll show you how to create them to utilize in your posts in just three simple steps.
Let’s get started!
What Reusable Blocks Are and Why You May Want to Use Them
As you may know, the Block Editor is based on modular blocks of content. They can contain text, images, buttons, videos, tables, and dozens of other content types. What’s more, they can be easily added, deleted, edited, and moved to create posts and pages. This is all achieved through a drag-and-drop interface.
However, you may use the same collection of blocks often in your layouts. This could prove repetitive and a time sink. To solve this issue, you can leverage reusable blocks. These can be any group of pre-existing blocks of practically any type, which can be saved and used wherever necessary.
The major benefit of reusable blocks in WordPress is the time saved in creating new Heading and Text blocks, typing out the content and setting the correct formatting, and designing a button or form for each individual post or page. In addition, content will be consistent across your entire site, rather than the natural inconsistencies in creating these elements from scratch.
Any block can be made reusable, but the most value will be had when complex or otherwise ‘dense’ layout designs feature often in your content. For example, a Call To Action (CTA) is a common feature of many sites, and it may encompass a heading, blurb, and button or form elements.
In this instance, you could save your CTA collection as a reusable block, then simply insert it at the end of every new post you create. Of course, the sky’s the limit here, and you can do the same for your logo, social media buttons, or any other frequently used content on your website.
How to Create Reusable Blocks in WordPress (in 3 Steps)
As we’ve said, creating reusable blocks is a short and simple process. Let’s take a look at how to achieve this in WordPress using the Block Editor, starting with the most simple step.
Step 1: Create a New Block and Add Your Content
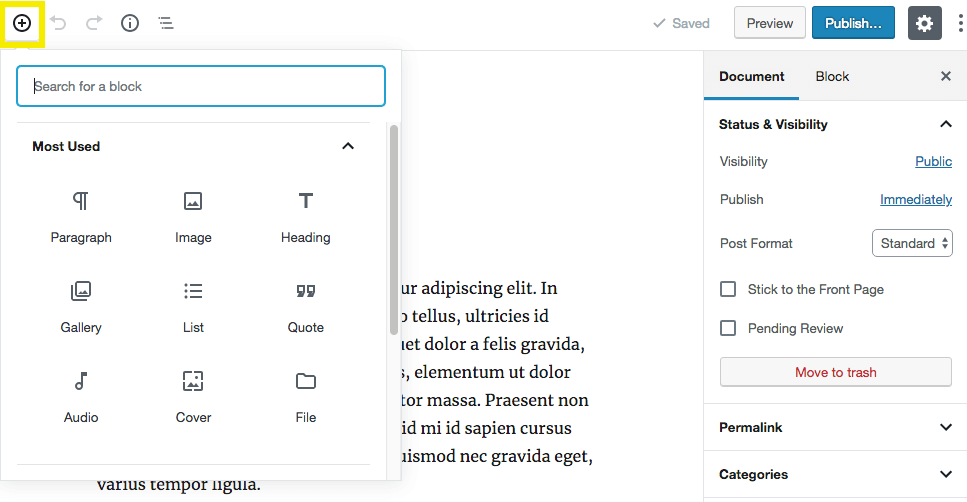
If you’ve been using the Block Editor already, you should be familiar with this process. To begin, create a new block by clicking the Add Block icon button (visualized as a ‘plus’ sign), and select the type of block you want to use from the menu:
Once you’ve added the block to the post, begin creating the content you want to include in your reusable block. Note you can do this for a singular block, or a collection.
You may already have a block featured in a previous post that would suit being turned into a reusable block. To do this, open the post containing the block in question, and continue following these steps – reusable blocks are nothing if not flexible elements.
Step 2: Add Your Block to the Reusable Blocks Drop-Down
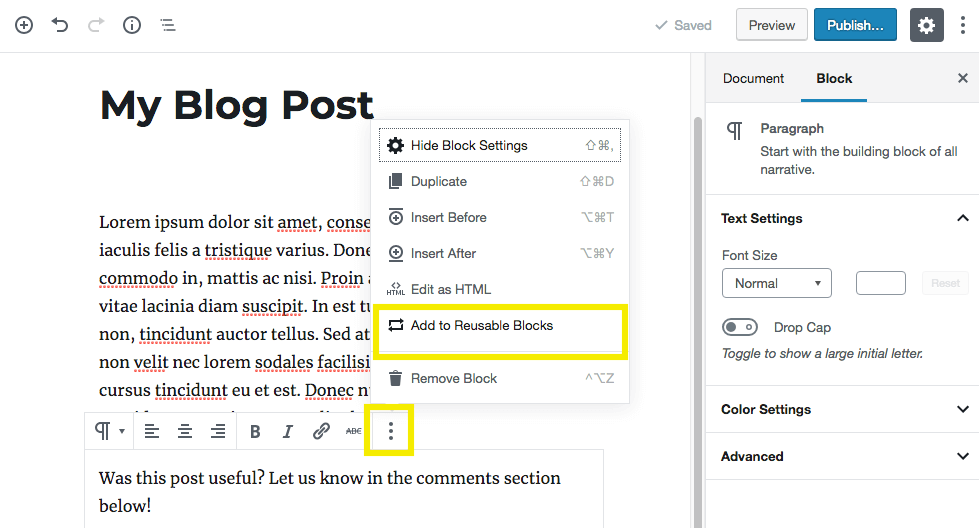
Each block has a dedicated toolbar, where you can make edits and change its settings. To do this for your reusable block, click on the ‘hamburger’-style menu button to see some additional options. Somewhere in the list will be the Add to Reusable Blocks item:
By selecting this option you’ll be able to give your reusable block a distinct name. In order to find it more easily later on, make sure the name clearly and concisely describes the block.
Finally, click Save to add your block to the reusable blocks list. At this point, you’ll be able to use it within your posts and pages.
Step 3: Use Your Reusable Block in a New Post
Now you’re ready to put your reusable block to the test! Open a new post, then go to add a new block as you normally would. If you scroll past the block menu, you should see a drop-down titled Reusable Blocks:
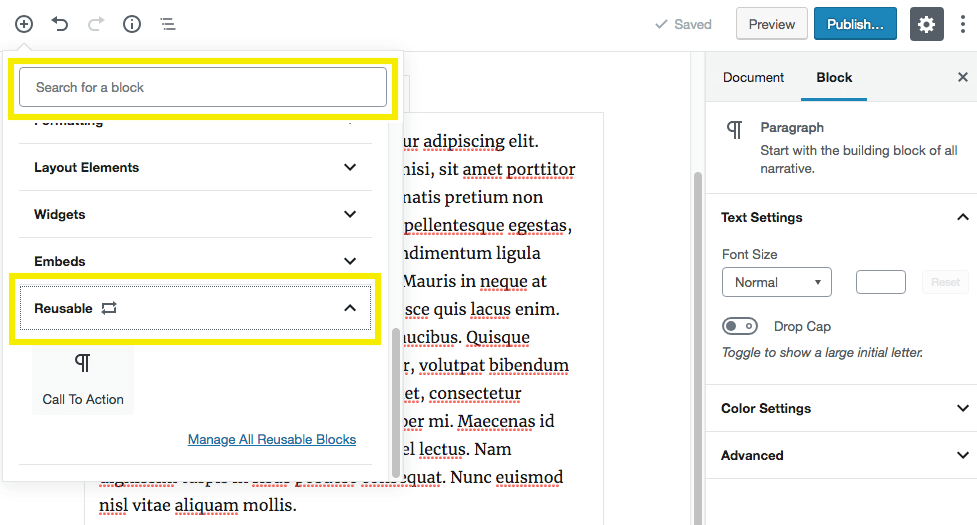
You can find all of your reusable blocks in this menu, or alternatively you can search for its name. From here, click on the reusable block you wish to add, and it will appear in the editor.
While you can edit your reusable block directly, this will make changes globally. In other words, all instances of the reusable block on your site will be subjected to the changes you make. This could make it difficult to tailor a reusable block to your specific application, but it’s possible to do so by converting it back to regular blocks.
To do this, click the hamburger-style menu in your reusable block’s toolbar, and select Convert to Regular Block:
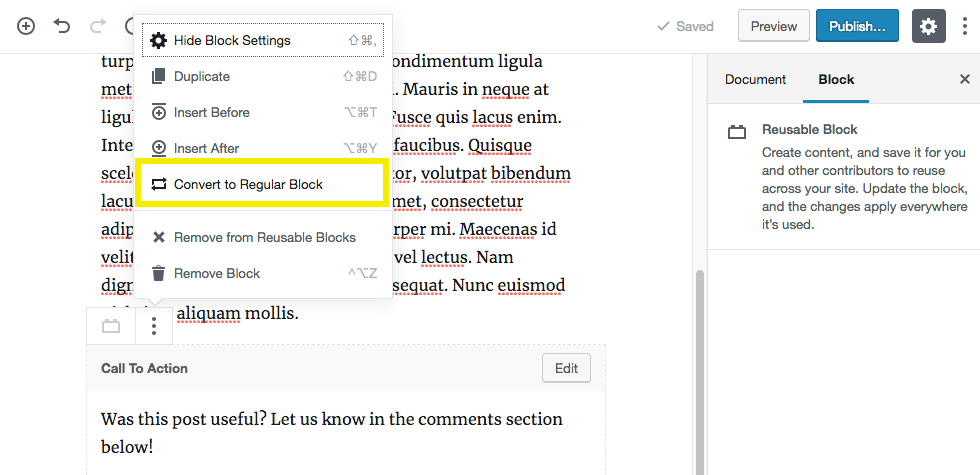
This ‘unlinks’ the blocks from the saved version, and lets you work on them to match your custom intentions. We’d recommend leaving them as-is, although you can of course set them as a reusable block again. However, just make sure you’ve provided a suitably unique name, in order to stop any confusion down the line.
Conclusion
Reusable blocks could help cut down on the time you spend inserting the same type of content into your posts and pages. It will also help keep frequently used content such as CTAs, logos, and social media links consistent from post to post. You’ll be able to eliminate one of the most tedious aspects of writing and publishing posts, so you can focus on more important tasks relating to your content.
This post has looked at how to create reusable blocks in WordPress, in three easy steps. Let’s recap them quickly:
- Create a new block and add content.
- Add your block to the Reusable Blocks list.
- Use your reusable block in a new post.
Do you have any questions about how to create or use reusable blocks? Ask away in the comments section below!
Article image thumbnail: Shutterstock.
The post How to Create Reusable Blocks in WordPress appeared first on Elegant Themes Blog.