
Welcome to post 3 of 5 in our miniseries How to Create Stunning Grid Layouts with Divi’s Video Module. In this series we are going to walk you through how to create amazing grid layouts from scratch using the Divi Visual Builder. And if you are worried about this being too complicated, think again! All of these layouts can be created and styled using the Visual Builder without additional code.
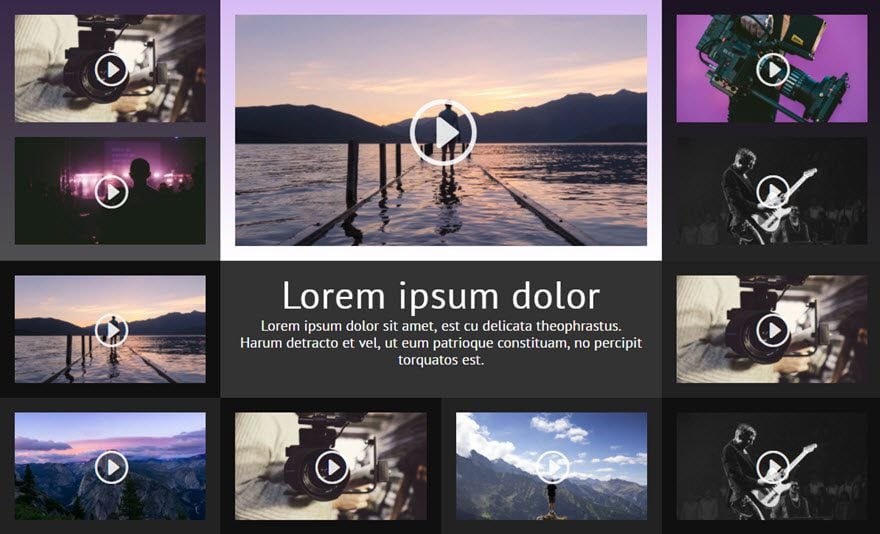
Welcome to part 3 of the series! I have a feeling this one will surprise you a little bit. Today, I’m going to show you how to use semi-transparent background colors and gradients to create multiple border color variations. At the end I will show you how you can completely change the color scheme with just a few clicks. This layout is made up of a combination of two ¼ ½ ¼ columns structure rows and a ¼ ¼ ¼ ¼ column structure row.
I’m going to use the video module to add the videos and the blurb module to serve as a title and description section in the middle of the grid. Like all of the layouts in this series, this one is also easy to implement using Divi.
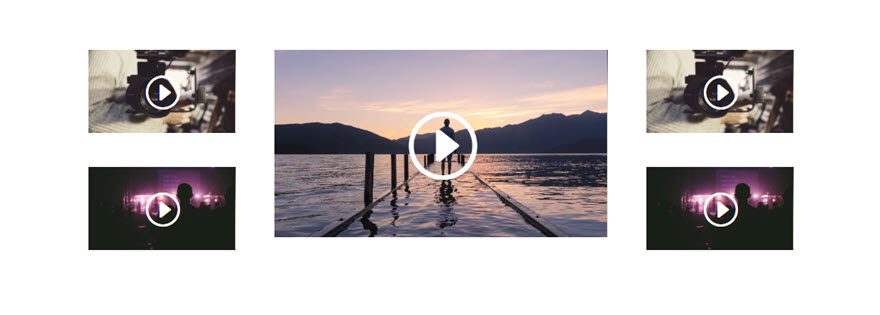
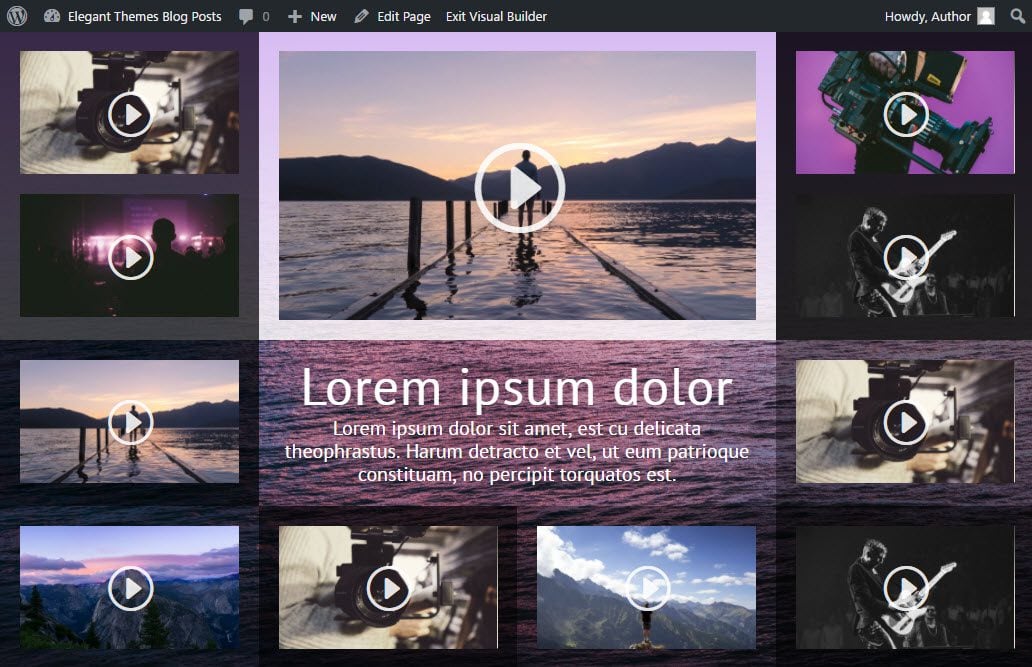
Here is what the Final Result will Look Like
The Concept & Inspiration
Actually, the original layout idea came from the popular site giphy.com from the way that it showcases a larger featured gif in the middle column surrounded by smaller gifs. I thought this idea would work well for a video grid layout since this would allow you to feature a bigger video with the other videos surrounding it. However, I didn’t care for the masonry style of the surrounding giphy images, so for this post, I went with the even column approach to make everything more symmetrical.
Besides the layout, I wanted to explore the semi-transparent background capabilities of Divi a bit more to create something unique.
Let’s get started.
Implementing The Design With Divi
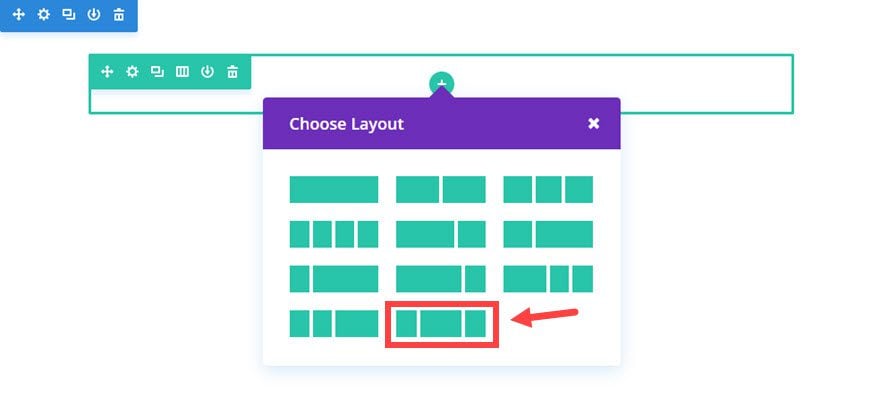
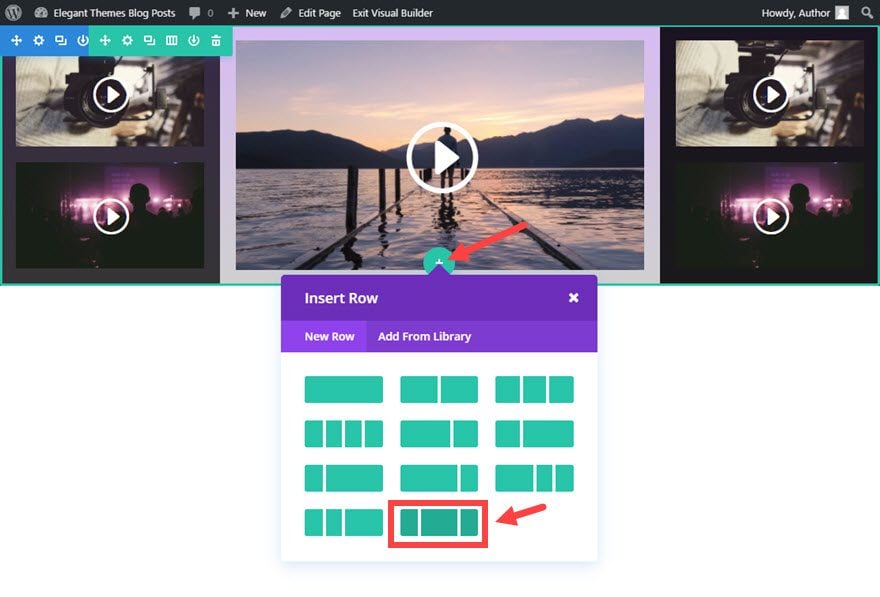
First, add a regular section with a ¼ ½ ¼ (2-column) structure.
Next add a Video Module to the first column.
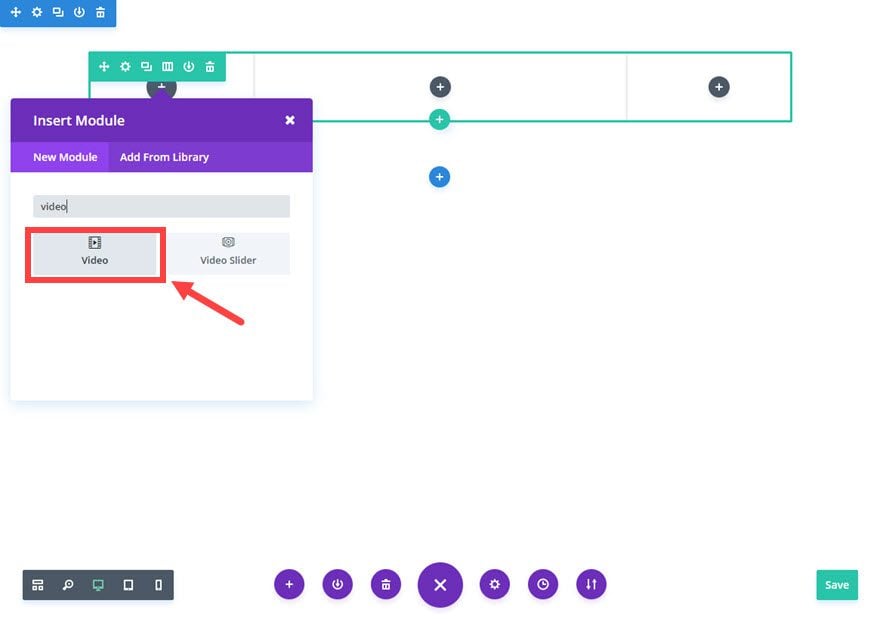
Update the Video Settings as follows:
Content Options
Video MP4/URL: [enter URL for video]
Image Overlay URL: [upload a custom image for your video or generate one automatically from the video]
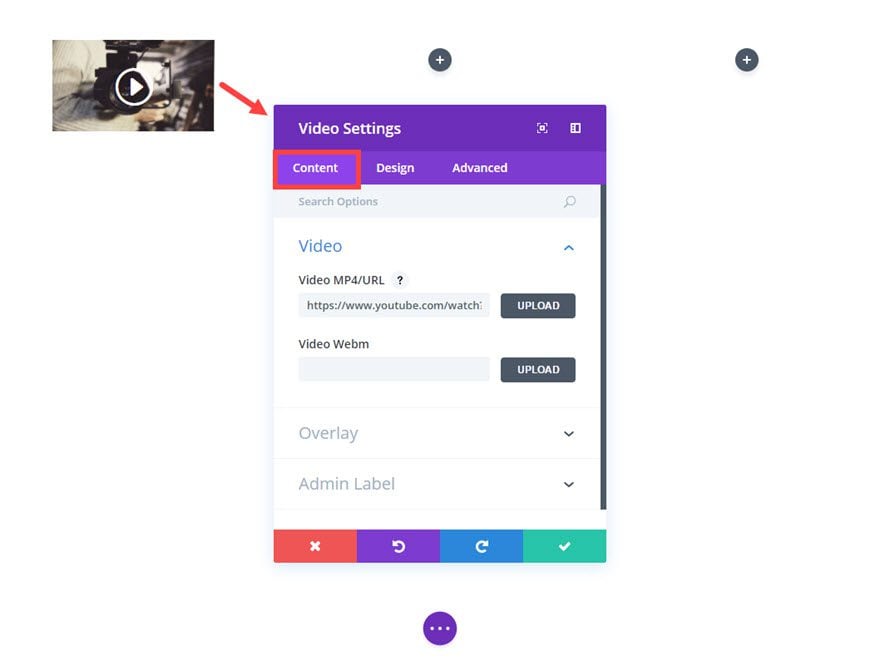
Save Settings
Then add a Divider Module directly under the Video Module.
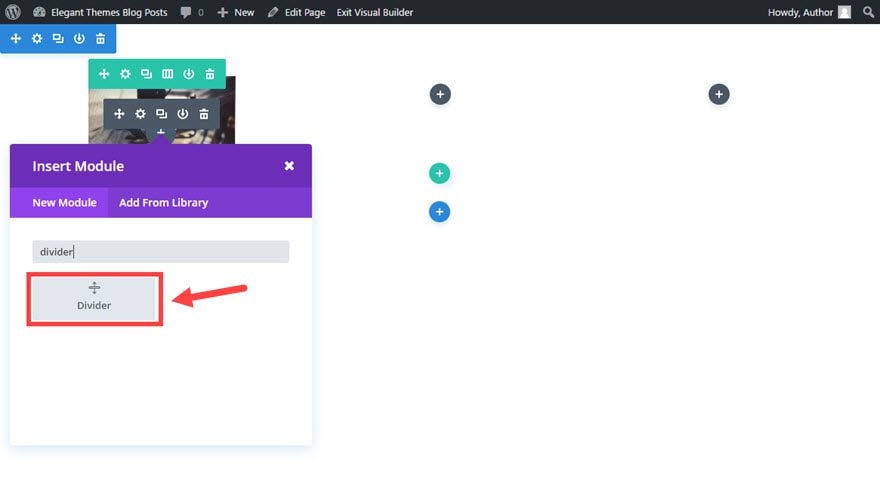
In the Divider Settings, under the

Now since we are going to be adding a lot of videos, I find it easier to duplicate the video module just created and drag over to right spots. Then I can go back and change the video URL and cover images later.
First, let’s duplicate the video module you just created and drag it under the divider module in the first column.
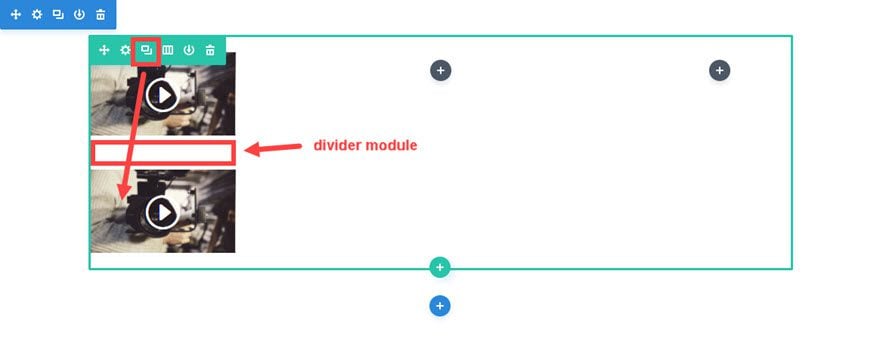
After that you can continue duplicate the first column elements (the video, the divider, and the video) and drag them over to the far right column. Then you can duplicate one of the video modules and drag it to the center column. Once you update all of the video contents you should have something that looks like this…
Before we continue, go ahead and add your background color to your section and your row columns. Go to the Section settings (blue area) and update the following:
Content Options
Background Color: #333333
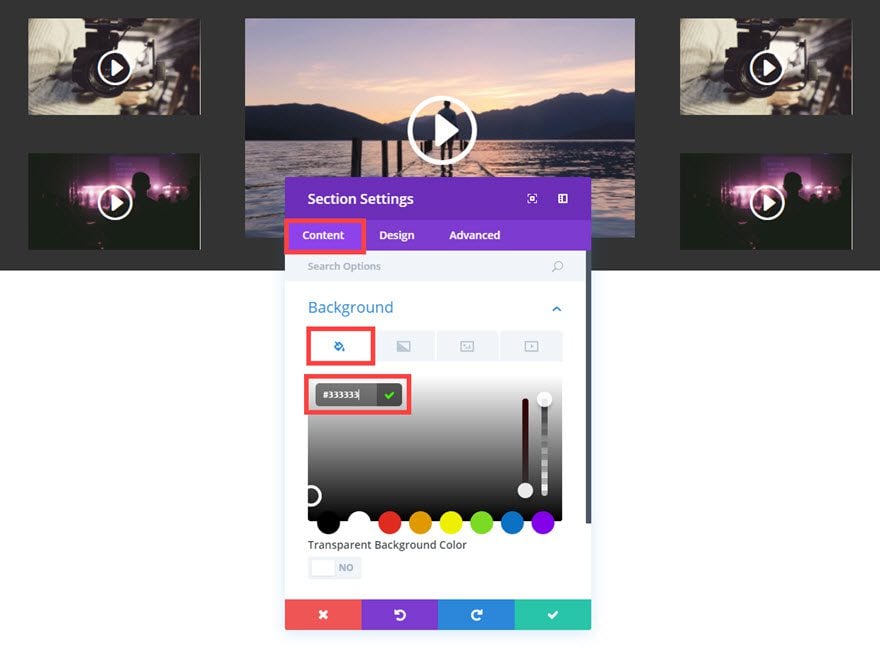
Design Options:
Custom Padding: 0px Top, 0px Bottom
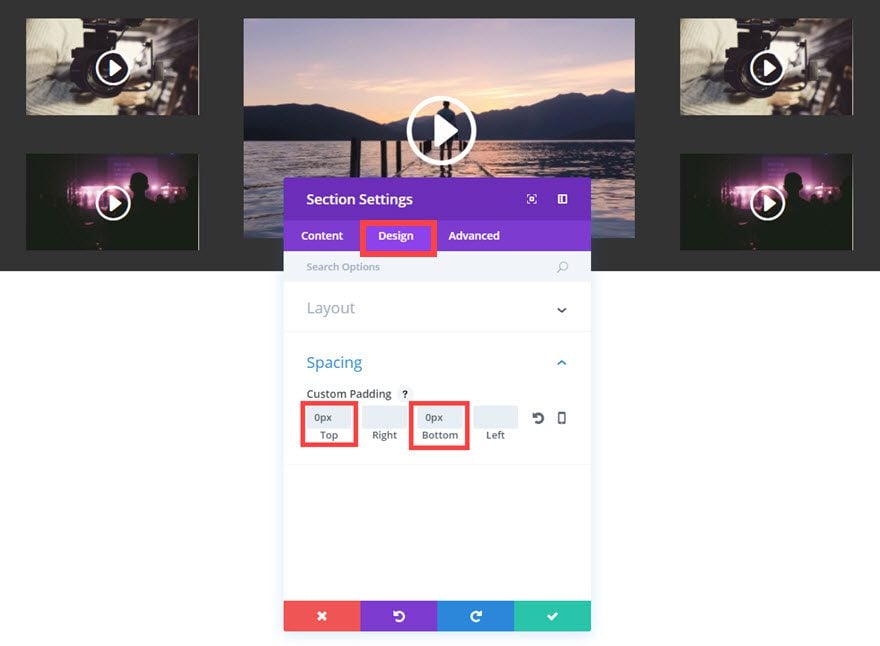
Save Settings
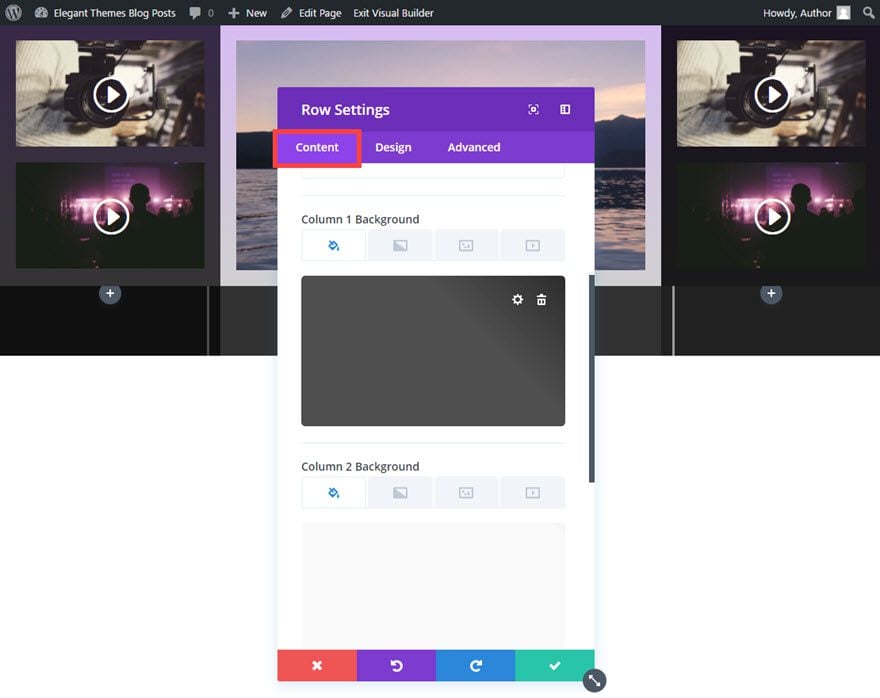
Now edit your Row Settings with the following updates:
Content Options:
Background Gradient Colors: rgba(255,255,255,0.58) and #b684e8
Gradient Direction: 360deg
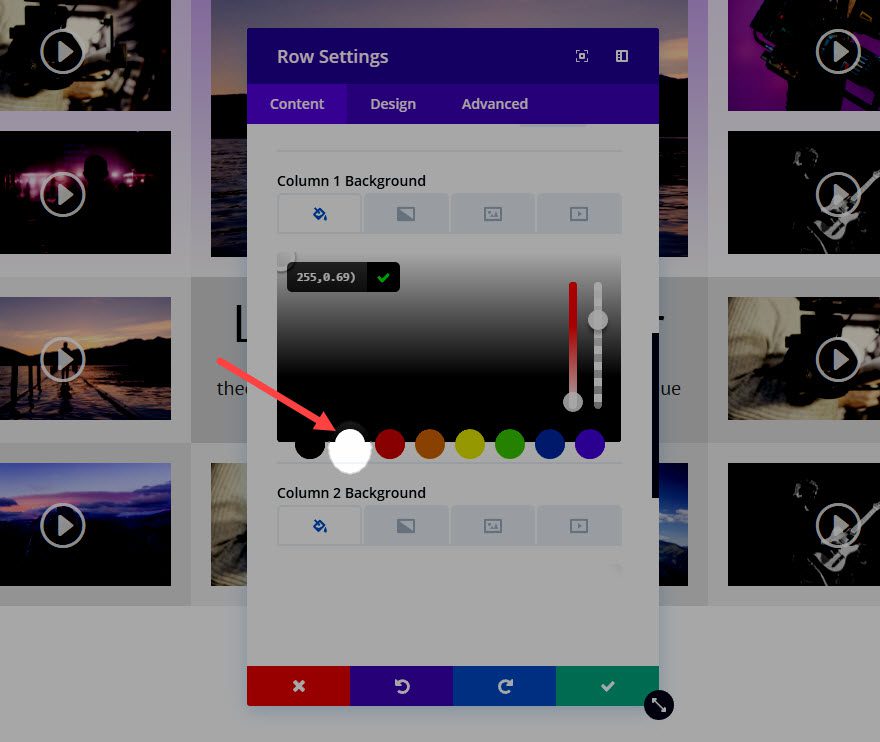
Column 1 Background Color: rgba(0,0,0,0.69)
Column 2 Background Color: rgba(255,255,255,0.45)
Column 1 Background Color: rgba(0,0,0,0.85)
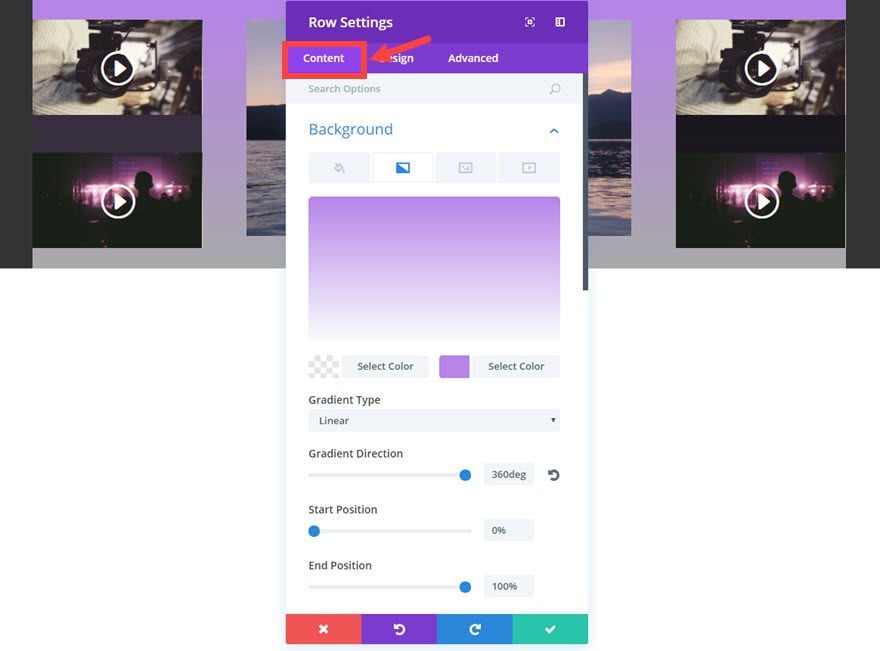
Design Options
Make This Row Fullwidth: YES
Use Custom Gutter Width: YES
Gutter Width: 1
Equalize Column Heights: YES
Custom Padding: 0px Top, 0px Bottom
Custom Marging: 0px Top, 0px Bottom
Column 1 Custom Padding: 20px Top, 20px Right, 20px Bottom, 20px Left
Column 2 Custom Padding: 20px Top, 20px Right, 20px Bottom, 20px Left
Column 3 Custom Padding: 20px Top, 20px Right, 20px Bottom, 20px Left
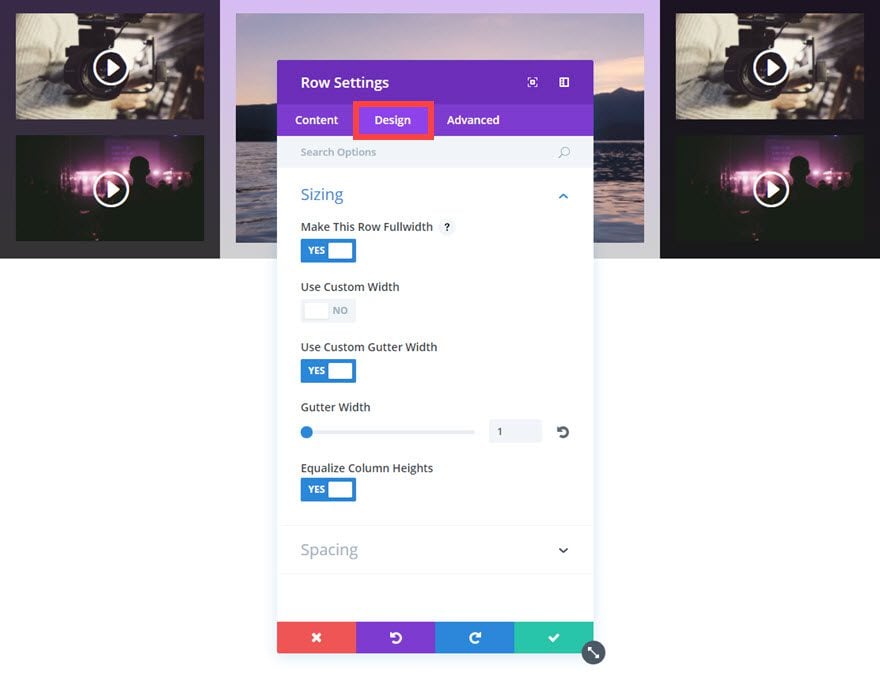
Save Settings
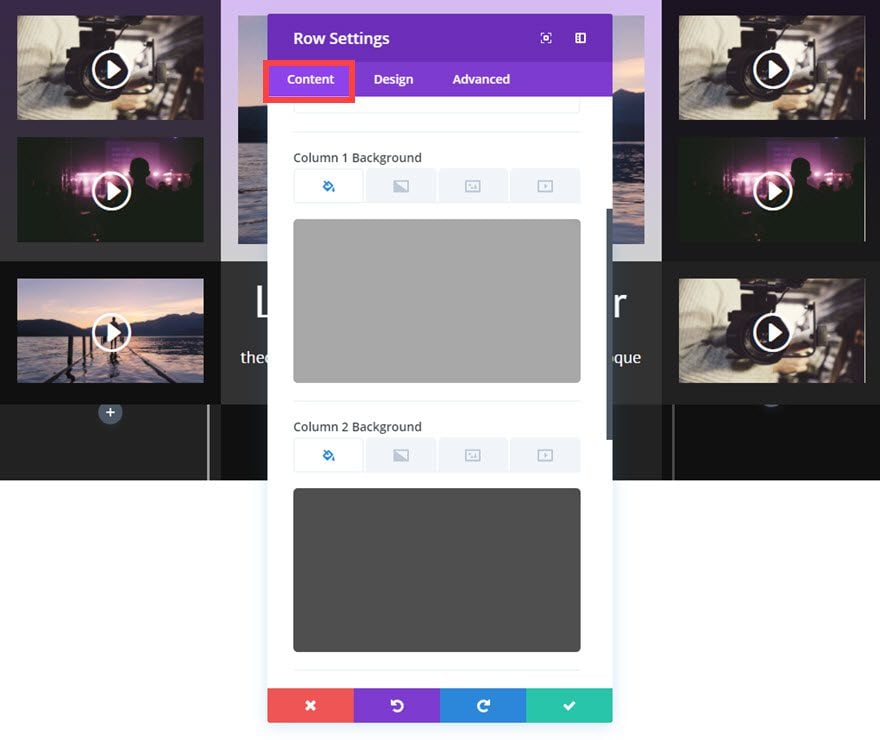
Now it’s time to add the second row. Go ahead and add another ¼ ½ ¼ (3-column) structure row under the first one.
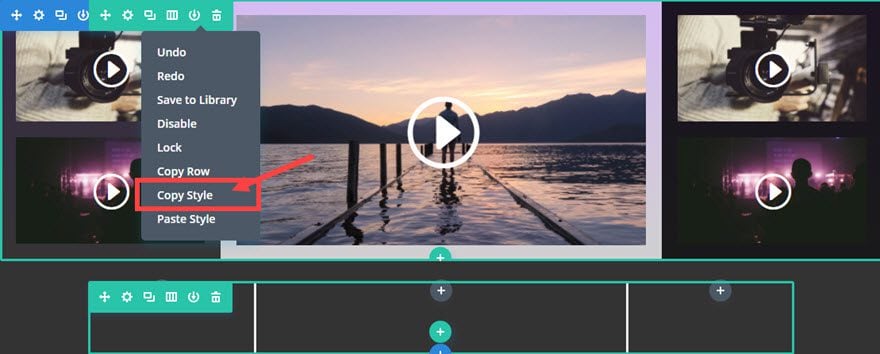
To give yourself a head start on setting up the options for the Row Settings, use the right click functionality to copy the style of the first row and paste it to the second row.

Now, for your row settings, all you need to update are the Content options as follows:
Background Gradient: none (erase the one that was copied over)
Column 1 Background Color: rgba(0,0,0,0.69)
Column 2 Background Color: rgba(0,0,0,0.0) – this is the same as none or transparent
Column 3 Background Color: rgba(0,0,0,0.35)
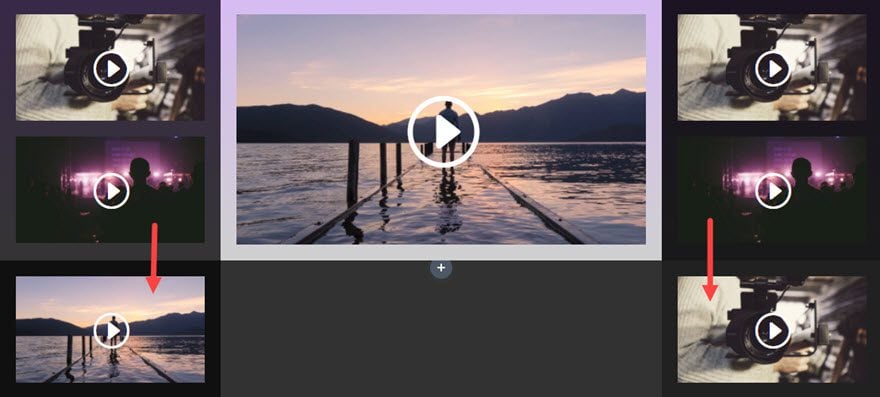
Now that your row settings are complete, go ahead and duplicate and drag (or copy and paste) a video module into the first (far left) and also in the third row (far right). Then update the video content.
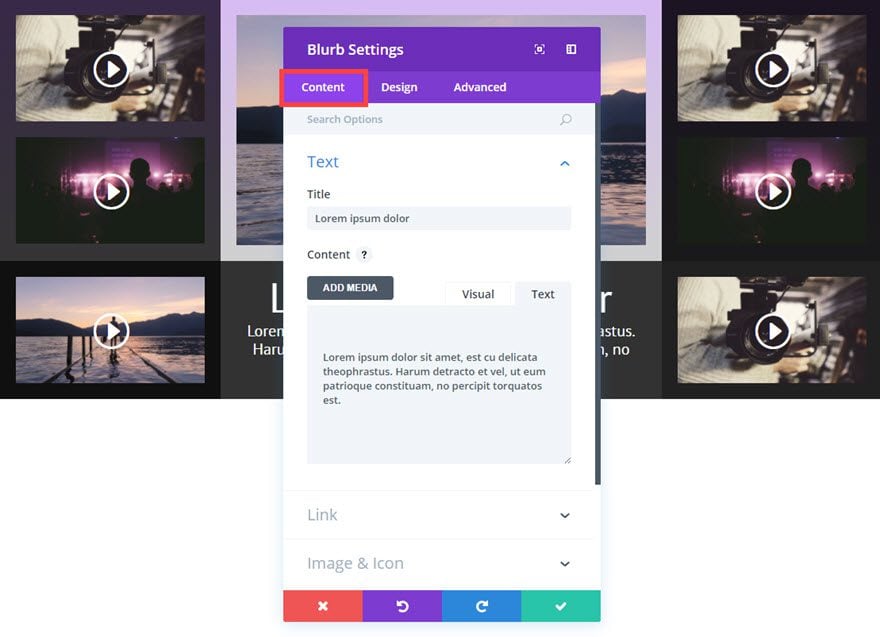
For the middle column, add a blurb module and update the settings as follows:
Content Options
Title: [enter title of page or video]
Content: [enter content or description of the video or page]
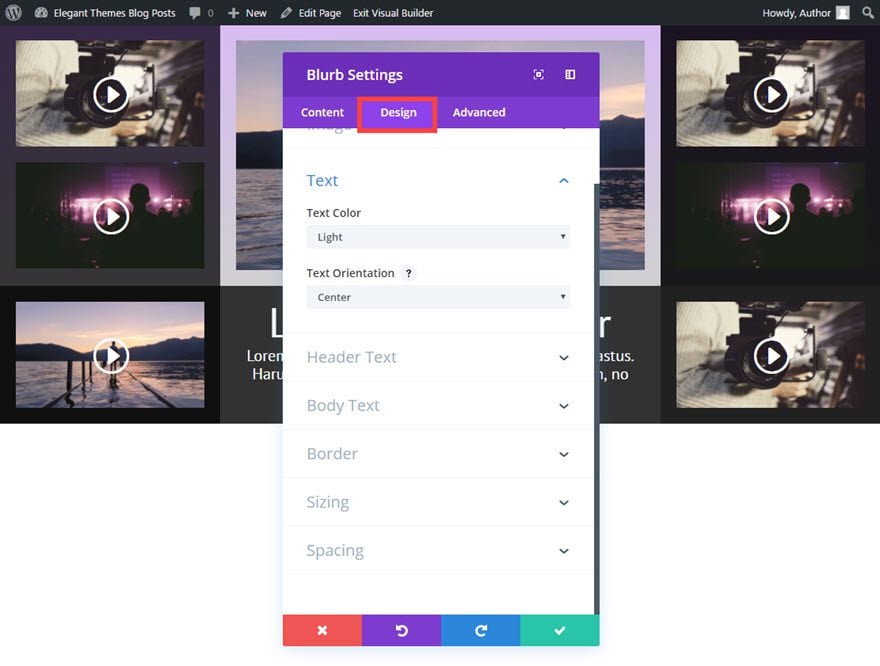
Design Options
Text Color: Light
Text Orientation: Center
Header Font: PT Sans
Header Font Size: 52px
Header Letter Spacing: 1px
Body Font: PT Sans
Body Font Size: 20px
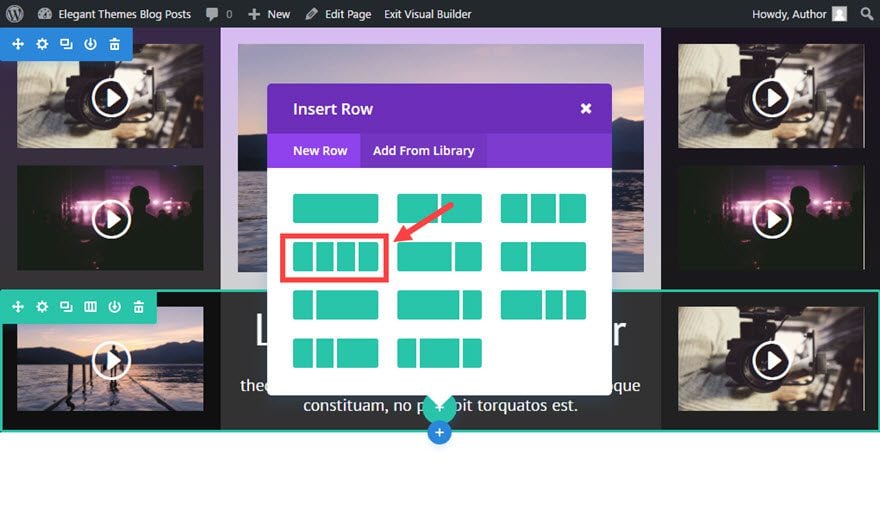
Now it’s finally time for the last row. Of course, you could add more if you needed to.
Go ahead and add a ¼ ¼ ¼ ¼ (4-column) structure row under the previous row.
Like you did before, copy the design of the previous row and paste to the current row to give you a little head start on design.
Then update the row settings as follows:
Content Options
Column 1 Background Color: rgba(0,0,0,0.34)
Column 2 Background Color: rgba(0,0,0,0.69)
Column 3 Background Color: rgba(0,0,0,0.34)
Column 4 Background Color: rgba(0,0,0,0.69)
Design Options
Column 4 Custom Padding: 20px 20px 20px 20px
Save Settings
Next duplicate or copy a video modules into each of the four columns. After you have updated all of you video content, you are done!
Check out your new grid layout…
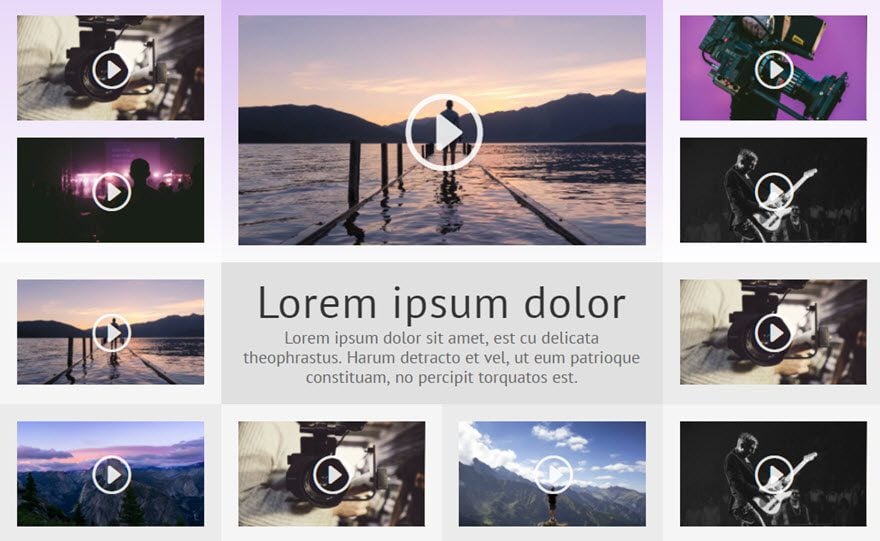
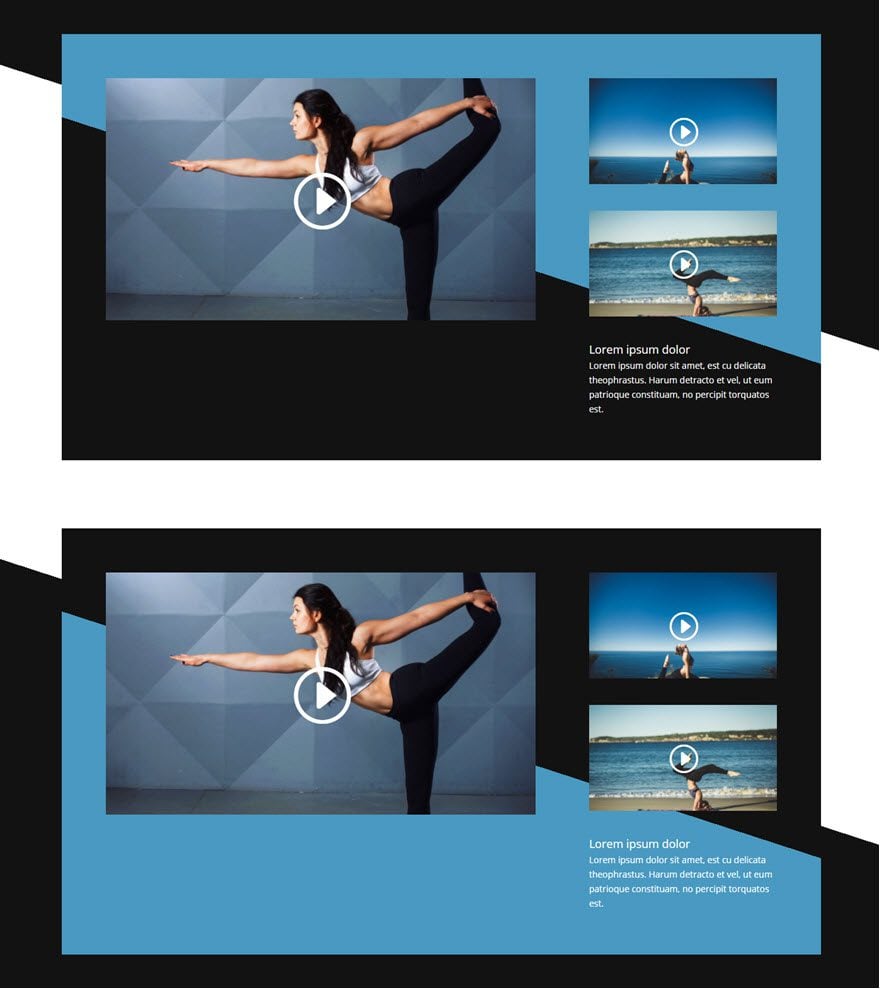
Creating the Light Version
To change the previous dark video grid design into a light version, all you need to do is update a few of the design options.
Update Section Settings as follows:
Content Options:
Background Color: rgba(0,0,0,0.12)
Update All Row Settings as follows:
Basically go back to each of the three row settings and wherever you see a background color being used, simply click the white color pallette option. This will turn all of the dark semi-transparent dark backgrounds into semi-transparent light backgrounds.
Update the Blurb Module Settings as follows:
Design Options
Text Color: Dark
That will do it! Check out the light version.
Easily Change Design with Section Background Options
Because the grid is built with semi-transparent backgrounds, you can easily change the section background color, gradient, or image to give your site a fresh look and feel that matches your site perfectly.
Look at the difference it can make with adding a background image to section settings.
Another way to match your site is to match the colors of the background gradient we added in the first row.
Coming Up…
The next post in this series is going to be a completely different feel. This one is all about keeping things clean and simple. And a few background gradient tricks.
Until then, I look forward to hearing from you in the comments.
Enjoy!
The post How to Create Stunning Grid Layouts with Divi’s Video Module (Part 3) appeared first on Elegant Themes Blog.