
In today’s tutorial, we’re going to show you how to make the Social Media Follow Module fit certain needs. Social Media Follow is a module that is rarely missing from any page on any website. It’s one of the main ways to connect the social media channels with the website. To help you achieve the desired connection between your website and social media channels, we have Monarch. A plugin that easily helps you show social media follow buttons on your website. But if you’d rather prefer achieving some of the Monarch results through the Divi builder, then this post may come in handy.
We’re going to show you how to create a fixed Social Media Follow Module for your website which is one of the things the Monarch plugin provides. Besides locating it on the left or right side (standard settings within Monarch), we’ll also show you how to make it stick to the top and bottom of your page. In addition to making it stick on the top of the page, we’ll also include a part where we show you how to make the Social Media Follow Module appear below the primary menu on your website (whether your primary menu is fixed or not).
Let’s have a look at the final results below.
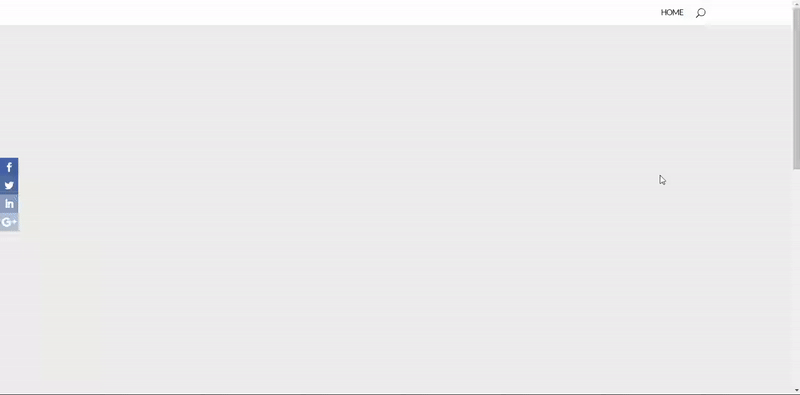
Left Side Example
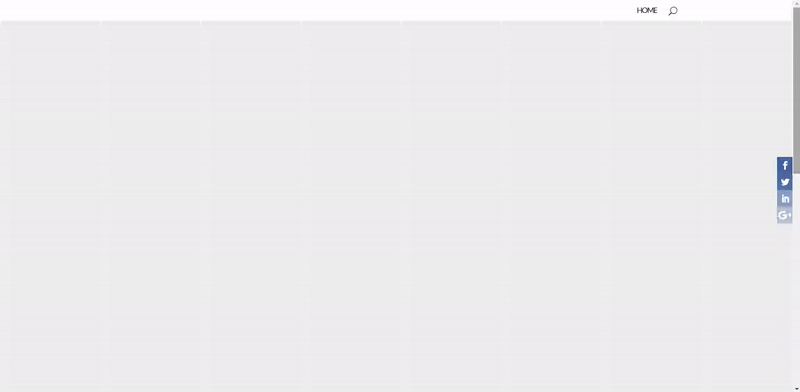
Right Side Example
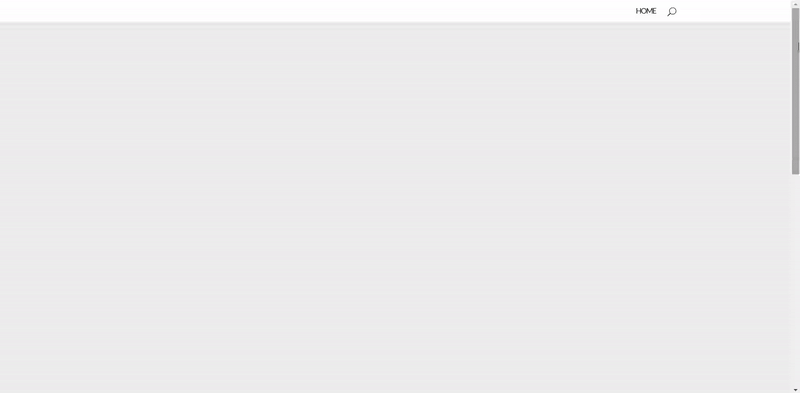
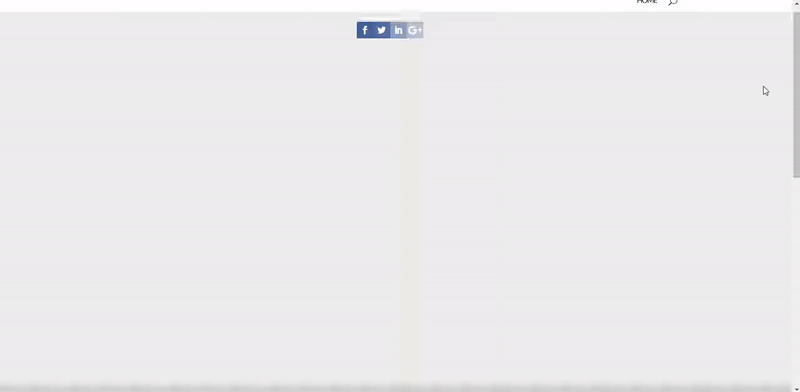
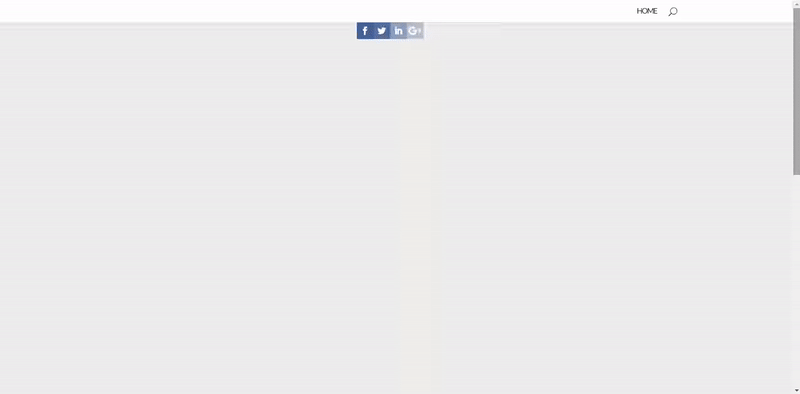
Top Example (Standard)
Without Fixed Navigation
With Fixed Navigation
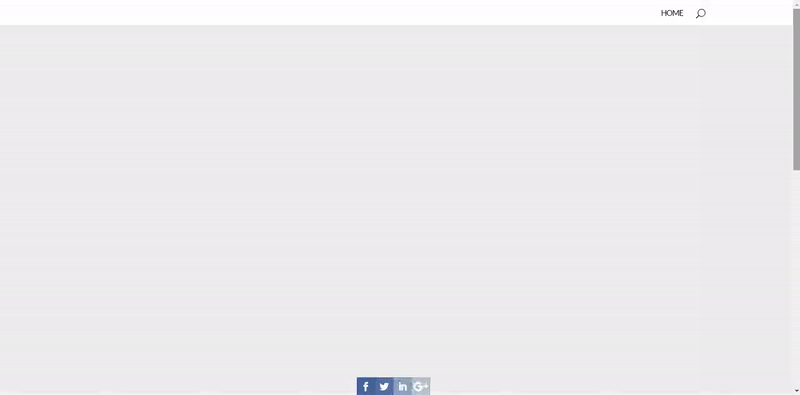
Bottom Example
General Steps
Subscribe To Our Youtube Channel
Since the basic steps of adding a Social Media Follow Module to a page are the same in every example, we’re only going to show this once. If you want to achieve the same result for the right side, the top or bottom placement, you’ll have to do add the social media follow module first as explained in the following part of this post.
Add Social Media Follow Module to Page
To make this easy, we’re going to add the Social Media Follow Module to the first section of our page. By doing that, you’ll immediately know where to find it when you want to make any changes in the future. We don’t really need a separate row for this module since we’re going to assign a fixed position to it.
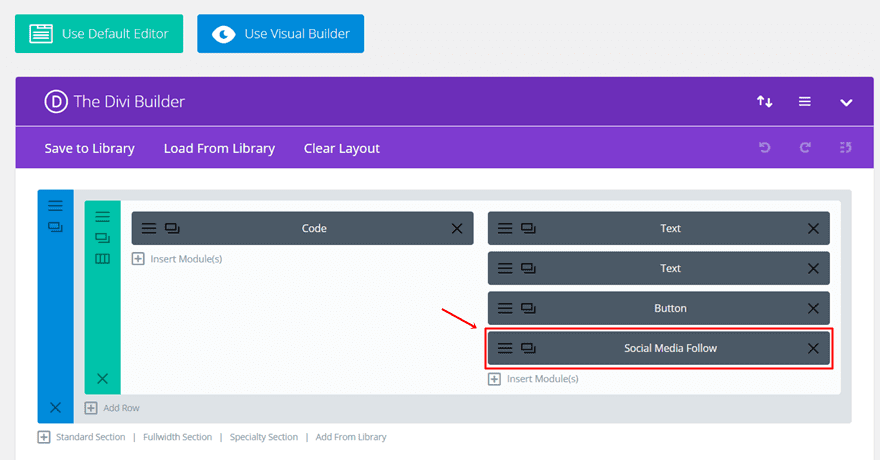
Add Social Media Channels to Social Media Follow Module+
The next thing we’ll need to do is add the needed social media channels to the Social Media Follow Module. Open the module settings and click on ‘Add New Social Network’. Once you’ve done that, you can choose the social media network you’d like to add and assign an URL to it.
For each one of the social networks, there’s automatically an icon color assigned that matches the social network. If you, however, prefer using colors in the style of your own website, you can choose a different color in the Design tab. For the example we’ll show you how to make, we’ll include four social networks; Facebook, Twitter, Google+ and LinkedIn. Instead of using the standard colors, we’re going to give each one of the social networks the same color but with a different opacity. We’ll also order the social media channels according to importance.
Facebook Settings
Click on ‘Add New Social Network’. In the social network options, choose for Facebook. While still in the Content tab, add the URL linked to the Facebook social media channel.
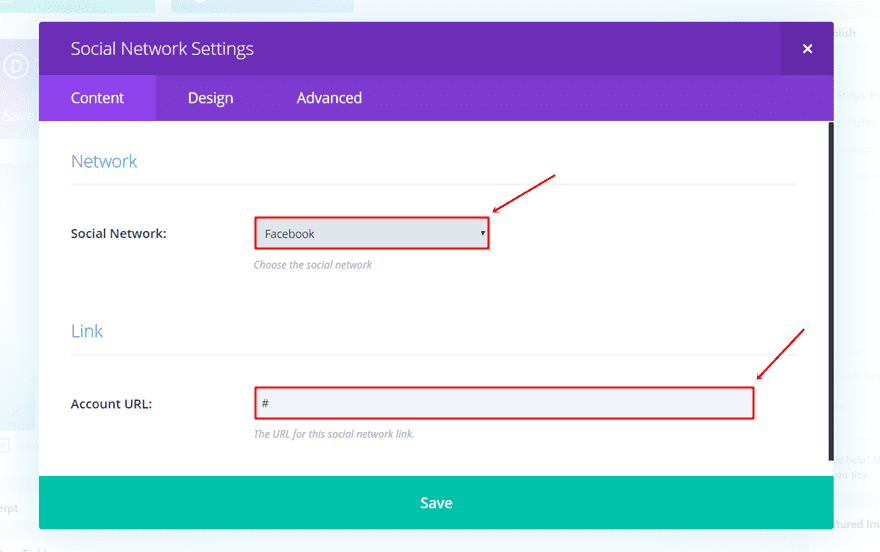
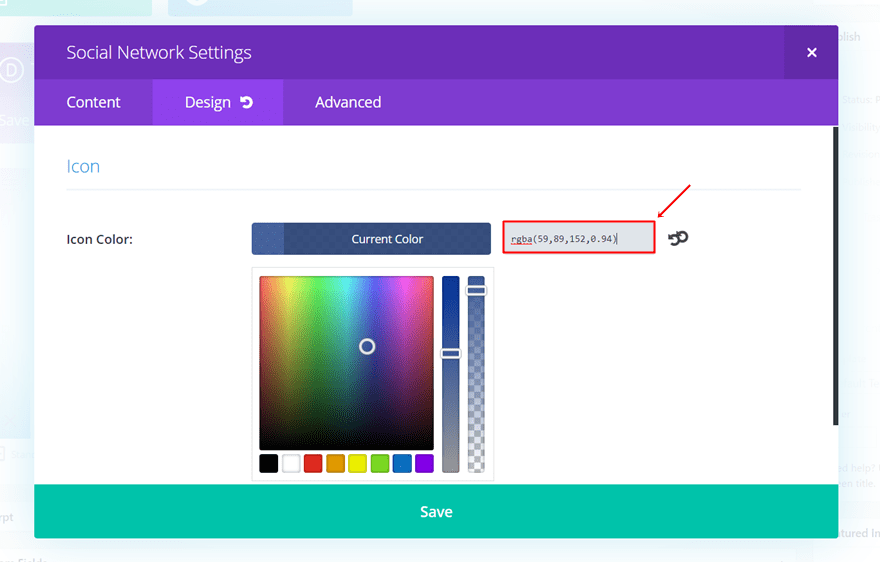
Then, move on to the Design tab. In this case, Facebook is the most important social network. That’s why we’re going to give it the shade of color that draws the most attention. The color we’ve used is ‘rgba(59,89,152,0.94)’.
Twitter Settings
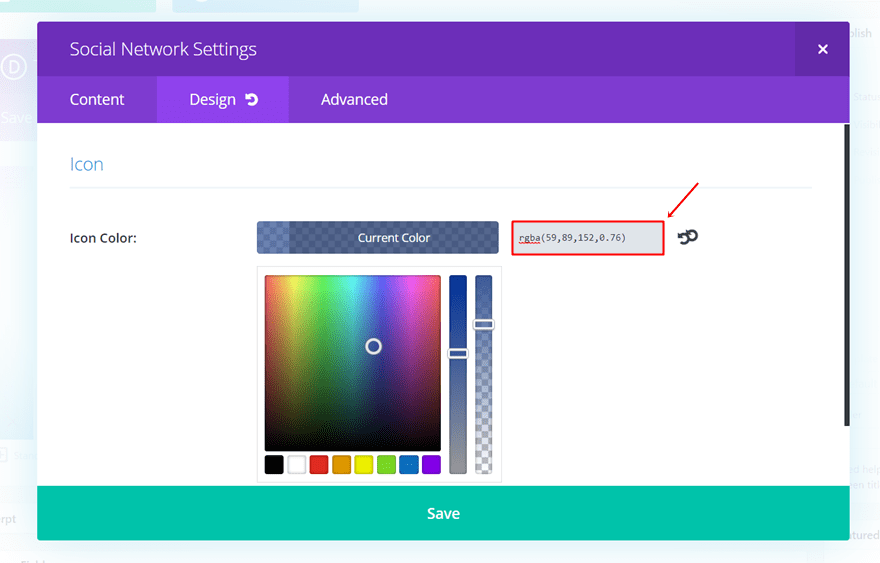
Next, add a new Social Network. Instead of choosing for Facebook, choose for Twitter this time. Add the URL in that same Content tab and move on to the Design tab. Within the Design tab, choose ‘rgba(59,89,152,0.76)’ as the background color. In this case, Twitter is an important social media channel but not as important as Facebook. That’s why it comes second in the row and with a slightly more transparent and less notable color.
LinkedIn Settings
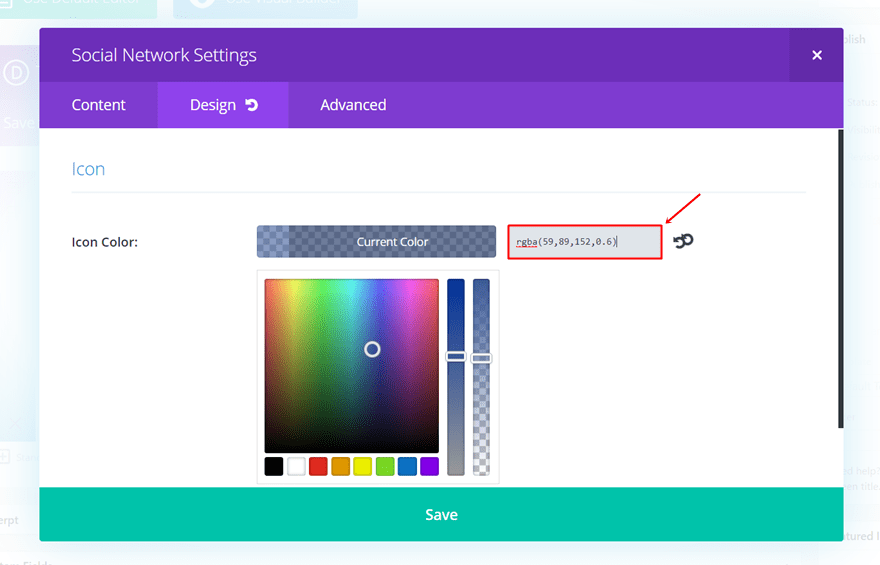
Repeat the same process for the LinkedIn social network in the Content tab and go to the Design tab. Within the Design tab, assign the ‘rgba(59,89,152,0.6)’ color to the icon.
Google+ Settings
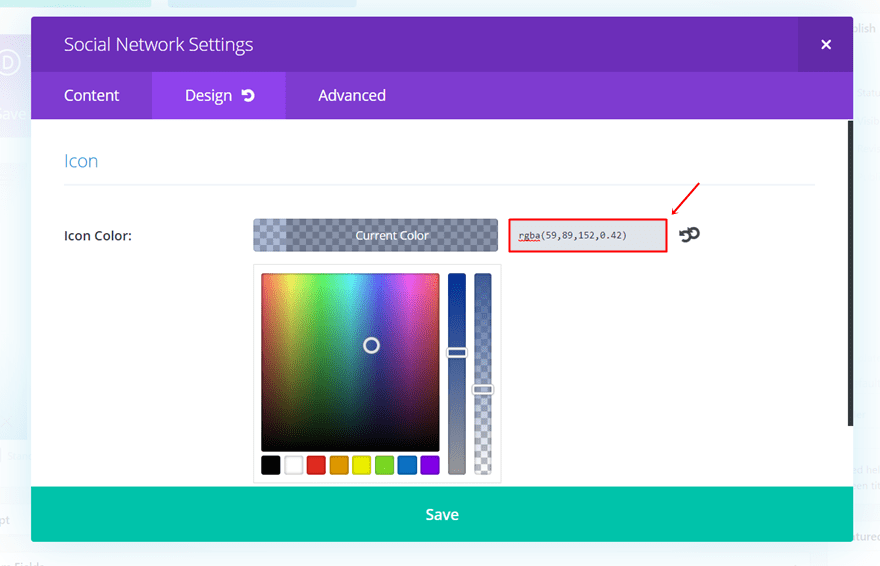
And last but not least; add a Google+ social icon. Fill in the URL and go to the Design tab. This is the ‘least’ important social network we want to add to the list in this example and it’ll have the ‘rgba(59,89,152,0.42)’ icon color.
Create The Left Sidebar Social Media Follow
The first fixed Social Media Follow Module we’ll show you how to make is located at the left side of your page. This is the most frequently used one and may be the one that immediately makes you think about Monarch the most. Follow the general steps first and continue by adding the CSS code which you will find in the next part of this post. We’ll show you two ways how to add the CSS code; to the Theme Options and to one page in particular. After this example, you can choose between the two options for the other examples as well.
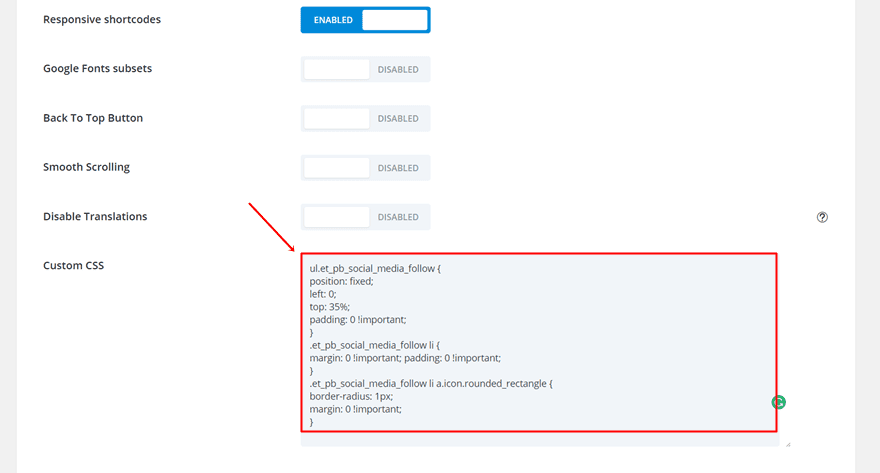
Add CSS Code Lines to Theme Options
One of the methods to add the additional CSS code is through the Theme Options. This method is most frequently used when you want to create the effect throughout the whole website. But remember; if you’re using this effect, you’ll have to include the Social Media Follow Module on each page of your website (or on the pages you wish for it to appear).
To add the CSS code to your Theme Options, go to your WordPress Dashboard > Divi > Theme Options > General > Scroll down the General tab and add the following lines of CSS code to the Custom CSS field:
ul.et_pb_social_media_follow {
position: fixed;
left: 0;
top: 35%;
padding: 0 !important;
z-index: 999 !important;
}
.et_pb_social_media_follow li {
margin: 0 !important; padding: 0 !important;
}
.et_pb_social_media_follow li a.icon.rounded_rectangle {
border-radius: 1px;
margin: 0 !important;
} 
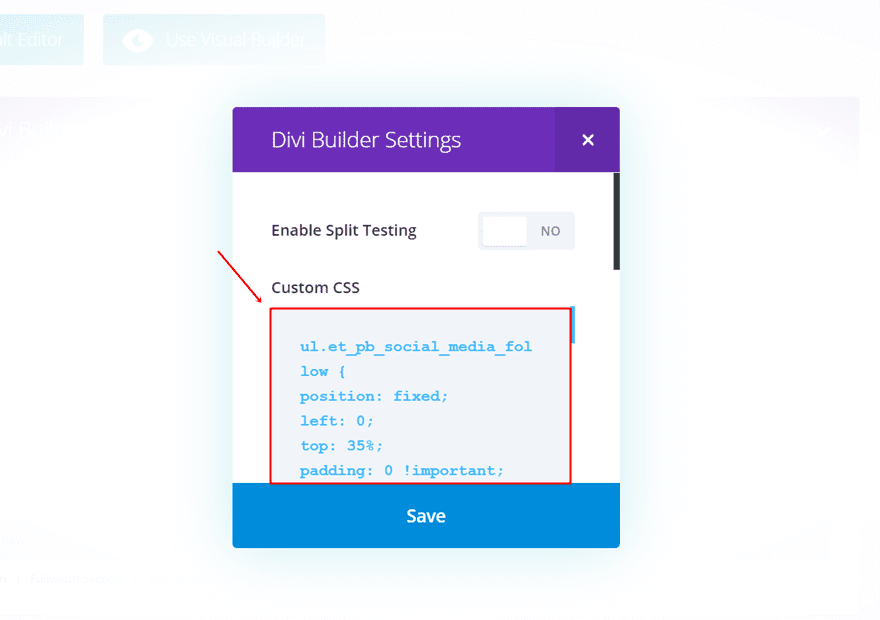
Add CSS Code Lines to One Page in Particular
Another method that helps you apply CSS code is by adding it to one page in particular. This method is most commonly used when you decide to add the Social Media Follow Module to only one page in particular. By using this method, your website won’t load the CSS code lines on every other page on your website that doesn’t contain the Social Media Follow Module. Or, if you want the Social Media Follow Module on other pages to behave as usual, this method will help you as well.
Click on the following button on your Divi builder:
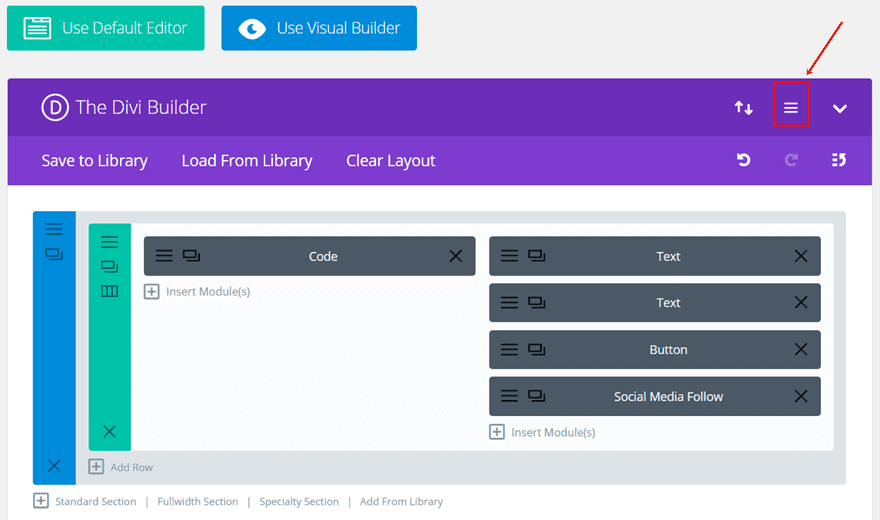
Next, copy and paste the CSS code in the Custom CSS field.
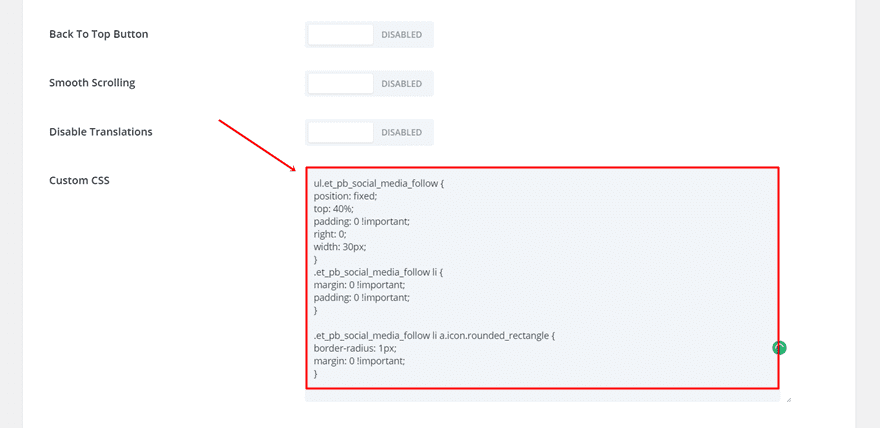
Create Right Sidebar Social Media Follow
The next code we’ll share will help you put the Social Media Follow module on the right side of your website.
The Needed CSS Code Lines
Add the following CSS code lines to the Theme Options or to one page in particular as explained in the example above.
ul.et_pb_social_media_follow {
position: fixed;
top: 40%;
padding: 0 !important;
right: 0;
width: 30px;
z-index: 999 !important;
}
.et_pb_social_media_follow li {
margin: 0 !important;
padding: 0 !important;
}
.et_pb_social_media_follow li a.icon.rounded_rectangle {
border-radius: 1px;
margin: 0 !important;
} 
Create Top Social Media Follow
Moving on, you can also locate your Social Media Follow Module at the top of your website. This is actually a very interesting way of letting the social media icons follow your visitors through the website. It’s not that often used, so it catches people’s eye.
The Needed CSS Code Lines
Copy and paste the following lines of CSS code into the Theme Options or add them to one page in particular.
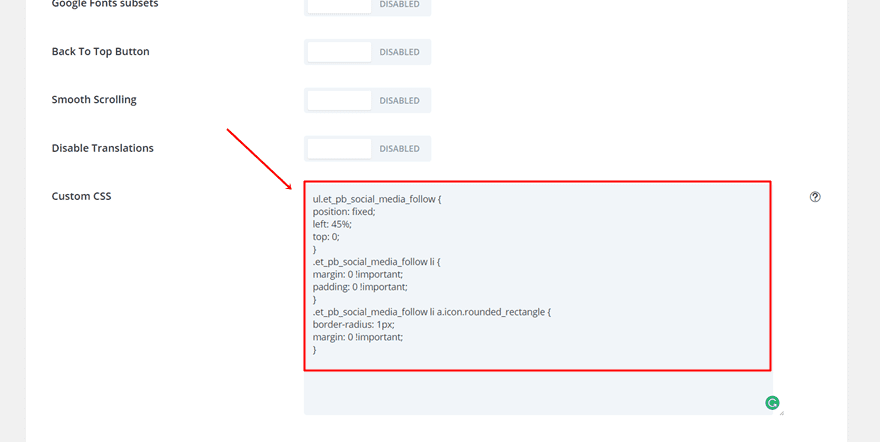
ul.et_pb_social_media_follow {
position: fixed;
left: 45%;
top: 0;
z-index: 999 !important;
}
.et_pb_social_media_follow li {
margin: 0 !important;
padding: 0 !important;
}
.et_pb_social_media_follow li a.icon.rounded_rectangle {
border-radius: 1px;
margin: 0 !important;
} 
Create Top Social Media Follow Below The Primary Menu
The previously shown method to add the Social Media Follow Module to your website doesn’t take the Primary Menu into consideration. If you, however, want the Social Media Follow to appear below the primary menu and get back to the top when scrolling, this part of the post might help you out.
Add the CSS Code
In both cases where the fixed navigation is activated and where it is not, you should add the following lines of CSS code into the Theme Options or add them to one page in particular:
ul.et_pb_social_media_follow {
position: fixed;
left: 45%;
top: 0;
z-index: 999 !important;
}
.et_pb_social_media_follow li {
margin: 0 !important;
padding: 0 !important;
}
.et_pb_social_media_follow li a.icon.rounded_rectangle {
border-radius: 1px;
margin: 0 !important;
}
After that, you’ll need to add some jQuery code as well. The jQuery code depends on whether you have activated the fixed navigation or not.
With Fixed Navigation
If you have fixed navigation activated, you’ll need to add the following lines of jQuery code to the head of your website or to a Code Module within the page where you want it to work:
<script text= "text/javascript">
jQuery(function($) {
$("ul.et_pb_social_media_follow").css("margin-top", $("#main-header").outerHeight());
$(window).bind('scroll', function() {
var navi = $("#main-header");
var naviHeight= navi.outerHeight();
if ($(window).scrollTop() <= naviHeight){
$("ul.et_pb_social_media_follow").css("margin-top", naviHeight);
}
});
});
</script> 
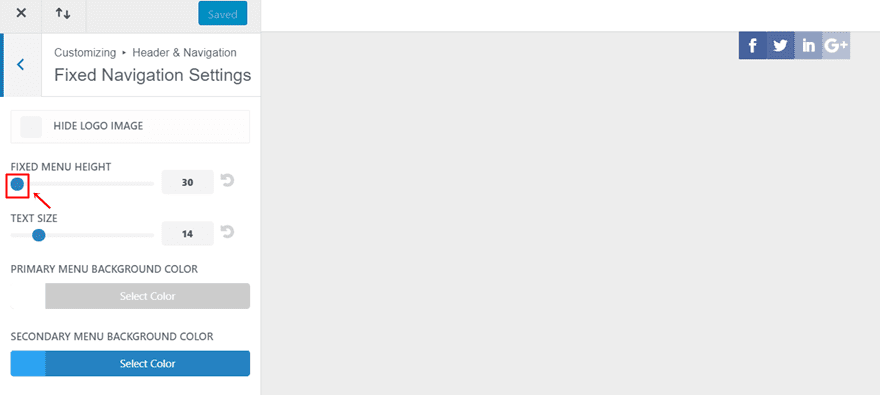
Don’t forget to use the CSS code lines as well. The jQuery code is additional. Also, make sure that when you scroll, the height of your primary stays the same. You can do that by going to your WordPress Dashboard > Appearance > Customize > Header & Navigation > Fixed Navigation Settings > Select the minimum for the Fixed Menu Height.
Without Fixed Navigation
If you want to achieve the same result, but you don’t have a fixed navigation, the code will be slightly different:
<script text= "text/javascript">
jQuery(function($) {
$("ul.et_pb_social_media_follow").css("margin-top", $("#main-header").outerHeight());
$(window).bind('scroll', function() {
var navi = $("#main-header");
var naviHeight= navi.outerHeight();
if ($(window).scrollTop() <= naviHeight){
$("ul.et_pb_social_media_follow").css("margin-top", naviHeight);
}
else {
$("ul.et_pb_social_media_follow").css("margin-top", 0);
}
});
});
</script> 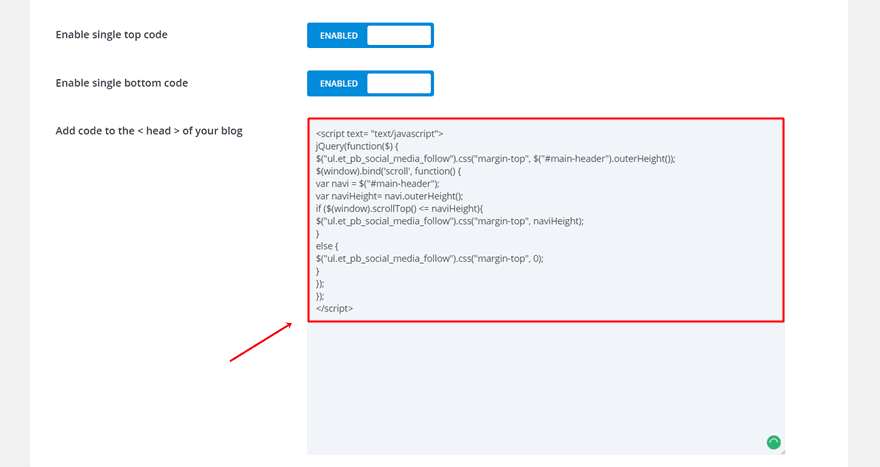
Create Bottom Social Media Follow
The last one in the row is the bottom Social Media Follow Module.
The Needed CSS Code Lines
Add the following lines of CSS code to the Custom CSS field of your Theme Options or to one page in particular:
ul.et_pb_social_media_follow {
position: fixed;
left: 45%;
bottom: 0;
padding: 0 !important;
z-index: 999 !important;
}
.et_pb_social_media_follow li {
margin: 0 !important;
padding: 0 !important;
}
.et_pb_social_media_follow li a.icon.rounded_rectangle {
border-radius: 1px;
margin: 0 !important;
} 
Final Thoughts
In this tutorial, we’ve shown you how to create the Social Media Follow Module in the same style as the Monarch plugin. By using this method, you won’t need to download the Monarch plugin if you’re solely using it to share your social media channels. For social media sharing, you’d still have to use the Monarch plugin. If you have any questions or suggestions; feel free to leave a comment in the comment section below so we can get in touch!
Be sure to subscribe to our email newsletter and YouTube channel so that you never miss a big announcement, useful tip, or Divi freebie!
Featured Image by Snopek Nadia / shutterstock.com
The post How to Make The Social Media Follow Module Fixed Like Monarch appeared first on Elegant Themes Blog.