
When uninstalling software, the process sometimes leaves some remnant files and data behind. One of the reasons is that if you want to install it again down the line, you won’t lose your settings. It sounds practical and logical, but in reality, it often leaves you with both cluttered systems and WordPress installations.
WordPress does a great job of removing most leftover data when you uninstall a plugin, but it’s not perfect. This means you may need to delete files and data manually, which we’ll teach you to do in this article. Before that, let’s talk a bit about why this happens in WordPress and why it can be such a pain!
What Happens When You Uninstall WordPress Plugins
Uninstalling plugins in WordPress is simple – jump over to the Plugins tab on your dashboard, deactivate one or more, then hit the Uninstall button. If you prefer a more manual approach, you can access your website via File Transfer Protocol (FTP) and remove the plugin folders directly from your server. However, this approach doesn’t take into account any relevant database entries.
Here’s part of the problem. It’s often not enough just to delete a plugin’s files, you also need to clean your database of any related entries to them. When it comes to an Operating System (OS) such as Windows, this means removing entries from your registry. Within WordPress, it means dropping tables related to a plugin from your database.
However, leaving files or entries in your database doesn’t ultimately affect the way WordPress works in most cases. However, files add up, which means you’re wasting storage space. The larger your database gets, the longer your loading times may become. Most plugins are quite good when it comes to cleaning up after themselves. However, others have a reputation for leaving stuff behind.
In most cases, if you’re using popular plugins, you shouldn’t have to worry too much about cleaning up after them. Some will even ask you if you want to remove all related files, or leave settings-specific files behind to offer a way of saving your settings upon uninstallation. However, things aren’t always perfect, so knowing how to tidy things up after uninstalling ‘messy’ plugins can come in handy.
How to Uninstall WordPress Plugins Cleanly (In 3 Steps)
While we won’t walk you through how to uninstall WordPress plugins here, we’ll instead pick up after the process has been completed. Before you jump to step one, we recommend you backup your website. Since we’re going to be deleting files and database entries, there’s a small chance of something going wrong, playing it safe is a sound plan.
Step #1: Remove Any Leftover Files Using FTP
WordPress keeps files related to each plugin within easy-to-locate and unique folders. To access them, we recommend using an FTP client such as FileZilla, which is much easier than other methods, such as using your cPanel’s file browser.
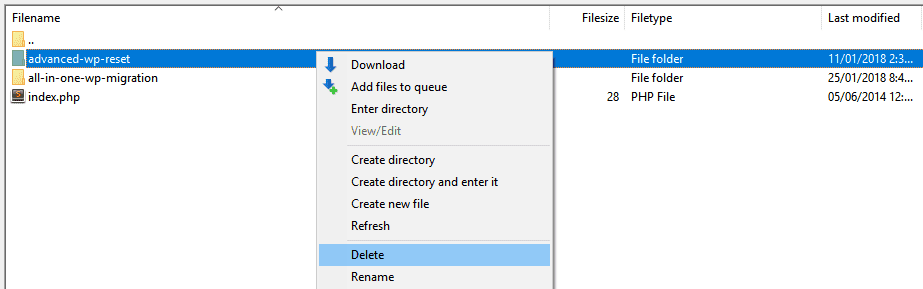
Once you login via FTP, navigate to the public_html > wp-content > plugins folder. Keep in mind – your WordPress root folder may be named something different than public_html depending on your host (such as www or your website’s name, for example). In any case, once you enter the plugins directory, you’ll find folders for each plugin set up on your website:

Ideally, you should recognize the folder names in this directory. If you don’t, open your WordPress dashboard, jump to the Plugins tab, and check out which ones are installed on your website. There should be an equal number of plugins and folders within the plugins directory, regardless of which ones are active or not. If you have a greater number of folders within plugins, one of your previously uninstalled plugins has left some files behind. You can safely delete the folder by right-clicking and choosing Delete:
Bear in mind that deleting the files can take some time depending on how many there are. Don’t worry – this won’t affect your site’s functionality in any way.
Step #2: Drop Any Orphaned Tables From Your Database
A lot of WordPress plugins add information to your database through their own tables. When you uninstall a plugin that leaves some (or all) of those tables behind, they’re called ‘orphaned’.
There’s a debate on whether orphaned tables really have a significant impact on your website’s performance. Assuming they do, it makes sense to clean them up. Regardless, keeping your website as tidy as possible is a good practice to maintain, so you may want to clean those tables anyway.
There are two ways to erase orphaned WordPress tables. The first one involves using a plugin such as WP-Optimize, which is designed specifically to clean up unused information from your database:
Once you install and activate the plugin, a new WP-Optimize tab will show up on your dashboard. If you click on it, you’ll be able to choose which parts of your database to clean up. For example, you can delete existing post revisions, automatic drafts, and trashed posts. However, for this tutorial, the only setting we care about is Optimize database tables, which will take care of orphaned data:
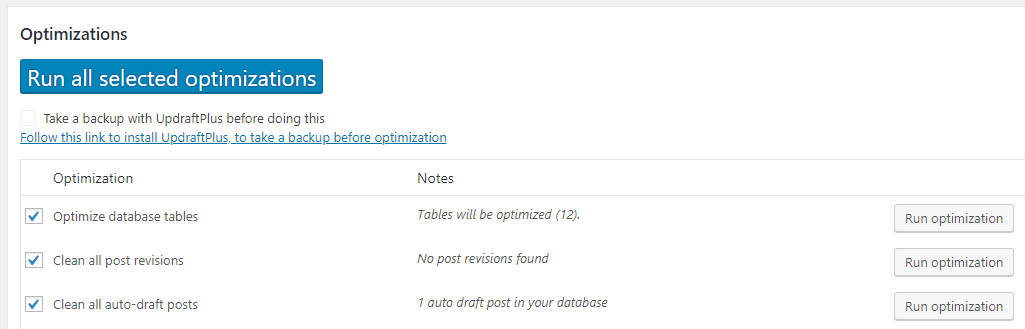
At this point, you can either click on the Run optimization button, or run all selected optimizations at once. However, we only recommend the former approach if you understand what each setting does, which is simple because they’re pretty straightforward.
In any case, when the plugin is done, you’ll see a simple Optimization complete message, and that’s it! Using a plugin is definitely the easiest method in this case. However, if you’re feeling brave, you can also try deleting orphaned tables from your database manually.
To do this, you’ll need to use a tool such as phpMyAdmin, which you should be able to access from your hosting control panel in most cases. From within phpMyAdmin, you can select the database you want to clean up, before using the Search function at the top of the screen:
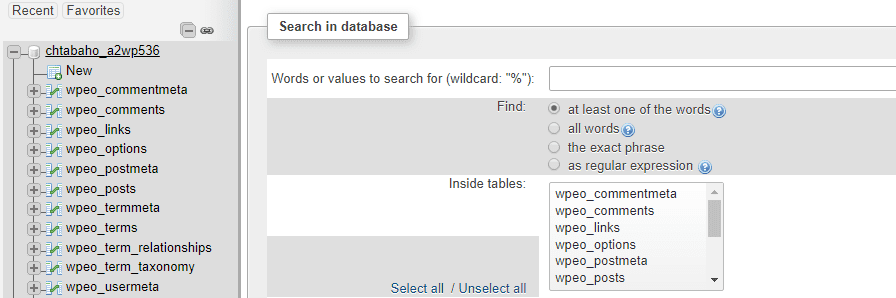
Here, you’ll be able to search your database’s tables for any values you want. Since we’re cleaning up after a plugin, you’ll want to try looking for entries that include the plugin’s name.
Keep in mind – we heavily discourage you from using this method unless you’re comfortable editing databases. There’s a chance you may delete tables unrelated to the plugin you’re trying to clean up, which can obviously affect your website’s functionality. Given how tricky databases can be to navigate, using a plugin may be a better option regardless of your expertise.
Step #3: Remove Any Shortcodes Associated With the Plugin
Of course, some plugins let you to implement functionality using shortcodes. However, uninstalling those plugins usually leaves the related shortcodes behind. This means you’ll need to remove each instance manually, which can be a drain on your time.
The first solution is to add code to your functions.php file telling WordPress to disable certain shortcodes from displaying. However, this doesn’t remove the shortcode itself from your pages. What’s more, if you decide to install the plugin again, you’ll need to rededit your functions.php file. Regardless, it’s a lot of hassle when there’s an easier solution.
If you’re dealing with a plugin that’s left orphaned shortcodes behind, using a tool such as Better Search and Replace can help:

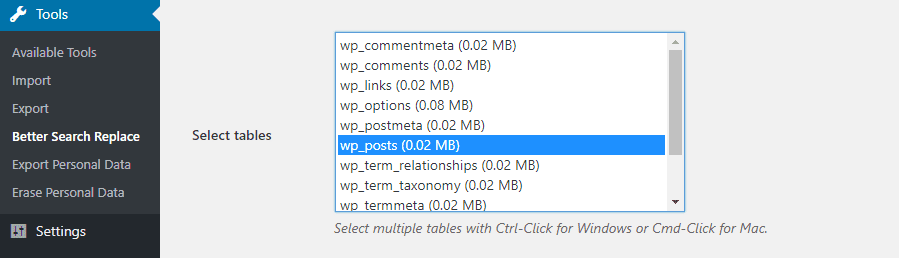
This plugin enables you to search for specific values within your website and replace them with others. Many use it to replace internal links, although it’s also great for removing shortcodes. Once you’ve installed and activated the plugin, navigate to the Tools > Better Search Replace tab. Inside, you’ll find two fields where you can input the value the plugin should look for and what to replace it with:

Below, you can choose within which tables the plugin should replace those values. In this case, you should choose wp_posts, so the plugin will look for the shortcode you input within your pages and posts:
Here’s an example of how your options should look when you use the plugin:

Note we’re leaving the Replace with field empty, so the plugin will just delete the instances of shortcode it finds. When you’re set, hit the Run Search/Replace button and let the plugin work its magic. Now check any pages containing orphaned shortcodes, and the content should be clean!
Conclusion
WordPress enables you to uninstall plugins in a matter of minutes, and many are removed cleanly. However, some plugins leave behind rogue files, and database entries that can end up impacting your site’s performance. If you use a lot of plugins, we recommend you look for leftover files once every few months.
As for how to deal with these unwanted files and information, here are three quick steps to get you through it:
- Remove any unwanted files using FTP.
- Drop unwanted tables from your database using phpMyAdmin.
- Remove any shortcode associated with the plugin from your pages.
Do you have any questions about how to uninstall WordPress plugins cleanly? Let’s talk about them in the comments section below!
Article image thumbnail by ConceptVectorDesign / shutterstock.com.
The post How to Uninstall WordPress Plugins Cleanly appeared first on Elegant Themes Blog.