
![]()
Our Biggest Discount Of Of All Time
Cyber Monday only comes once a year, and when it does, we like to do something really special. Today we are offering 25% OFF EVERYTHING, the biggest discount we have ever given. This discount has only ever been offered once before (during last year’s Black Friday and Cyber Monday sale), and it won’t be back again until next year. It wont be available for long, and once the sales have ended you will have to wait a whole year for it to come back (so don’t miss out)!
INCLUDES 6 EXCLUSIVE LAYOUT PACKS
Everyone who takes advantage of our Cyber Monday sale will also get exclusive access to 6 Cyber Monday Divi Layout Packs. These are world-class designs built by our very own Divi design team. They are the perfect way to jump-start your next Divi websites, and they are only available to Black Friday and Cyber Monday customers and current Lifetime members. Once the sale is over, these layouts won’t be available ever again!
Click Here To Purchase A New MembershipClick Here To Upgrade Your Current AccounClick Here To Renew Your Expired Account
Ahoy, Divi Nation! We’re back with another one of our amazing free Divi layout packs! Yay! This one is aimed at freelancers, and it’s exclusive to the super-awesome Cyber Monday deal that I know you just couldn’t resist.
Today our design team has put together an absolutely beautiful site for freelancers. Not only does the layout pack let you showcase your skills and portfolio to your clients, but when integrated with a tool like Calendly you can use it to easily set up meetings with your clients (or potential clients) in just a couple of clicks.
I will be guiding you through every step of the process today, from setting up the Freelance layout pack, to embedding Calendly in the best places using the Divi Builder, and even tweaking the elements a bit to make them stand out with a bit of extra pizzazz.
But before we can get to that, you’ll either need to partake in our Cyber Monday Deal or (if you’re a lifetime member) go the members area and download the layout pack for yourself.
Download The Exclusive Layout Before It Disappears!
Already a Lifetime Member? You can download the pack right now, no need to partake in our Cyber Monday sale!
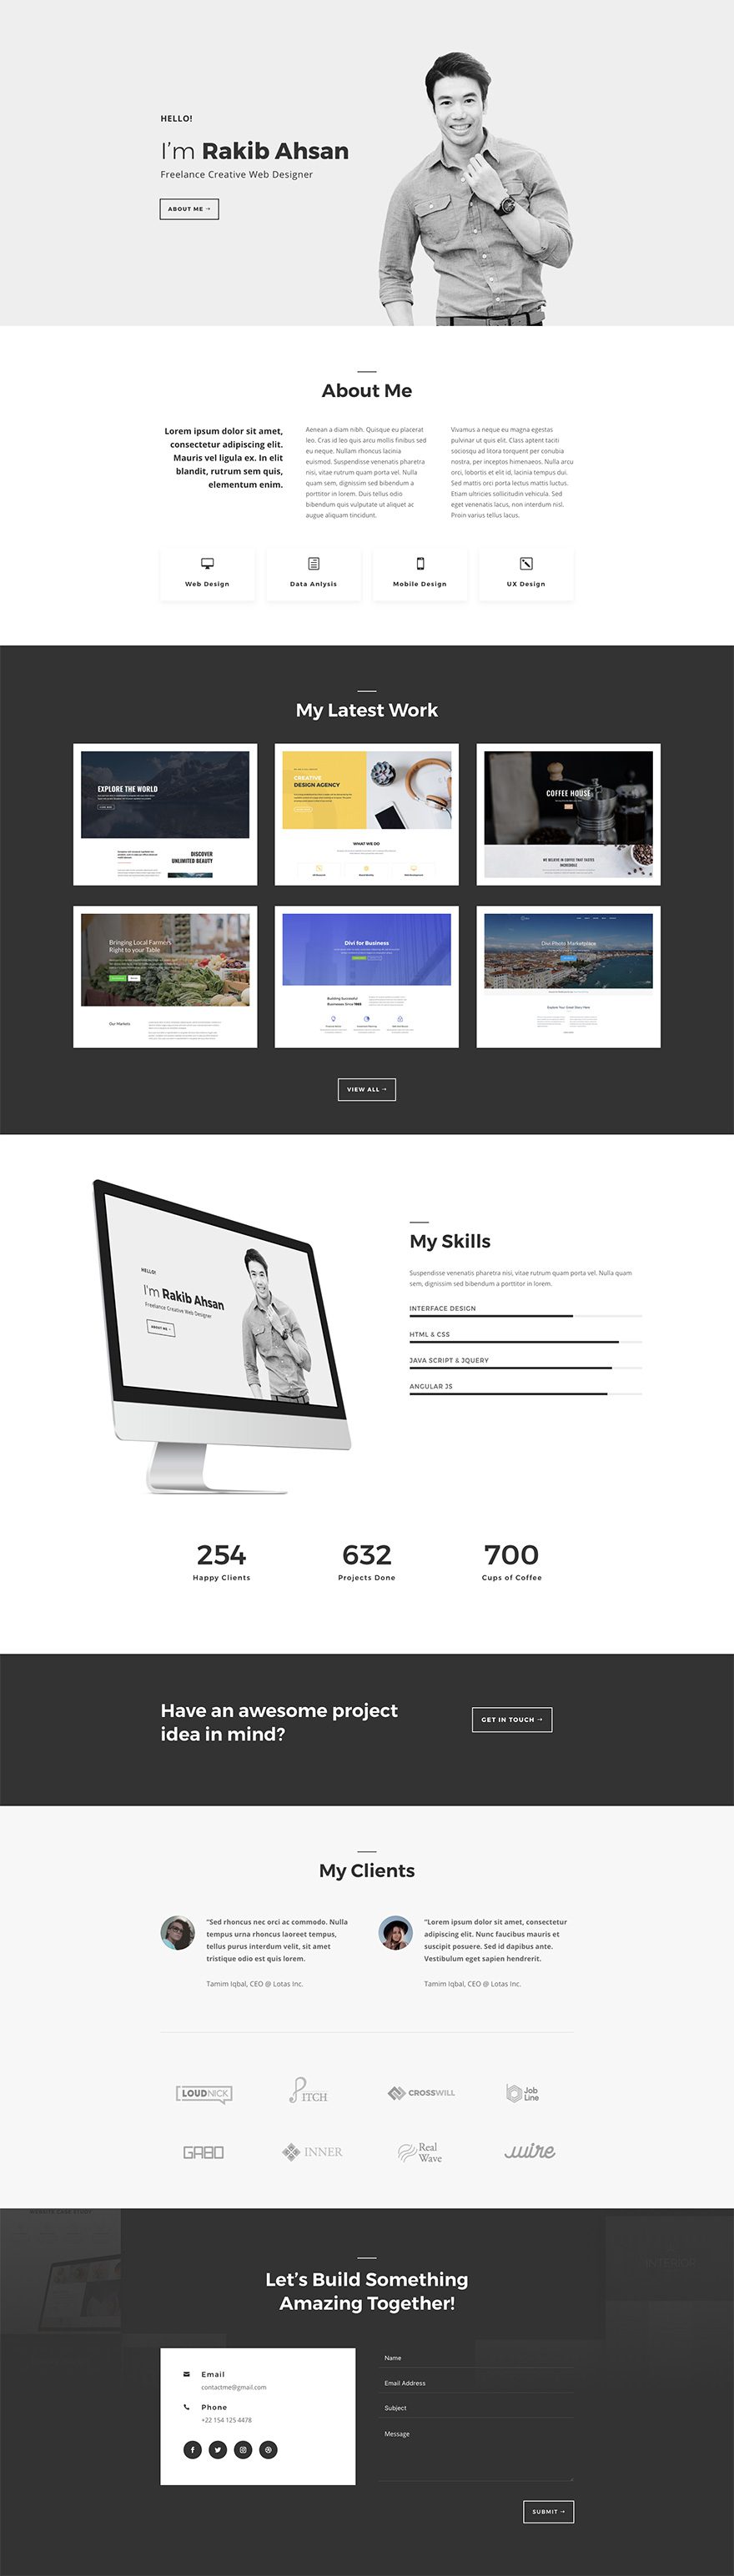
A Look Inside the Exclusive Cyber Monday Layout Pack for Freelancers
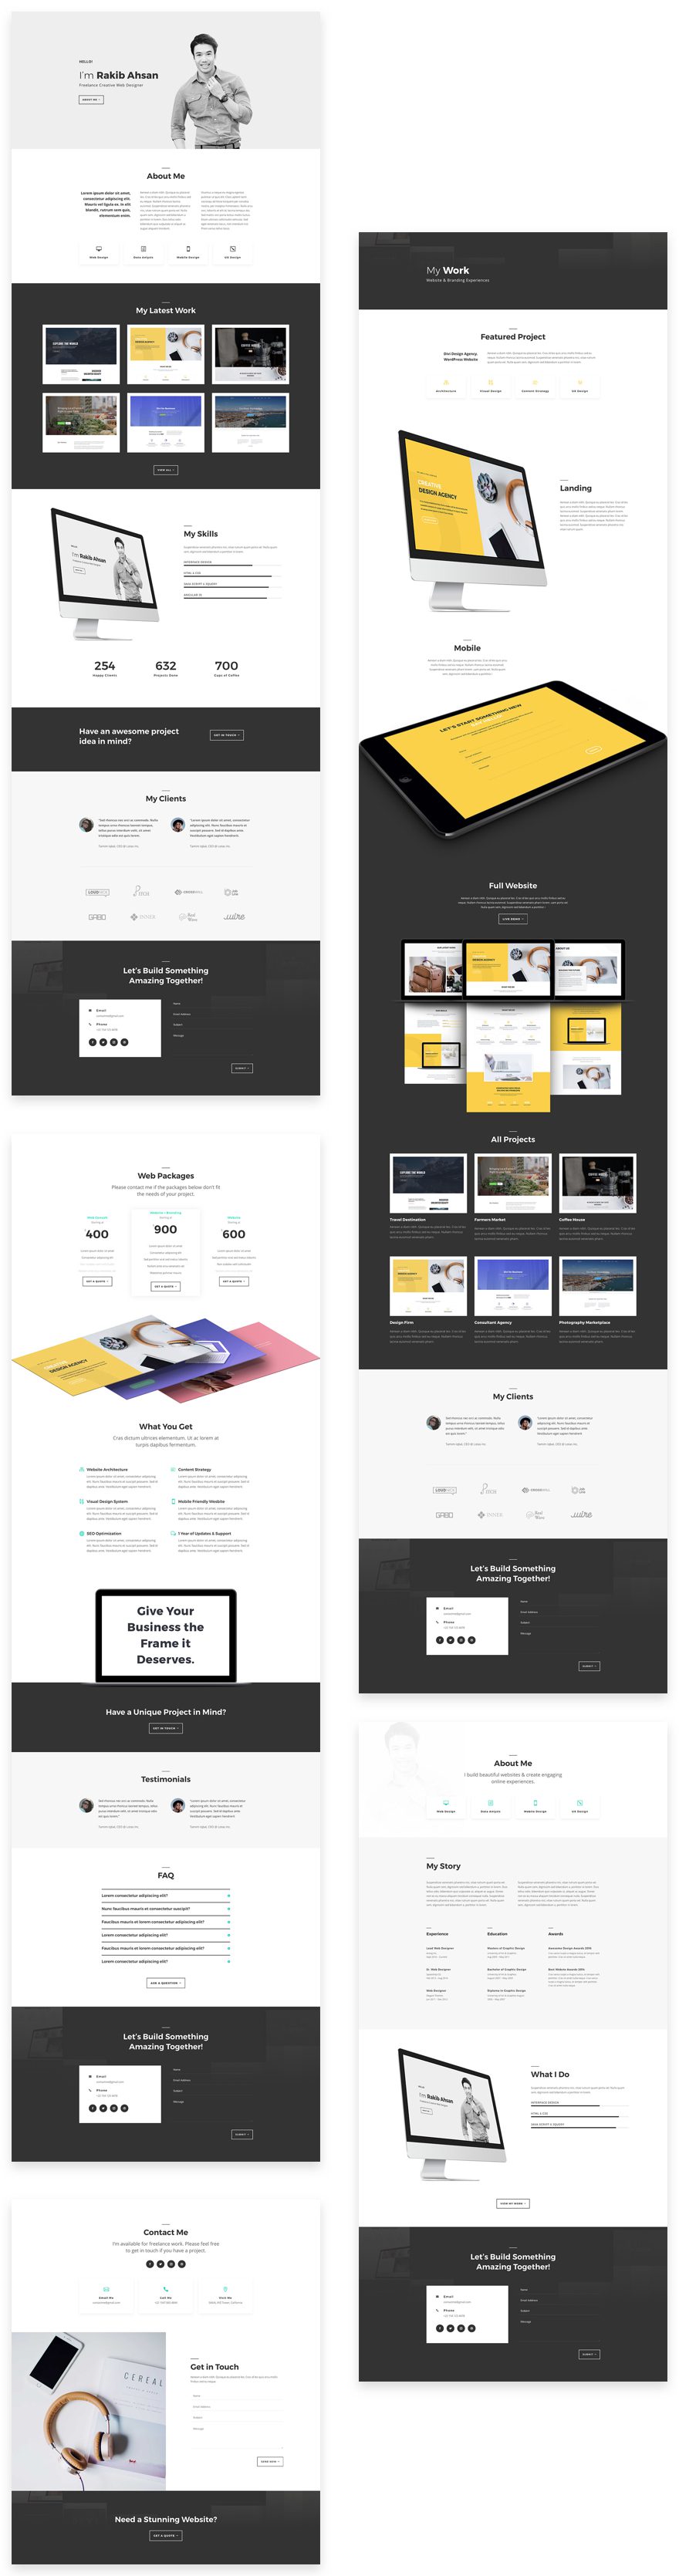
Landing Page Design
Download The Exclusive Layout Before It Disappears!
Already a Lifetime Member? You can download the pack right now, no need to partake in our Cyber Monday sale!
Portfolio Page Design
Download The Exclusive Layout Before It Disappears!
Already a Lifetime Member? You can download the pack right now, no need to partake in our Cyber Monday sale!
Pricing Page Design
Download The Exclusive Layout Before It Disappears!
Already a Lifetime Member? You can download the pack right now, no need to partake in our Cyber Monday sale!
Contact Page Design
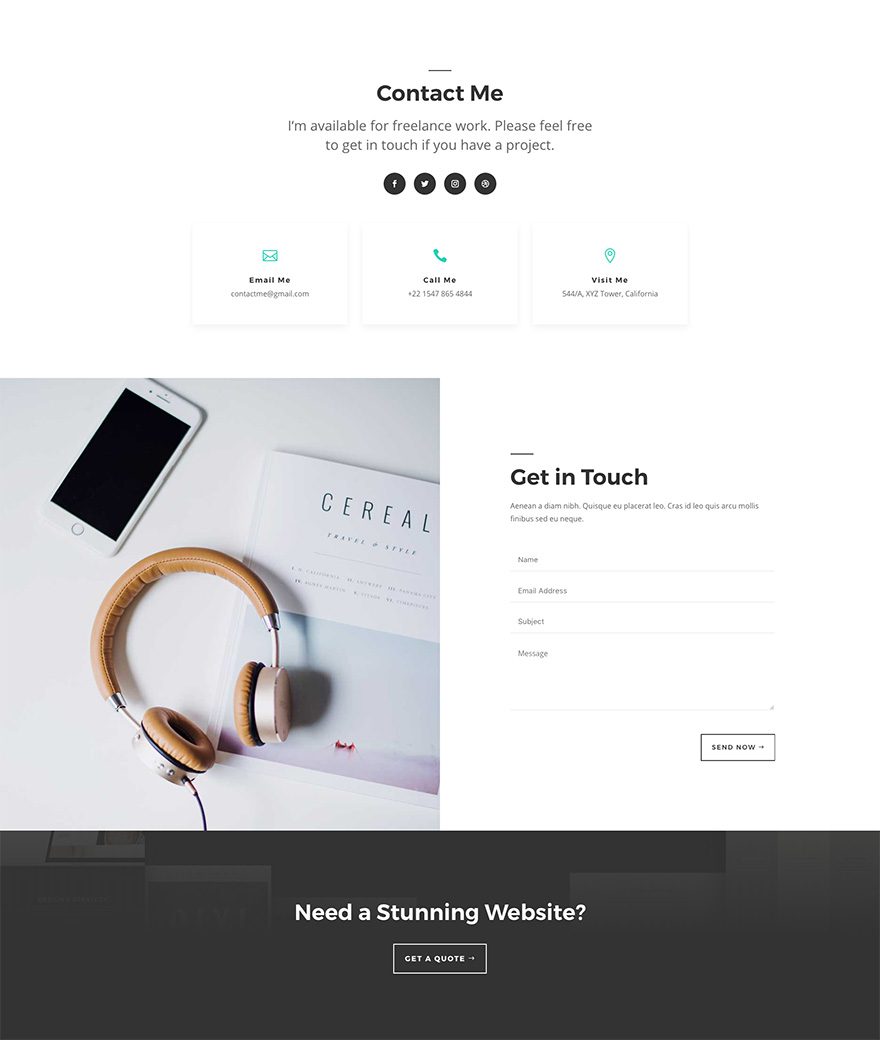
Download The Exclusive Layout Before It Disappears!
Already a Lifetime Member? You can download the pack right now, no need to partake in our Cyber Monday sale!
About Page Design
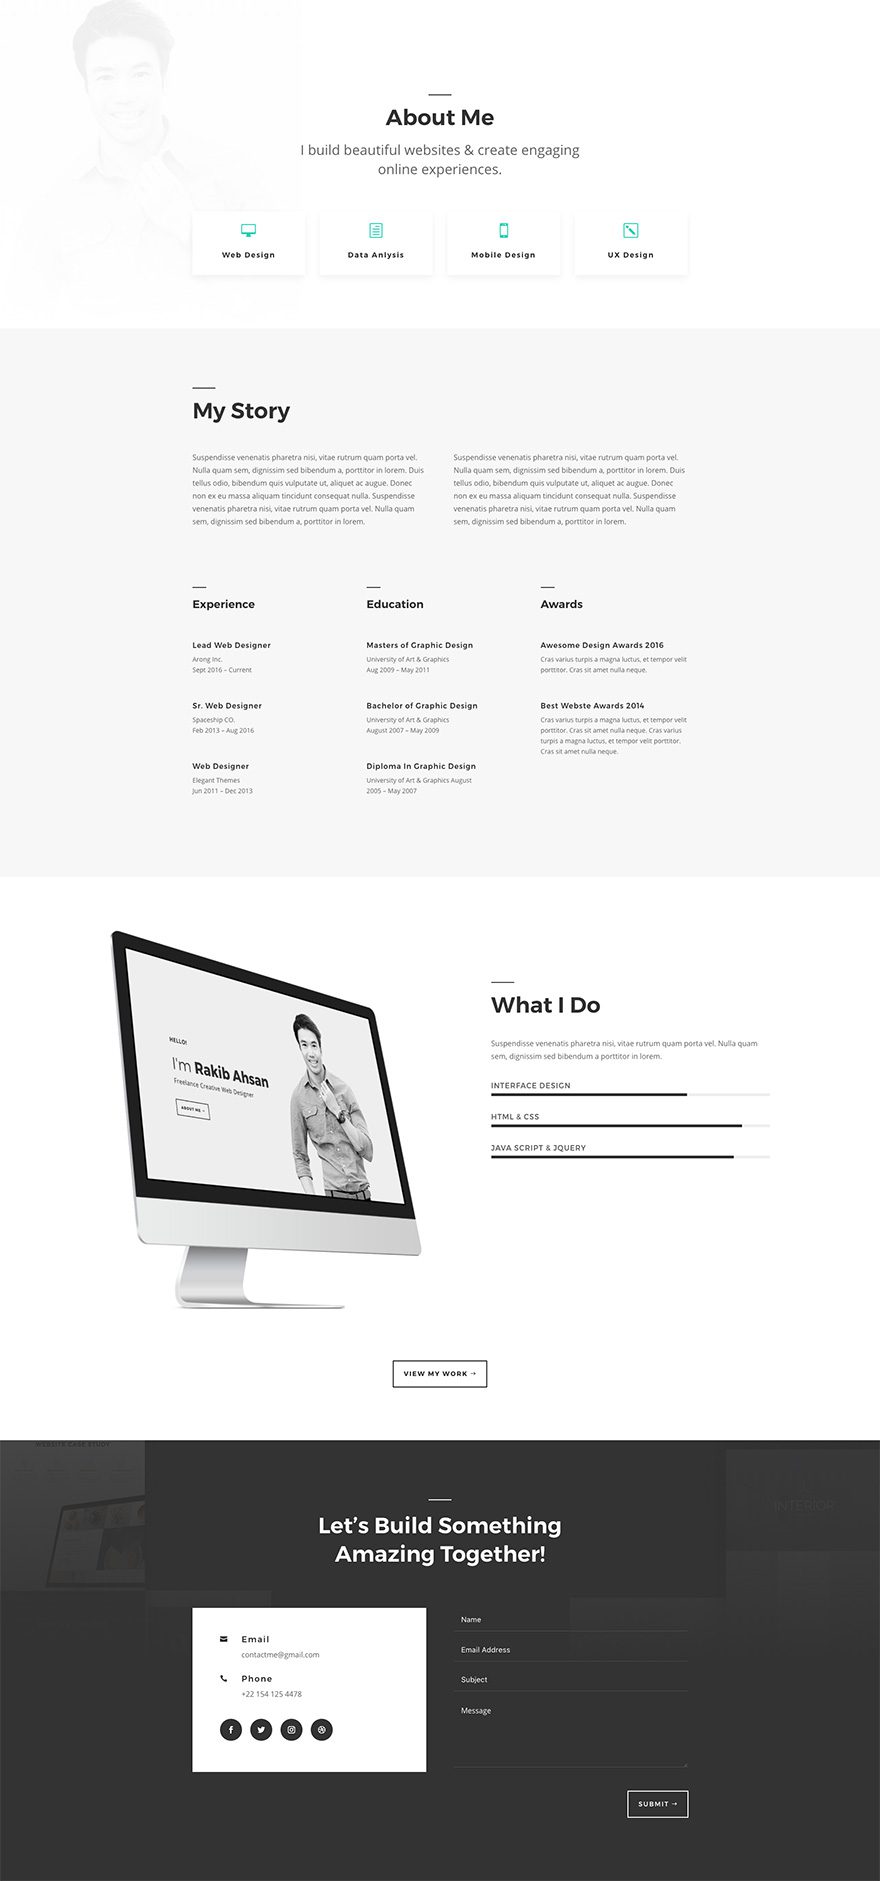
Download The Exclusive Layout Before It Disappears!
Already a Lifetime Member? You can download the pack right now, no need to partake in our Cyber Monday sale!
Get the Exclusive Cyber Monday Layout Pack for Freelancers
Before getting into this use case, you will need to lay your hands on the exclusive Cyber Monday Layout Pack for Freelancers which you can get by becoming a new Elegant Themes Member, upgrading your existing account, or by already being a Lifetime Member with us. If you are indeed already a Lifetime Member you can login to our members area and download all of our exclusive layout packs here. Everyone else will need to use the button below to buy or upgrade before they can follow along with the rest of our tutorial.
Download The Exclusive Layout Before It Disappears!
Already a Lifetime Member? You can download the pack right now, no need to partake in our Cyber Monday sale!
How to Use the Exclusive Cyber Monday Freelance Layout Pack & Calendly to Schedule Client Meetings
I am pretty sure y’all know how to do the most basic parts of the setup process, so forgive me as I skip over the first handful.
- Install and activate Divi and the Divi Builder
- Download the Freelance layout pack and import the freelance_all.json file to your Divi Theme Library
- Create new WordPress pages for each layout
- Create your main menu
If you’re not 100% solid on doing any of these steps, this post should be able to get you to our starting point.
Now, we’re totally ready to dig in and get to freelancin’!
Part 1: Calendly
In case you aren’t familiar, Calendly is an pretty nifty scheduling tool. You simply put in the times that you’re available, and Calendly makes a widget where people can pick a time that syncs to their calendars and yours.
For a freelancer, this is an amazing piece of software, and as always, you need to set up an account before you start.
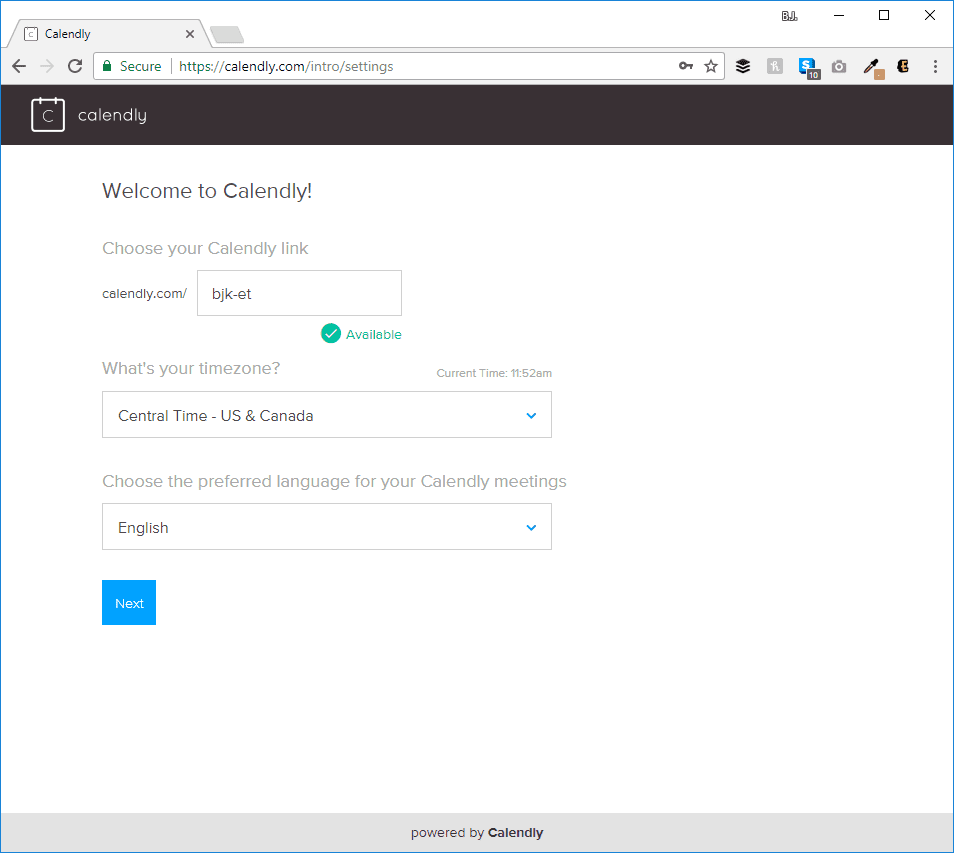
Once you’re signed up and verified (I am assuming you don’t need a walkthrough for that), it’s time to make the magic happen.
When picking a URL, make sure you remember that it’s public and will be shared with each person who makes an appointment with you. It’s hard to go wrong with your initials or name here. And the timezone you choose is for you–Calendly automatically adjusts for your clients.
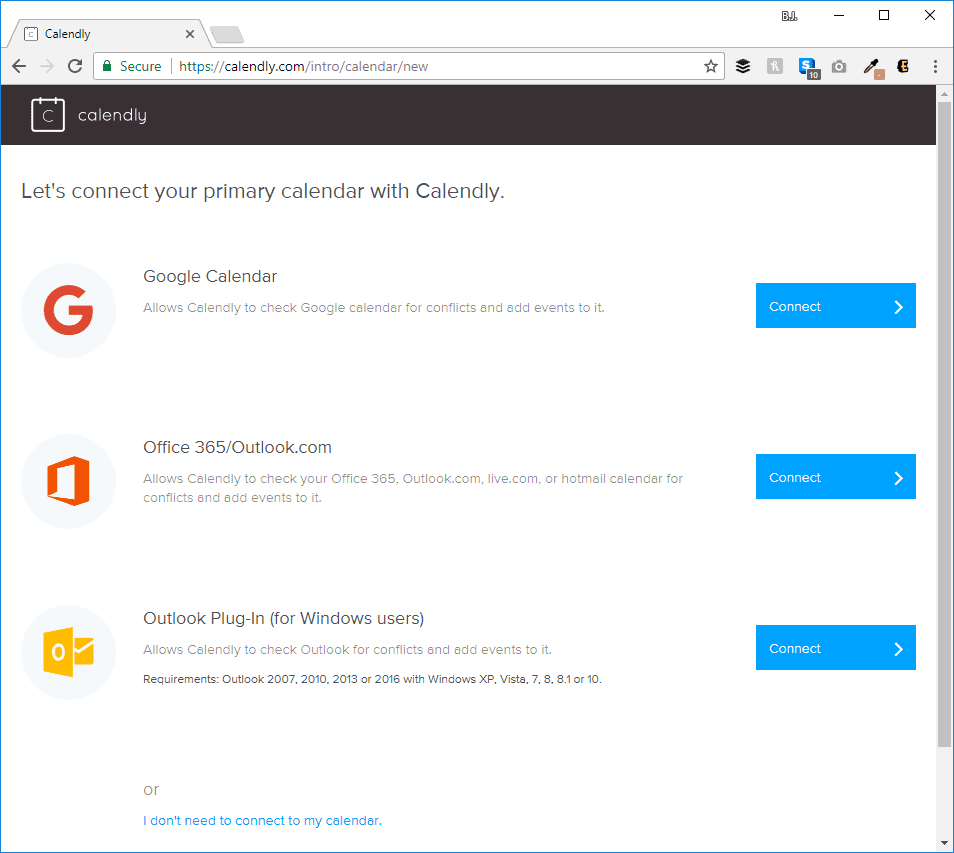
Setting up your calendar should be no sweat. Just pick where your schedule lives and allow the app access so it can automatically update events.
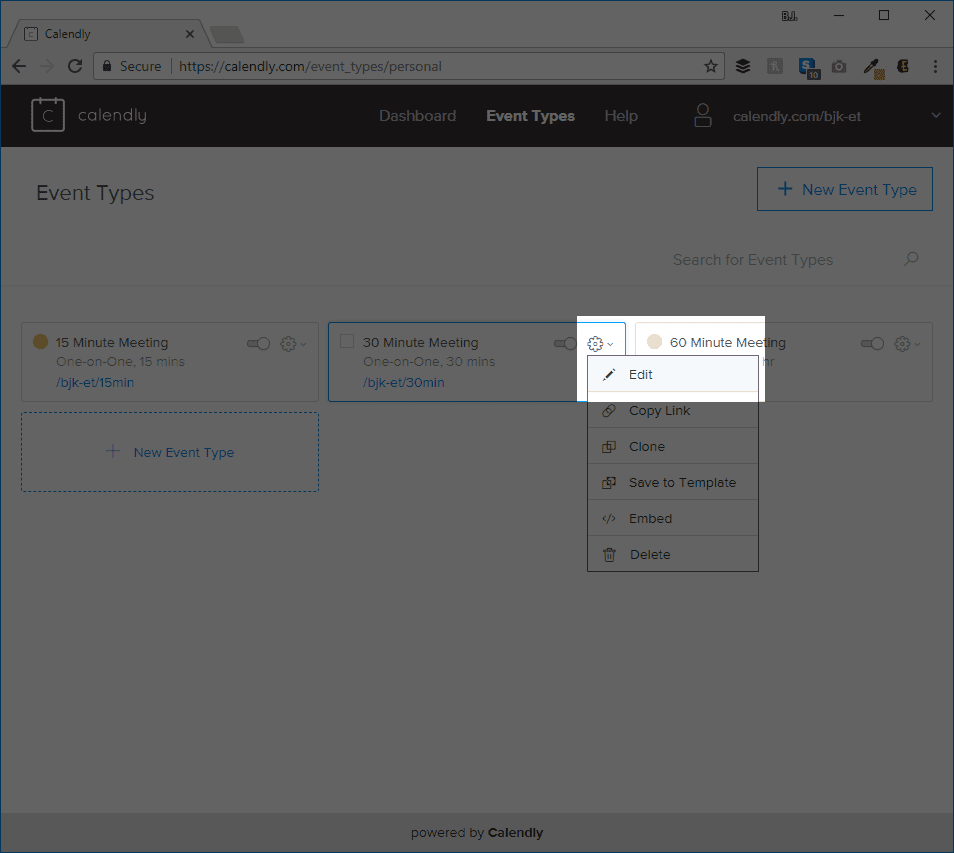
When that’s done, you’re technically able to start scheduling. Calendly gives you three default meeting lengths (15, 30, and 60 minutes) with matching URLs. They’re totally customizable, and you can go in and edit them or create your own.
For this, I am just gonna play with the 30 Minute Meeting as it is, but you can always hit the Edit button to adjust your real-world availabilities.
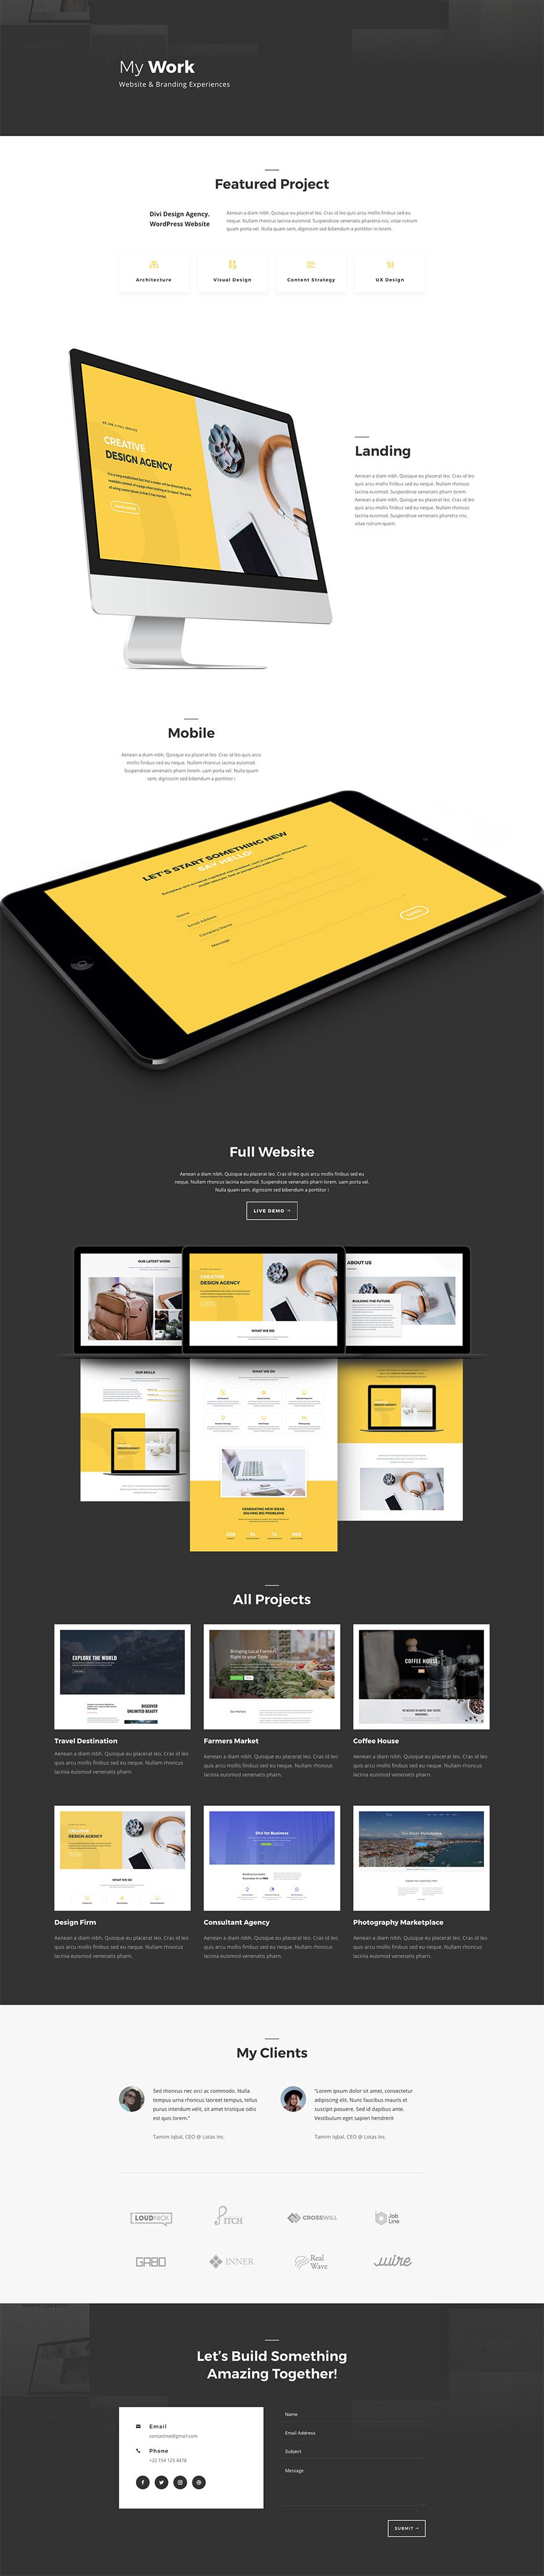
Part 2: Picking Pages
When you have your calendar and availabilities set just like you want them, move over to the the installation of WordPress where you have the Freelance layout pack installed. Since you’ve already taken the time to apply the layout packs, you just need to choose where the best places for Calendly embeds to go.
We have a few choices with this layout pack, and while it’s tempting to embed your new Calendly on each page, I don’t think that’s the best idea. You do have normal contact forms, too, so you want the scheduling tool to stand out.
We are going to embed these, then, on the Pricing page and the Portfolio page. These should have the strongest lead generation for personal meetings, while the other pages still provide an opportunity for them to contact you through typical means.
–SCREENSHOTS OF PRICING AND PORTFOLIO–
Part 3: Putting It to Good Use
Let’s tackle your Pricing page first. Once you’ve navigated there, you’ll see a pricing module at the very top (go figure!). Below that is the What You Get section that details your services.
Your visitors will likely have a question at this point. So we want to give them the ability to contact you directly.
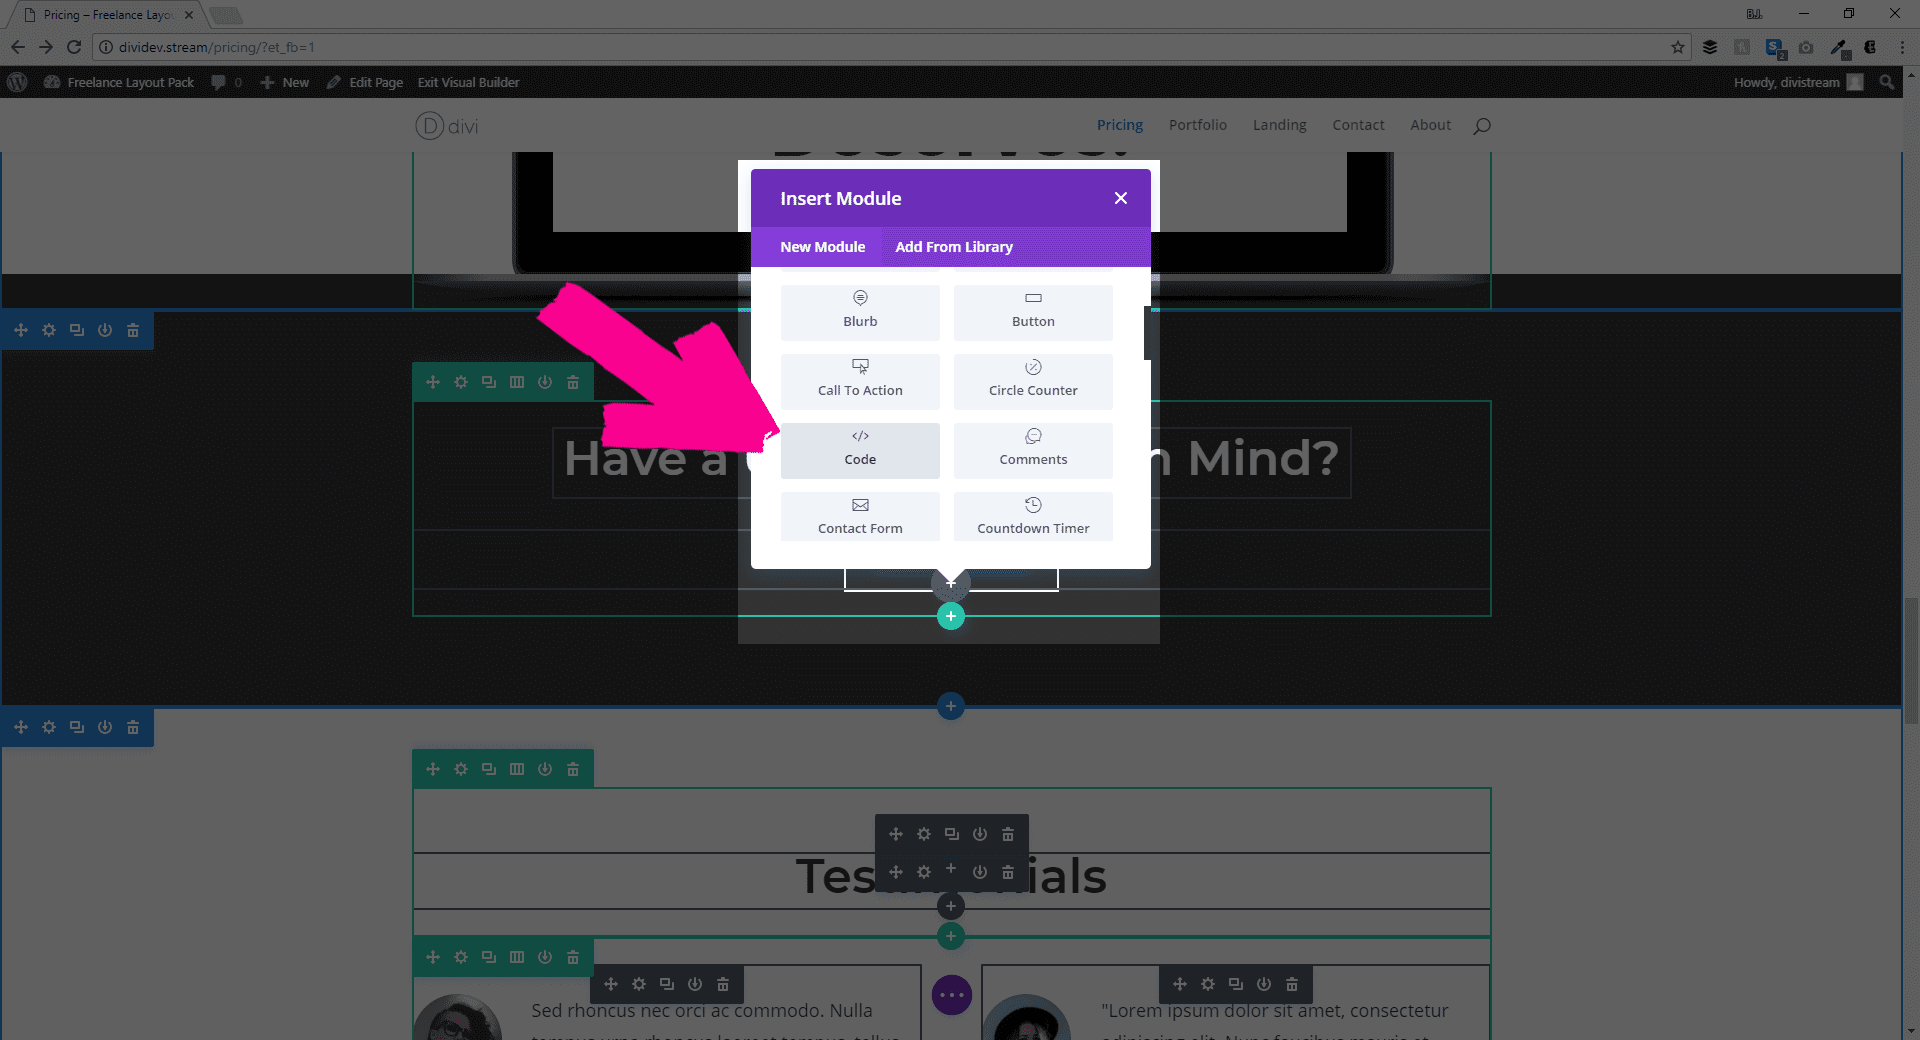
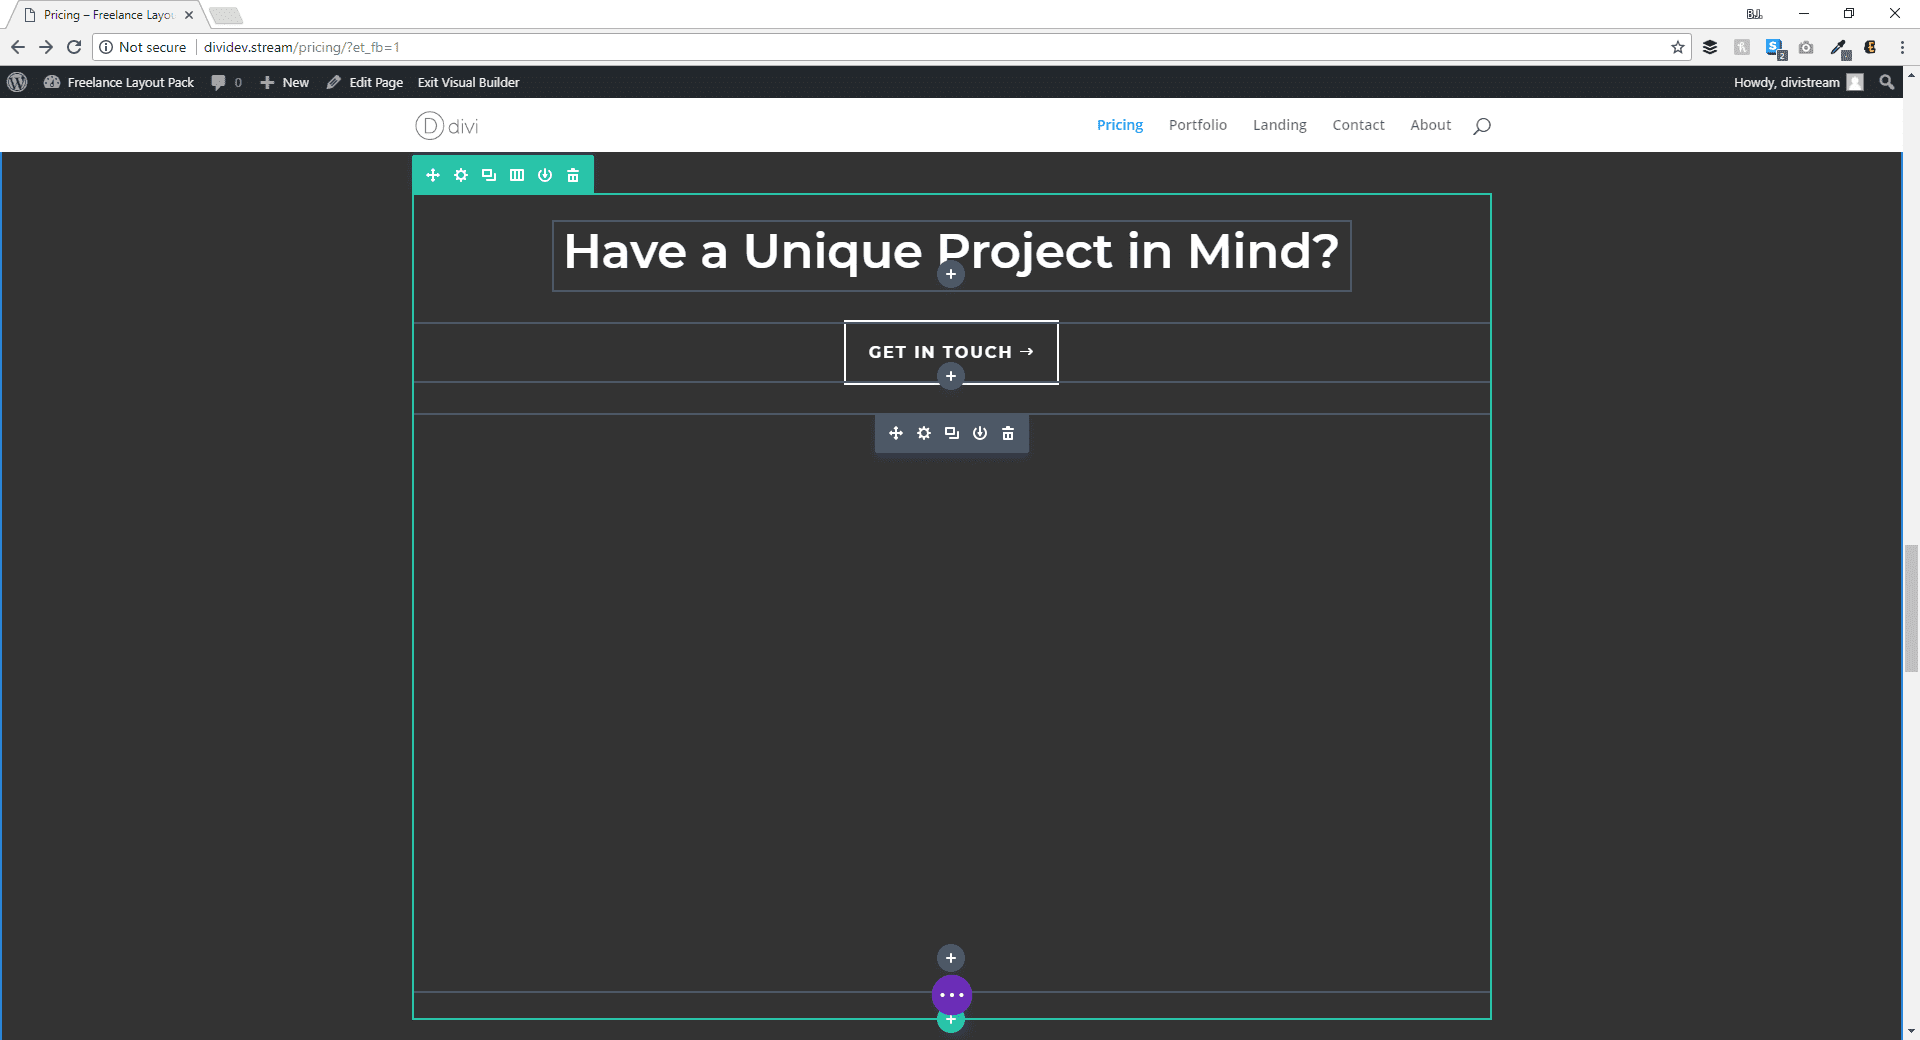
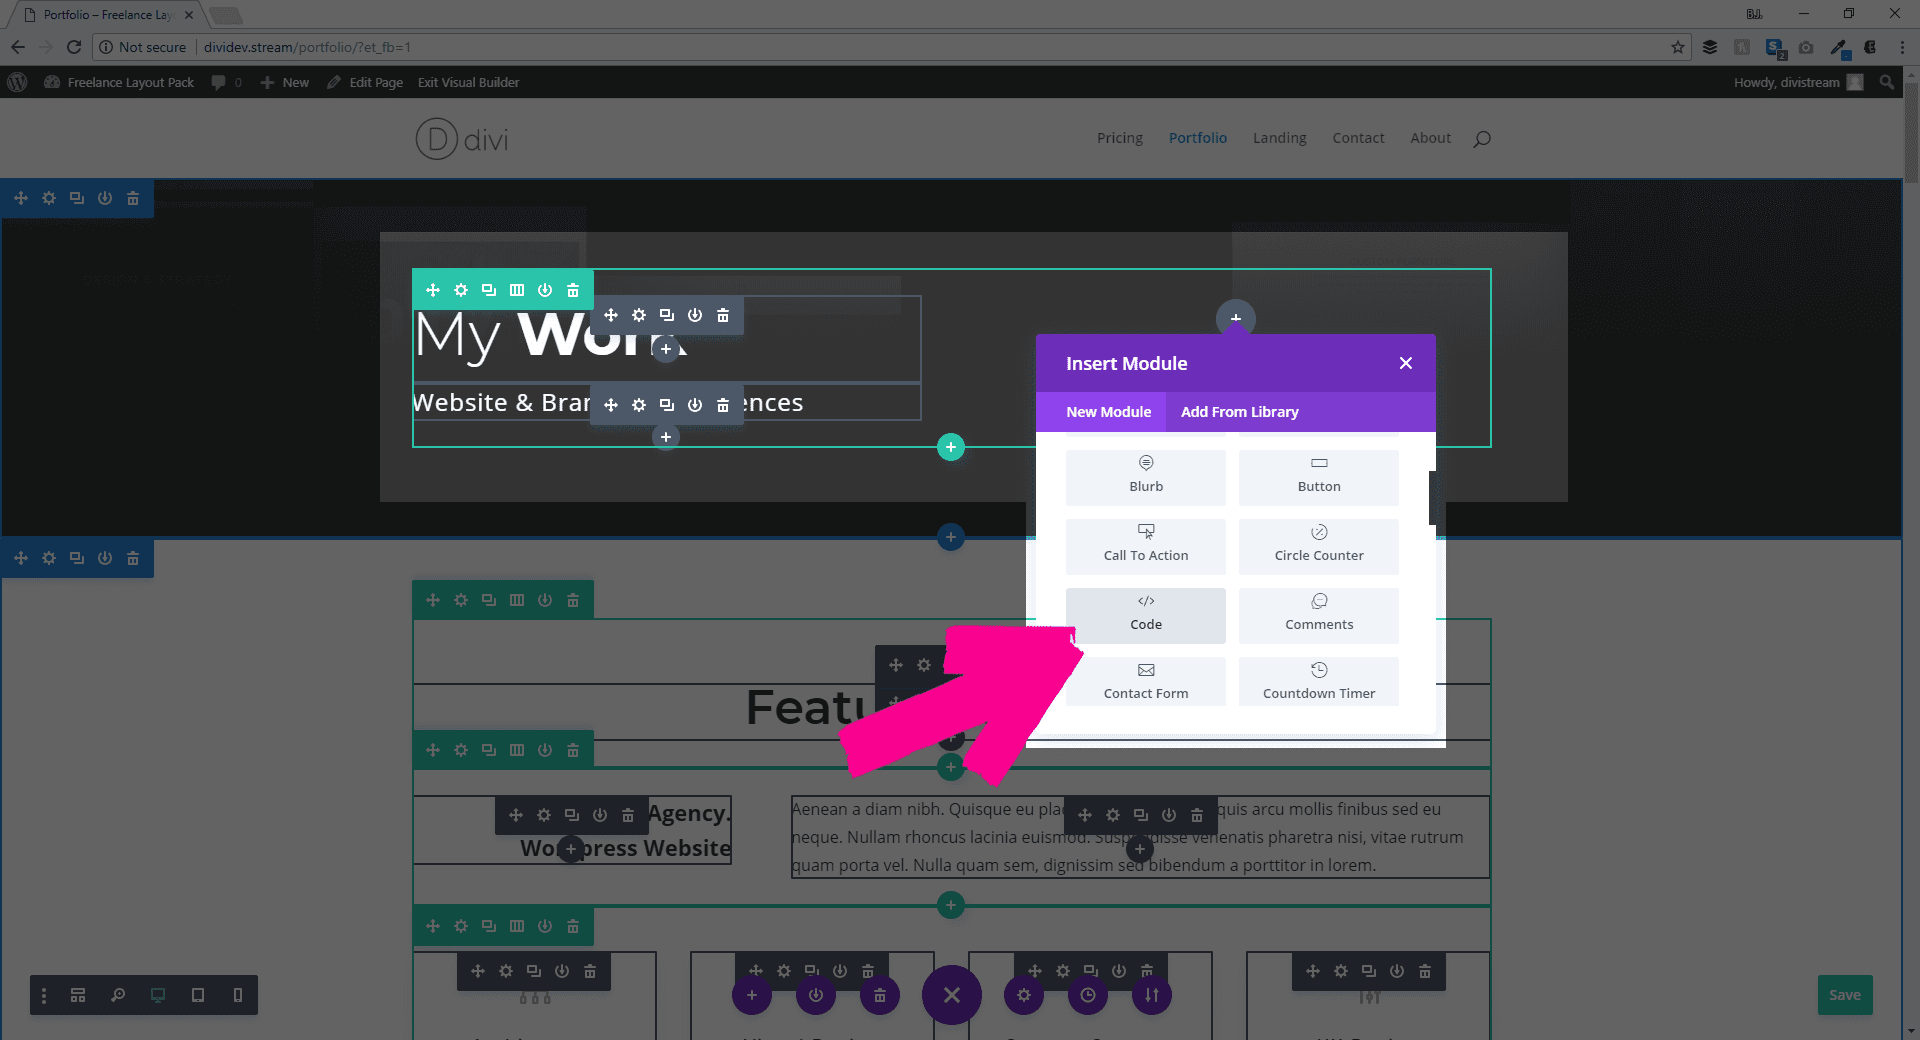
We will enter the Visual Builder and scroll down to the section titled Have a Unique Project in Mind? and insert a new Code Module by clicking the black + at the very bottom of the row.
(These screenshots show the grid mode in the Visual Builder, by the way. It’s super cool.)
Navigate back to your Calendly dashboard and find the event you want to embed. Like I said, this will be the 30 Minute Meeting, and when you click the gear icon, you will see a dropdown menu and an Embed option. Click it.
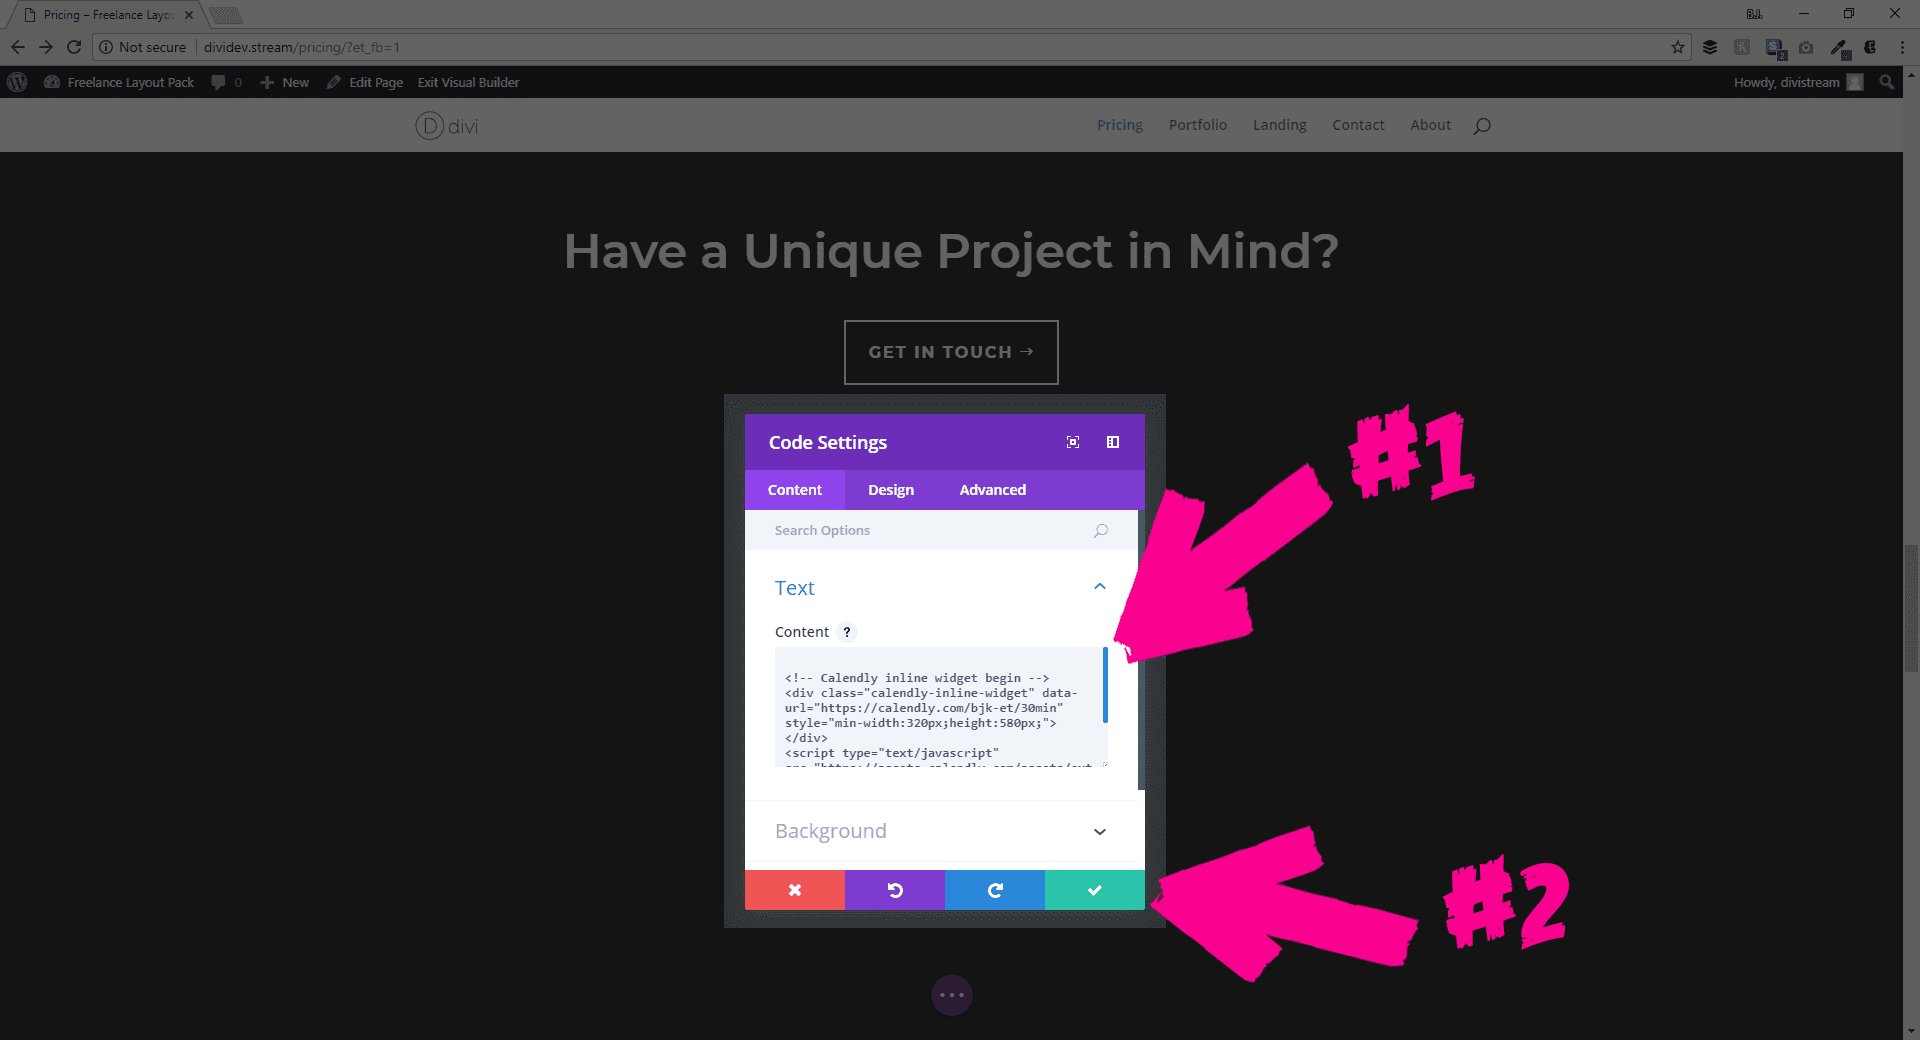
You get to choose from three types of widgets, but we are going for the inline one for the Pricing page.
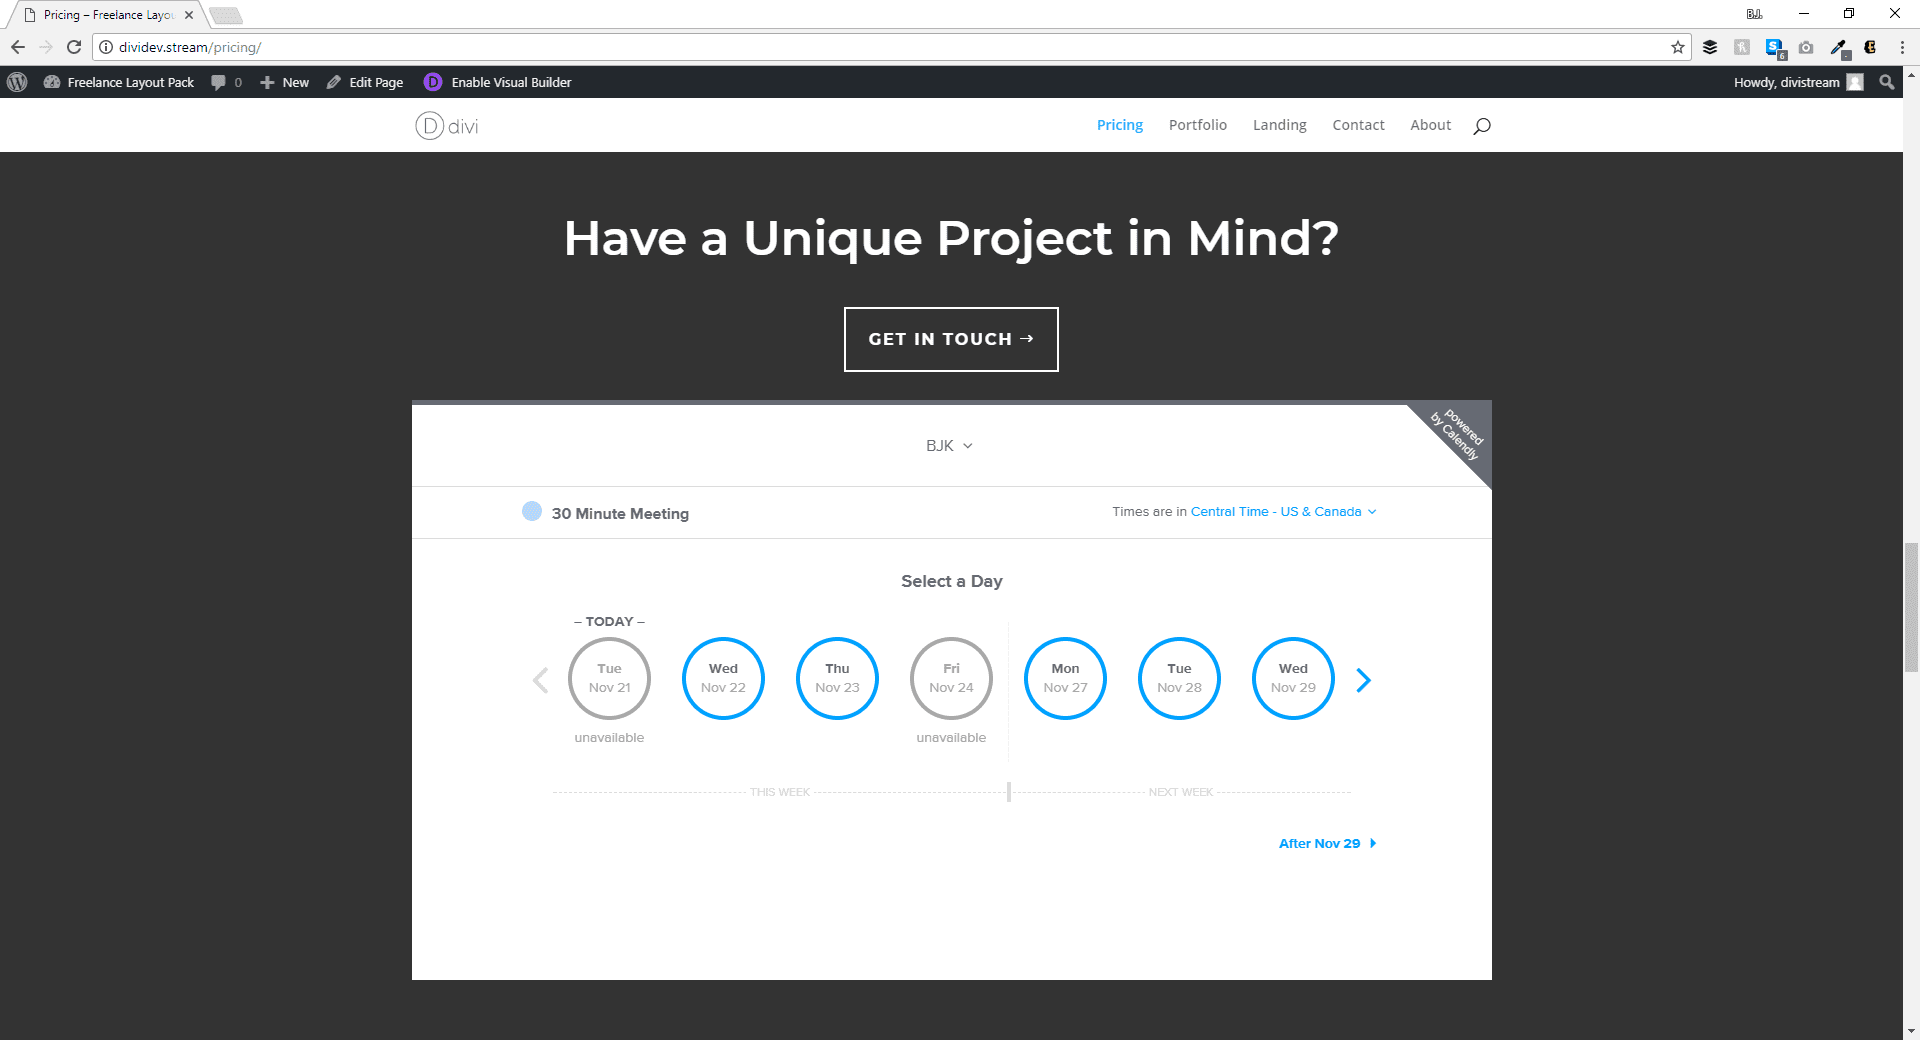
Click the Copy Code text in the Calendly modal and go back to your Visual Builder. Open the module settings and paste in the Calendly code.
Hit the green checkmark to save and…you get a big ole blank spot. Ruh-roh, Raggy!
But don’t worry!
This happens with the Visual Builder when external content is displayed. Everything is just fine and dandy. So save your page by opening up the purple menu at the bottom of the page and clicking the green save button at the right.
When you click the Exit Visual Builder button at the top of the page, you can scroll down to see your brand-spanking-new Calendly widget.
Part 4: A Small Touch
As it stands, your new widget looks a touch out of place directly under the contact button that comes with the layout pack.
Into the Visual Builder we go once again and just click the Duplicate Module button on the section’s existing header, drag it below the button and type in the new text you want.
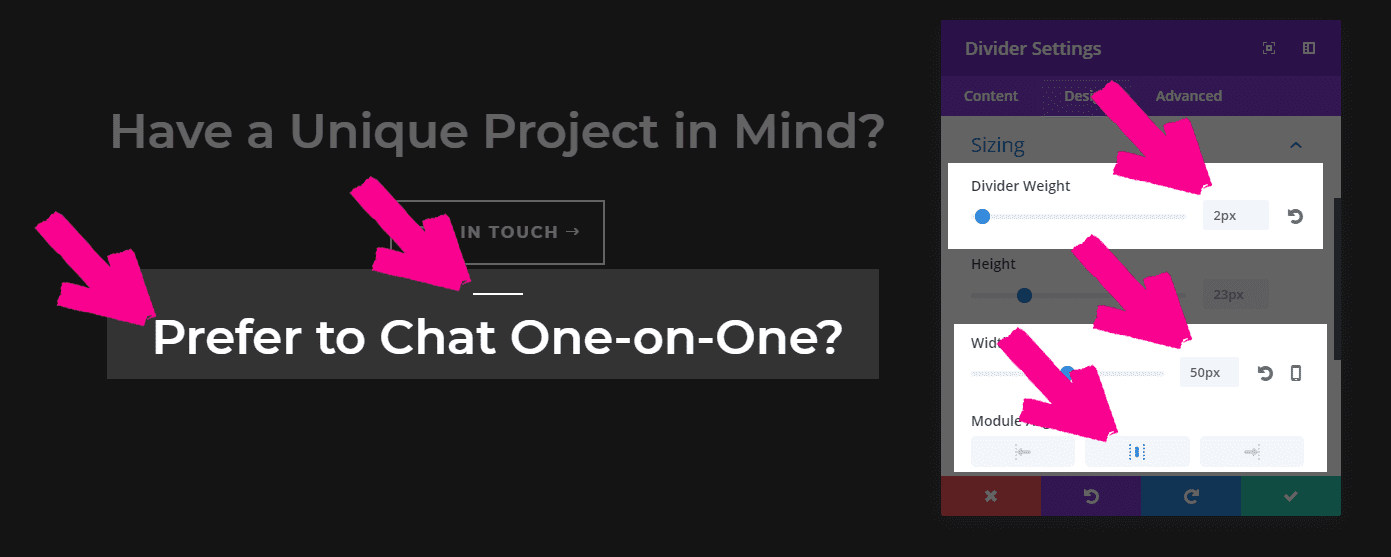
I also think a Divider Module looks really nice here, so I added one above the new header and changed the design tab settings for Spacing to a -10px margin on bottom and Sizing with a 2px Divider Weight, 50px width, and centered alignment.
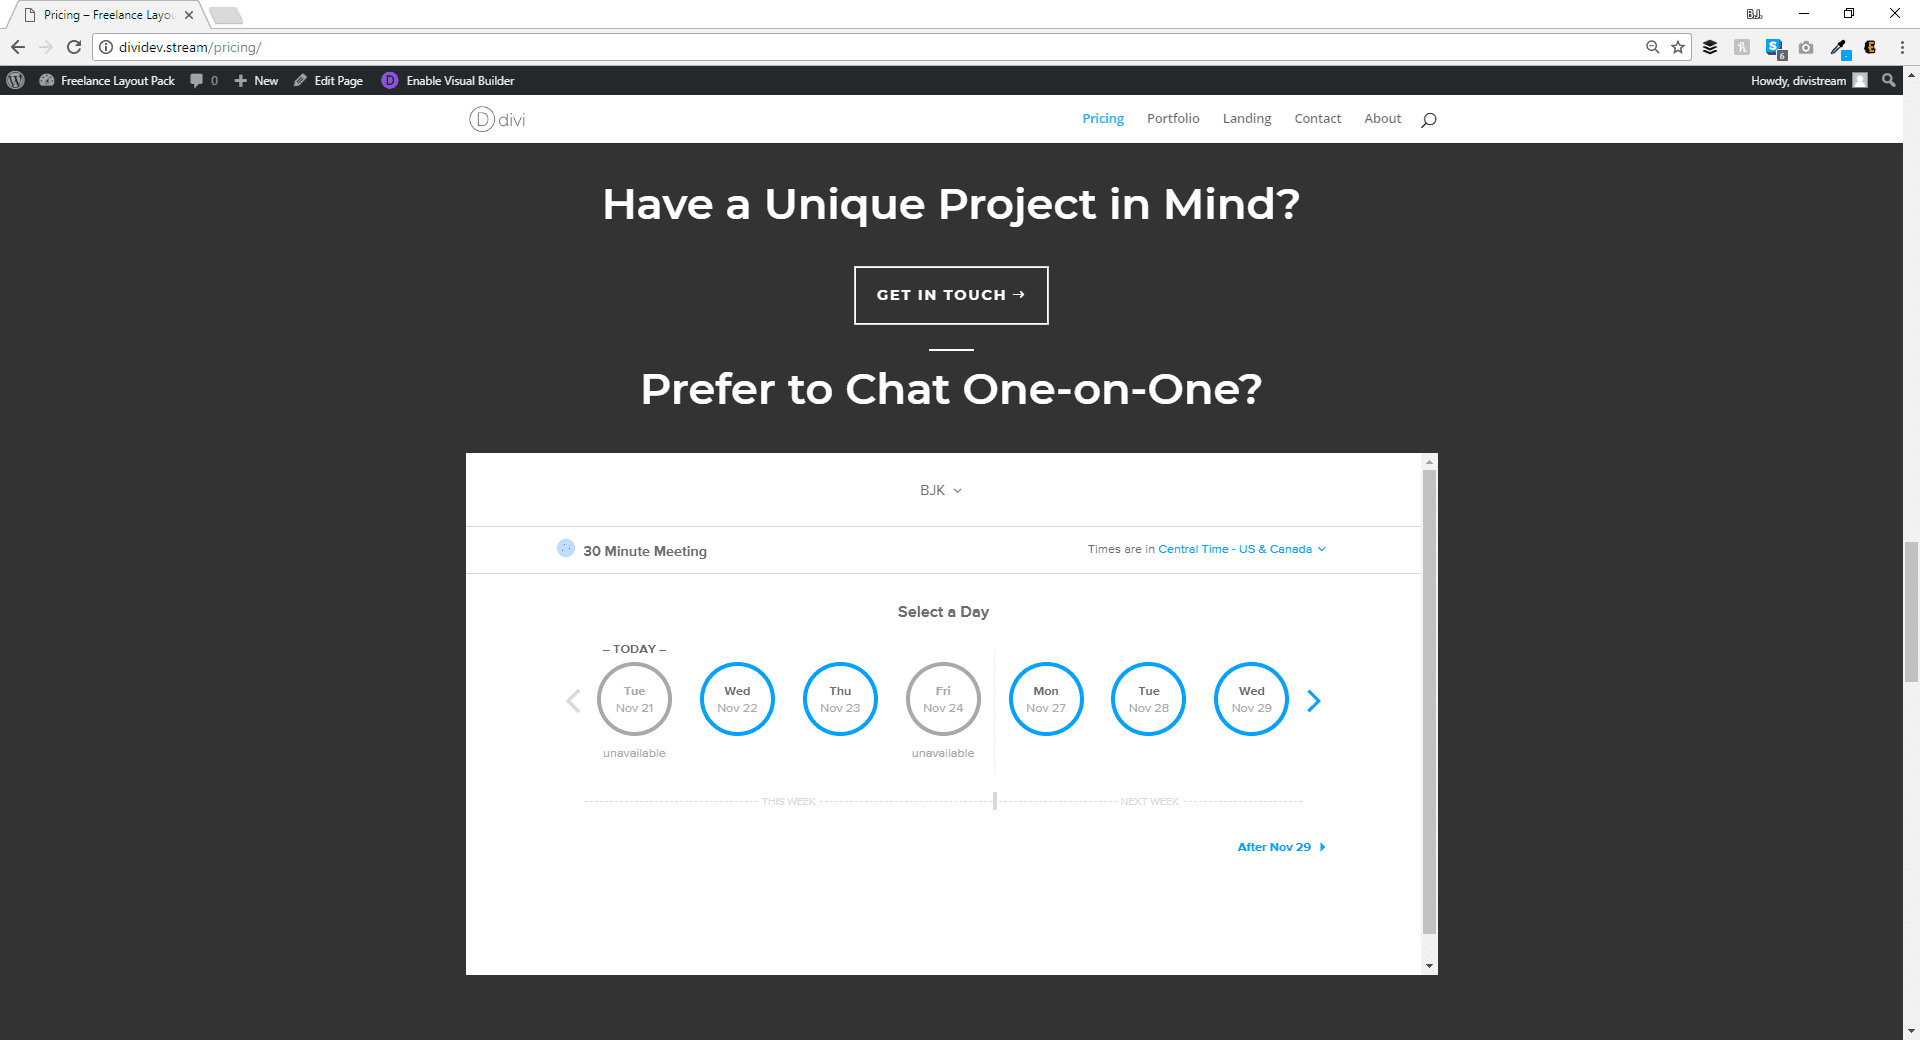
Now, when you leave the Visual Builder, you will see this beauty.
Part 5: The Portfolio
The rest of the tutorial is actually pretty simple since you’ve already done the whole process once.
Head back to your Calendly page (that you surely have open in a separate tab, still. Right?) And this time, let’s put the Popup Widget code somewhere on the Portfolio page to get a floating button in the corner to follow your user around.
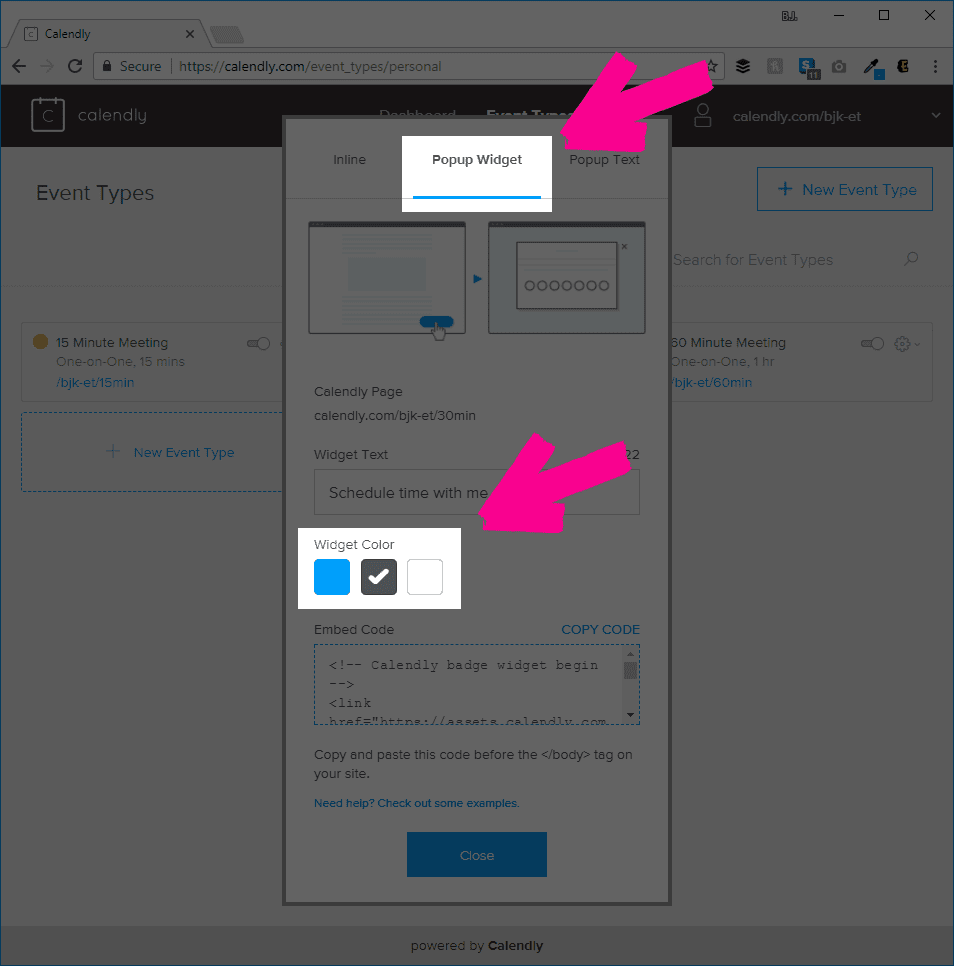
You can change the text to whatever you want, if you want, but I do suggest changing the color from blue to black. That way it matches the layout pack design and doesn’t stick out.
You can embed the Calendly code anywhere you want on the page, as long as it’s the /body, so I chose to put it at the very top of the first row. Since we are using a Code Module to display a floating widget, this placement will change nothing about the layout.
Once again, you can see the widget when you exit the Visual Builder. When your prospective clients click the button in the lower right, it brings up a modal with the same scheduler that we have inline on the Pricing page.

Pretty cool, right?
Final Thoughts
The Freelance layout pack for Divi is just awesome. The design team really outdid themselves on this one. Your clients will see your style and class, and when you add a Calendly widget (or widgets) to the mix, they won’t be able to resist booking you on the spot.
![]()
Our Biggest Discount Of Of All Time
Cyber Monday only comes once a year, and when it does, we like to do something really special. Today we are offering 25% OFF EVERYTHING, the biggest discount we have ever given. This discount has only ever been offered once before (during last year’s Black Friday and Cyber Monday sale), and it won’t be back again until next year. It wont be available for long, and once the sales have ended you will have to wait a whole year for it to come back (so don’t miss out)!
INCLUDES 6 EXCLUSIVE LAYOUT PACKS
Everyone who takes advantage of our Cyber Monday sale will also get exclusive access to 6 Cyber Monday Divi Layout Packs. These are world-class designs built by our very own Divi design team. They are the perfect way to jump-start your next Divi websites, and they are only available to Black Friday and Cyber Monday customers and current Lifetime members. Once the sale is over, these layouts won’t be available ever again!
Click Here To Purchase A New MembershipClick Here To Upgrade Your Current AccounClick Here To Renew Your Expired Account
The post How to Use the Exclusive Cyber Monday Freelance Layout Pack & Calendly to Schedule Client Meetings appeared first on Elegant Themes Blog.