
Modern web design is still about breaking the grid. This is done by staggering elements and design accents in positions that break the normal structure of a grid layout. You can see us apply a lot of these broken grid designs throughout our awesome Divi layouts. Usually, this involves something like moving modules outside of a column or row so that they extend outside a container or overlap other elements on the page. But you may not have thought of moving the actual column.
In this tutorial, I’m going to show you how to stagger Divi columns and modules for unique broken grid designs. With Divi’s new column options, you can easily move columns around as well as the modules they contain. This allows you to design both the module and the column with unique styles for a creative broken grid design.
Let’s get started!
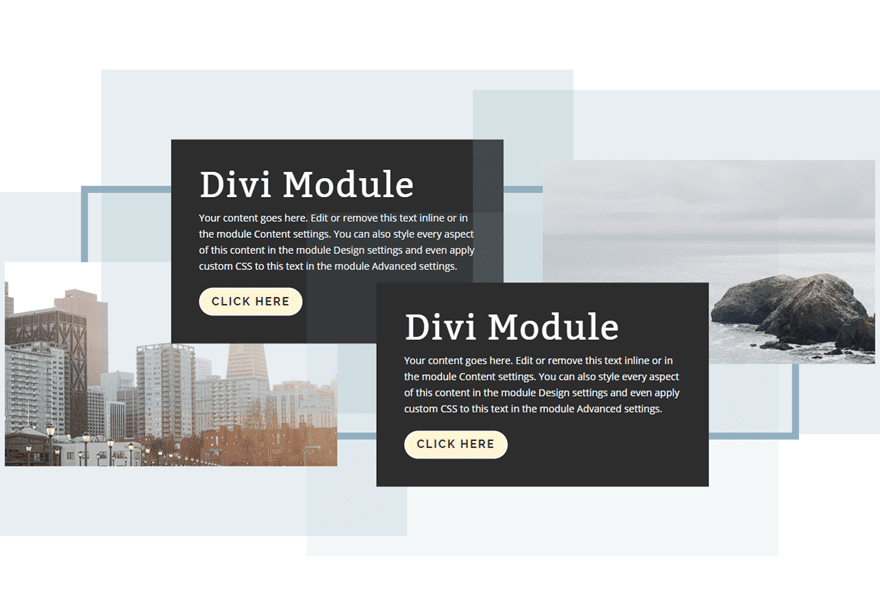
Sneak Peek
Here is a quick peek at the design examples we will build in this tutorial.
Download the Stagger Divi Columns and Modules Layout for FREE
To lay your hands on the designs from this tutorial, you will first need to download it using the button below. To gain access to the download you will need to subscribe to our Divi Daily email list by using the form below. As a new subscriber, you will receive even more Divi goodness and a free Divi Layout pack every Monday! If you’re already on the list, simply enter your email address below and click download. You will not be “resubscribed” or receive extra emails.
@media only screen and ( max-width: 767px ) {.et_bloom .et_bloom_optin_1 .carrot_edge.et_bloom_form_right .et_bloom_form_content:before, .et_bloom .et_bloom_optin_1 .carrot_edge.et_bloom_form_left .et_bloom_form_content:before { border-top-color: #ffffff !important; border-left-color: transparent !important; }
}.et_bloom .et_bloom_optin_1 .et_bloom_form_content button { background-color: #f92c8b !important; } .et_bloom .et_bloom_optin_1 .et_bloom_form_content .et_bloom_fields i { color: #f92c8b !important; } .et_bloom .et_bloom_optin_1 .et_bloom_form_content .et_bloom_custom_field_radio i:before { background: #f92c8b !important; } .et_bloom .et_bloom_optin_1 .et_bloom_border_solid { border-color: #f7f9fb !important } .et_bloom .et_bloom_optin_1 .et_bloom_form_content button { background-color: #f92c8b !important; } .et_bloom .et_bloom_optin_1 .et_bloom_form_container h2, .et_bloom .et_bloom_optin_1 .et_bloom_form_container h2 span, .et_bloom .et_bloom_optin_1 .et_bloom_form_container h2 strong { font-family: “Open Sans”, Helvetica, Arial, Lucida, sans-serif; }.et_bloom .et_bloom_optin_1 .et_bloom_form_container p, .et_bloom .et_bloom_optin_1 .et_bloom_form_container p span, .et_bloom .et_bloom_optin_1 .et_bloom_form_container p strong, .et_bloom .et_bloom_optin_1 .et_bloom_form_container form input, .et_bloom .et_bloom_optin_1 .et_bloom_form_container form button span { font-family: “Open Sans”, Helvetica, Arial, Lucida, sans-serif; } p.et_bloom_popup_input { padding-bottom: 0 !important;}

Download For Free
Join the Divi Newlsetter and we will email you a copy of the ultimate Divi Landing Page Layout Pack, plus tons of other amazing and free Divi resources, tips and tricks. Follow along and you will be a Divi master in no time. If you are already subscribed simply type in your email address below and click download to access the layout pack.
You have successfully subscribed. Please check your email address to confirm your subscription and get access to free weekly Divi layout packs!
To import the layout to your page, simply extract the zip file and drag the json file into the Divi Builder.
Let’s get to the tutorial shall we?
Basic Idea Explained
The basic idea behind how to stagger Divi columns and modules for unique broken grid designs involves using Divi’s transform translate property to position columns and the modules they contain.
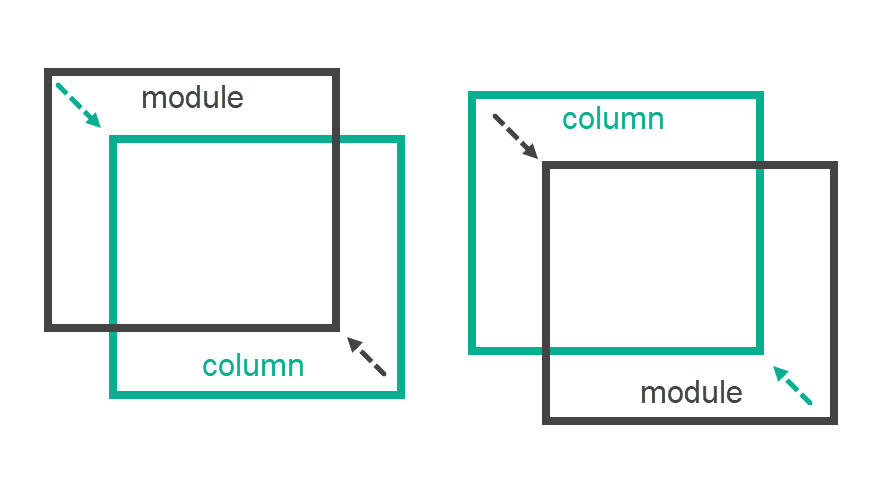
Once the elements are staggered, you have all the design features of a column and a module to add design accents that create unique broken grid designs.
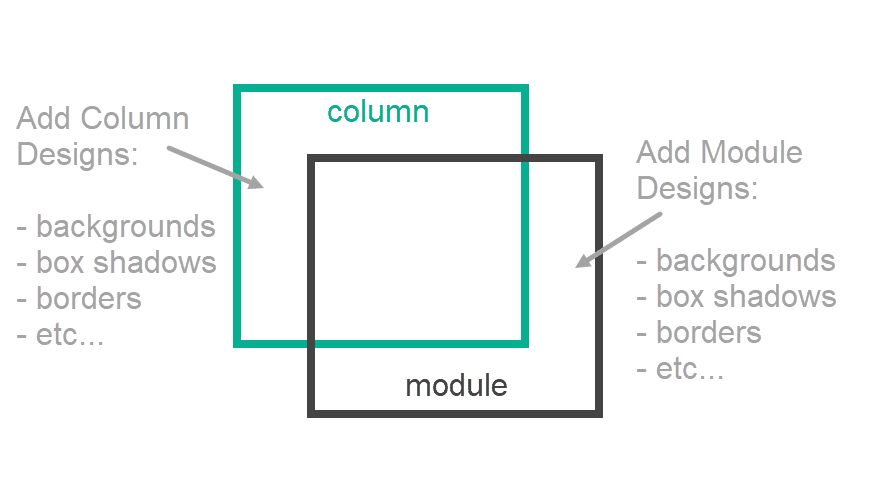
So for example, you could add a unique background (color, image, etc.) with a box shadow to your column and a completely different background and box shadow to your module.
Now that you have the basic idea, let’s create the design from scratch.
What You Need to Get Started
To get started, you will need to have the following:
- The Divi Theme installed and active
- A new page created to build from scratch on the front end (visual builder)
- A couple of Images to be used for mock content
After that, you will have a blank canvas to start designing in Divi.
Staggering Columns and Modules to Create a Unique Broken Grid Design in Divi
First, create a new regular section with a two-column row.
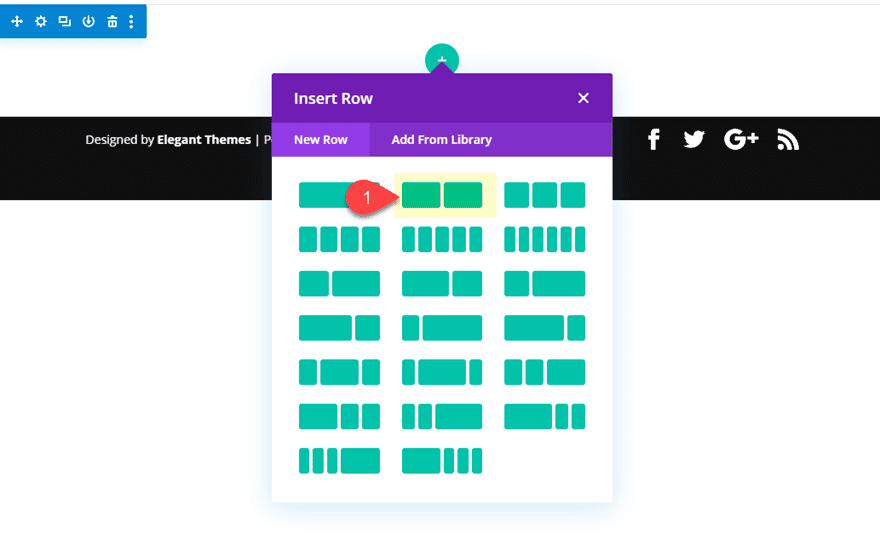
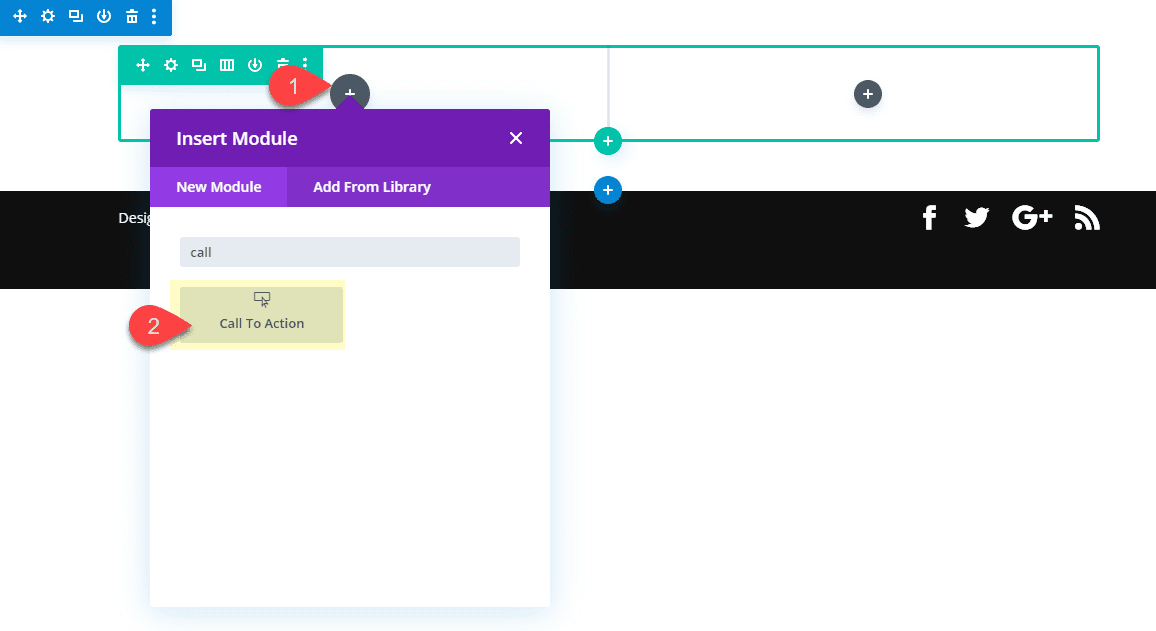
Then add a call to action module in column 1.
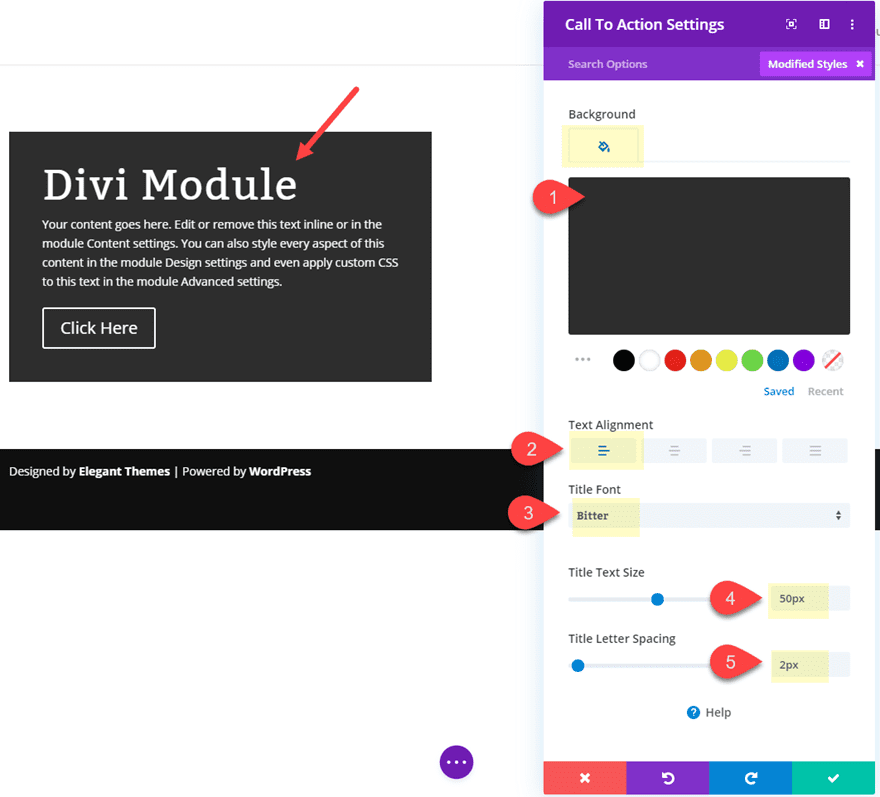
Change the title text to “Divi Module” or another short title of your choosing.
Then Update the module with a dark background color and then change up the Title text as follows:
Background Color: #333333
Text Alignment: left
Title Font: bitter
Title Text size: 50px
Title Letter Spacing: 2px
Then update the call to action module button as follows:
Button Text Size: 16px
Button Text Color: #333333
Button Background Color:
Button Border Color: #ffffff
Button Border Radius: 25px
Button Letter Spacing: 2px
Button Font: Raleway
Button Font Weight: Bold
Button Font Style: TT

Next, copy the module and paste the duplicate in column 2 so that you have the same call to action module in each column.

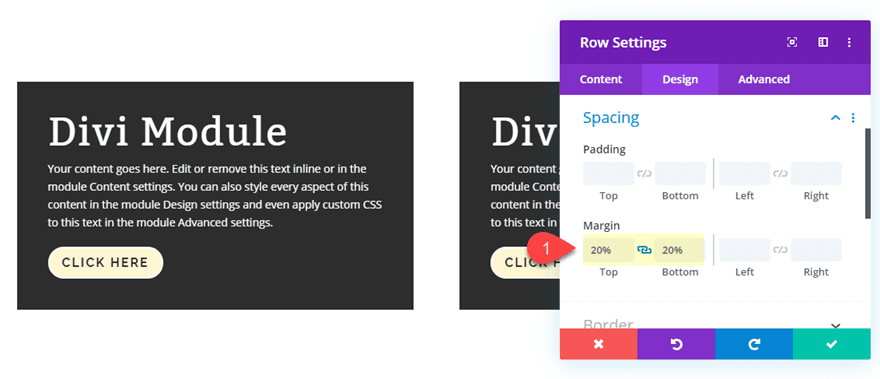
Update Row Spacing
Now let’s add some top and bottom margin to the row to make room for the design.
Margin: 20% top, 20% bottom
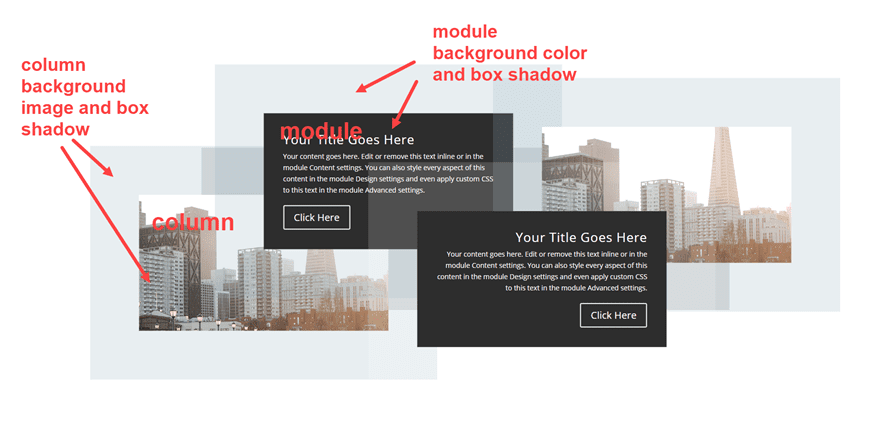
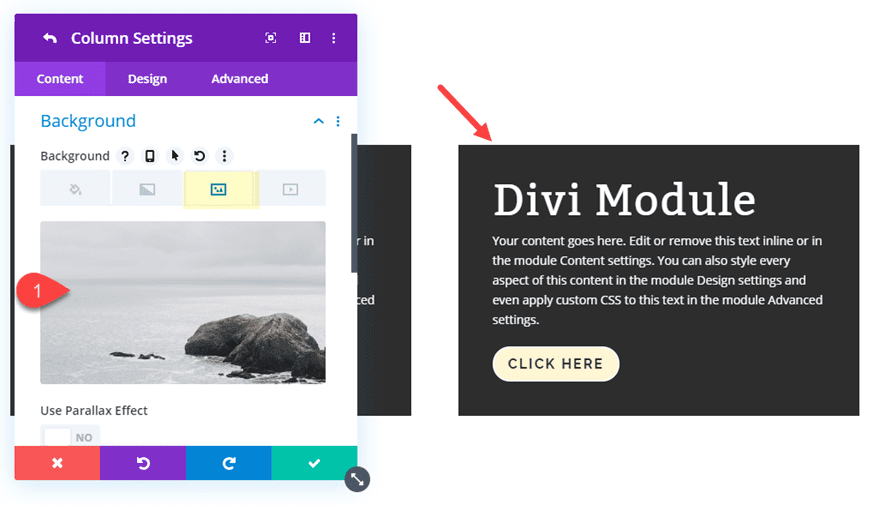
Add Column Background Images
Even though we won’t be able to see them yet, we are going to add background images to each of the columns. They will become visible once we move our module outside the column container with transform translate.
Go ahead and open the settings for column 1 and add a background image.
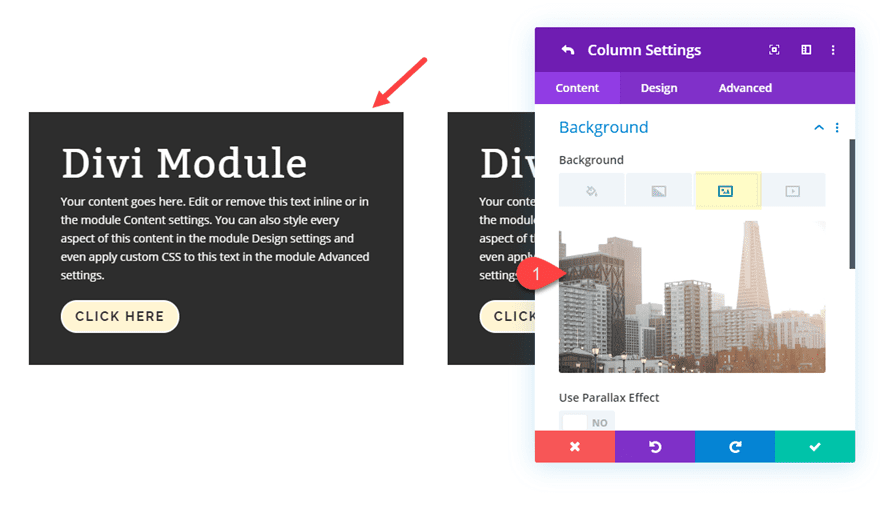
Then open the settings for column 2 and add a background image.
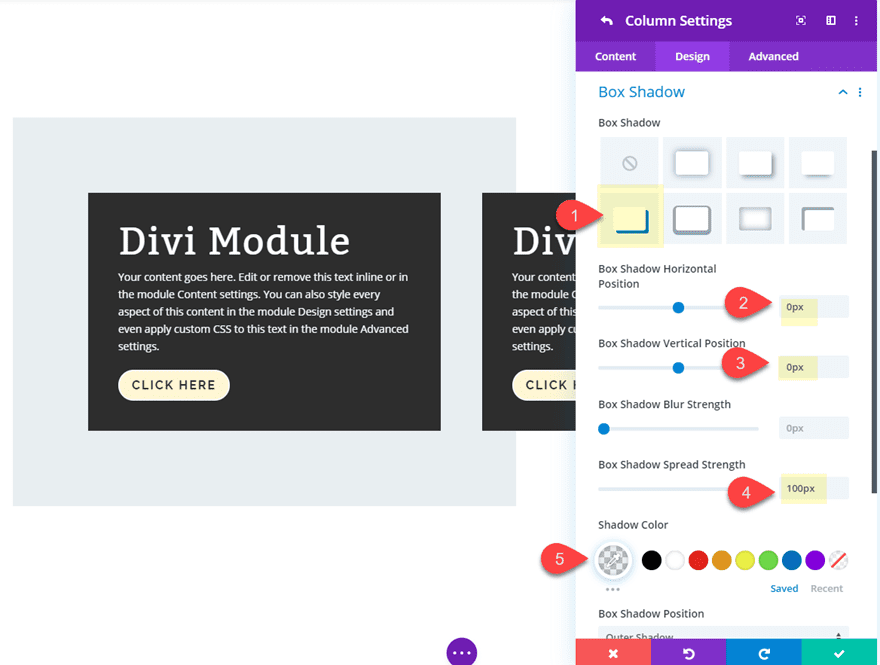
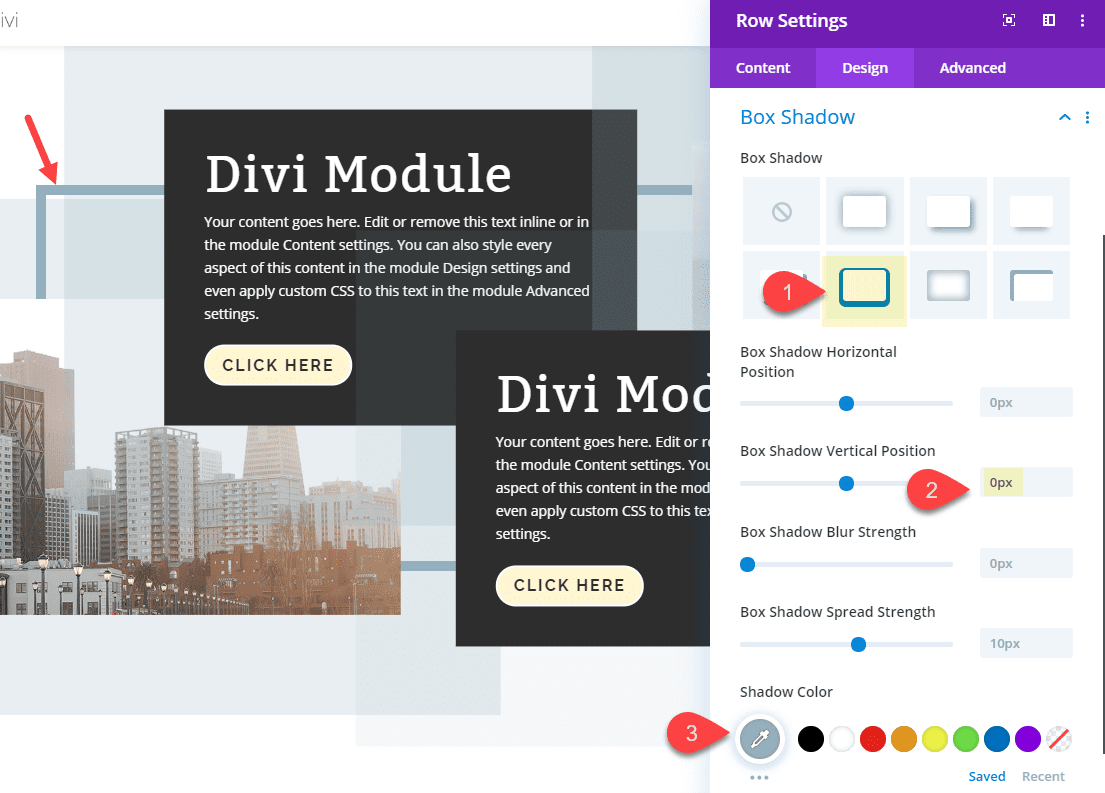
Add a Box Shadow to each column
Open column 1 settings and add the following box shadow:
Box Shadow: see screenshot
Box Shadow Horizontal Position: 0px
Box Shadow Vertical Position: 0px
Box Shadow Spread Strength: 100px
Shadow Color: rgba(151,178,193,0.21)
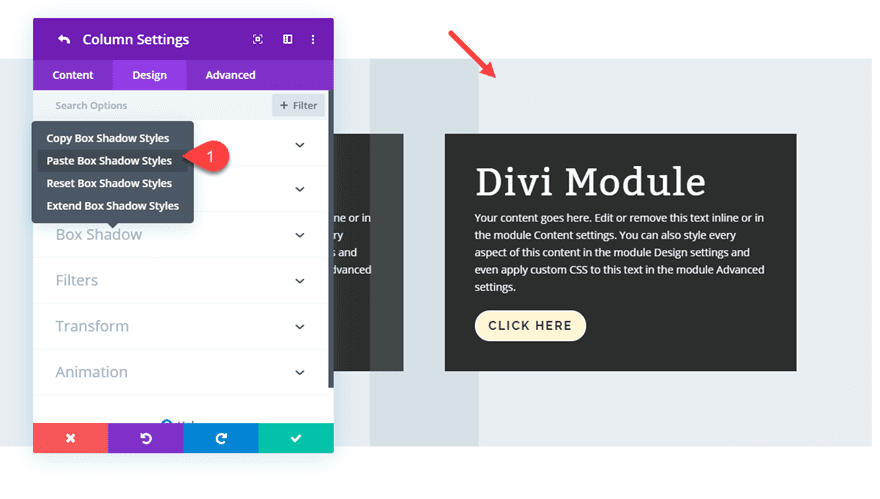
Then add the same box shadow style to column 2. To speed things up, you can use the right click options to copy the box shadow styles in column 1 and then paste them to the box shadow styles in column 2.
You will notice the box shadows will overlap. Using a semi transparent box shadow color will help create a cool overlapping effect. This is the great thing about using box shadows in design. Unlike borders, you can add large shadows that look like borders but they don’t affect the actual spacing of the layout.
Stagger Divi Columns Using Transform Translate
At this point, we are ready to start staggering the columns and modules to complete the broken grid design. First, we need to move the columns to the outer edge of the page. Then we can move the modules toward the center later.
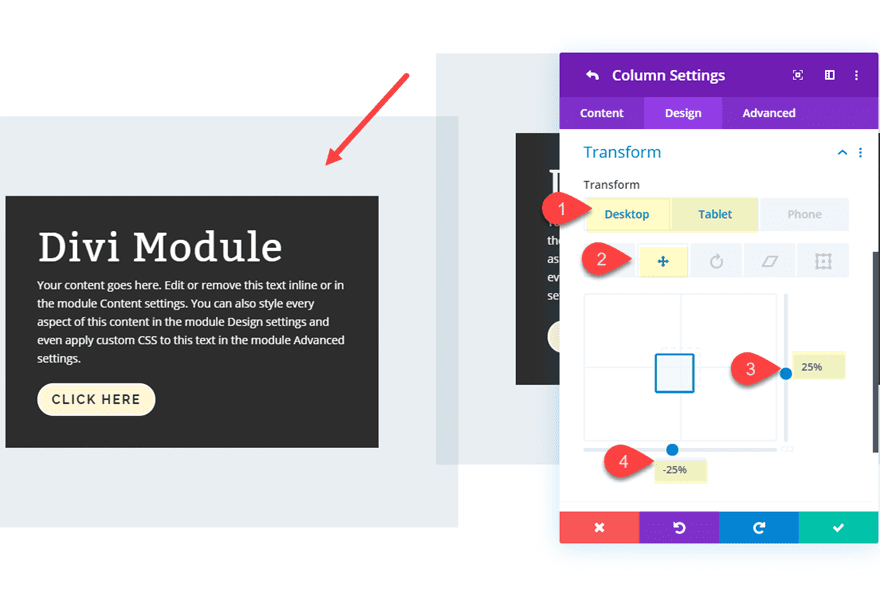
Stagger Column 1
Open column 1 setting and add the following transform translate property.
Transform Translate X axis: 25%
Transform Translate Y axis: -25% (desktop), -5% (tablet)
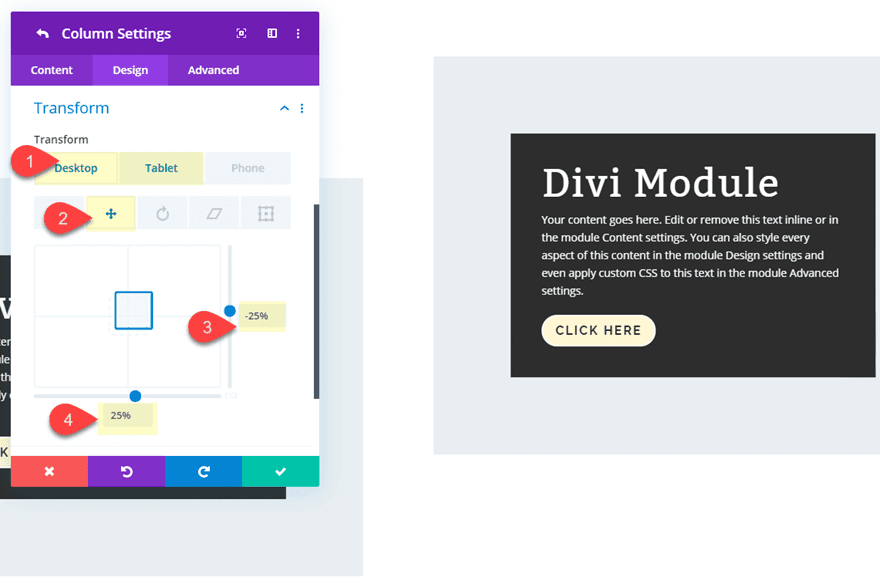
Stagger Column 2
For column 2, add the following transform translate property.
Transform Translate X axis: -25%
Transform Translate Y axis: 25% (desktop), 5% (tablet)
Stagger the Modules Using Transform Translate
Now we are ready to stagger our modules by moving them outside of the column container. This will expose the column background image and allow us to add another box shadow to the module for an additional overlapping design element.
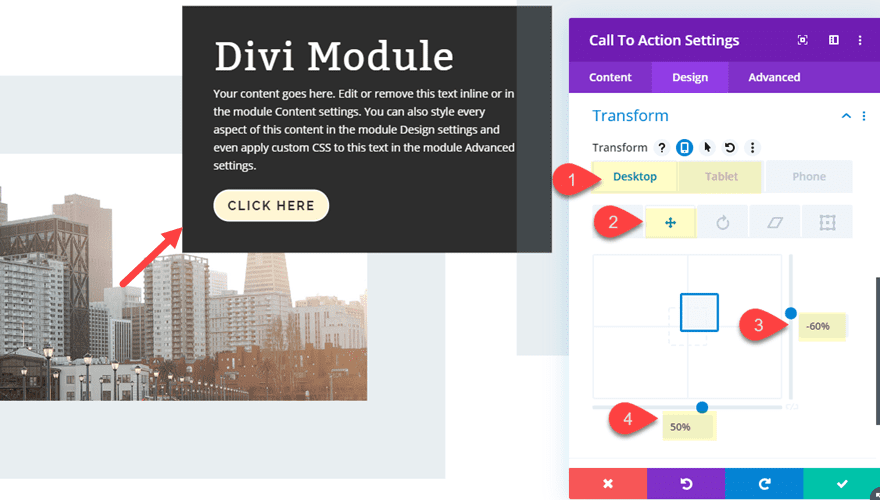
Stagger Module 1
Open the settings for the call to action module in column 1 and update the following:
Transform Translate X axis: -60%
Transform Translate Y axis: 50% (desktop), 10% (tablet)
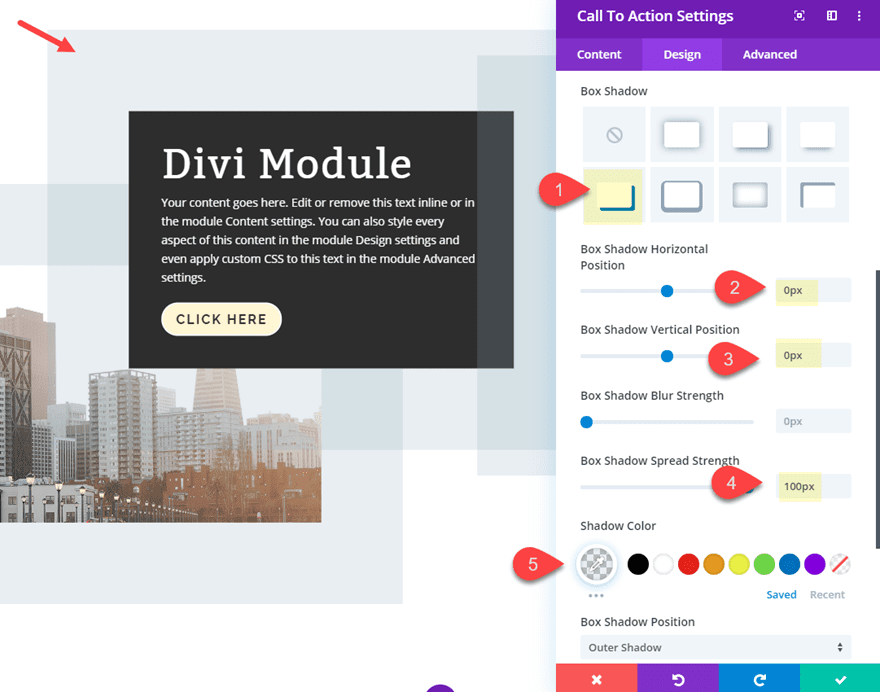
Add a box shadow to Module 1
Then add the following box shadow to the call to action module in column 1:
Box Shadow: see screenshot
Box Shadow Horizontal Position: 0px
Box Shadow Vertical Position: 0px
Box Shadow Spread Strength: 100px
Shadow Color: rgba(151,178,193,0.21)
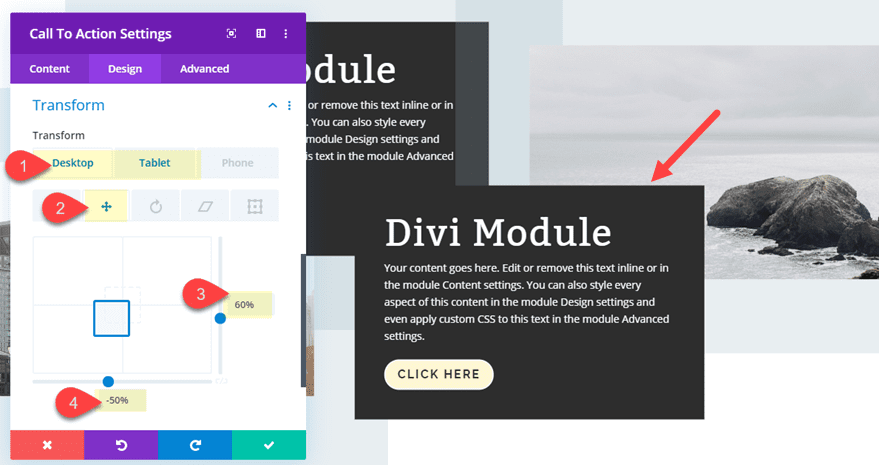
Stagger Module 2
To move the module in column 2, update the following:
Transform Translate X axis: 60%
Transform Translate Y axis: -50% (desktop), -10% (tablet)
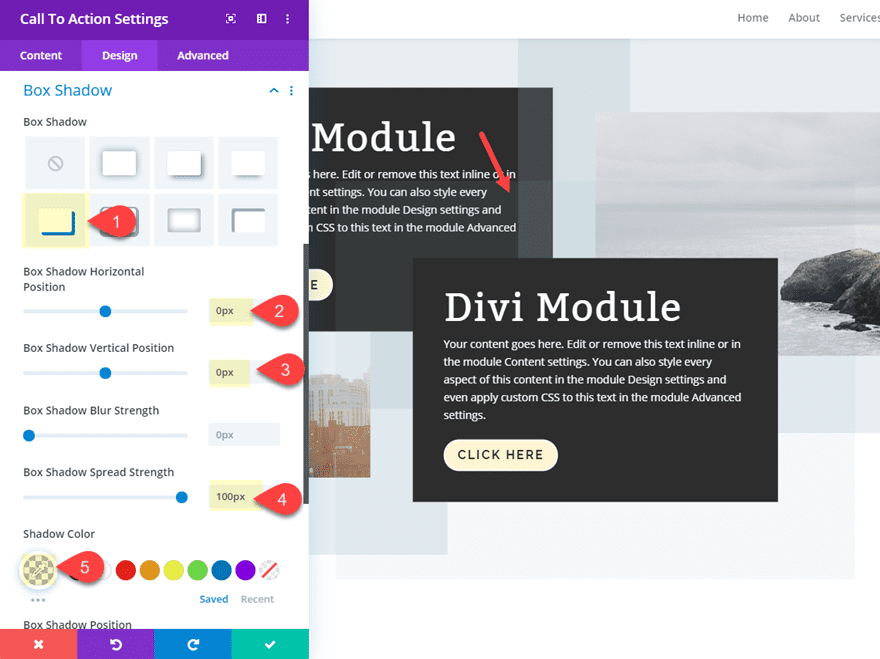
Add a box shadow to Module 2
Next, we can add a box shadow to the call to action module in column 2. We need to make this box shadow almost completely transparent because it will be overlapping module 1 and we don’t want to make it difficult to read the content.
Box Shadow: see screenshot
Box Shadow Horizontal Position: 0px
Box Shadow Vertical Position: 0px
Box Shadow Spread Strength: 100px
Shadow Color: rgba(151,178,193,0.09)
Add a Row Box Shadow Frame
To complete the design, let’s add a box shadow to the row that serves as a frame design element that sits in the background.
Box Shadow: see screenshot
Box Shadow Vertical Position: 0px
Shadow Color: #97b2c1
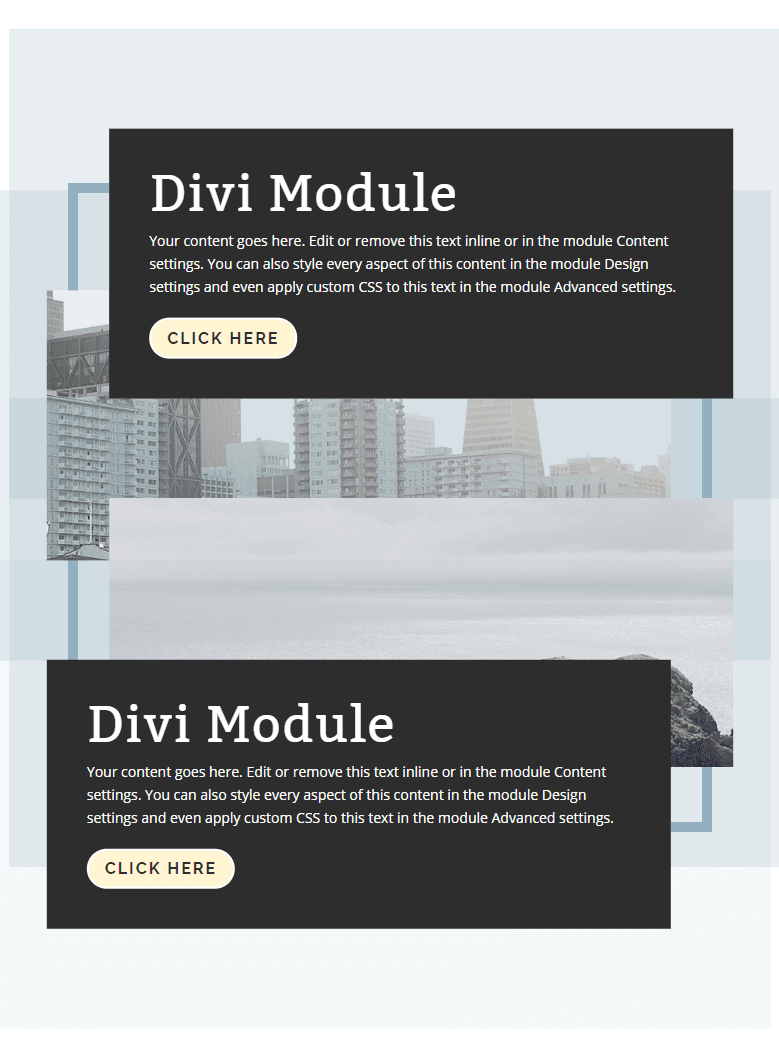
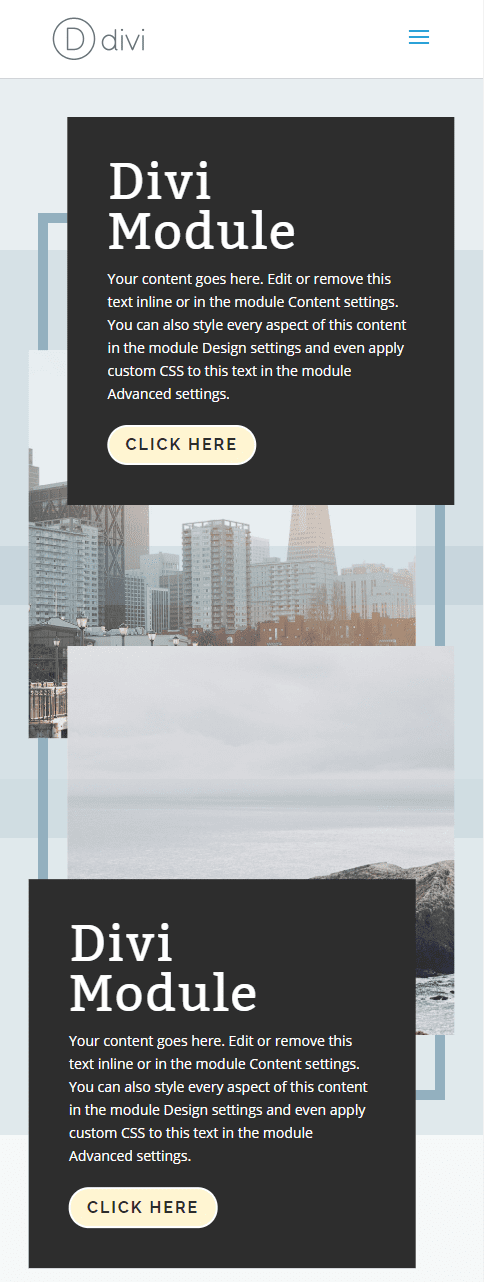
Final Design
Now let’s check out the final design.
Desktop
Tablet
Phone
Experimenting with Different Designs
What is cool about this design is that it allows you can easily change the number of modules, colors, and spacing for new designs. And you can stagger Divi columns and modules in various positions as well.
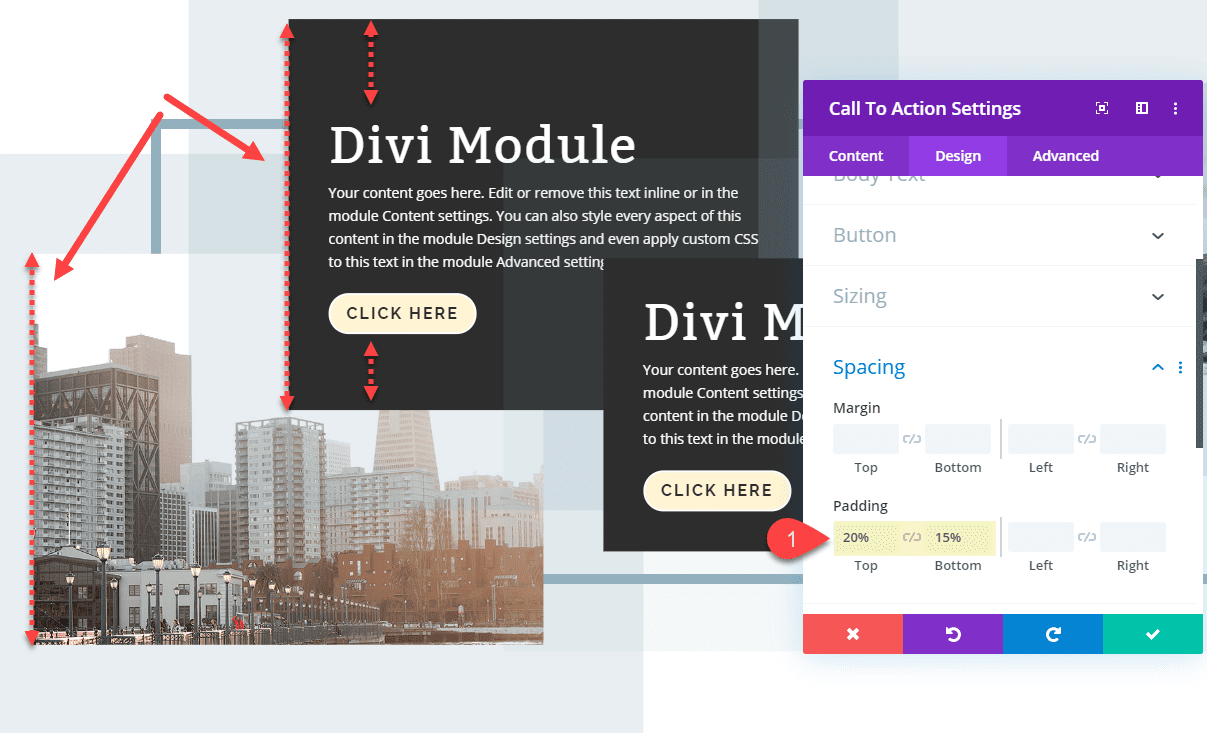
Adding spacing to the module to create a column background image of equal size to the module
Because the column size is dictated by the size of the content it contains, whatever space you add to the module will also increase the size of column. And since our column has been staggered with a background image, this is an easy way to have that background image always scale with the size of the module for a balanced design.
For example, open the settings for the call to action module in column 1 and update the padding as follows:
Padding: 20% top, 15% bottom
And notice how the column 1 background image scales with the size of the module.
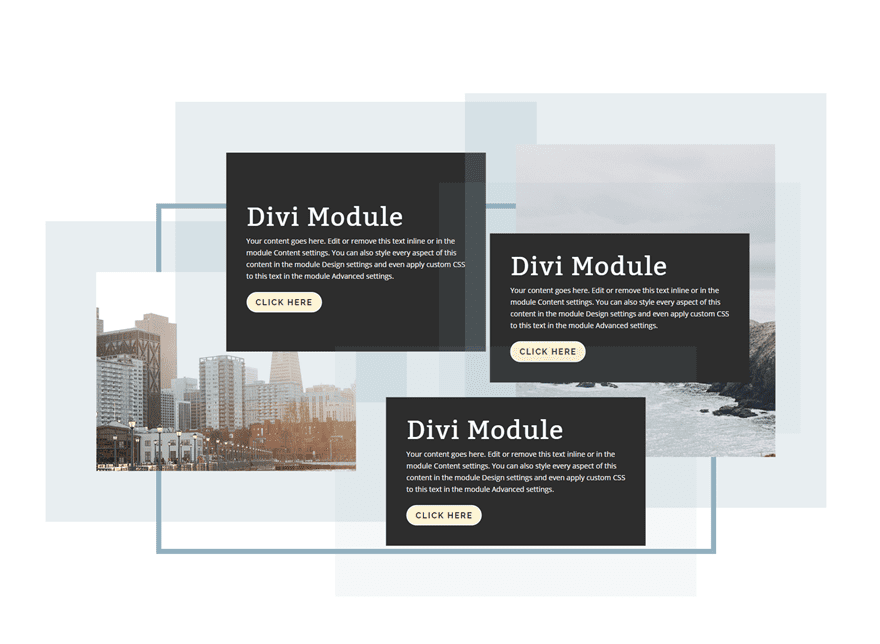
Adding more modules
In the same way adding more padding to the module increases the size of the column background, adding more modules in the column will also increase the size of the column background.
For example, duplicate the module in column 2 and notice how the background image expands to accommodate the space needed for the two modules in the column.
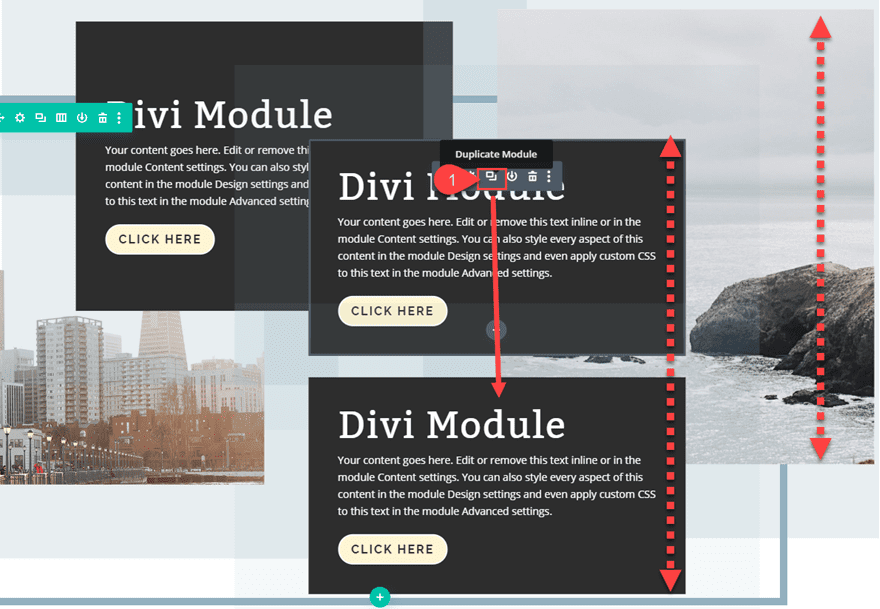
Then you can move the top module in column 2 over to the right a bit for a nice alternative design.

Here is the result.
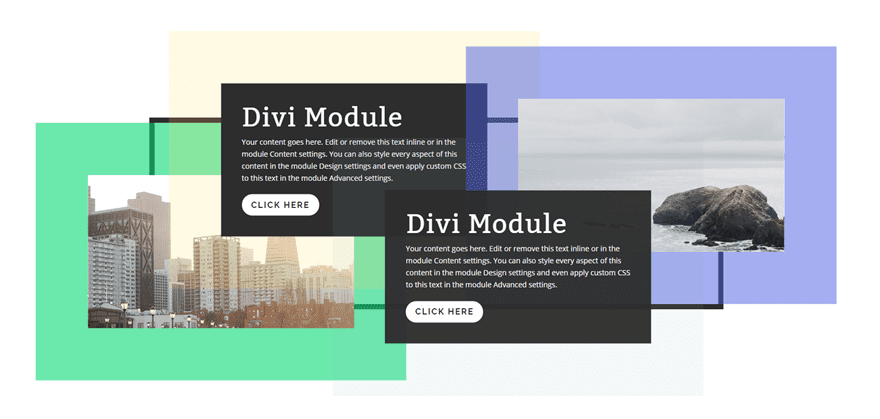
Changing Colors
If you are looking to match the layout with your own color scheme, a great way to do that is to update the box shadow colors.
Here is an example of what it would look like when updating the semi transparent box shadows for column 1, module 1, and module 2.
Final Thoughts
I hope this tutorial has given you a little inspiration for how you can stagger Divi columns and modules to create your own unique broken grid designs. The technique is really simple, involving mainly a few transform translate properties to stagger the columns and modules and some box shadows to create the unique broken design. Feel free to explore more color options and introduce more modules to see where the design might take you.
I look forward to hearing from you in the comments.
Cheers!
The post How to Stagger Divi Columns and Modules for Unique Broken Grid Designs appeared first on Elegant Themes Blog.