How to Create a Blog Post Ticker with Divi’s Post Slider Module
A blog post ticker is a convenient tool for dynamically showcasing blog posts (recent, related, etc.) on your website. You can think of it as a news ticker for WordPress blog posts.
Today, we are going to show you how to create a blog post ticker with Divi’s post slider module. Similar to a news ticker, the blog post ticker we are going to create will be a simplified and compact version of Divi’s post slider module. And, because the post slider module has built-in features for showcasing posts in a variety of ways, you can use it anywhere you want. You could use it on the homepage as a post ticker to show recent posts, or you can use it on the header of a blog post template to show posts related by current category.
After we show you how to create the blog post ticker in Divi, we’ll also show you how to save it to your Divi Library so you can add it to a header of a blog post template in the Divi Builder.
Let’s get started!
Sneak Peek
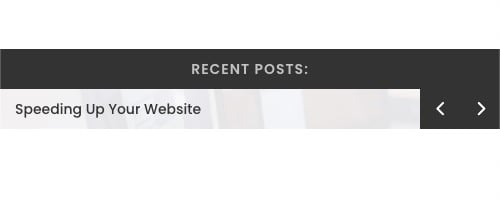
Here is a quick look at the blog post ticker we’ll build in this tutorial.
Here is how the post ticker stacks nicely on phone display.

We’ll show how to add the post ticker to show related posts on the header of a blog post template as well.
Download the Layout and Template for FREE
To lay your hands on the designs from this tutorial, you will first need to download it using the button below. To gain access to the download you will need to subscribe to our Divi Daily email list by using the form below. As a new subscriber, you will receive even more Divi goodness and a free Divi Layout pack every Monday! If you’re already on the list, simply enter your email address below and click download. You will not be “resubscribed” or receive extra emails.
.et_bloom .et_bloom_optin_1 .et_bloom_form_content { background-color: #4843d2 !important; } .et_bloom .et_bloom_optin_1 .et_bloom_form_container .et_bloom_form_header { background-color: #ffffff !important; } .et_bloom .et_bloom_optin_1 .carrot_edge .et_bloom_form_content:before { border-top-color: #ffffff !important; } .et_bloom .et_bloom_optin_1 .carrot_edge.et_bloom_form_right .et_bloom_form_content:before, .et_bloom .et_bloom_optin_1 .carrot_edge.et_bloom_form_left .et_bloom_form_content:before { border-top-color: transparent !important; border-left-color: #ffffff !important; }
@media only screen and ( max-width: 767px ) {.et_bloom .et_bloom_optin_1 .carrot_edge.et_bloom_form_right .et_bloom_form_content:before { border-top-color: #ffffff !important; border-left-color: transparent !important; }.et_bloom .et_bloom_optin_1 .carrot_edge.et_bloom_form_left .et_bloom_form_content:after { border-bottom-color: #ffffff !important; border-left-color: transparent !important; }
}.et_bloom .et_bloom_optin_1 .et_bloom_form_content button { background-color: #f92c8b !important; } .et_bloom .et_bloom_optin_1 .et_bloom_form_content .et_bloom_fields i { color: #f92c8b !important; } .et_bloom .et_bloom_optin_1 .et_bloom_form_content .et_bloom_custom_field_radio i:before { background: #f92c8b !important; } .et_bloom .et_bloom_optin_1 .et_bloom_border_solid { border-color: #f7f9fb !important } .et_bloom .et_bloom_optin_1 .et_bloom_form_content button { background-color: #f92c8b !important; } .et_bloom .et_bloom_optin_1 .et_bloom_form_container h2, .et_bloom .et_bloom_optin_1 .et_bloom_form_container h2 span, .et_bloom .et_bloom_optin_1 .et_bloom_form_container h2 strong { font-family: “Open Sans”, Helvetica, Arial, Lucida, sans-serif; }.et_bloom .et_bloom_optin_1 .et_bloom_form_container p, .et_bloom .et_bloom_optin_1 .et_bloom_form_container p span, .et_bloom .et_bloom_optin_1 .et_bloom_form_container p strong, .et_bloom .et_bloom_optin_1 .et_bloom_form_container form input, .et_bloom .et_bloom_optin_1 .et_bloom_form_container form button span { font-family: “Open Sans”, Helvetica, Arial, Lucida, sans-serif; } p.et_bloom_popup_input { padding-bottom: 0 !important;}
Download For Free
Join the Divi Newsletter and we will email you a copy of the ultimate Divi Landing Page Layout Pack, plus tons of other amazing and free Divi resources, tips and tricks. Follow along and you will be a Divi master in no time. If you are already subscribed simply type in your email address below and click download to access the layout pack.
You have successfully subscribed. Please check your email address to confirm your subscription and get access to free weekly Divi layout packs!
Import the Layout to the Divi Library
To import the section layout to your Divi Library, navigate to the Divi Library.
Click the Import button.
In the portability popup, select the import tab and choose the download file from your computer. It will be the JSON file inside the folder named “blog post ticker layout (Divi Library)”.
Then click the import button.

Once done, the section layout will be available in the Divi Builder.
Import the Layout to the Divi Library
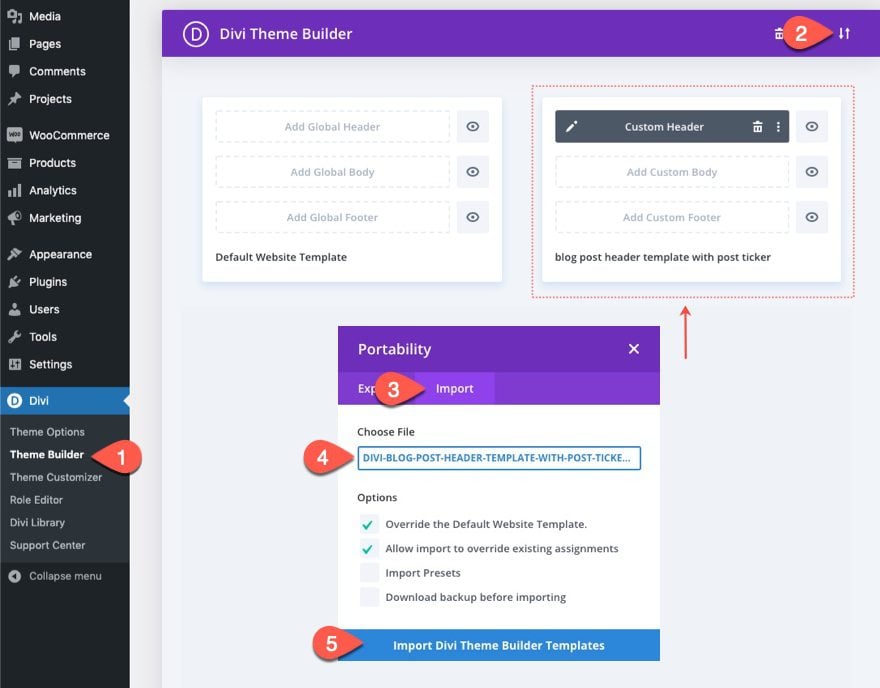
If you want to import the blog post template with the post ticker added to the header, you will need to navigate the Divi > Theme Builder.
Then use the portability icon at the top right of the page to import the JSON file. It will be the file inside the folder named “blog post header template with post ticker (Theme Builder)”.
Let’s get to the tutorial, shall we?
What You Need to Get Started

To get started, you will need to do the following:
- If you haven’t yet, install and activate the Divi Theme.
- Create a new page in WordPress and use the Divi Builder to edit the page on the front end (visual builder).
- Choose the option “Build From Scratch”.
After that, you will have a blank canvas to start designing in Divi.
Creating the Blog Post Ticker in Divi
Creating the Row
To start, let’s create a one-column row inside the section.
Row Settings
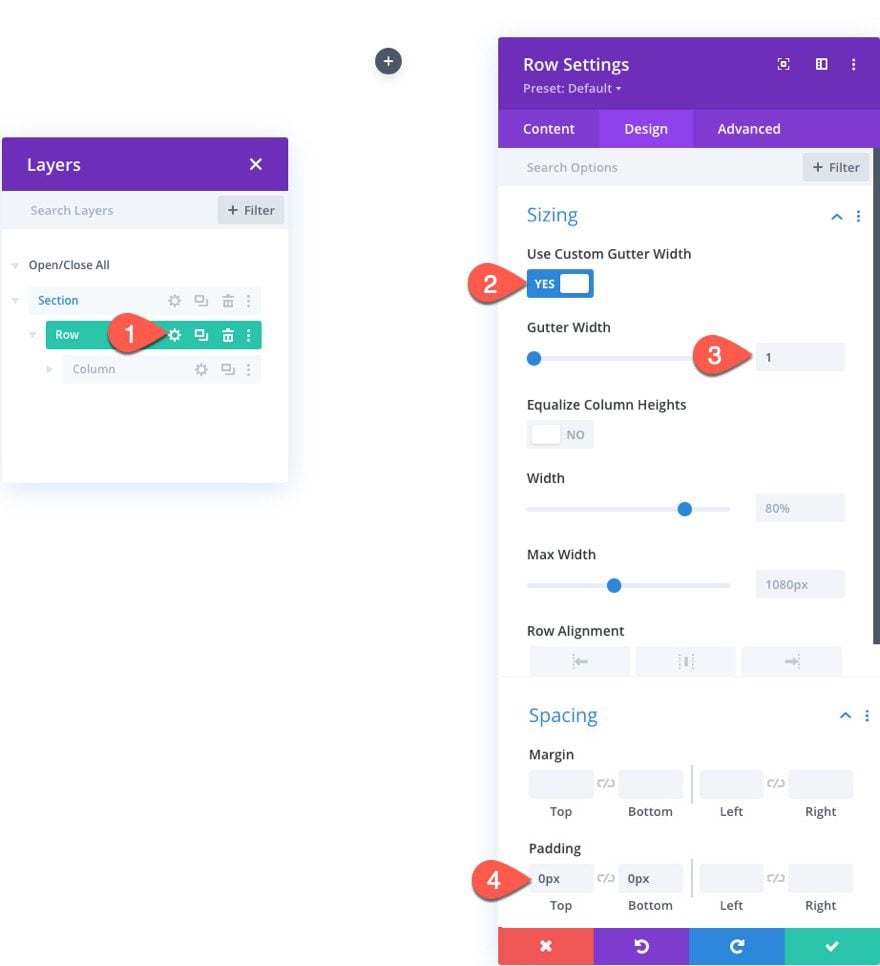
Next, update the row design settings as follows:
- Gutter Width: 1
- Padding: 0px top, 0px bottom
Creating the Post Ticker Title with a Text Module
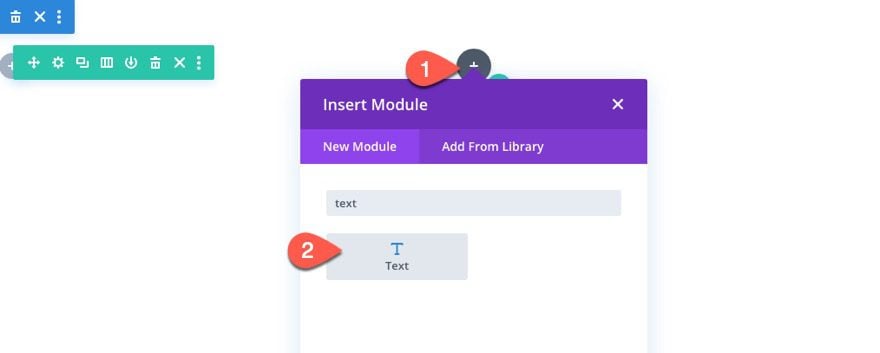
Now that the row is in place, add a text module to the row to create the post ticker title.
Title Text and Background
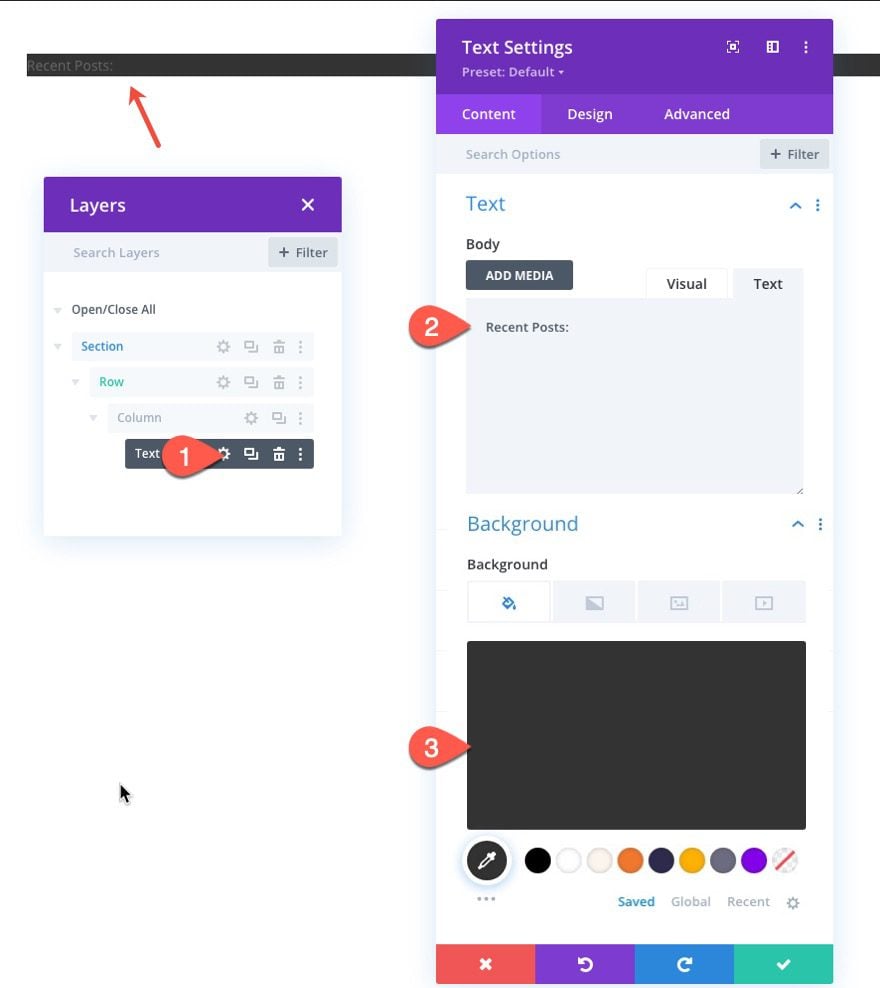
Update the body text to read “Recent Posts:”.
Then update the background color:
- Background Color: #333333
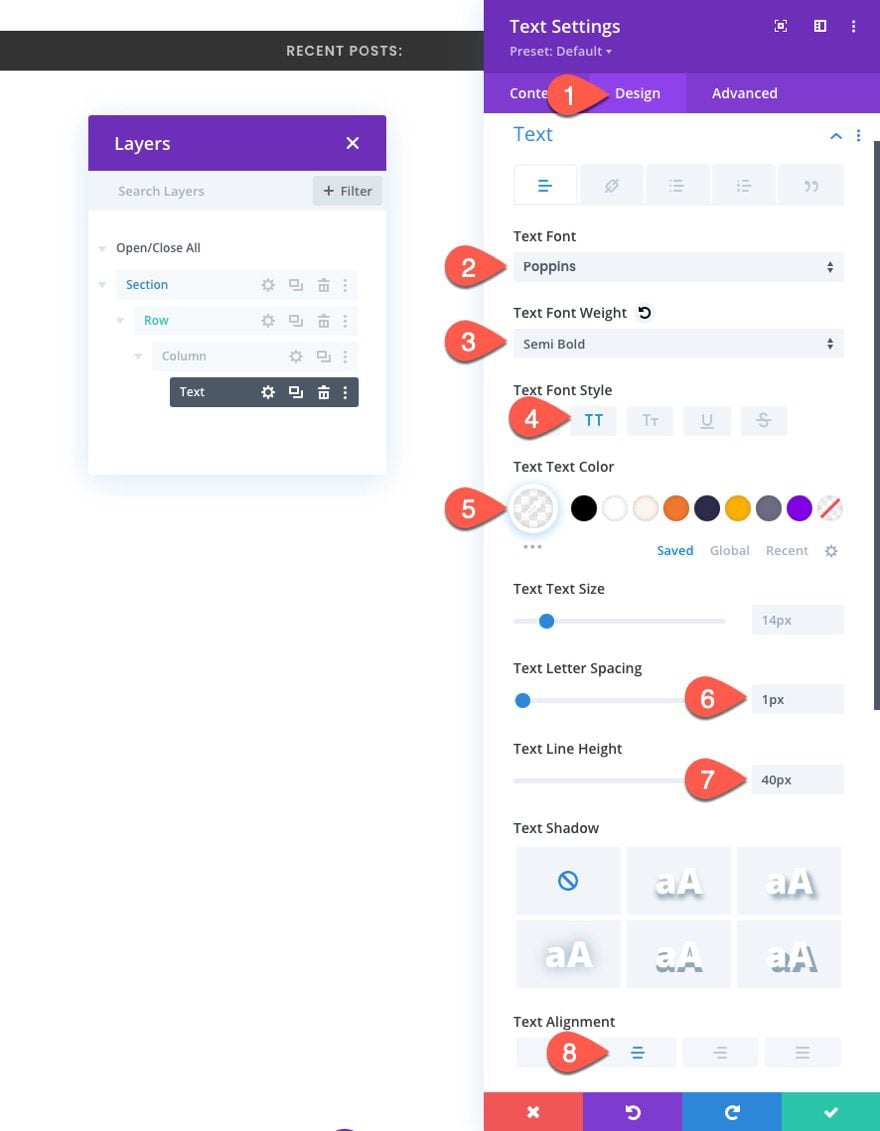
Design Settings
Under the design tab, update the text styles as follows:
- Text Font: Poppins
- Text Font Weight: Semi Bold
- Text Font Style: TT
- Text Text Color: rgba(255,255,255,0.7)
- Text Letter Spacing: 1px
- Text Line Height: 40px
- Text Alignment: Center
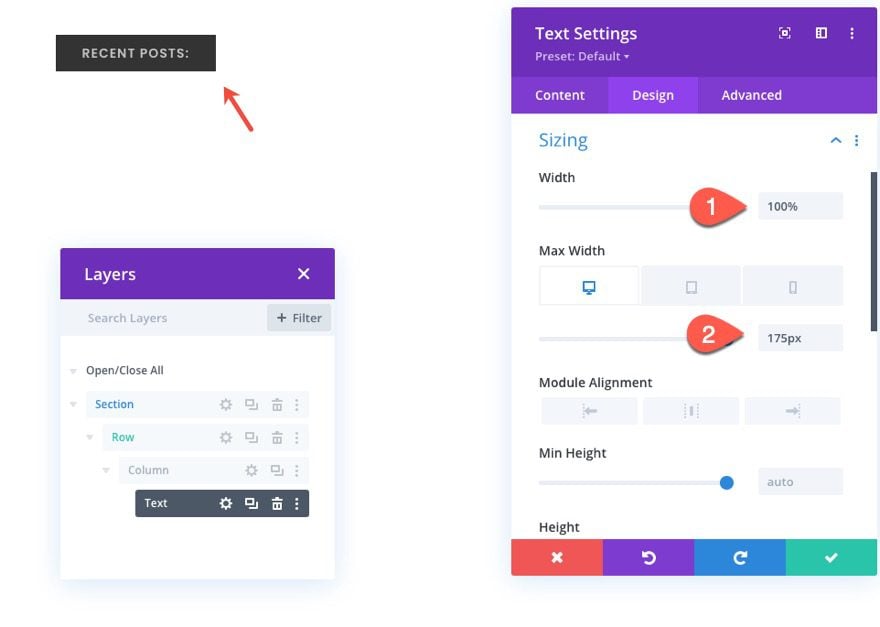
- Width: 100%
- Max Width: 175px (desktop and tablet), 100% (phone)
That takes care of our post ticker title. Now let’s start building the post ticker.
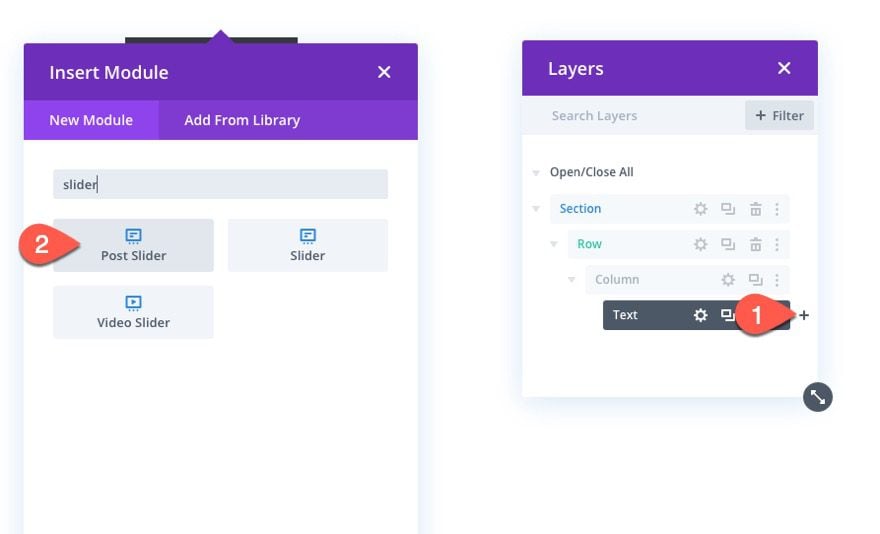
Creating the Blog Post Ticker with a Blog Post Slider Module
To create the blog post ticker, we are going to use a post slider module and then simplify the design to make it really compact.
Add a post slider module under the text module.
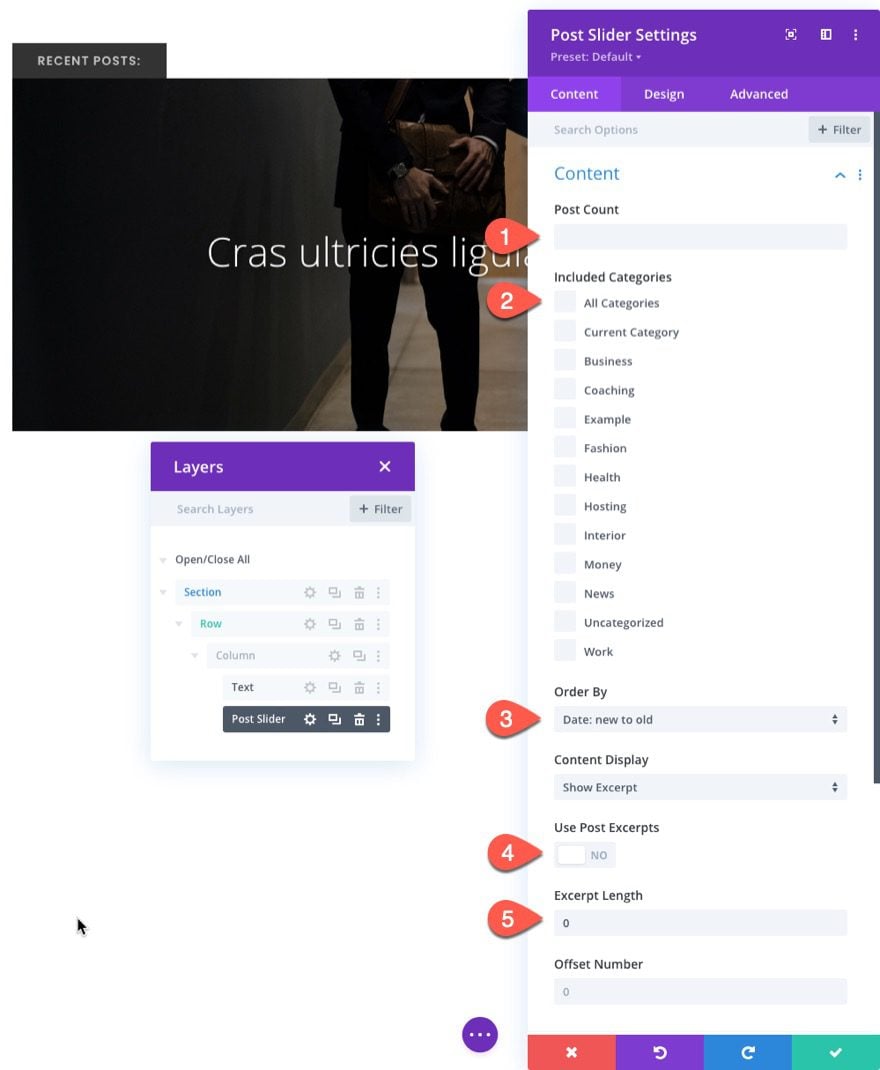
Post Slider Content
Under the content tab, you can choose the post count, included categories, and how they or ordered. For this example we are going to keep the default and have the slider show the most recent posts.
To hide the post excerpt, make sure to update the following:
- Use Post Excerpts: NO
- Excerpt Length: 0
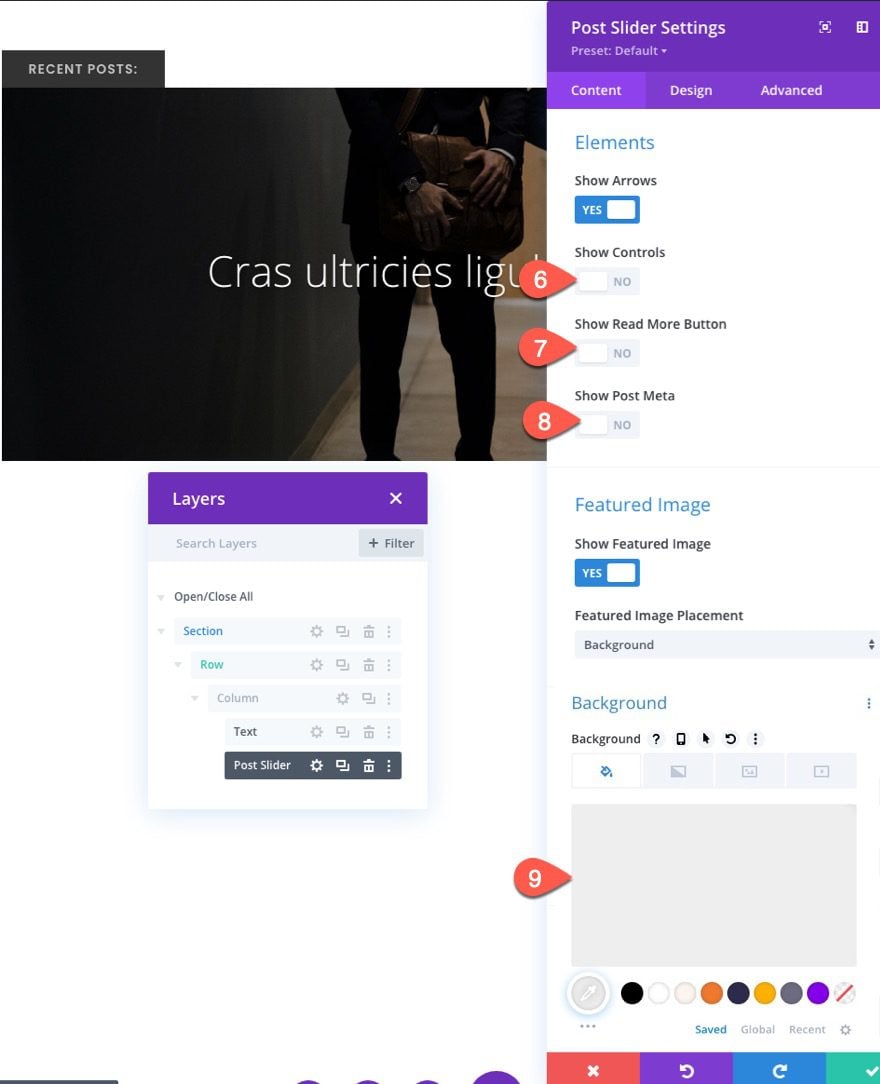
Post Slider Elements and Background
Really, all we want to display in the slider is the post title and the slide arrows. Under the elements option group, hide everything but the arrows.
- Show Controls: NO
- Show Read More Button: NO
- Show Post Meta: NO
We are going to keep the option to show the featured image as the background of each slide. But for a backup, make sure to add the following background color:
- Background Color: #eeeeee
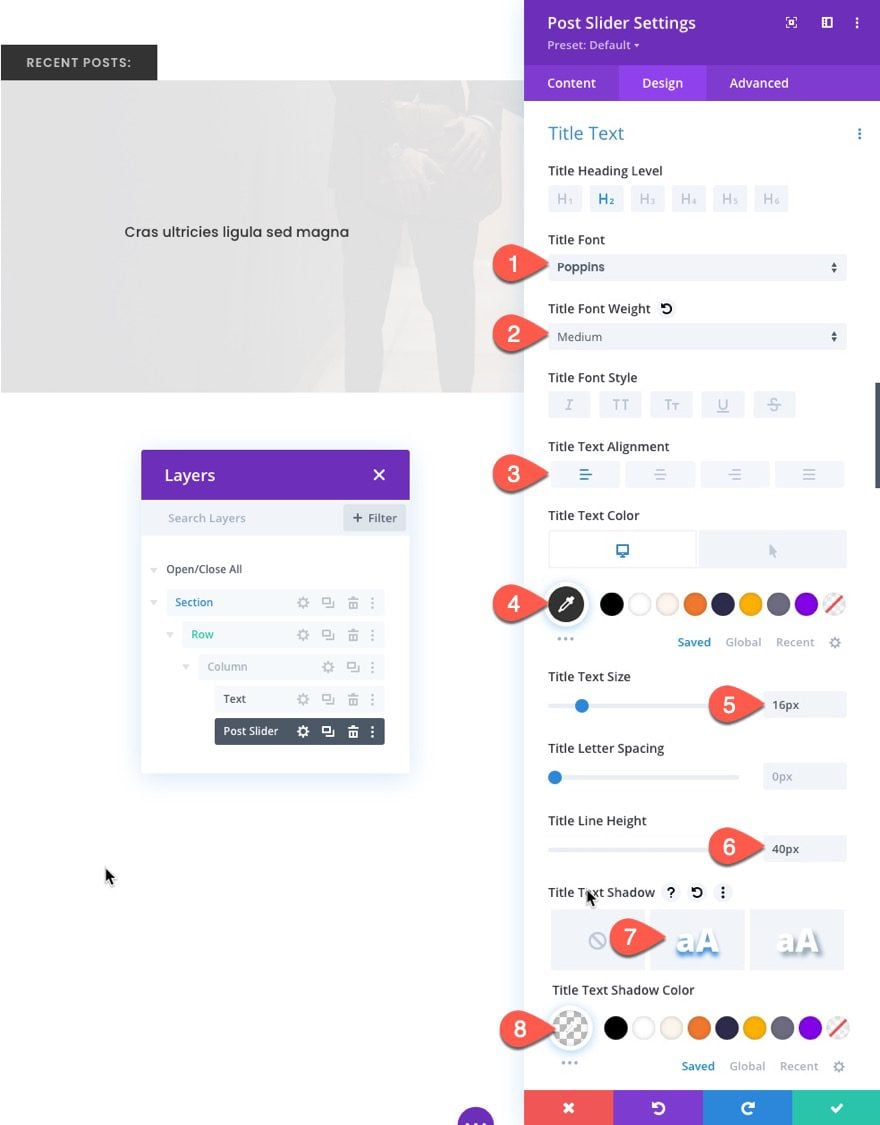
Post Slider Design Settings
Title Text
Under the design tab, update the title text styles as follows:
- Title Font: Poppins
- Title Font Weight: Medium
- Title Text Alignment: Left
- Title Text Color: #333333
- Title Text Color (hover): #ef51f7
- Title Text Size: 16px (desktop), 14px (phone)
- Title Line Height: 40px
- Title Text Shadow: see screenshot
- Title Text Shadow Color: transparent
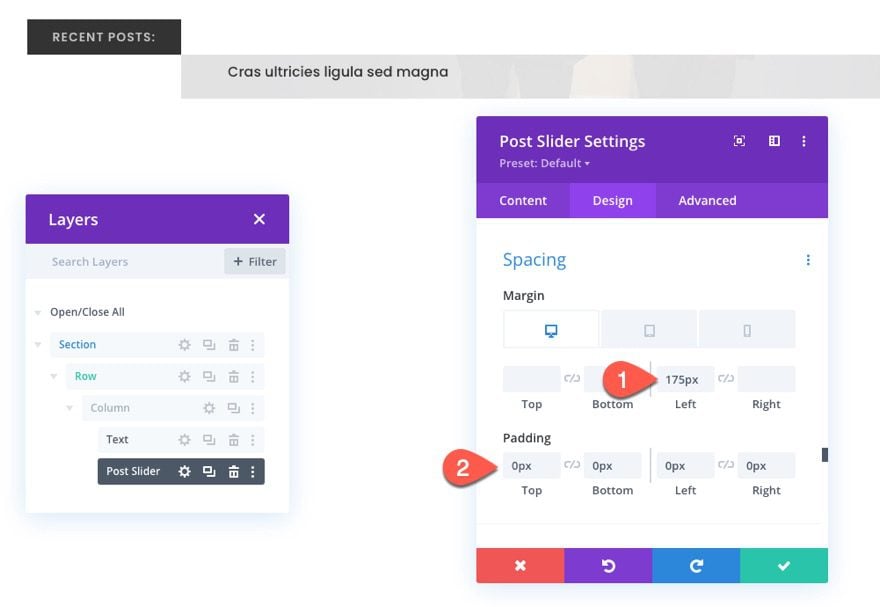
Spacing
We need to make room for the post ticker title text module so that we can position our post slider on the right side of it. To do that, update the following:
- Margin: 175px left (desktop and tablet), 0px left (phone)
- Padding: 0px top, 0px bottom, 0px left, 0px right
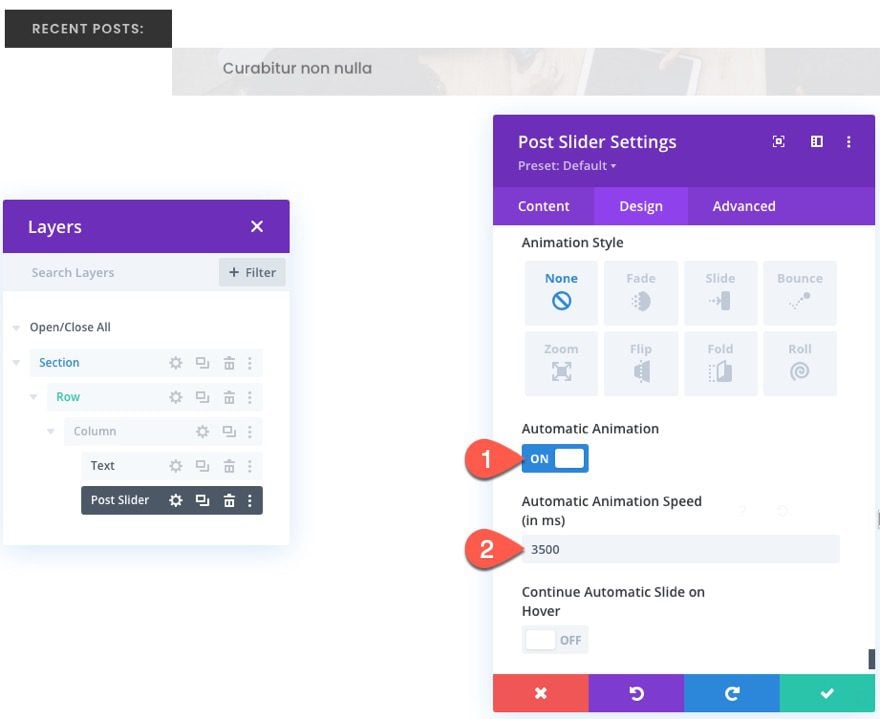
Automatic Animation
The post slider has a built-in option for adding automatic animation. This will give us the ticker functionality we need to see the posts without having to click the slide arrows.
Add the automatic animation as follows:
- Automatic Animation: ON
- Automatic Animation Speed: 3500
Feel free to increase or decrease the speed to whatever you feel is best.
Advanced Styling
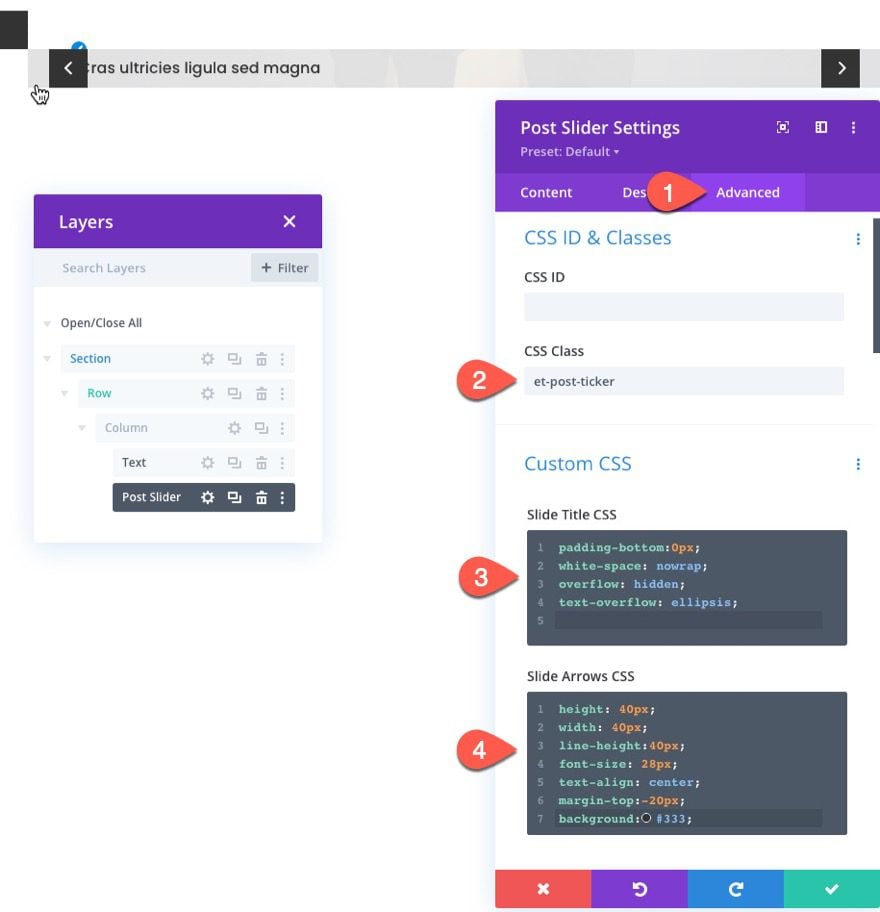
CSS Class and Custom CSS
At this point, the post slider is a functioning post ticker for the most part. But there are a few advanced tweaks we can add to clean up the design.
First, add a custom CSS Class as follows:
- CSS Class: et-post-ticker
To make sure the post title stays on one line inside the slider/ticker and hides the overflow with an ellipsis, add the following CSS to the Slide Title:
padding-bottom:0px;
white-space: nowrap;
overflow: hidden;
text-overflow: ellipsis;
To give the slide arrows more of a button feel, add the following CSS to the Slide Arrows:
height: 40px;
width: 40px;
line-height:40px;
font-size: 28px;
text-align: center;
margin-top:-20px;
background:#333;
Additional CSS with Code Module for Positioning Slide Arrows
At this point, the default functionality of the slide arrows will show only on hover and the placement of the arrows are on the right and left sides of the slide. To improve the user experience and make it more like a post ticker, we can have the arrows show always and position them to the right of the slider.
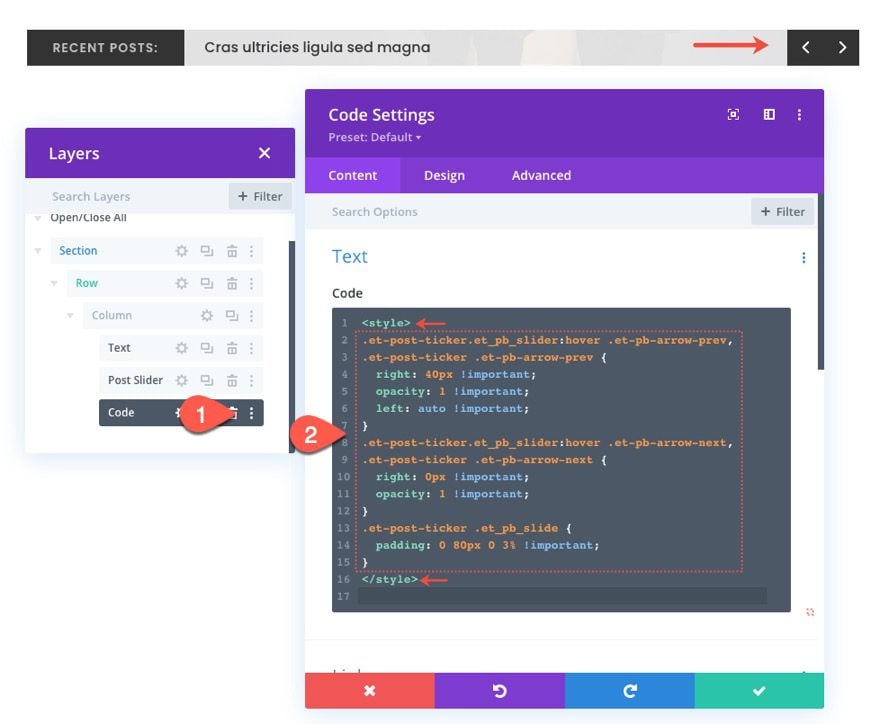
To do this, add a new code module under the post slider.
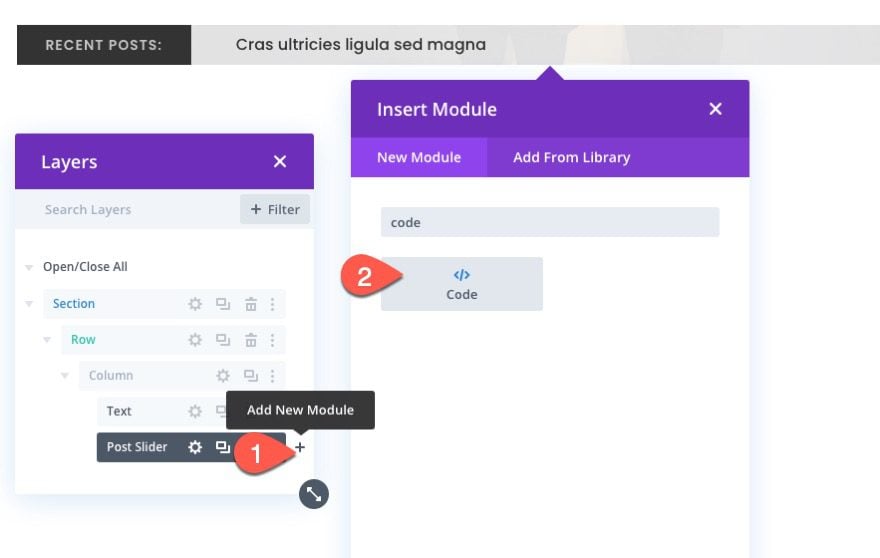
Then paste the following CSS making sure to wrap it with the necessary style tags.
.et-post-ticker.et_pb_slider:hover .et-pb-arrow-prev,
.et-post-ticker .et-pb-arrow-prev {
  right: 40px !important;
  opacity: 1 !important;
  left: auto !important;
}
.et-post-ticker.et_pb_slider:hover .et-pb-arrow-next,
.et-post-ticker .et-pb-arrow-next {
  right: 0px !important;
  opacity: 1 !important;
}
.et-post-ticker .et_pb_slide {
  padding: 0 84px 0 3% !important;
}
Final Result
Here is the final result on a live page.
Notice how the post ticker handles the overflow of the title text.

And here is how the post ticker stacks nicely on phone display.
Adding the Post Ticker to the Header of a Blog Post Template
One obvious use case for this post ticker is to have it display recent posts on an actual header of a blog post template. Here’s how you can do that.
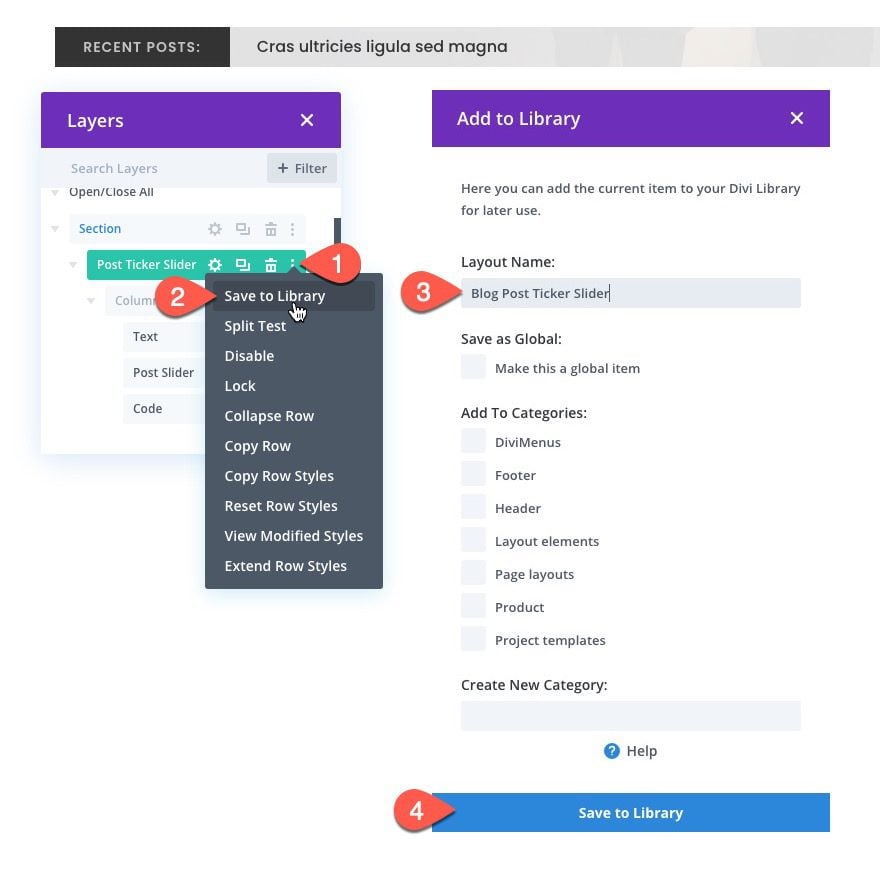
Saving the Row to the Divi Library
First, save the row containing the elements that make up our post ticker to the Divi Library. You can do this by clicking on the three-dots icon on the row and selecting “Save to Library”. Then give the layout a name and click the “Save to Library” button.
Adding the Post Ticker Row to the Header template
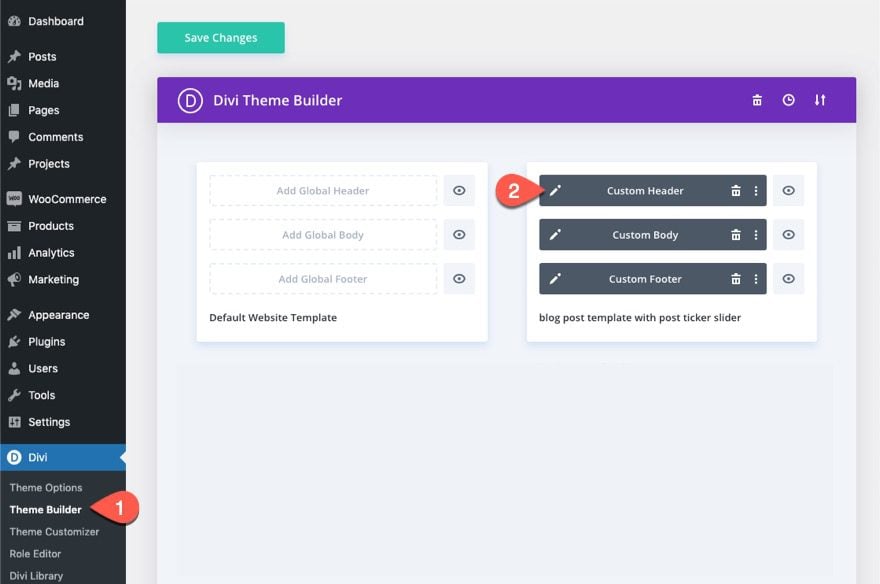
Edit the Custom Header
Once the row has been saved to the library, we are ready to add it to a custom header. For this example, make sure the template is assigned to “All Posts”. Then click to edit the custom header for that template.
Insert Row (Post Ticker) from Library
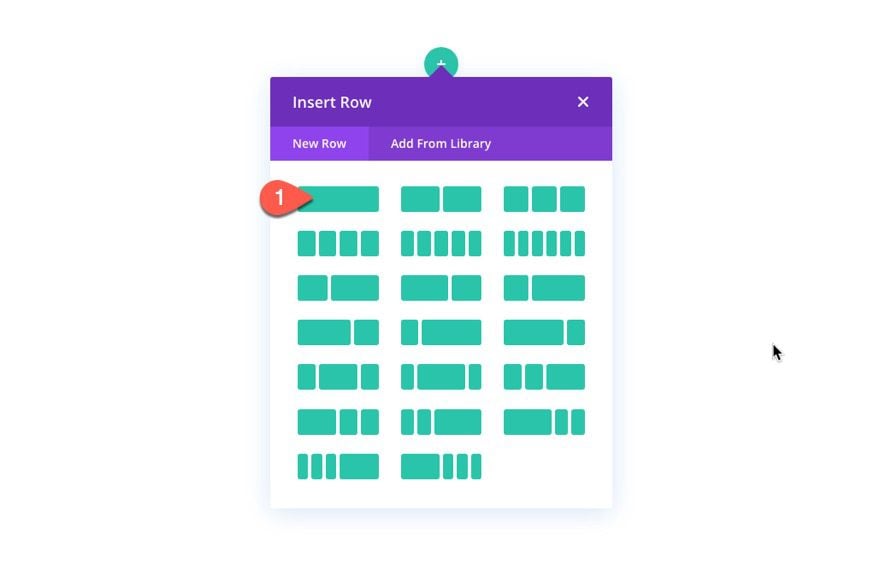
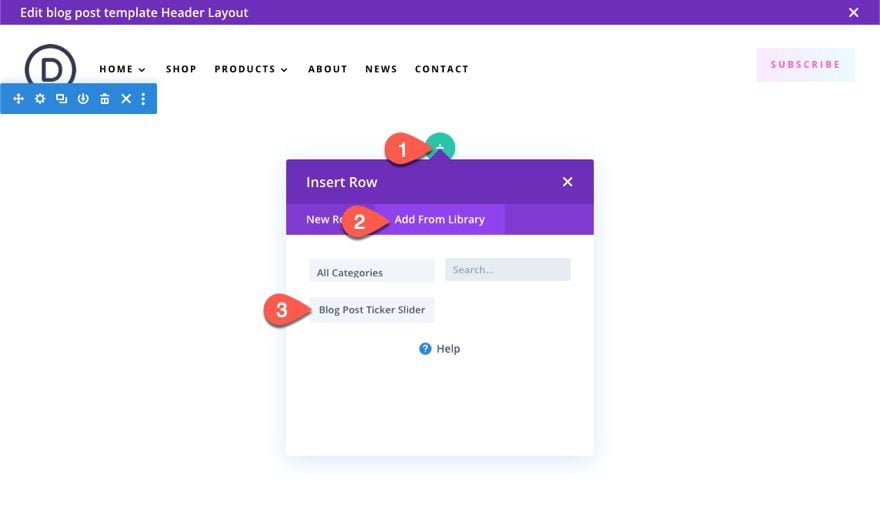
In the header layout editor, click to add a new row wherever you want the post ticker to be displayed.
In the Inser Row modal, select the Add From Library tab. Find the blog post ticker row you previously saved to the library and select it.
Now the post ticker will show on the header.
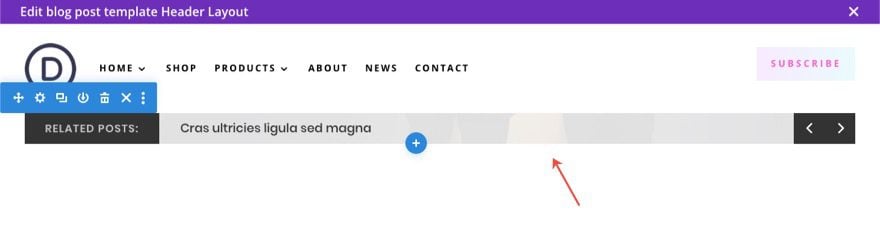
Showcase Related Posts for Current Category
Because this post ticker is going to be displayed only on blog posts, we can choose to display only the posts related to the current category.
First, we need to update the title text in our text module to “Related Posts:”.
Then, open the post slider settings. Under Included Categories, select the Current Category option.
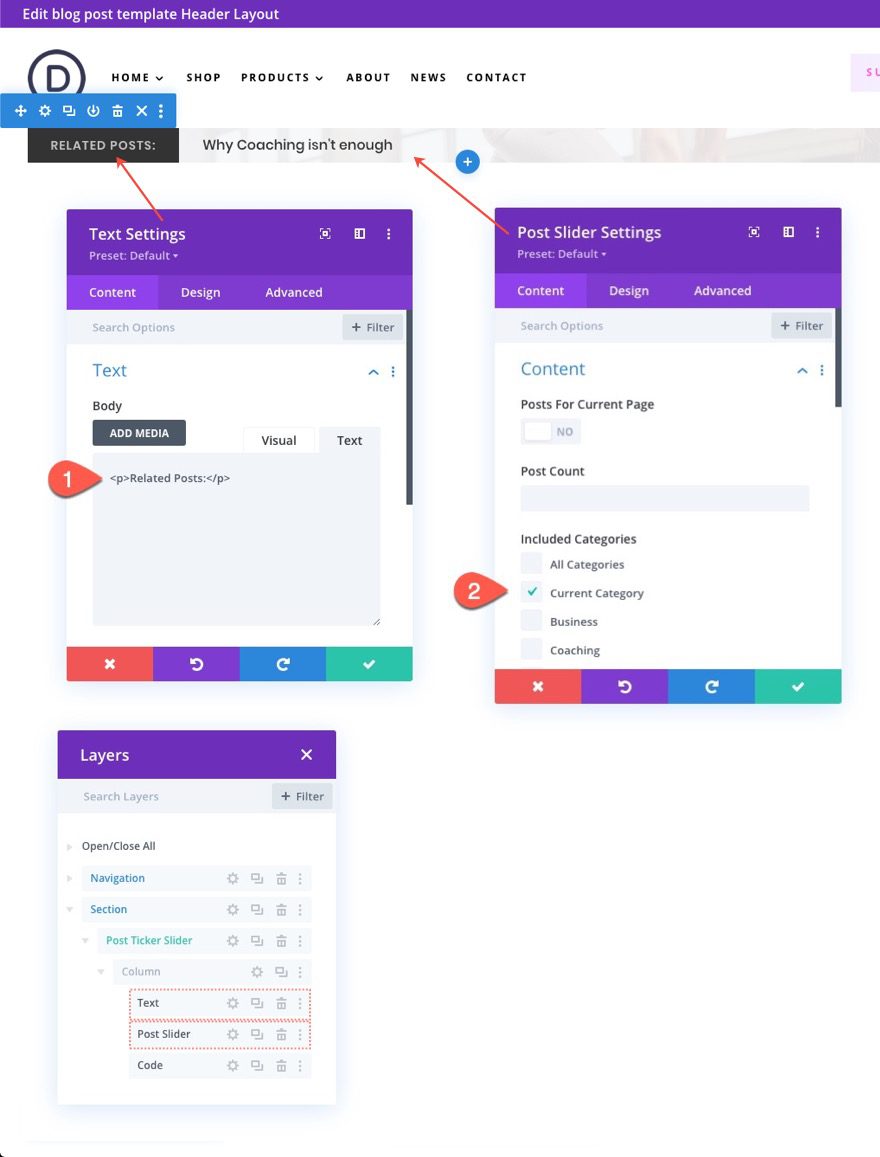
Now each blog post will have a post ticker in the header that displays related posts by current category.
Result on Blog Post Template
Here is the automatic animation in action.
Here is how you can click the navigation arrows to jump to next and previous posts. And clicking the post title brings you to that post.
And here is how it looks on tablet and phone.


Final Thoughts
As we have learned, we can create a blog post ticker easily by simplifying Divi’s slider module design and making a few custom tweaks to the navigation arrows. And don’t forget that you can always make style adjustments easily using all of the options built-in to the post slider. Hopefully, this will come in handy for all you bloggers and web developers out there.
I look forward to hearing from you in the comments.
Cheers!
.inline-code{padding: 0px 4px; color: crimson; font-family: Monaco,consolas,bitstream vera sans mono,courier new,Courier,monospace!important} video.with-border {border-radius: 8px;box-shadow: 0 8px 60px 0 rgba(103,151,255,.11), 0 12px 90px 0 rgba(103,151,255,.11);display:block;margin: 0 auto;}
The post How to Create a Blog Post Ticker with Divi’s Post Slider Module appeared first on Elegant Themes Blog.