
Introducing Divi Presets
The New Way To Build Websites With Divi
Today we are excited to introduce Divi Presets, the new class-based design system that will change the way you design Divi websites forever. When you customize the style of a Divi module, row or section you can now save that custom style as Divi Preset. That preset can be applied to elements across your entire website so that they all share the same custom appearance. When you modify a preset, all items using that preset will reflect the change. Furthermore, when you add a new element to a page, you can quickly apply any of your saved presets instead of having to start from scratch. This is a huge change to the Divi design system and one of the most important Divi features we have released in years.
What Is A Divi Preset?
Each Divi module comes with a wide range of design settings that you can use to customize its appearance. You can take a standard Divi button module and add a new background color, rounded corners, larger text and a custom font (among many other things). That’s the beauty of Divi – full design control! However, designing hundreds of modules across your entire website takes a lot of time…until now.
The new Divi Presets system allows you to take a custom appearance and save it as a preset. All of the design changes you make are saved in the preset. When you add a new module to your page, you can browse your saved presets and quickly apply them.
Once a preset has been applied, the module’s default design is controlled by the preset. If you update the style of a preset, all modules using that preset are updated as well. This allows you to control the design of your entire website using a small collection of saved presets. Plus, it saves tons of time when adding new modules to your page, since you don’t need to design each new module from scratch but instead can quickly select an appearance from your Divi Presets library.
Designing New Divi Presets
Presets can be managed within the new presets dropdown menu found at the top of all settings panels. Click the “Add New Preset” button and give your preset a name to create a new preset. Next, customize your preset’s style using the module’s available design settings. After you save the preset, you will notice that it’s now available in the preset dropdown menu. The next time you add a module to a page, you can select this preset and the module’s design will be updated to reflect the custom appearance you created.
Creating New Presets From Existing Elements
You can also transform already-designed elements into reusable presets. If you have a module whose design has already been customized, you can save that custom appearance as a preset using the “Create New Preset From Current Styles” option.
Assigning Default Presets
Last year we introduced the Global Defaults Editor, allowing you customize the default appearance of each Divi module. The Divi Presets system expands upon and replaces global defaults, allowing you to create and maintain a collection of different preset appearances in addition to your default appearance. All modules start with a default preset, which can be adjusted to change the default appearance of modules across your entire website.
Any of your presets can also be assigned as the default preset. Once a default preset is assigned, modules across your entire website will assume this new default appearance. When you add a new module, it will use the default preset automatically. Current global defaults will be migrated into your new default preset when you update Divi.
Editing Existing Presets
You can always change the design of a saved preset. When you edit a preset, the appearance of all modules using that preset are updated across your entire website. To edit a preset, simply click the pencil icon within the presets dropdown menu.
A website intelligently designed using Divi Presets can be managed so much more easily than ever before since the website’s styles are consolidated into a small collection of shared presets that represent a broader design system. This is a major shift in Divi’s design methodology and a huge advantage for Divi users!
Understanding The New Presets Interface
All of your presets can be managed within the new presets dropdown menu. Here you can create new presets and manage existing presets. Let’s get to know the interface a little better.
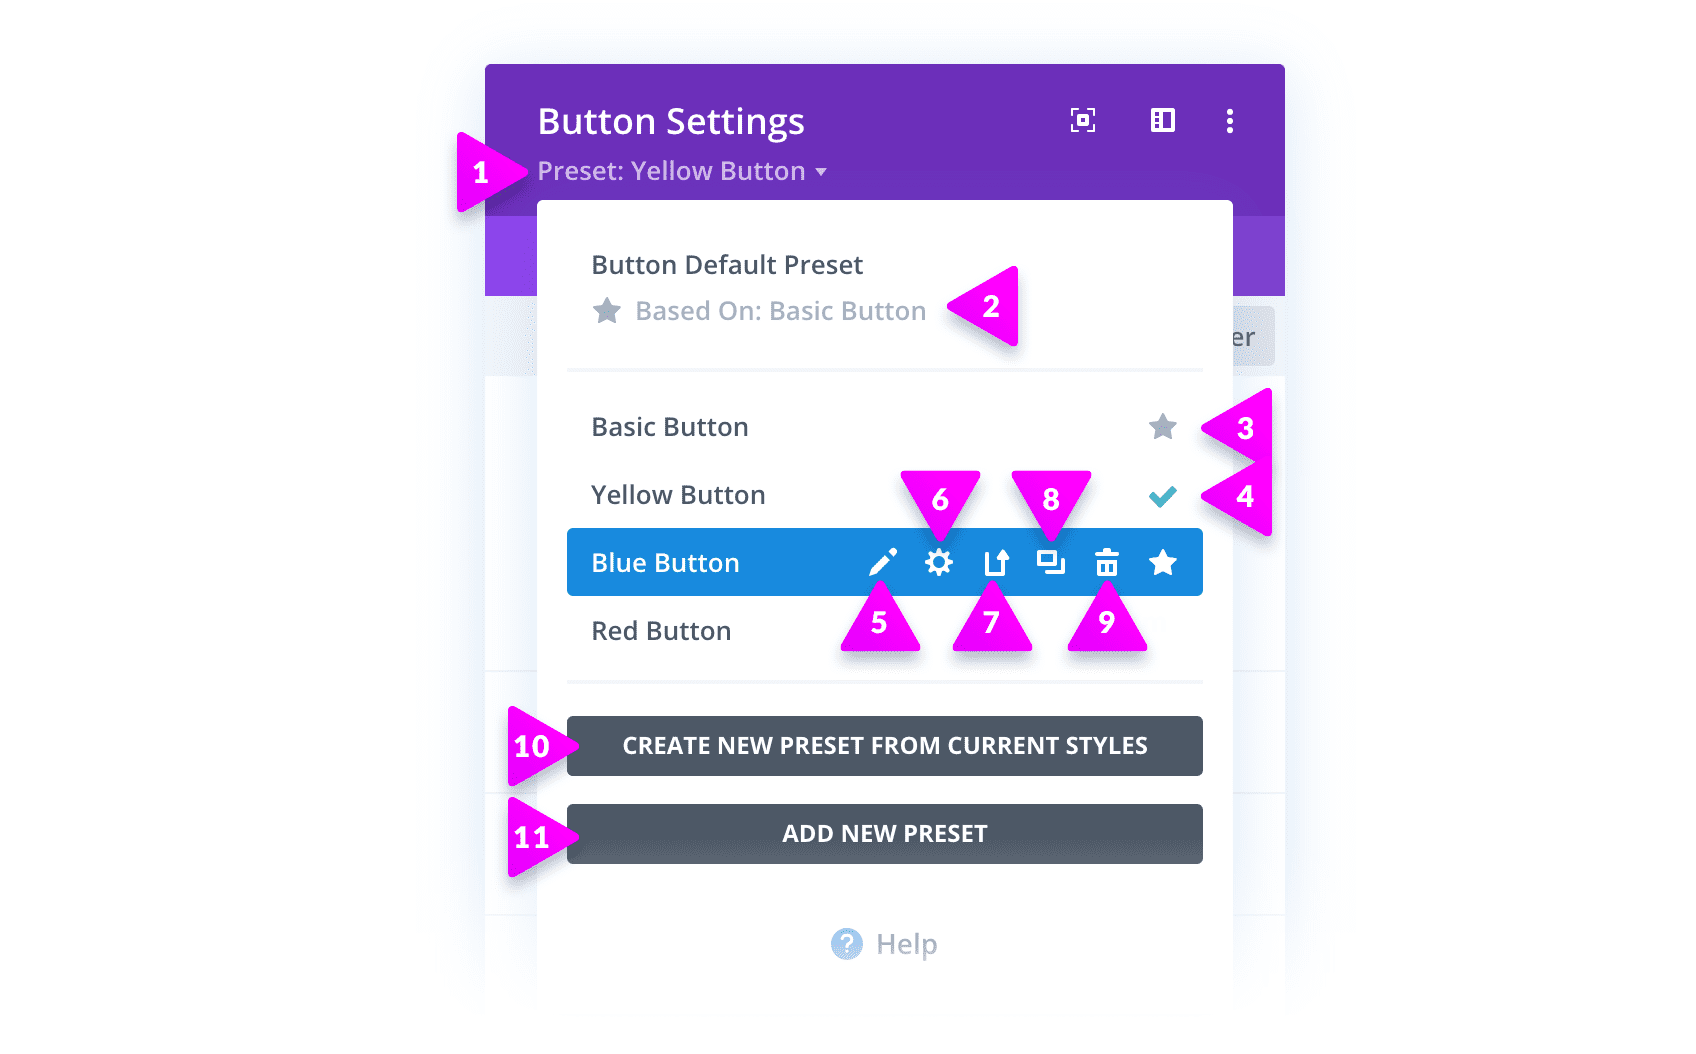
- Preset Dropdown Menu – Here you can see your module’s active preset. Click the dropdown menu to manage your presets library.
- Default Preset – This is your default preset. Select it to activate the default module appearance.
- Assigned Default Preset – This star signifies which preset is currently assigned as your default preset. All basic modules will use this preset as their default appearance. Click this star icon within any preset to make it the default preset.
- Selected Preset – The green check mark signifies which preset is currently assigned to the module you are editing. The module’s base styles are controlled by the selected preset.
- Edit A Preset – Click this pencil icon to edit the design of a preset. When you edit a preset’s design, all modules using that preset will take on the new appearance.
- Manage Preset Settings – Here you can change the preset’s name to better organize it within your preset library.
- Update Preset With Current Styles – This will update the preset to match the current design of the module your are editing.
- Duplicate Preset – You can duplicate any of your existing presets. This is a great way to create different variations without having to start from scratch.
- Delete Preset – Deleting a preset will remove it from your library. All modules using that preset will switch to the default preset.
- Create New Preset From Current Styles – This will create a new preset to match the design of the module you are currently editing. If you have pre-designed elements that you would like to reuse throughout your website, you can quickly turn them into presets.
- Add New Preset – This will add a new blank preset. You can then customize the preset using the module’s available design settings.
Why Divi Presets Are So Important
If you are a WordPress web designer, then you are probably familiar with HTML and CSS. Now just imagine having to create a website from scratch using HTML and CSS, but without the use of CSS Classes. You would need to add the styling information for every single element individually using in-line styles. If you wanted to update a shared style across your entire site, you would have to do it hundreds or thousands of times since none of those elements were using shared CSS classes. That sounds terrible, right? Believe it or not, that is the current state of most page builders, and that was the current state of Divi until now. Classes are to CSS, what Presets are to Divi. A website intelligently designed using Divi Presets can be managed so much more easily than ever before since the website’s styles are consolidated into a small collection of shared presets that represent a broader design system. This is a major shift in Divi’s design methodology and a huge advantage for Divi users.
Learn More About How To Use Divi Presets
We have written a full overview of Divi Presets, which can be found in our Divi documentation. You can also click the help icon within the Divi Presets menu while using the builder to watch a full video walkthrough.
The new Divi Presets system is available today, so download Divi and take it for a spin. Let us know what you think in the comments and don’t forget to check back next week for more great Divi features coming your way.
Join Or Upgrade Today For 10% Off!
Today’s The Best Day To Get Divi Or Upgrade Your Account To Lifetime
Join the most enthusiastic and loving WordPress theme community on the web and download Divi 3.0 today. Using the new Visual Builder, you can build websites faster than ever before with its incredibly fast and intuitive visual interface. You have to see it to believe it!
Join Today For 10% OFF!
Renew Your Account Today For 10% OFF!
Upgrade Your Account Today For 10% OFF!
The post Introducing The Incredible New Way To Design Divi Websites appeared first on Elegant Themes Blog.