Optimizing Your Divi Site’s Logo Image with Global Presets

Optimizing your site’s logo in Divi is an important part of the design of your website. But, it doesn’t have to be a mysterious or daunting endeavor. In fact, Divi makes it pretty simple with the Divi Theme Builder and all of the built-in design options available.
In this tutorial, we are going to show you how to optimize your logos with the right size, position, and style in Divi. Then we’ll show you how to save those designs as global presets you can use for future development.
Let’s jump in!
Download the Logo Image Presets Layout for FREE
To lay your hands on the designs from this tutorial, you will first need to download it using the button below. To gain access to the download you will need to subscribe to our Divi Daily email list by using the form below. As a new subscriber, you will receive even more Divi goodness and a free Divi Layout pack every Monday! If you’re already on the list, simply enter your email address below and click download. You will not be “resubscribed” or receive extra emails.
.et_bloom .et_bloom_optin_1 .et_bloom_form_content { background-color: #4843d2 !important; } .et_bloom .et_bloom_optin_1 .et_bloom_form_container .et_bloom_form_header { background-color: #ffffff !important; } .et_bloom .et_bloom_optin_1 .carrot_edge .et_bloom_form_content:before { border-top-color: #ffffff !important; } .et_bloom .et_bloom_optin_1 .carrot_edge.et_bloom_form_right .et_bloom_form_content:before, .et_bloom .et_bloom_optin_1 .carrot_edge.et_bloom_form_left .et_bloom_form_content:before { border-top-color: transparent !important; border-left-color: #ffffff !important; }
@media only screen and ( max-width: 767px ) {.et_bloom .et_bloom_optin_1 .carrot_edge.et_bloom_form_right .et_bloom_form_content:before, .et_bloom .et_bloom_optin_1 .carrot_edge.et_bloom_form_left .et_bloom_form_content:before { border-top-color: #ffffff !important; border-left-color: transparent !important; }
}.et_bloom .et_bloom_optin_1 .et_bloom_form_content button { background-color: #f92c8b !important; } .et_bloom .et_bloom_optin_1 .et_bloom_form_content .et_bloom_fields i { color: #f92c8b !important; } .et_bloom .et_bloom_optin_1 .et_bloom_form_content .et_bloom_custom_field_radio i:before { background: #f92c8b !important; } .et_bloom .et_bloom_optin_1 .et_bloom_border_solid { border-color: #f7f9fb !important } .et_bloom .et_bloom_optin_1 .et_bloom_form_content button { background-color: #f92c8b !important; } .et_bloom .et_bloom_optin_1 .et_bloom_form_container h2, .et_bloom .et_bloom_optin_1 .et_bloom_form_container h2 span, .et_bloom .et_bloom_optin_1 .et_bloom_form_container h2 strong { font-family: “Open Sans”, Helvetica, Arial, Lucida, sans-serif; }.et_bloom .et_bloom_optin_1 .et_bloom_form_container p, .et_bloom .et_bloom_optin_1 .et_bloom_form_container p span, .et_bloom .et_bloom_optin_1 .et_bloom_form_container p strong, .et_bloom .et_bloom_optin_1 .et_bloom_form_container form input, .et_bloom .et_bloom_optin_1 .et_bloom_form_container form button span { font-family: “Open Sans”, Helvetica, Arial, Lucida, sans-serif; } p.et_bloom_popup_input { padding-bottom: 0 !important;}
Download For Free
Join the Divi Newsletter and we will email you a copy of the ultimate Divi Landing Page Layout Pack, plus tons of other amazing and free Divi resources, tips and tricks. Follow along and you will be a Divi master in no time. If you are already subscribed simply type in your email address below and click download to access the layout pack.
You have successfully subscribed. Please check your email address to confirm your subscription and get access to free weekly Divi layout packs!
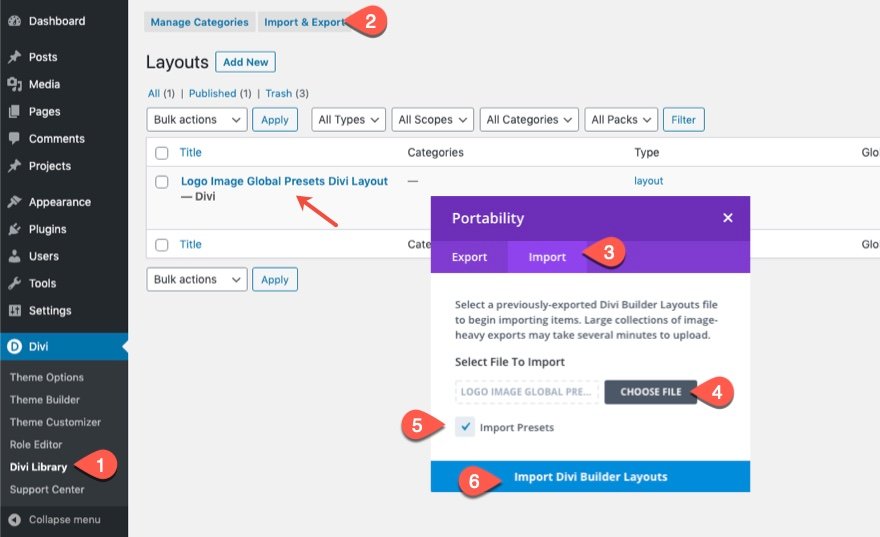
To use this logo image layout on your global header, you must first import it to the Divi Library as follows:
- Go to Divi > Divi Library.
- Click the import/export button at the top of the page.
- Select the Import tab in the portability popup
- Select Import Presets
- Click Import Button
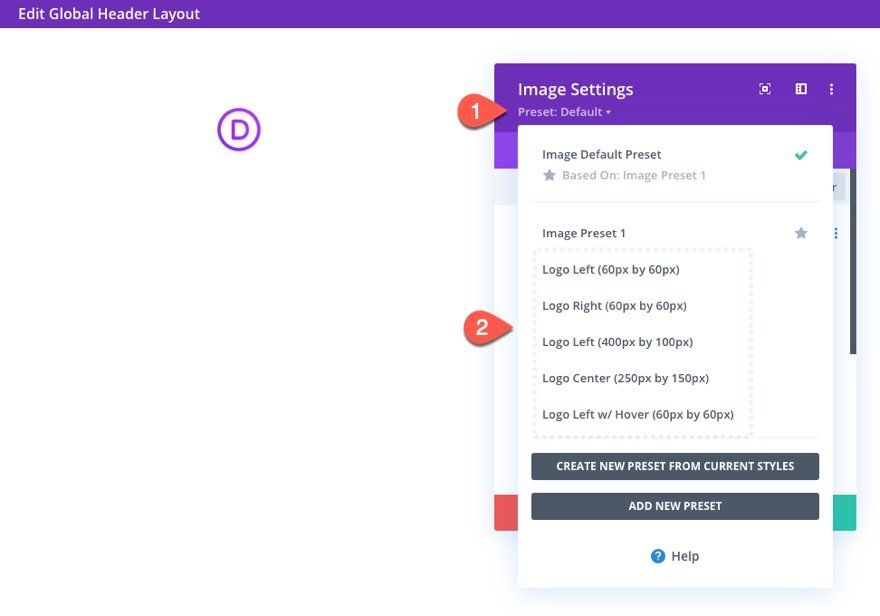
Then go to the theme builder and edit the global header. Add an image module where you want the logo to be and use the presets to style and place the logo accordingly.
Logo Sizes
Before we get to optimizing the logo image with Divi, it is important to consider optimizing the size of the logo image before uploading it to an image module. You don’t want to upload a 1920px by 1080px logo image to your site when you plan on displaying that logo at 100px by 50px. Sure, there ways to resize the logo image after the fact (i.e. srcset and image optimiztion plugins). But, this isn’t best practice since this may lead to slower page load times. And, let’s face it, your logo is too important to settle for messy shortcuts.
Here is a list of common logo image sizes to consider:
For horizontal layout:
- 250 px x 150 px
- 350 px x 75 px
- 400 px x 100 px
For vertical (square) layout:
- 160 px x 160 px (large)
- 60 px x 60 px (small)
You may need a bigger logo size than you might think.
It is common to need a smaller logo on desktop and a bigger logo on tablet (or even phone). In Divi, it is common for your column layouts to stack into a one-column layout on tablet and phone displays. And since tablet browser widths normally have a max-width of 980px which is a much larger container for your logo than maybe on desktop. Therefore, you may need to choose a bigger logo size and adjust the max height or width according to the device. If you upload a logo that is smaller than you need on tablet, you cannot increase the size without compromising the clarity of the image. In short, make sure the logo is as big as it’s largest display size on all browser widths.
Optimizing Your Divi Site’s Logo Size and Position with Global Presets
Editing Your Global Header Logo
To get started, navigate to the Divi Theme Builder by going to Divi > Theme Builder. Then click to build a new global header within the default website template.
![]()
Then select the option, “Build from Scratch”.
![]()
For this tutorial, we are going to be optimizing the logo included with a custom global header using the Divi Theme Builder. You are welcome to an existing header design or import one of our premade global header (and footer) templates from our blog. To keep things simple, we are going to build a really simple header layout with a logo and a menu.
Add Row and Column Layout
Within the Global Header Layout Editor, add a one-fourth three-fourths column row.
![]()
In the right column, add an image module just as a place holder to help us visualize the logo placement on the header.
Add the Image Module to Display the Logo Image
Add an image module to the left column.
![]()
Using the Image Module for Logos
For more traditional header designs, you can take advantage of Divi’s menu module to display your logo. However, with Divi’s dynamic content capabilities, you can display your site’s logo using any number of Divi modules. Basically, you can display your logo anywhere you can display an image in Divi. For example, you could choose to display the site logo on a blurb module image or even as a background image if you wanted. For this tutorial, we are going to concentrate on using the image module to display the site logo. This allows the logo to be a completely separate element (not connected with other elements in a module like a menu module or blurb module). Plus, the image module is built to style images, which gives us a lot of additional design options to style our logo image. Jump to the end of the article for more on how to add a site logo as a dynamic image.
Since we are going to test out a few different logo image sizes, we are going to stick regular images for our examples instead of the dynamic site logo.
Example 1: Building a Left-Aligned Logo Global Preset
For this first example, we are gong to build a simple preset for a left-aligned logo that is 60px by 60px.
Open the image module settings and upload a 60px by 60px logo image to the image module.
![]()
Update the image design settings as follows:
- Image Alignment: Center
- Max Width: 60px
- Module Alignment (desktop): Left
- Module Alignment (tablet and phone): Center
![]()
Even though this is design for a left-aligned logo, the image alignment is set to the center because the image alignment is different from the module alignment. The image alignment is centered within the module. And since the module has a max-width of 60px, the image alignment really doesn’t matter because the module alignment will now dictate the alignment of the logo image.
This is helpful if you ever want to add a background image to the logo or make the container rounded. Essentially, this makes the logo image container the same size as the logo image itself.
Notice that the module alignment is changed to center on tablet since the columns will stack on mobile.
Create New Preset From Current Styles
Now that the logo design is finished, you can create a global preset for the image module by clicking the preset dropdown and selecting “Create New Preset From Current Styles”.
![]()
Give the logo image preset a unique name. In this case, we can give it the name “Logo Left (60px by 60px)” to let us know exactly what size image to use and how the logo will be aligned when selecting to use the preset.
![]()
Example 2: Building a Right-Aligned Logo Global Preset
For this next example, we are going to create a right-aligned logo global preset. This will be easy to do with our current design and preset in place. Simply change the column layout to three-fourths one-fourth, move the menu to the left column, and move the logo to the right column.
![]()
Open the settings for the image module containing the logo image preset we just created.
Then update the design settings to change the module alignment to right.
![]()
Simple enough. N0w click the preset dropdown and create a new preset from current styles.
![]()
Give the preset the name “Logo Right (60px by 60px)”.
![]()
Example 3: Building a Centered Logo Global Preset
For this next example, we are going to build a centered logo global preset. Since this is a centered logo, we can use a larger logo for our example.
First, change the column layout to a 0ne-fourth one-half one-fourth structure so that you have a larger column in the middle for the logo. Then move the logo to the center column
![]()
Upload a new logo image that is 250px by 150px.
![]()
Under the design tab, update the following:
- Max Width: 250px
- Module Alignment: Center
![]()
Then add a new global preset from current styles.
![]()
And give it the name “Logo Center (250px by 150px).
![]()
Example 4: Building a Left-Aligned Large Logo Global Preset
For this next example, we are going to create a preset for larger left-aligned logo (400px by 100px).
Because the logo is going to be 400px wide, we want a column structure that will give the logo the space it needs.
Let’s go back to a two column structure with the logo on the left and the menu on the right. However, let’s change the structure to one-third two-thirds.
![]()
This will give us a column that is roughly 320px wide if we keep the default row max-width of 1080px.
Open the image module settings and add a logo image that is 400px by 100px.
![]()
Under the design tab, update the following:
- Max Width: 400px
- Module Alignment (desktop): left
- Module Alignment (tablet): center
As I mentioned, the column has a max width of 320px which means that the logo image will not be able to span to its full width on desktop. However, it will be able to on tablet once the columns are stacked. For this reason, we want to set the max-width of the image to 400px.
Now the logo is slightly larger on tablet as well as being centered.
![]()
![]()
Then add a new global preset from current styles.
![]()
Give it the name “Logo Left (400px by 100px)” and save the preset.
![]()
Example 5: Building a Left-Aligned Logo with Hover Effects Global Preset
For this final example, we are going to add some hover effects to a left-aligned logo and save it as a new global preset.
Normally, people link their logo to the homepage. Adding a hover effect can improve the UX by making its clickability more obvious.
For this example, we are going to use the 60px by 60px logo image with the “Logo Left (60px by 60px)” preset. Open the image settings and select the preset from the list.
![]()
Now we can tweak the preset with some hover effect styles before saving it as a new preset.
Update the following:
- Rounded Corners: 50%
![]()
- Box Shadow: see screenshot
- Box Shadow Horizontal Position: 0px
- Box Shadow Vertical Position: 0px (desktop) 5px (hover)
- Shadow Color: #ac3cf7
![]()
Then add the following transform rotation on hover:
- Transform Rotate Z Axis (hover): 90deg
![]()
Then create a new preset from current styles and name it “Logo Left w/ Hover (60px by 60px)”.
![]()
Here is the result.
Adding a Dynamic Site Logo to the Image Module
To add your site logo dynamically to the image module, first, you need to make sure and upload the site logo under Divi Theme Options.
![]()
Keep in mind the size of the logo you are selecting.
![]()
Then go the image module that has your global preset and open the settings. Delete the current image and then click the dynamic content icon. From the dropdown, select Site Logo.
![]()
Now your image module will pull your site’s logo dynamically.
![]()
Don’t forget to add a dynamic homepage link to the logo as well.
![]()
Final Thoughts
Hopefully this tutorial will help streamline the process of adding logos to your Divi headers. It starts with optimizing the size of your logo image before you even upload it to the Divi theme. Then you can use Divi’s built-in design settings to adjust the size and position of the image for different column layouts and different devices.
Of course, each website will require its own unique style, some of which will break out of the guidelines set in these examples. But I’m confident that with a few tweaks, you can create new presets for any unique layout with ease!
I look forward to hearing from you in the comments.
Cheers!
.inline-code{padding: 0px 4px; color: crimson; font-family: Monaco,consolas,bitstream vera sans mono,courier new,Courier,monospace!important} video.with-border {border-radius: 8px;box-shadow: 0 8px 60px 0 rgba(103,151,255,.11), 0 12px 90px 0 rgba(103,151,255,.11);display:block;margin: 0 auto;}
The post Optimizing Your Divi Site’s Logo Image with Global Presets appeared first on Elegant Themes Blog.